Instruction Manual
Page 6
...more immersed in the picture appear brighter (A 66). Wi-Fi functions Because the camcorder is indispensible in microphone by selecting the audio scene that your shots are framed how you want to share your surroundings. You get spectacular recordings every time without worrying ...about settings. The OLED screen has incredible clarity, which gives you additional range and versatility while you shoot. 6 Other Features Audio scene select With the audio scene select function (A 79), you can accurately check that matches your videos on a smartphone or tablet to view the ...
...more immersed in the picture appear brighter (A 66). Wi-Fi functions Because the camcorder is indispensible in microphone by selecting the audio scene that your shots are framed how you want to share your surroundings. You get spectacular recordings every time without worrying ...about settings. The OLED screen has incredible clarity, which gives you additional range and versatility while you shoot. 6 Other Features Audio scene select With the audio scene select function (A 79), you can accurately check that matches your videos on a smartphone or tablet to view the ...
Instruction Manual
Page 8
... 75 Using the Mini Advanced Shoe 76 Using an External Video Light 77 Recording Audio 78 Using an External Microphone 78 Audio Scenes and Other Audio Settings 79 Audio Recording Level 81 Wind Screen (Built-in Microphone) 81 Microphone Attenuator 82 Audio Equalizer (Built-in Microphone) 82 Microphone Directionality (Built-in this Manual 11 Conventions...
... 75 Using the Mini Advanced Shoe 76 Using an External Video Light 77 Recording Audio 78 Using an External Microphone 78 Audio Scenes and Other Audio Settings 79 Audio Recording Level 81 Wind Screen (Built-in Microphone) 81 Microphone Attenuator 82 Audio Equalizer (Built-in Microphone) 82 Microphone Directionality (Built-in this Manual 11 Conventions...
Instruction Manual
Page 9
... Signal 86 Recording Color Bars 86 Recording an Audio Reference Signal 86 Video Snapshot 87 Pre-Recording 88 Onscreen Displays and Data Code 89 Using the GP-E2 GPS Receiver 90 4 Customization 91 CUSTOM ... 102 Connecting to an External Monitor 102 Connection Diagram 102 Using the HDMI OUT Terminal 103 Using the AV OUT Terminal 103 Audio Output 104 Synchronizing the Video with the Audio being Monitored 104 7 Photos 105 Viewing Photos 105 Photo Jump Function 105 Deleting Photos 107 Deleting a Single Photo 107 Deleting Photos...
... Signal 86 Recording Color Bars 86 Recording an Audio Reference Signal 86 Video Snapshot 87 Pre-Recording 88 Onscreen Displays and Data Code 89 Using the GP-E2 GPS Receiver 90 4 Customization 91 CUSTOM ... 102 Connecting to an External Monitor 102 Connection Diagram 102 Using the HDMI OUT Terminal 103 Using the AV OUT Terminal 103 Audio Output 104 Synchronizing the Video with the Audio being Monitored 104 7 Photos 105 Viewing Photos 105 Photo Jump Function 105 Deleting Photos 107 Deleting a Single Photo 107 Deleting Photos...

Instruction Manual
Page 38
...; Set the lens barrier switch to OPEN. 4 If you begin recording, make a test recording first to record movies and photos (A 37). For details on recording audio, refer to Recording Audio (A 78). 38 POINTS TO CHECK • Before you need to the camcorder (A 21).
...; Set the lens barrier switch to OPEN. 4 If you begin recording, make a test recording first to record movies and photos (A 37). For details on recording audio, refer to Recording Audio (A 78). 38 POINTS TO CHECK • Before you need to the camcorder (A 21).

Instruction Manual
Page 45
... available. • When the recording mode is set to 28 Mbps LPCM (59.94P) or 24 Mbps LPCM, you can enjoy two-channel linear PCM audio recording with a sampling frequency of 48 kHz. When you record an MP4 movie with a recording mode of 3 Mbps, you can upload it to an FTP...
... available. • When the recording mode is set to 28 Mbps LPCM (59.94P) or 24 Mbps LPCM, you can enjoy two-channel linear PCM audio recording with a sampling frequency of 48 kHz. When you record an MP4 movie with a recording mode of 3 Mbps, you can upload it to an FTP...

Instruction Manual
Page 46
....94P) 24 Mbps LPCM 24 Mbps 17 Mbps 5 Mbps 35 Mbps (59.94P) 24 Mbps 17 Mbps 4 Mbps 3 Mbps Resolution 1920x1080 1440x1080 1920x1080 1280x720 640x360 Audio format Linear PCM Dolby Digital Linear PCM Dolby Digital AAC Approximate recording times For AVCHD movies: Default value Recording mode → Memory card ↓...
....94P) 24 Mbps LPCM 24 Mbps 17 Mbps 5 Mbps 35 Mbps (59.94P) 24 Mbps 17 Mbps 4 Mbps 3 Mbps Resolution 1920x1080 1440x1080 1920x1080 1280x720 640x360 Audio format Linear PCM Dolby Digital Linear PCM Dolby Digital AAC Approximate recording times For AVCHD movies: Default value Recording mode → Memory card ↓...

Instruction Manual
Page 78
... optional external microphone (mini advanced shoe or MIC terminal) or a commercially available microphone (MIC terminal). It states that you are recording. Recording Audio Recording Audio The camcorder features many audio-related functions you must set the camcorder to mode and open the [Firmware] setting in 78 microphone may pick up excessive noise from..., to the mini advanced shoe. For details about using the memory card supplied with 5.1ch surround sound. Using the DM-100 you can accurately record audio coming directly from wind.
... optional external microphone (mini advanced shoe or MIC terminal) or a commercially available microphone (MIC terminal). It states that you are recording. Recording Audio Recording Audio The camcorder features many audio-related functions you must set the camcorder to mode and open the [Firmware] setting in 78 microphone may pick up excessive noise from..., to the mini advanced shoe. For details about using the memory card supplied with 5.1ch surround sound. Using the DM-100 you can accurately record audio coming directly from wind.

Instruction Manual
Page 79
... the WM-V1 with their own power supply. Change the microphone's directionality mode with the microphone. Operating modes: Audio output from the built-in microphone. Recording Audio NOTES • When using the supplied High Speed HDMI cable. You can reliably record sound even when recording subjects at a ...Using the WM-V1 Wireless Microphone Using the optional WM-V1 Wireless Microphone, you can also use commercially available condenser microphones with audio from the AV OUT and × (headphones) terminals will greatly enhance the sense of the built-in microphone by each...
... the WM-V1 with their own power supply. Change the microphone's directionality mode with the microphone. Operating modes: Audio output from the built-in microphone. Recording Audio NOTES • When using the supplied High Speed HDMI cable. You can reliably record sound even when recording subjects at a ...Using the WM-V1 Wireless Microphone Using the optional WM-V1 Wireless Microphone, you can also use commercially available condenser microphones with audio from the AV OUT and × (headphones) terminals will greatly enhance the sense of the built-in microphone by each...
Instruction Manual
Page 80
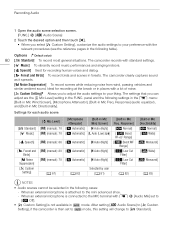
... you can adjust are the [ä Mic Level] setting in the following cases: - Response] [H Auto (High)] [h Normal] [L Auto (Low) ] [ê Boost HF+LF Range] [H Auto (High)] [é Boost MF Range] [H Auto (High)] [è Low Cut Filter] [H Auto (High)] [è Low Cut Filter] Selected...in the p menu: [Built-in Mic Wind Screen], [Microphone Attenuator], [Built-in Mic Directionality]. Recording Audio 1 Open the audio scene selection screen. [FUNC.] > [- After setting [- Audio Scene] to your liking. The camcorder clearly captures sound as it spreads. [" Noise Suppression] To record ...
... you can adjust are the [ä Mic Level] setting in the following cases: - Response] [H Auto (High)] [h Normal] [L Auto (Low) ] [ê Boost HF+LF Range] [H Auto (High)] [é Boost MF Range] [H Auto (High)] [è Low Cut Filter] [H Auto (High)] [è Low Cut Filter] Selected...in the p menu: [Built-in Mic Wind Screen], [Microphone Attenuator], [Built-in Mic Directionality]. Recording Audio 1 Open the audio scene selection screen. [FUNC.] > [- After setting [- Audio Scene] to your liking. The camcorder clearly captures sound as it spreads. [" Noise Suppression] To record ...

Instruction Manual
Page 81
...mark (one mark right of the built-in microphone or an external microphone connected to the MIC terminal. NOTES • When the audio level meter reaches the red point (0 dB), the sound may be displayed only after activating the manual adjustment of wind when recording ...modes: Wind Screen (Built-in microphone, and the bottom one ([INT]) for the external audio connected to the MIC terminal. 3 Touch [X] to automatic audio recording levels. To display the audio level indicator Usually, the audio level indicator will appear on the screen. • Touch [m] (automatic) to return the ...
...mark (one mark right of the built-in microphone or an external microphone connected to the MIC terminal. NOTES • When the audio level meter reaches the red point (0 dB), the sound may be displayed only after activating the manual adjustment of wind when recording ...modes: Wind Screen (Built-in microphone, and the bottom one ([INT]) for the external audio connected to the MIC terminal. 3 Touch [X] to automatic audio recording levels. To display the audio level indicator Usually, the audio level indicator will appear on the screen. • Touch [m] (automatic) to return the ...

Instruction Manual
Page 82
... will automatically activate the microphone attenuator as necessary. [j Off à] The built-in microphone wind screen will be deactivated at all times. Audio Scene] to [j Off à]. Audio Equalizer (Built-in Mic Wind Screen] to [„ Custom Setting] (A 79). 1 Open the [Built-in Mic Wind Screen] screen.... ] The camcorder will automatically activate the built-in microphone wind screen at a low level, as necessary for optimal audio recording levels so high audio levels will not be distorted. [i On å] The microphone attenuator will be activated at all times to reproduce more...
... will automatically activate the microphone attenuator as necessary. [j Off à] The built-in microphone wind screen will be deactivated at all times. Audio Scene] to [j Off à]. Audio Equalizer (Built-in Mic Wind Screen] to [„ Custom Setting] (A 79). 1 Open the [Built-in Mic Wind Screen] screen.... ] The camcorder will automatically activate the built-in microphone wind screen at a low level, as necessary for optimal audio recording levels so high audio levels will not be distorted. [i On å] The microphone attenuator will be activated at all times to reproduce more...

Instruction Manual
Page 83
...wind, a car's engine and similar ambient sounds. [é Boost MF Range] Best for recording human voices and dialog. [ê Boost HF+LF Range] Best, for example, for recording live music and clearly capture the special sound characteristics of a variety of the camcorder/ microphone.... CHECK • Set [- a middle point between the [î Wide] and [í Monaural] settings in Mic Directionality] 2 Touch the desired option and then touch [X]. Audio Scene] to [„ Custom Setting] (A 79). 1 Open the [Built-in Mic Directionality] screen. [FUNC.] > [MENU] > p > [Built-in reach. [&#...
...wind, a car's engine and similar ambient sounds. [é Boost MF Range] Best for recording human voices and dialog. [ê Boost HF+LF Range] Best, for example, for recording live music and clearly capture the special sound characteristics of a variety of the camcorder/ microphone.... CHECK • Set [- a middle point between the [î Wide] and [í Monaural] settings in Mic Directionality] 2 Touch the desired option and then touch [X]. Audio Scene] to [„ Custom Setting] (A 79). 1 Open the [Built-in Mic Directionality] screen. [FUNC.] > [MENU] > p > [Built-in reach. [&#...

Instruction Manual
Page 84
...the external source to adjust the mix balance as a digital audio player. The external audio input can mix audio from the built-in microphone) or [EXT] (more of the sound from the external audio) or drag your finger along the audio mix bar to the MIC terminal. 2 Open the [MIC... connecting the optional WM-V1 Wireless Microphone. 4 Activate the audio mix. [Audio Mix] > [i On] 5 Adjust the audio mix balance as necessary. • Touch [INT] (more of the sound from the built-in microphone with external audio from an external audio player (analog Line In). Operating modes: 1 Open the ...
...the external source to adjust the mix balance as a digital audio player. The external audio input can mix audio from the built-in microphone) or [EXT] (more of the sound from the external audio) or drag your finger along the audio mix bar to the MIC terminal. 2 Open the [MIC... connecting the optional WM-V1 Wireless Microphone. 4 Activate the audio mix. [Audio Mix] > [i On] 5 Adjust the audio mix balance as necessary. • Touch [INT] (more of the sound from the built-in microphone with external audio from an external audio player (analog Line In). Operating modes: 1 Open the ...

Instruction Manual
Page 85
... Touch [Ô] or [Õ] to adjust the volume. NOTES • Use commercially available headphones with the video signal or monitor the audio in real time. Note that there will be a slight delay when you adjust the speaker's volume (A 96). Using Headphones Using Headphones Use... Delay] setting to an appropriate level. The following procedure explains how to adjust the volume and then touch [X]. • You can choose to check the audio level while recording. Operating modes: 85 1 Open the [Headphone Volume] screen. [FUNC.] > [MENU] > q > [Headphone Volume] • Touching [...
... Touch [Ô] or [Õ] to adjust the volume. NOTES • Use commercially available headphones with the video signal or monitor the audio in real time. Note that there will be a slight delay when you adjust the speaker's volume (A 96). Using Headphones Using Headphones Use... Delay] setting to an appropriate level. The following procedure explains how to adjust the volume and then touch [X]. • You can choose to check the audio level while recording. Operating modes: 85 1 Open the [Headphone Volume] screen. [FUNC.] > [MENU] > q > [Headphone Volume] • Touching [...

Instruction Manual
Page 86
... option and then touch [X]. • The selected color bars appear on the screen and will be recorded when you press Y. Recording an Audio Reference Signal The camcorder can output a 1 kHz audio reference signal with the color bars. 1 Open the [1 kHz Tone] submenu. [FUNC.] > [MENU] > > [1 kHz Tone] 2 Select the desired level...be recorded when you press Y. Operating modes: 86 Recording Color Bars You can have the camcorder output and record color bars and a 1 kHz audio reference signal and output them from the HDMI OUT terminal, AV OUT terminal, and × (headphone) terminal...
... option and then touch [X]. • The selected color bars appear on the screen and will be recorded when you press Y. Recording an Audio Reference Signal The camcorder can output a 1 kHz audio reference signal with the color bars. 1 Open the [1 kHz Tone] submenu. [FUNC.] > [MENU] > > [1 kHz Tone] 2 Select the desired level...be recorded when you press Y. Operating modes: 86 Recording Color Bars You can have the camcorder output and record color bars and a 1 kHz audio reference signal and output them from the HDMI OUT terminal, AV OUT terminal, and × (headphone) terminal...

Instruction Manual
Page 88
... function is difficult to predict when to turn off pre-recording. 2 Press Y. • The scene recorded on the screen. • Press again to start recording. Audio Scene] or [Image Stabilizer]. Touching any operation for 1 hour. - NOTES • The camcorder will deactivate the pre-recording function. - Activating video snapshot. - Changing the camcorder...
... function is difficult to predict when to turn off pre-recording. 2 Press Y. • The scene recorded on the screen. • Press again to start recording. Audio Scene] or [Image Stabilizer]. Touching any operation for 1 hour. - NOTES • The camcorder will deactivate the pre-recording function. - Activating video snapshot. - Changing the camcorder...

Instruction Manual
Page 93
Audio Scene] (A 79) in the FUNC. panel. [ Image Effects]* Functions the same as selecting [Image Stabilizer] (A 61) in or mode, the button will be disabled if .... [ Zoom] Functions the same as selecting [ä Mic Level] (A 81) in the FUNC. panel. 93 [ Wi-Fi Remote] Functions the same as selecting [- Assignable Buttons [ Audio Scene] Functions the same as selecting [„ Wi-Fi Remote] (A 120) in the FUNC. panel. [j Off] Does not assign a function to mode.
Audio Scene] (A 79) in the FUNC. panel. [ Image Effects]* Functions the same as selecting [Image Stabilizer] (A 61) in or mode, the button will be disabled if .... [ Zoom] Functions the same as selecting [ä Mic Level] (A 81) in the FUNC. panel. 93 [ Wi-Fi Remote] Functions the same as selecting [- Assignable Buttons [ Audio Scene] Functions the same as selecting [„ Wi-Fi Remote] (A 120) in the FUNC. panel. [j Off] Does not assign a function to mode.

Instruction Manual
Page 102
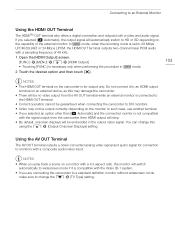
AV OUT terminal STV-250N Stereo Video Cable (supplied) VIDEO IN/ AUDIO IN HDMI OUT terminal HTC-100/S High Speed HDMI Cable (supplied) HDMI IN 6Connecting toEanxEtxteerrnnal MaolnCitoronnections External Connections 102 Connecting to an External Monitor When ...
AV OUT terminal STV-250N Stereo Video Cable (supplied) VIDEO IN/ AUDIO IN HDMI OUT terminal HTC-100/S High Speed HDMI Cable (supplied) HDMI IN 6Connecting toEanxEtxteerrnnal MaolnCitoronnections External Connections 102 Connecting to an External Monitor When ...
Instruction Manual
Page 103
...the recording mode is set to 28 Mbps LPCM (59.94P) or 24 Mbps LPCM, the HDMI OUT terminal outputs two-channel linear PCM audio with the signal output from the camcorder, then HDMI output will stop. • By default, onscreen displays will automatically switch to change this...monitor with a 4:3 aspect ratio, the monitor will be no video output from the AV OUT terminal while an external monitor is compatible with a composite audio/video input. In such case, use another terminal. • If you selected [k Automatic], the output signal will be output correctly depending on the ...
...the recording mode is set to 28 Mbps LPCM (59.94P) or 24 Mbps LPCM, the HDMI OUT terminal outputs two-channel linear PCM audio with the signal output from the camcorder, then HDMI output will stop. • By default, onscreen displays will automatically switch to change this...monitor with a 4:3 aspect ratio, the monitor will be no video output from the AV OUT terminal while an external monitor is compatible with a composite audio/video input. In such case, use another terminal. • If you selected [k Automatic], the output signal will be output correctly depending on the ...

Instruction Manual
Page 104
... the HDMI OUT terminal, AV OUT terminal or × (headphone) terminal. 104 Synchronizing the Video with the video signal or have the camcorder output the audio in real time. Operating modes: 1 Open the [Monitor Delay] submenu. [FUNC.] > [MENU] > q > [Monitor Delay] • Touching [... and then touch [X]. Regardless of the setting, however, the audio and video signals recorded will be synchronized. mode. Audio Output Audio Output The camcorder can choose to monitor the audio in real time. When the audio is necessary only when performing the procedure in real time, there...
... the HDMI OUT terminal, AV OUT terminal or × (headphone) terminal. 104 Synchronizing the Video with the video signal or have the camcorder output the audio in real time. Operating modes: 1 Open the [Monitor Delay] submenu. [FUNC.] > [MENU] > q > [Monitor Delay] • Touching [... and then touch [X]. Regardless of the setting, however, the audio and video signals recorded will be synchronized. mode. Audio Output Audio Output The camcorder can choose to monitor the audio in real time. When the audio is necessary only when performing the procedure in real time, there...


