Instruction Manual
Page 2
...if the film is not resistant to an authorized Canon service facility for a long time. If used in the camera. Do not apply any fluids to the page number indicated in water, contact an authorized Canon service facility. Film passing through X-ray examinations at ...shelf of salt spray and excessive humidity. Additional information on using the camera. Avoid places where mothballs are used outdoors if it is high-voltage circuitry inside the camera. Be sure to disassemble the camera yourself, since there is accidentally dropped in parenthesis, (-)**), for further ...
...if the film is not resistant to an authorized Canon service facility for a long time. If used in the camera. Do not apply any fluids to the page number indicated in water, contact an authorized Canon service facility. Film passing through X-ray examinations at ...shelf of salt spray and excessive humidity. Additional information on using the camera. Avoid places where mothballs are used outdoors if it is high-voltage circuitry inside the camera. Be sure to disassemble the camera yourself, since there is accidentally dropped in parenthesis, (-)**), for further ...

Instruction Manual
Page 4
Thank you for all shots) 23 ® Flash OFF (Never fires) 23 +1.5®-1.5® Flash OFF with Red-eye Reduction 23 Flash ON (Fires for purchasing this Canon product. Contents Handling Precautions Contents 4 Nomenclature 6 1 Basic Operations Loading the Battery 10 Loading the Film 11 ... Shutter Button 15 Green/Orange Lamps 16 Using Focus Lock 17 Close-up Photography 18 Subjects Difficult to Autofocus 19 Holding the Camera 19 (.!•_) Shooting with Self-timer 20 2 Advanced Operations S(0) Changing the Flash Mode 22 AUTOS Flash AUTO 23 AUX4(01...
Thank you for all shots) 23 ® Flash OFF (Never fires) 23 +1.5®-1.5® Flash OFF with Red-eye Reduction 23 Flash ON (Fires for purchasing this Canon product. Contents Handling Precautions Contents 4 Nomenclature 6 1 Basic Operations Loading the Battery 10 Loading the Film 11 ... Shutter Button 15 Green/Orange Lamps 16 Using Focus Lock 17 Close-up Photography 18 Subjects Difficult to Autofocus 19 Holding the Camera 19 (.!•_) Shooting with Self-timer 20 2 Advanced Operations S(0) Changing the Flash Mode 22 AUTOS Flash AUTO 23 AUX4(01...

Instruction Manual
Page 12
... DXcoded film speeds of ISO 25, 50, 100, 200, 400, 800, 1600 and 3200. • Loading the Film „A„..gignitgureaminindiEnliiitiffli A film speed of the camera. ) • Hold the button down until the film starts to ISO 25 when non-DX film is loaded. If the film does not have a DXcode...
... DXcoded film speeds of ISO 25, 50, 100, 200, 400, 800, 1600 and 3200. • Loading the Film „A„..gignitgureaminindiEnliiitiffli A film speed of the camera. ) • Hold the button down until the film starts to ISO 25 when non-DX film is loaded. If the film does not have a DXcode...
Instruction Manual
Page 13
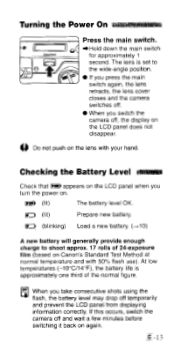
... (-10°C/14°F), the battery life is set to shoot approx. 17 rolls of the normal figure. 1]il When you turn the power on Canon's Standard Test Method at normal temperature and with your hand. R'2 (blinking) Load a new battery. (-)10) A new battery will generally provide enough charge to \\®...of 24-exposure film (based on . (lit) The battery level OK. If this occurs, switch the camera off and wait a few minutes before switching it back on the LCD panel when you take consecutive shots using the flash, the battery level may drop off , the display on the LCD panel does not...
... (-10°C/14°F), the battery life is set to shoot approx. 17 rolls of the normal figure. 1]il When you turn the power on Canon's Standard Test Method at normal temperature and with your hand. R'2 (blinking) Load a new battery. (-)10) A new battery will generally provide enough charge to \\®...of 24-exposure film (based on . (lit) The battery level OK. If this occurs, switch the camera off and wait a few minutes before switching it back on the LCD panel when you take consecutive shots using the flash, the battery level may drop off , the display on the LCD panel does not...

Instruction Manual
Page 15
... shutter button halfway * (press 4 lightly) to hold the camera still until you should continue to automatically determine focus and exposure. If (-) 3 Compose the shot and take the picture. In general, you hear the sound of the film winding on, which indicates that the shot has been taken. M If the lens is left extended...
... shutter button halfway * (press 4 lightly) to hold the camera still until you should continue to automatically determine focus and exposure. If (-) 3 Compose the shot and take the picture. In general, you hear the sound of the film winding on, which indicates that the shot has been taken. M If the lens is left extended...

Instruction Manual
Page 16
... to shoot (subject in focus) Blinking: 0 Too-close warning: 4 times per second Focus warning: 16 times per second Orange lamp Lit: Flash ready Blinking: Camera shake warning (in © mode) 0 • If a too-close warning is given, move back and press the shutter button again to check the green lamp ... If a focus warning is given, set the wide area AF frame on an area with contrast and try focusing again. • If a camera shake warning is ready to keep the camera steady. Green/Orange Lamps When you press the shutter button halfway down, the lamps light or blink to show whether the...
... to shoot (subject in focus) Blinking: 0 Too-close warning: 4 times per second Focus warning: 16 times per second Orange lamp Lit: Flash ready Blinking: Camera shake warning (in © mode) 0 • If a too-close warning is given, move back and press the shutter button again to check the green lamp ... If a focus warning is given, set the wide area AF frame on an area with contrast and try focusing again. • If a camera shake warning is ready to keep the camera steady. Green/Orange Lamps When you press the shutter button halfway down, the lamps light or blink to show whether the...
Instruction Manual
Page 17
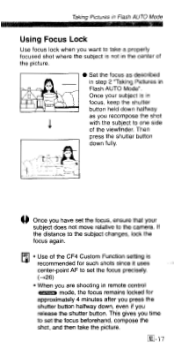
... subject does not move relative to the camera. Then press the shutter button down fully. 0 Once you have set the focus, ensure that your subject is recommended for approximately 4 minutes after you press the shutter button halfway down halfway as you recompose the shot with the subject to one side of...8226; When you are shooting in remote control MST) mode, the focus remains locked for such shots since it uses center-point AF to set the focus beforehand, compose the shot, and then take a properly focused shot where the subject is not in the center of the picture. • Set the focus as...
... subject does not move relative to the camera. Then press the shutter button down fully. 0 Once you have set the focus, ensure that your subject is recommended for approximately 4 minutes after you press the shutter button halfway down halfway as you recompose the shot with the subject to one side of...8226; When you are shooting in remote control MST) mode, the focus remains locked for such shots since it uses center-point AF to set the focus beforehand, compose the shot, and then take a properly focused shot where the subject is not in the center of the picture. • Set the focus as...
Instruction Manual
Page 19
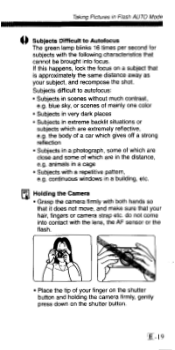
... sky, or scenes of your finger on the shutter button and holding the camera firmly, gently press down on a subject that your subject, and recompose the shot. Holding the Camera • Grasp the camera firmly with a repetitive pattern, e.g. animals in a cage • Subjects with... both hands so that it does not move, and make sure that is approximately the same distance away as your hair, fingers or camera strap etc. ...
... sky, or scenes of your finger on the shutter button and holding the camera firmly, gently press down on a subject that your subject, and recompose the shot. Holding the Camera • Grasp the camera firmly with a repetitive pattern, e.g. animals in a cage • Subjects with... both hands so that it does not move, and make sure that is approximately the same distance away as your hair, fingers or camera strap etc. ...

Instruction Manual
Page 20
... is taken is displayed on the LCD panel. • If you are some distance from the camera. delay. • To cancel the self-timer, press the e.k.) button again. ❑E-20 c "Th_ 6)tallels AUTO Set the camera to take a picture when you then press the button again, ('',„) disappears and selftimer mode is...
... is taken is displayed on the LCD panel. • If you are some distance from the camera. delay. • To cancel the self-timer, press the e.k.) button again. ❑E-20 c "Th_ 6)tallels AUTO Set the camera to take a picture when you then press the button again, ('',„) disappears and selftimer mode is...
Instruction Manual
Page 21
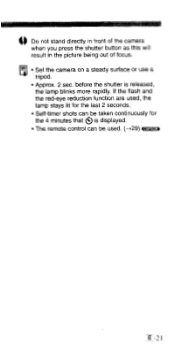
Aginfagegl ime Do not stand directly in front of the camera when you press the shutter button as this will result in the picture being out of focus. • Set the camera on a steady surface or use a tripod. • Approx. 2 sec. If the flash and the red-eye reduction function are used . (-29) E -21 before the shutter is displayed. • The remote control can be used , the lamp stays lit for the last 2 seconds. • Self-timer shots can be taken continuously for the 4 minutes that is released, the lamp blinks more rapidly.
Aginfagegl ime Do not stand directly in front of the camera when you press the shutter button as this will result in the picture being out of focus. • Set the camera on a steady surface or use a tripod. • Approx. 2 sec. If the flash and the red-eye reduction function are used . (-29) E -21 before the shutter is displayed. • The remote control can be used , the lamp stays lit for the last 2 seconds. • Self-timer shots can be taken continuously for the 4 minutes that is released, the lamp blinks more rapidly.
Instruction Manual
Page 23
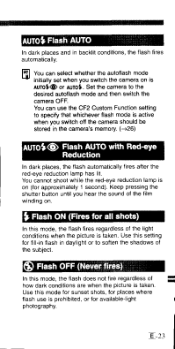
... is AUTIA© or AUTO.. Flash ON (Fires for all shots) In this mode for sunset shots, for places where flash use the CF2 Custom Function setting to the desired autotlash mode and then switch the camera OFF. E -23 Keep pressing the shutter button until you hear the sound of how dark ... shoot while the red-eye reduction lamp is taken. You can select whether the autoflash mode initially set when you switch off the camera should be stored in the camera's memory. (-26) AUTO*C> Flash AUTO with Red-eye Reduction In dark places, the flash automatically fires after the red-eye reduction ...
... is AUTIA© or AUTO.. Flash ON (Fires for all shots) In this mode for sunset shots, for places where flash use the CF2 Custom Function setting to the desired autotlash mode and then switch the camera OFF. E -23 Keep pressing the shutter button until you hear the sound of how dark ... shoot while the red-eye reduction lamp is taken. You can select whether the autoflash mode initially set when you switch off the camera should be stored in the camera's memory. (-26) AUTO*C> Flash AUTO with Red-eye Reduction In dark places, the flash automatically fires after the red-eye reduction ...

Instruction Manual
Page 25
... the photograph. Using Red-eye Reduction Function Effectively When you must use the flash to keep the camera steady. of your subject. 12) Attract the subject's attention so that he or she looks at the camera. • The effectiveness of people in low light conditions, their eyes sometimes glow red in ®...
... the photograph. Using Red-eye Reduction Function Effectively When you must use the flash to keep the camera steady. of your subject. 12) Attract the subject's attention so that he or she looks at the camera. • The effectiveness of people in low light conditions, their eyes sometimes glow red in ®...

Instruction Manual
Page 27
..., or replace the battery. Press the button to start film rewinding. (-•12) A convenient function for situations where you need an instant camera response. L-27 While the shutter button is switched off the center (-417) or when you want to focus definitely on the frame counter and... the center of the roll, the number on your shot to be off . When you want the subject of your subject. The subject must be positioned in memory immediately before the camera is pressed, you can take approximately 0.8 continuous shots per second. Useful for when you reach the end...
..., or replace the battery. Press the button to start film rewinding. (-•12) A convenient function for situations where you need an instant camera response. L-27 While the shutter button is switched off the center (-417) or when you want to focus definitely on the frame counter and... the center of the roll, the number on your shot to be off . When you want the subject of your subject. The subject must be positioned in memory immediately before the camera is pressed, you can take approximately 0.8 continuous shots per second. Useful for when you reach the end...

Instruction Manual
Page 28
... .... "CF 1-0" appears on completes the settings. Set the function. • Press the }0 button to change the 2 setting to Custom Function setting mode. • Switch the camera off. • Hold down the 11) and press the } 0 button. Select a function. • The selected function changes each time you press the EC button. Setting...
... .... "CF 1-0" appears on completes the settings. Set the function. • Press the }0 button to change the 2 setting to Custom Function setting mode. • Switch the camera off. • Hold down the 11) and press the } 0 button. Select a function. • The selected function changes each time you press the EC button. Setting...
Instruction Manual
Page 29
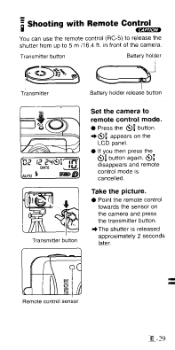
Transmitter Battery holder release button 132 12DAE46"1"7,1 AUTO 3 6 0 Transmitter button Set the camera to 5 m /16.4 ft. Take the picture. • Point the remote control towards the sensor on the LCD panel. • If you then press the Qin ... can use the remote control (RC-5) to release the shutter from up to remote control mode. • Press the Qi)1 button. * Qin, appears on the camera and press the transmitter button. 4The shutter is cancelled. in front of the...
Transmitter Battery holder release button 132 12DAE46"1"7,1 AUTO 3 6 0 Transmitter button Set the camera to 5 m /16.4 ft. Take the picture. • Point the remote control towards the sensor on the LCD panel. • If you then press the Qin ... can use the remote control (RC-5) to release the shutter from up to remote control mode. • Press the Qi)1 button. * Qin, appears on the camera and press the transmitter button. 4The shutter is cancelled. in front of the...

Instruction Manual
Page 30
... control function may not be taken for the 4 minutes that 6)if is displayed. • Set the camera on the camera is close to sunlight or strong fluorescent light. Remote control signal reception: Reception of the remote control signal is indicated by the red-eye ...) and a countdown displayed on the LCD panel. 0 • Shooting with remote control may not operate correctly if the camera is exposed to a fluorescent light during signal reception. Eal • Remote control shots can be possible if the remote control sensor on a steady surface or use the selftimer to take the picture...
... control function may not be taken for the 4 minutes that 6)if is displayed. • Set the camera on the camera is close to sunlight or strong fluorescent light. Remote control signal reception: Reception of the remote control signal is indicated by the red-eye ...) and a countdown displayed on the LCD panel. 0 • Shooting with remote control may not operate correctly if the camera is exposed to a fluorescent light during signal reception. Eal • Remote control shots can be possible if the remote control sensor on a steady surface or use the selftimer to take the picture...
Instruction Manual
Page 36
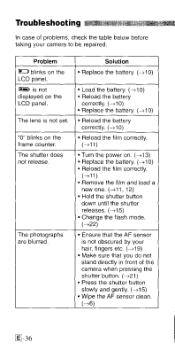
.... Troubleshooting In case of problems, check the table below before aking your hair, fingers etc. ( 19) • Make sure that you do not stand directly in front of the camera when pressing the shutter button. (-*21) • Press the shutter button slowly and gently. (-*15) • Wipe the... button down until the shutter releases. (-*15) • Change the flash mode. (-*22) • Ensure that the AF sensor is not obscured by your camera to be repaired. "0" blinks on the LCD panel. The photographs are blurred. Solution • Replace the battery. (-*10) • Load the battery. (-*10...
.... Troubleshooting In case of problems, check the table below before aking your hair, fingers etc. ( 19) • Make sure that you do not stand directly in front of the camera when pressing the shutter button. (-*21) • Press the shutter button slowly and gently. (-*15) • Wipe the... button down until the shutter releases. (-*15) • Change the flash mode. (-*22) • Ensure that the AF sensor is not obscured by your camera to be repaired. "0" blinks on the LCD panel. The photographs are blurred. Solution • Replace the battery. (-*10) • Load the battery. (-*10...

Instruction Manual
Page 37
When the "H" disappears from the camera. or 36exposure film with the DXcode. Problem Solution I can't imprint the date/time or a caption on the LCD panel. • Remove the battery from the LCD panel, load the battery again. (-10) rEi-37 The date/time or caption imprinted on the photos is difficult to read. • Compose your shots so that the background where the data is imprinted is dark. (-32) "H" is displayed on the last frame. • Use 12-, 20-, 24-
When the "H" disappears from the camera. or 36exposure film with the DXcode. Problem Solution I can't imprint the date/time or a caption on the LCD panel. • Remove the battery from the LCD panel, load the battery again. (-10) rEi-37 The date/time or caption imprinted on the photos is difficult to read. • Compose your shots so that the background where the data is imprinted is dark. (-32) "H" is displayed on the last frame. • Use 12-, 20-, 24-
Instruction Manual
Page 38
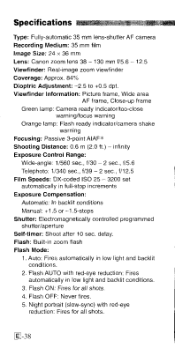
...programmed shutter/aperture Self-timer: Shoot after 10 sec. Specifications Type: Fully-automatic 35 mm lens-shutter AF camera Recording Medium: 35 mm film Image Size: 24 x 36 mm Lens: Canon zoom lens 38 - 130 mm f/5.6 - 12.5 Viewfinder: Real-image zoom viewfinder Coverage: Approx. 84...area AF frame, Close-up frame Green lamp: Camera ready indicator/too-close warning/focus warning Orange lamp: Flash ready indicator/camera shake warning Focusing: Passive 3-point AIAF* Shooting Distance: 0.6 m (2.0 ft.) - delay. Flash ON: Fires for all shots. 4. C-38 Flash AUTO with red-eye ...
...programmed shutter/aperture Self-timer: Shoot after 10 sec. Specifications Type: Fully-automatic 35 mm lens-shutter AF camera Recording Medium: 35 mm film Image Size: 24 x 36 mm Lens: Canon zoom lens 38 - 130 mm f/5.6 - 12.5 Viewfinder: Real-image zoom viewfinder Coverage: Approx. 84...area AF frame, Close-up frame Green lamp: Camera ready indicator/too-close warning/focus warning Orange lamp: Flash ready indicator/camera shake warning Focusing: Passive 3-point AIAF* Shooting Distance: 0.6 m (2.0 ft.) - delay. Flash ON: Fires for all shots. 4. C-38 Flash AUTO with red-eye ...

Instruction Manual
Page 42
... T2E 71(7, Canada For all inquiries concerning this camera, call toll tree in Caner 1-80,OK-CANON EUROPE, AFRICA & MIDDLE EAST CANON EUROPA N.V. m. H. CANON LATIN AMERICA, INC. Fred Thomas Drive, P.O. For all inquiries concerning this camera, call toll free in the U. 1-800-OK-CANON or write to: Customer Relations, Canon U.S.A., Inc. Bovenkerkerweg 59-61, P.O. Bessenveldstraat 7, 1831 Degem...
... T2E 71(7, Canada For all inquiries concerning this camera, call toll tree in Caner 1-80,OK-CANON EUROPE, AFRICA & MIDDLE EAST CANON EUROPA N.V. m. H. CANON LATIN AMERICA, INC. Fred Thomas Drive, P.O. For all inquiries concerning this camera, call toll free in the U. 1-800-OK-CANON or write to: Customer Relations, Canon U.S.A., Inc. Bovenkerkerweg 59-61, P.O. Bessenveldstraat 7, 1831 Degem...


