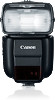

Instruction Manual
Page 4
... assume that the Custom Functions and Personal Functions of the Speedlite, and the menu and Custom Functions of four AA/LR6 alkaline batteries and Canon's testing standards. All figures are based on the use Speedlite 430EX III-RT illustrations. 4 A selection can also be made by turning...Indicates the top, bottom, left , and right ( buttons) of the cross keys. Basic Assumptions The operation procedures assume that both the Speedlite and the camera's power switches are at their default settings. The icons used for more information. : Warning to prevent shooting problems. :...
... assume that the Custom Functions and Personal Functions of the Speedlite, and the menu and Custom Functions of four AA/LR6 alkaline batteries and Canon's testing standards. All figures are based on the use Speedlite 430EX III-RT illustrations. 4 A selection can also be made by turning...Indicates the top, bottom, left , and right ( buttons) of the cross keys. Basic Assumptions The operation procedures assume that both the Speedlite and the camera's power switches are at their default settings. The icons used for more information. : Warning to prevent shooting problems. :...
Instruction Manual
Page 5
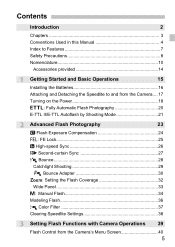
...Manual 4 Index to Features 7 Safety Precautions 8 Nomenclature 10 Accessories provided 14 1 Getting Started and Basic Operations 15 Installing the Batteries 16 Attaching and Detaching the Speedlite to and from the Camera.... 17 Turning on the Power 18 a: Fully Automatic Flash Photography 20 E-TTL II/E-TTL Autoflash by... Adapter 30 e: Setting the Flash Coverage 32 Wide Panel 33 q: Manual Flash 34 Modeling Flash 36 o Color Filter 37 Clearing Speedlite Settings 38 3 Setting Flash Functions with Camera Operations 39 Flash Control from the Camera's Menu Screen 40 5
...Manual 4 Index to Features 7 Safety Precautions 8 Nomenclature 10 Accessories provided 14 1 Getting Started and Basic Operations 15 Installing the Batteries 16 Attaching and Detaching the Speedlite to and from the Camera.... 17 Turning on the Power 18 a: Fully Automatic Flash Photography 20 E-TTL II/E-TTL Autoflash by... Adapter 30 e: Setting the Flash Coverage 32 Wide Panel 33 q: Manual Flash 34 Modeling Flash 36 o Color Filter 37 Clearing Speedlite Settings 38 3 Setting Flash Functions with Camera Operations 39 Flash Control from the Camera's Menu Screen 40 5

Instruction Manual
Page 7
Index to Features Power Source Batteries Firing interval/ frequency Power ON/OFF Flash ready Quick flash Auto power off Î p.16 Î p.16 Î p.18 Î p.18 Î p.18 Î p.18 Operations Attaching and detaching the Speedlite Î p.17 Lock function Î p.19 LCD panel illumination Î p.19 Normal Shooting Full auto (E-TTL...
Index to Features Power Source Batteries Firing interval/ frequency Power ON/OFF Flash ready Quick flash Auto power off Î p.16 Î p.16 Î p.18 Î p.18 Î p.18 Î p.18 Operations Attaching and detaching the Speedlite Î p.17 Lock function Î p.19 LCD panel illumination Î p.19 Normal Shooting Full auto (E-TTL...
Instruction Manual
Page 8
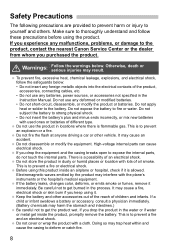
..., death or serious injuries may cause an accident. Do not disassemble or modify the equipment. This is flammable gas. Do not use any batteries, power sources, or accessories not specified in the process. Do not store the product in locations where there is to yourself and others. ...out of the reach of different type. Do not subject the battery to the product, contact the nearest Canon Service Center or the dealer from whom you keep using this product inside the product, promptly remove the battery. If the battery leaks, changes color, deforms, or emits smoke or fumes, remove...
..., death or serious injuries may cause an accident. Do not disassemble or modify the equipment. This is flammable gas. Do not use any batteries, power sources, or accessories not specified in the process. Do not store the product in locations where there is to yourself and others. ...out of the reach of different type. Do not subject the battery to the product, contact the nearest Canon Service Center or the dealer from whom you keep using this product inside the product, promptly remove the battery. If the battery leaks, changes color, deforms, or emits smoke or fumes, remove...

Instruction Manual
Page 9
...temperature object. The product may become cold and may result in a low-temperature environment for a prolonged period, make sure to remove the battery, and disconnect the external power source and cable from contacting your eyes, skin, or clothing, flush the affected area with other organic ..., keep at least 1 meter/3.3 feet away. Otherwise physical injury or property damage may cause a skin burn. 9 When disposing of a battery, insulate the electrical contacts with tape to prevent contact with lots of clean water without rubbing it. Long contact on the skin may cause...
...temperature object. The product may become cold and may result in a low-temperature environment for a prolonged period, make sure to remove the battery, and disconnect the external power source and cable from contacting your eyes, skin, or clothing, flush the affected area with other organic ..., keep at least 1 meter/3.3 feet away. Otherwise physical injury or property damage may cause a skin burn. 9 When disposing of a battery, insulate the electrical contacts with tape to prevent contact with lots of clean water without rubbing it. Long contact on the skin may cause...

Instruction Manual
Page 11
... button (p.38, 52, 54, 74, 80) Flash-ready lamp/ Test flash button (p.18, 56) Back button (p.4) Mounting foot lock lever (p.17) Lock-release button (p.17) Battery compartment cover (p.16) Power switch (p.18) : Power on : Button/Dial lock (Power on) : Power off Select Dial Select/Set button Cross keys Zoom button (p.32... mode button (p.20, 34, 63) Wireless/Linked shooting setting button (p.50, 73/68) Flash exposure compensation/ Flash output setting button (p.24/34) * Not available with Speedlite 430EX III. 11
... button (p.38, 52, 54, 74, 80) Flash-ready lamp/ Test flash button (p.18, 56) Back button (p.4) Mounting foot lock lever (p.17) Lock-release button (p.17) Battery compartment cover (p.16) Power switch (p.18) : Power on : Button/Dial lock (Power on) : Power off Select Dial Select/Set button Cross keys Zoom button (p.32... mode button (p.20, 34, 63) Wireless/Linked shooting setting button (p.50, 73/68) Flash exposure compensation/ Flash output setting button (p.24/34) * Not available with Speedlite 430EX III. 11

Instruction Manual
Page 16
...and slide it up by following the procedure of burn. When continually firing, do not use "AA/R6 lithium batteries". CAUTION Do not use the Speedlite while touching the same part for power supply. 1 Open the cover. Due to 2.5 sec. Firing Interval ...batteries for a long period of Flashes Approx. 180 to 3.5 sec. Make sure the "+" and "-" battery contacts are correctly oriented as shown in very hot places. 16 Number of time. When continuous flash or modeling flash is fully charged (p.18). Approx. 0.1 to 1200 times Based on new AA/LR6 alkaline batteries and Canon...
...and slide it up by following the procedure of burn. When continually firing, do not use "AA/R6 lithium batteries". CAUTION Do not use the Speedlite while touching the same part for power supply. 1 Open the cover. Due to 2.5 sec. Firing Interval ...batteries for a long period of Flashes Approx. 180 to 3.5 sec. Make sure the "+" and "-" battery contacts are correctly oriented as shown in very hot places. 16 Number of time. When continuous flash or modeling flash is fully charged (p.18). Approx. 0.1 to 1200 times Based on new AA/LR6 alkaline batteries and Canon...

Instruction Manual
Page 17
...place, it . 17 Be sure to turn off during recycling, replace the batteries with new ones. When replacing the batteries, replace all the way into the camera's hot shoe. 2 Secure the Speedlite. Attaching and Detaching the Speedlite to and from the camera. Slide the mounting foot lock lever to the ... the lock-release button, slide the lock lever to the left and detach the Speedlite from the Camera 1 Attach the Speedlite. Attaching and Detaching the Speedlite to and from the Camera Using AA/R6 batteries other than the alkaline type may cause contact failure due to the irregular shape of...
...place, it . 17 Be sure to turn off during recycling, replace the batteries with new ones. When replacing the batteries, replace all the way into the camera's hot shoe. 2 Secure the Speedlite. Attaching and Detaching the Speedlite to and from the camera. Slide the mounting foot lock lever to the ... the lock-release button, slide the lock lever to the left and detach the Speedlite from the Camera 1 Attach the Speedlite. Attaching and Detaching the Speedlite to and from the Camera Using AA/R6 batteries other than the alkaline type may cause contact failure due to the irregular shape of...
Instruction Manual
Page 18
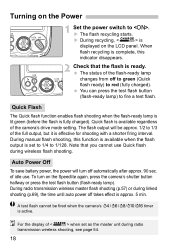
...fully charged). Turning on the Power 1 Set the power switch to fire a test flash. X The flash recycling starts. Auto Power Off To save battery power, the power will be fired when the camera's 3/1/o/7/2 timer is set as the master unit during wireless flash shooting. For the display of ...A test flash cannot be approx. 1/2 to 1/128. The status of when set to 1/4 to 1/3 of the full output, but it is displayed on the Speedlite again, press the camera's shutter button halfway or press the test flash button (flash-ready lamp). Quick flash is ready. of the camera's drive mode...
...fully charged). Turning on the Power 1 Set the power switch to fire a test flash. X The flash recycling starts. Auto Power Off To save battery power, the power will be fired when the camera's 3/1/o/7/2 timer is set as the master unit during wireless flash shooting. For the display of ...A test flash cannot be approx. 1/2 to 1/128. The status of when set to 1/4 to 1/3 of the full output, but it is displayed on the Speedlite again, press the camera's shutter button halfway or press the test flash button (flash-ready lamp). Quick flash is ready. of the camera's drive mode...

Instruction Manual
Page 19
...set as a "slave camera unit" in linked shooting, the LCD panel illuminates in orange. To retain the settings when replacing the batteries, replace the batteries within 1 min. When the temperature of the LCD panel illumination (P.Fn-02 to prevent the flash function settings from being accidentally ...01/p.83). Turning on the LCD panel. When setting a function, the illumination continues until auto power off the power switch and removing the batteries. During normal flash shooting, when set as the "master camera unit" in linked shooting (p.67), the LCD panel illuminates in effect even...
...set as a "slave camera unit" in linked shooting, the LCD panel illuminates in orange. To retain the settings when replacing the batteries, replace the batteries within 1 min. When the temperature of the LCD panel illumination (P.Fn-02 to prevent the flash function settings from being accidentally ...01/p.83). Turning on the LCD panel. When setting a function, the illumination continues until auto power off the power switch and removing the batteries. During normal flash shooting, when set as the "master camera unit" in linked shooting (p.67), the LCD panel illuminates in effect even...

Instruction Manual
Page 92
... more Necessary Interval Time (Guideline) 20 min. Temperature Increase Warning As the internal temperature of the flash head, batteries, and the area near the battery compartment may increase. f Flash Firing Restriction due to indicate the increase in two levels. When flash firing is ...restricted, a warning icon is displayed to Temperature Increase When continuous flash or modeling flash is repeatedly fired in short intervals, the temperature of the Speedlite...
... more Necessary Interval Time (Guideline) 20 min. Temperature Increase Warning As the internal temperature of the flash head, batteries, and the area near the battery compartment may increase. f Flash Firing Restriction due to indicate the increase in two levels. When flash firing is ...restricted, a warning icon is displayed to Temperature Increase When continuous flash or modeling flash is repeatedly fired in short intervals, the temperature of the Speedlite...

Instruction Manual
Page 93
...illumination of flash firings, see page 15 (continuous flashes) or page 36 (modeling flash). Do not touch the flash head, batteries, or the area near the battery compartment immediately after firing continuous flash or modeling flash. Touching them may result in a burn. For cautions on the number ...of the LCD panel will be displayed even if the temperature of the flash head rises. 93 Before replacing the batteries, make sure ...
...illumination of flash firings, see page 15 (continuous flashes) or page 36 (modeling flash). Do not touch the flash head, batteries, or the area near the battery compartment immediately after firing continuous flash or modeling flash. Touching them may result in a burn. For cautions on the number ...of the LCD panel will be displayed even if the temperature of the flash head rises. 93 Before replacing the batteries, make sure ...

Instruction Manual
Page 94
... your dealer or nearest Canon Service Center. Press the shutter button halfway or press the test flash button (p.18). With high-speed sync, the faster the shutter speed, the lower the guide number becomes. If this Troubleshooting Guide. Make sure that the batteries are installed in the .... Pictures are dirty, wipe the contacts (p.10) with a dry cloth, etc. Move closer to the camera (p.17). The Speedlite does not fire. or longer, replace the batteries (p.16). The power turns off has activated. If there is closed (p.16). Troubleshooting Guide If a problem occurs with the flash...
... your dealer or nearest Canon Service Center. Press the shutter button halfway or press the test flash button (p.18). With high-speed sync, the faster the shutter speed, the lower the guide number becomes. If this Troubleshooting Guide. Make sure that the batteries are installed in the .... Pictures are dirty, wipe the contacts (p.10) with a dry cloth, etc. Move closer to the camera (p.17). The Speedlite does not fire. or longer, replace the batteries (p.16). The power turns off has activated. If there is closed (p.16). Troubleshooting Guide If a problem occurs with the flash...

Instruction Manual
Page 99
...Infrared AF-assist beam Emitting small series of the units, surrounding environment, weather conditions, etc. Radio Transmission Wireless Master/Slave Function (430EX III-RT only) Frequency: 2405 MHz - 2475 MHz Modulation system: Primary modulation: OQPSK, Secondary modulation: DS-SS Wireless settings: Master/slave...lamp: Normal flash: Approx. 0.1 - 3.5 sec., Quick flash: Approx. 0.1 - 2.5 sec. * When using AA/LR6 alkaline batteries Lights up in red: normal flash available Lights up on the relative positions of flashes: Supported during viewfinder shooting, and Quick mode during ...
...Infrared AF-assist beam Emitting small series of the units, surrounding environment, weather conditions, etc. Radio Transmission Wireless Master/Slave Function (430EX III-RT only) Frequency: 2405 MHz - 2475 MHz Modulation system: Primary modulation: OQPSK, Secondary modulation: DS-SS Wireless settings: Master/slave...lamp: Normal flash: Approx. 0.1 - 3.5 sec., Quick flash: Approx. 0.1 - 2.5 sec. * When using AA/LR6 alkaline batteries Lights up in red: normal flash available Lights up on the relative positions of flashes: Supported during viewfinder shooting, and Quick mode during ...

Instruction Manual
Page 100
...Canon's testing standards. Product specifications and the exterior are based on the slave unit Customizable Functions Custom Functions: 10 types Personal Functions: 430EX III-RT: 8 types / 430EX III: 6 types Power Source Speedlite power source: Four AA/LR6 alkaline batteries * AA/HR6 Ni-MH batteries can be used Battery... OFF, using AA/LR6 alkaline batteries Auto power off: Power off after approx. 90 sec. Weight: 430EX III-RT: Approx. 295 g / 10.41 oz., 430EX III: Approx. 290 g / 10.23 oz. (Speedlite only, excluding batteries) Operation Environment Working temperature range:...
...Canon's testing standards. Product specifications and the exterior are based on the slave unit Customizable Functions Custom Functions: 10 types Personal Functions: 430EX III-RT: 8 types / 430EX III: 6 types Power Source Speedlite power source: Four AA/LR6 alkaline batteries * AA/HR6 Ni-MH batteries can be used Battery... OFF, using AA/LR6 alkaline batteries Auto power off: Power off after approx. 90 sec. Weight: 430EX III-RT: Approx. 295 g / 10.41 oz., 430EX III: Approx. 290 g / 10.23 oz. (Speedlite only, excluding batteries) Operation Environment Working temperature range:...

Instruction Manual
Page 105
Batteries shall not be exposed to charging. Only for European Union and EEA (Norway, Iceland and Liechtenstein) This symbol indicates that are generally associated with your ... office, waste authority, approved WEEE scheme or your cooperation in the correct disposal of this product is not to be disposed of with EEE. Dry batteries shall not be subjected to excessive heat such as sunshine, fire, or the like. CAN ICES-3 (B) / NMB-3 (B) The apparatus shall not be exposed to the...
Batteries shall not be exposed to charging. Only for European Union and EEA (Norway, Iceland and Liechtenstein) This symbol indicates that are generally associated with your ... office, waste authority, approved WEEE scheme or your cooperation in the correct disposal of this product is not to be disposed of with EEE. Dry batteries shall not be subjected to excessive heat such as sunshine, fire, or the like. CAN ICES-3 (B) / NMB-3 (B) The apparatus shall not be exposed to the...

Instruction Manual
Page 106
...-assist beam 22, 81, 84, 87 Auto power off 18, 83, 84 Auto zoom adjustment to image sensor size 22 Av (Aperture-priority AE 21 B Batteries 16 Bounce 28 Bounce adapter 30 C C.Fn 80, 81, 83 Case 14 Catchlight shooting 29 Clear all 44, 82 Clearing settings (Reverting to defaults 38...
...-assist beam 22, 81, 84, 87 Auto power off 18, 83, 84 Auto zoom adjustment to image sensor size 22 Av (Aperture-priority AE 21 B Batteries 16 Bounce 28 Bounce adapter 30 C C.Fn 80, 81, 83 Case 14 Catchlight shooting 29 Clear all 44, 82 Clearing settings (Reverting to defaults 38...
