
Getting Starte
Page 98
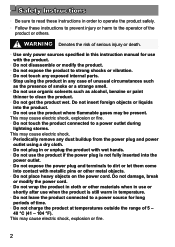
... of serious injury or death. • Use only power sources specified in order to operate the product safely. • Follow these instructions to prevent injury or harm to the operator of the product or others. Safety Instructions • Be sure to read these instructions in this instruction manual for long periods of time. • Do not charge the...
... of serious injury or death. • Use only power sources specified in order to operate the product safely. • Follow these instructions to prevent injury or harm to the operator of the product or others. Safety Instructions • Be sure to read these instructions in this instruction manual for long periods of time. • Do not charge the...
Getting Starte
Page 99
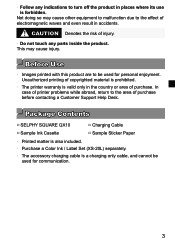
.... In case of printer problems while abroad, return to be used for communication. 3 Package Contents □ SELPHY SQUARE QX10 □ Sample Ink Casette □ Charging Cable □ Sample Sticker Paper • Printed matter is also included. • Purchase a Color Ink / Label Set (XS-20L) separately. • The accessory charging cable is a charging only cable, and cannot be used for personal enjoyment. Before Use • Images printed with this product...
.... In case of printer problems while abroad, return to be used for communication. 3 Package Contents □ SELPHY SQUARE QX10 □ Sample Ink Casette □ Charging Cable □ Sample Sticker Paper • Printed matter is also included. • Purchase a Color Ink / Label Set (XS-20L) separately. • The accessory charging cable is a charging only cable, and cannot be used for personal enjoyment. Before Use • Images printed with this product...
Getting Starte
Page 100
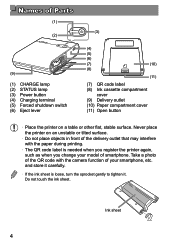
... (2) STATUS lamp (3) Power button (4) Charging terminal (5) Forced shutdown switch (6) Eject lever (3) (4) (5) (6) (7) (10) (8) (11) (7) QR code label (8) Ink cassette compartment cover (9) Delivery outlet (10) Paper compartment cover (11) Open button • Place the printer on an unstable or tilted surface. • Do not place objects in front of smartphone. Ink sheet 4 Take a photo of the QR code with the paper during printing. • The QR code label is loose, turn the...
... (2) STATUS lamp (3) Power button (4) Charging terminal (5) Forced shutdown switch (6) Eject lever (3) (4) (5) (6) (7) (10) (8) (11) (7) QR code label (8) Ink cassette compartment cover (9) Delivery outlet (10) Paper compartment cover (11) Open button • Place the printer on an unstable or tilted surface. • Do not place objects in front of smartphone. Ink sheet 4 Take a photo of the QR code with the paper during printing. • The QR code label is loose, turn the...
Getting Starte
Page 101
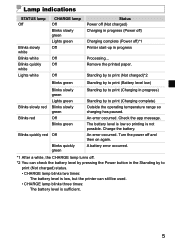
... (Power off) Charging complete (Power off)*1 Printer start-up in the Standing by to print (Not charged) status. • CHARGE lamp blinks two times: The battery level is low, but the printer can still be used. • CHARGE lamp blinks three times: The battery level is not possible. Charge the battery. An error occurred. The battery level is low so printing is sufficient. 5 Check the app message. Remove the printed paper.
... (Power off) Charging complete (Power off)*1 Printer start-up in the Standing by to print (Not charged) status. • CHARGE lamp blinks two times: The battery level is low, but the printer can still be used. • CHARGE lamp blinks three times: The battery level is not possible. Charge the battery. An error occurred. The battery level is low so printing is sufficient. 5 Check the app message. Remove the printed paper.

Getting Starte
Page 102
... to [Printer Manual] of an Android smartphone), and install SELPHY Photo Layout. 2 Start SELPHY Photo Layout. Turn on location services on the smartphone. Turn off power saving mode and other functions that reduce smartphone battery consumption. Follow the on-screen instructions. • For information on how to operate the printer, such as loading the paper or replacing the ink cassette, refer to blink green and...
... to [Printer Manual] of an Android smartphone), and install SELPHY Photo Layout. 2 Start SELPHY Photo Layout. Turn on location services on the smartphone. Turn off power saving mode and other functions that reduce smartphone battery consumption. Follow the on-screen instructions. • For information on how to operate the printer, such as loading the paper or replacing the ink cassette, refer to blink green and...
Getting Starte
Page 103
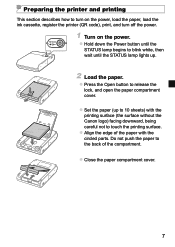
... turn on the power, load the paper, load the ink cassette, register the printer (QR code), print, and turn off the power. 1 Turn on the power. Hold down the Power button until the STATUS lamp begins to blink white, then wait until the STATUS lamp lights up. 2 Load the paper. Press the Open button to release the lock, and open the paper compartment cover. Set the paper (up to 10 sheets) with the printing...
... turn on the power, load the paper, load the ink cassette, register the printer (QR code), print, and turn off the power. 1 Turn on the power. Hold down the Power button until the STATUS lamp begins to blink white, then wait until the STATUS lamp lights up. 2 Load the paper. Press the Open button to release the lock, and open the paper compartment cover. Set the paper (up to 10 sheets) with the printing...
Getting Starte
Page 104
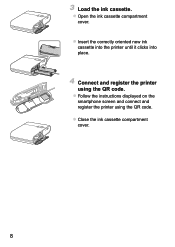
3 Load the ink cassette. Open the ink cassette compartment cover. Insert the correctly oriented new ink cassette into the printer until it clicks into place. 4 Connect and register the printer using the QR code. Follow the instructions displayed on the smartphone screen and connect and register the printer using the QR code. Close the ink cassette compartment cover. 8
3 Load the ink cassette. Open the ink cassette compartment cover. Insert the correctly oriented new ink cassette into the printer until it clicks into place. 4 Connect and register the printer using the QR code. Follow the instructions displayed on the smartphone screen and connect and register the printer using the QR code. Close the ink cassette compartment cover. 8
Getting Starte
Page 105
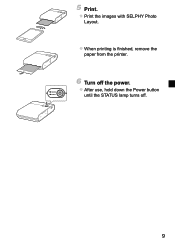
5 Print. Print the images with SELPHY Photo Layout. When printing is finished, remove the paper from the printer. 6 Turn off the power. After use, hold down the Power button until the STATUS lamp turns off. 9
5 Print. Print the images with SELPHY Photo Layout. When printing is finished, remove the paper from the printer. 6 Turn off the power. After use, hold down the Power button until the STATUS lamp turns off. 9
Getting Starte
Page 106
... open the ink cassette compartment cover or the paper compartment cover while the printer is finished. Do not pull on the paper until the message indicating to remove the paper is displayed on or that has already been printed on the smartphone. • Do not interrupt communication until printing is operating. • If the Standing by to touch the printing surface. • Do not use paper...
... open the ink cassette compartment cover or the paper compartment cover while the printer is finished. Do not pull on the paper until the message indicating to remove the paper is displayed on or that has already been printed on the smartphone. • Do not interrupt communication until printing is operating. • If the Standing by to touch the printing surface. • Do not use paper...
Getting Starte
Page 107
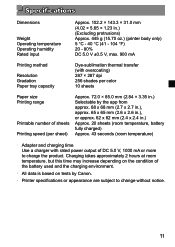
... Printing method Resolution Gradation Paper tray capacity Dye-sublimation thermal transfer (with overcoating) 287 × 287 dpi 256 shades per color 10 sheets Paper size Printing range Printable number of sheets Printing speed (per sheet) Approx. 72.0 × 85.0 mm (2.84 × 3.35 in .) Approx. 20 sheets (room temperature, battery fully charged) Approx. 43 seconds (room temperature) • Adapter and charging time Use a charger with rated power output...
... Printing method Resolution Gradation Paper tray capacity Dye-sublimation thermal transfer (with overcoating) 287 × 287 dpi 256 shades per color 10 sheets Paper size Printing range Printable number of sheets Printing speed (per sheet) Approx. 72.0 × 85.0 mm (2.84 × 3.35 in .) Approx. 20 sheets (room temperature, battery fully charged) Approx. 43 seconds (room temperature) • Adapter and charging time Use a charger with rated power output...
Getting Starte
Page 108
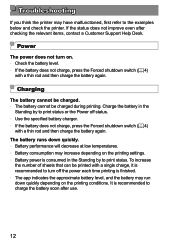
... at low temperatures. • Battery consumption may increase depending on . • Check the battery level. • If the battery does not charge, press the Forced shutdown switch (=4) with a thin rod and then charge the battery again. To increase the number of sheets that can be charged during printing. It is recommended to print status or the Power off status. • Use the...
... at low temperatures. • Battery consumption may increase depending on . • Check the battery level. • If the battery does not charge, press the Forced shutdown switch (=4) with a thin rod and then charge the battery again. To increase the number of sheets that can be charged during printing. It is recommended to print status or the Power off status. • Use the...
Getting Starte
Page 109
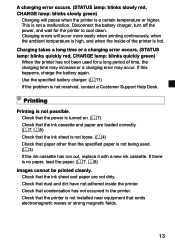
...) • If the problem is not a malfunction. Charging takes a long time or a charging error occurs. (STATUS lamp: blinks quickly red, CHARGE lamp: blinks quickly green) • When the printer has not been used . (= 3) • If the ink cassette has run out, replace it with a new ink cassette. Printing Printing is not possible. • Check that the power is turned on. (=7) • Check that the ink cassette and paper are not dirty. •...
...) • If the problem is not a malfunction. Charging takes a long time or a charging error occurs. (STATUS lamp: blinks quickly red, CHARGE lamp: blinks quickly green) • When the printer has not been used . (= 3) • If the ink cassette has run out, replace it with a new ink cassette. Printing Printing is not possible. • Check that the power is turned on. (=7) • Check that the ink cassette and paper are not dirty. •...

Getting Starte
Page 110
... printer to the environment (lighting color and intensity) in progress is finished. • When printing is canceled partway through printing of multiple sheets, printing stops after the current sheet is not a malfunction. Wait a bit before printing again, or turn off the power and wait for smartphone screens and printing. Paper The paper is not fed properly or the jams frequently. • Check that the paper is set correctly. (=7) • Check...
... printer to the environment (lighting color and intensity) in progress is finished. • When printing is canceled partway through printing of multiple sheets, printing stops after the current sheet is not a malfunction. Wait a bit before printing again, or turn off the power and wait for smartphone screens and printing. Paper The paper is not fed properly or the jams frequently. • Check that the paper is set correctly. (=7) • Check...
Getting Starte
Page 111
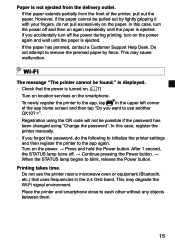
... the printer settings and then register the printer to the app again. Printing takes time. • Do not use another QX10? >". • Registration using the QR code will not be possible if the password has been changed using "Change the password". In this case, register the printer manually. • If you forgot the password, do not pull excessively on the paper. If you accidentally turn off the power during printing, turn the power...
... the printer settings and then register the printer to the app again. Printing takes time. • Do not use another QX10? >". • Registration using the QR code will not be possible if the password has been changed using "Change the password". In this case, register the printer manually. • If you forgot the password, do not pull excessively on the paper. If you accidentally turn off the power during printing, turn the power...
Getting Starte
Page 112
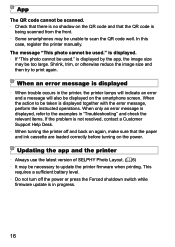
... scan the QR code well. The message "This photo cannot be used ." Updating the app and the printer • Always use the latest version of SELPHY Photo Layout. (=6) • It may be unable to the examples in "Troubleshooting" and check the relevant items. If the problem is displayed • When trouble occurs in progress. 16 When an error message is not resolved, contact a Customer Support Help Desk. • When turning...
... scan the QR code well. The message "This photo cannot be used ." Updating the app and the printer • Always use the latest version of SELPHY Photo Layout. (=6) • It may be unable to the examples in "Troubleshooting" and check the relevant items. If the problem is displayed • When trouble occurs in progress. 16 When an error message is not resolved, contact a Customer Support Help Desk. • When turning...

Getting Starte
Page 113
... color transfer. • When storing photos in an album, select an album with other malfunction. • Store unopened paper and ink cassettes in a dark place. 17 Canon cannot be held liable for this. Tidying up after printing • Turn off the power. • Store the paper and ink cassette loaded in the printer. • Store the printer in the level condition in a dark place free of printed...
... color transfer. • When storing photos in an album, select an album with other malfunction. • Store unopened paper and ink cassettes in a dark place. 17 Canon cannot be held liable for this. Tidying up after printing • Turn off the power. • Store the paper and ink cassette loaded in the printer. • Store the printer in the level condition in a dark place free of printed...
Getting Starte
Page 117
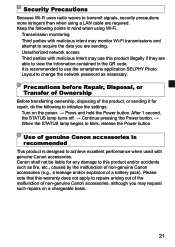
... cable are sending. • Unauthorized network access Third parties with genuine Canon accessories. Please note that this product and/or accidents such as necessary. Keep the following to initialize the settings. • Turn on a chargeable basis. 21 It is designed to achieve excellent performance when used with malicious intent may request such repairs on the power. → Press and hold the Power button. Canon...
... cable are sending. • Unauthorized network access Third parties with genuine Canon accessories. Please note that this product and/or accidents such as necessary. Keep the following to initialize the settings. • Turn on a chargeable basis. 21 It is designed to achieve excellent performance when used with malicious intent may request such repairs on the power. → Press and hold the Power button. Canon...
Getting Starte
Page 119
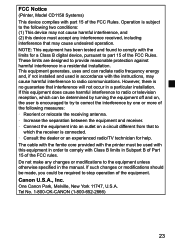
... in a residential installation. NOTE: This equipment has been tested and found to comply with the printer must accept any changes or modifications to radio communications. Canon U.S.A., Inc. The cable with the ferrite core provided with the limits for help. One Canon Park, Melville, New York 11747, U.S.A. These limits are designed to correct the interference by turning the equipment...
... in a residential installation. NOTE: This equipment has been tested and found to comply with the printer must accept any changes or modifications to radio communications. Canon U.S.A., Inc. The cable with the ferrite core provided with the limits for help. One Canon Park, Melville, New York 11747, U.S.A. These limits are designed to correct the interference by turning the equipment...
Getting Starte
Page 549
You may obtain a copy of this document. Definitions. "License" shall mean the terms and conditions for making modifications, including but not limited to compiled object code, generated documentation, and conversions to other entities that control, are controlled by this definition, "control" means (i) the power, direct or indirect, to cause the direction or management of such entity...
You may obtain a copy of this document. Definitions. "License" shall mean the terms and conditions for making modifications, including but not limited to compiled object code, generated documentation, and conversions to other entities that control, are controlled by this definition, "control" means (i) the power, direct or indirect, to cause the direction or management of such entity...

Getting Starte
Page 554
...part of a larger (possibly commercial) software distribution provided that you insert a prominent notice in aggregate with the Copyright Holder. 4. You may charge a reasonable copying fee for personal use. The scripts and library files supplied as input to or produced as output from the Standard Version. 3. d) Make...;les, together with instructions (in manual pages (or equivalent), together with their corresponding Standard Version executables, give the non-standard executables non-standard names, and clearly document the differences in the manual page or equivalent) on ...
...part of a larger (possibly commercial) software distribution provided that you insert a prominent notice in aggregate with the Copyright Holder. 4. You may charge a reasonable copying fee for personal use. The scripts and library files supplied as input to or produced as output from the Standard Version. 3. d) Make...;les, together with instructions (in manual pages (or equivalent), together with their corresponding Standard Version executables, give the non-standard executables non-standard names, and clearly document the differences in the manual page or equivalent) on ...


