ImageBrowser 6.5 for Macintosh Instruction Manual
Page 13
... by [Preferences] and [Layout Print], and place a check mark beside [Shooting Date]. Click here to crop and print a portion of Contents 13 Sets the printer, paper size and borderless printing settings.
... by [Preferences] and [Layout Print], and place a check mark beside [Shooting Date]. Click here to crop and print a portion of Contents 13 Sets the printer, paper size and borderless printing settings.

ImageBrowser 6.5 for Macintosh Instruction Manual
Page 15
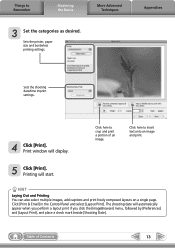
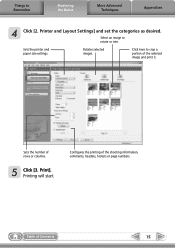
Sets the printer, paper size and number of the shooting information, comments, headers, footers or page numbers. 4 Click [Print]. Configures the printing of print copies settings. Print window will start. Click here to Remember Mastering the Basics More Advanced Techniques Appendices 3 Set the categories as desired. Table of rows or columns. Rotates selected images. Things to crop a portion of the selected image and print it. Sets the number of Contents 15 Select an image to rotate or trim. Printing will display. 5 Click [Print].
Sets the printer, paper size and number of the shooting information, comments, headers, footers or page numbers. 4 Click [Print]. Configures the printing of print copies settings. Print window will start. Click here to Remember Mastering the Basics More Advanced Techniques Appendices 3 Set the categories as desired. Table of rows or columns. Rotates selected images. Things to crop a portion of the selected image and print it. Sets the number of Contents 15 Select an image to rotate or trim. Printing will display. 5 Click [Print].

ZoomBrowser EX 6.5 for Windows Instruction Manual
Page 13
... settings. 5 Click [3. Click the [Print & Email] task button in the Main Window, followed by [Print Using Other Software]. Table of an image. Sets the printer, paper size and borderless printing settings. Printing will start. HINT Printing Using Other Software If you have specialized printing software installed on the computer, you can...
... settings. 5 Click [3. Click the [Print & Email] task button in the Main Window, followed by [Print Using Other Software]. Table of an image. Sets the printer, paper size and borderless printing settings. Printing will start. HINT Printing Using Other Software If you have specialized printing software installed on the computer, you can...
ZoomBrowser EX 6.5 for Windows Instruction Manual
Page 15
Sets the number of the shooting information, comments, headers, footers or page numbers. Things to crop a portion of the selected image and print it. Click here to Remember Mastering the Basics More Advanced Techniques Appendices 4 Click [2. Select an image to rotate or trim. Printing will start. Rotates selected images. Configures the printing of rows or columns. 5 Click [3. Print]. Table of Contents 15 Sets the printer and paper size settings. Printer and Layout Settings] and set the categories as desired.
Sets the number of the shooting information, comments, headers, footers or page numbers. Things to crop a portion of the selected image and print it. Click here to Remember Mastering the Basics More Advanced Techniques Appendices 4 Click [2. Select an image to rotate or trim. Printing will start. Rotates selected images. Configures the printing of rows or columns. 5 Click [3. Print]. Table of Contents 15 Sets the printer and paper size settings. Printer and Layout Settings] and set the categories as desired.
SELPHY ES2 / ES20 Printer User Guide
Page 6
... shots from the actual printer. *1 SD is an acronym for the Postcard-Size ink and paper integrated cartridge. z Illustrations and screen examples shown in this guide use Canon digital cameras. z This printer can be used with the SELPHY ES2/ES20. Unless otherwise noted, the instructions are referred to as "memory cards" in this guide...
... shots from the actual printer. *1 SD is an acronym for the Postcard-Size ink and paper integrated cartridge. z Illustrations and screen examples shown in this guide use Canon digital cameras. z This printer can be used with the SELPHY ES2/ES20. Unless otherwise noted, the instructions are referred to as "memory cards" in this guide...
SELPHY ES2 / ES20 Printer User Guide
Page 9
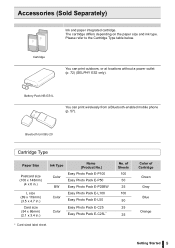
Cartridge You can print wirelessly from a Bluetooth-enabled mobile phone (p. 57). Bluetooth Unit BU-20 Cartridge Type Paper Size Postcard size (100 x 148mm) (4 x 6 in.) L size (89 x 119mm) (3.5 x 4.7 in.) Card size (54 x 86mm) (2.1 x 3.4 in.) Ink Type Name (Product No.) Color Easy Photo Pack E-...25 Color of Cartridge Green Gray Blue Orange Getting Started 9 Battery Pack NB-ES1L You can print outdoors, or at locations without a power outlet (p. 72) (SELPHY ES2 only). Accessories (Sold Separately) Ink and paper integrated cartridge. The cartridge differs depending on the...
Cartridge You can print wirelessly from a Bluetooth-enabled mobile phone (p. 57). Bluetooth Unit BU-20 Cartridge Type Paper Size Postcard size (100 x 148mm) (4 x 6 in.) L size (89 x 119mm) (3.5 x 4.7 in.) Card size (54 x 86mm) (2.1 x 3.4 in.) Ink Type Name (Product No.) Color Easy Photo Pack E-...25 Color of Cartridge Green Gray Blue Orange Getting Started 9 Battery Pack NB-ES1L You can print outdoors, or at locations without a power outlet (p. 72) (SELPHY ES2 only). Accessories (Sold Separately) Ink and paper integrated cartridge. The cartridge differs depending on the...

SELPHY ES2 / ES20 Printer User Guide
Page 10
...card inserted (p. 25). 10 Getting Started These are for inserting a memory card or card adapter with a memory card inserted. Paper projects from a mobile phone (SELPHY ES2 only). Press to open the print receptacle cover. Slide up to manually open the cartridge cover. Front View 1 7 2 ...8 3 9 4 10 5 11 6 12 1 Print Receptacle Cover 2 Print Receptacle Button 3 Paper-Handling Slot 4 Indicator Lamp 5 Infrared Data Receiver ...
...card inserted (p. 25). 10 Getting Started These are for inserting a memory card or card adapter with a memory card inserted. Paper projects from a mobile phone (SELPHY ES2 only). Press to open the print receptacle cover. Slide up to manually open the cartridge cover. Front View 1 7 2 ...8 3 9 4 10 5 11 6 12 1 Print Receptacle Cover 2 Print Receptacle Button 3 Paper-Handling Slot 4 Indicator Lamp 5 Infrared Data Receiver ...

SELPHY ES2 / ES20 Printer User Guide
Page 15
... search key. P : Postcard size L : L size C : Card size C Label: Card size full-sized label sheet BW : Postcard size (black and white) Displays the remaining amount of paper in the Creative Print image selection screen, displays the Jump screen. Components Guide...
... search key. P : Postcard size L : L size C : Card size C Label: Card size full-sized label sheet BW : Postcard size (black and white) Displays the remaining amount of paper in the Creative Print image selection screen, displays the Jump screen. Components Guide...
SELPHY ES2 / ES20 Printer User Guide
Page 17
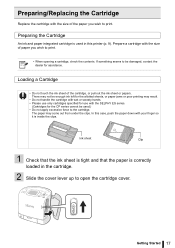
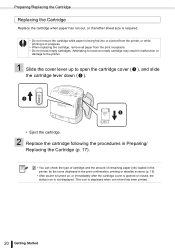
In this case, push the paper down with the SELPHY ES series. (Cartridges for the allotted sheets, or paper jams or poor printing may come out from under the clips. If something seems to be enough ink left for the CP series cannot be ...used in the cartridge. 2 Slide the cover lever up to open the cartridge cover. Preparing the Cartridge An ink and paper integrated cartridge is inside the clips. The paper may result. • Do not handle the cartridge with wet or sweaty hands. • Please use only cartridges specified for assistance...
In this case, push the paper down with the SELPHY ES series. (Cartridges for the allotted sheets, or paper jams or poor printing may come out from under the clips. If something seems to be enough ink left for the CP series cannot be ...used in the cartridge. 2 Slide the cover lever up to open the cartridge cover. Preparing the Cartridge An ink and paper integrated cartridge is inside the clips. The paper may result. • Do not handle the cartridge with wet or sweaty hands. • Please use only cartridges specified for assistance...
SELPHY ES2 / ES20 Printer User Guide
Page 18
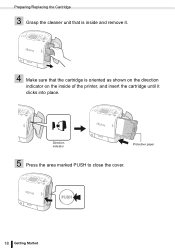
Direction indicator Protective paper 5 Press the area marked PUSH to close the cover. 18 Getting Started Preparing/Replacing the Cartridge 3 Grasp the cleaner unit that is inside and remove it. 4 Make sure that the cartridge is oriented as shown on the direction indicator on the inside of the printer, and insert the cartridge until it clicks into place.
Direction indicator Protective paper 5 Press the area marked PUSH to close the cover. 18 Getting Started Preparing/Replacing the Cartridge 3 Grasp the cleaner unit that is inside and remove it. 4 Make sure that the cartridge is oriented as shown on the direction indicator on the inside of the printer, and insert the cartridge until it clicks into place.
SELPHY ES2 / ES20 Printer User Guide
Page 19
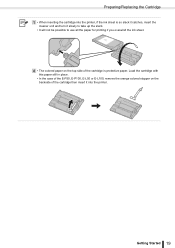
Getting Started 19 Load the cartridge with this paper still in place. • In the case of the E-P50, E-P100, E-L50 or E-L100, remove the orange colored stopper on the backside of the cartridge ... to take up the slack. • It will not be possible to use all the paper for printing if you overwind the ink sheet. 4 • The colored paper on the top side of the cartridge is protective paper. Preparing/Replacing the Cartridge 1 • When inserting the cartridge into the printer, if the ink...
Getting Started 19 Load the cartridge with this paper still in place. • In the case of the E-P50, E-P100, E-L50 or E-L100, remove the orange colored stopper on the backside of the cartridge ... to take up the slack. • It will not be possible to use all the paper for printing if you overwind the ink sheet. 4 • The colored paper on the top side of the cartridge is protective paper. Preparing/Replacing the Cartridge 1 • When inserting the cartridge into the printer, if the ink...
SELPHY ES2 / ES20 Printer User Guide
Page 20
... (p. 17). 2 • You can check the type of cartridge and the amount of remaining paper (ink) loaded in the printer, by the icons displayed in progress. • When replacing the cartridge, remove all paper from the print receptacle. • Do not reuse empty cartridges. This icon is not displayed. ...Preparing/Replacing the Cartridge Replacing the Cartridge Replace the cartridge when paper has run out, or if another sheet size is required. • Do not remove the cartridge while paper is being fed into or ejected from the printer, or while printing is in the ...
... (p. 17). 2 • You can check the type of cartridge and the amount of remaining paper (ink) loaded in the printer, by the icons displayed in progress. • When replacing the cartridge, remove all paper from the print receptacle. • Do not reuse empty cartridges. This icon is not displayed. ...Preparing/Replacing the Cartridge Replacing the Cartridge Replace the cartridge when paper has run out, or if another sheet size is required. • Do not remove the cartridge while paper is being fed into or ejected from the printer, or while printing is in the ...
SELPHY ES2 / ES20 Printer User Guide
Page 23
Do not touch the paper until printing ends. z Do not raise the carrying handle when printing. z If the printer overheats, ... images from the printer. z Do not eject the cartridge or open the print receptacle cover. z During the printing operation, paper is unusually warm or you are printing continuously). If closed accidentally, press the print receptacle button to accumulate in equipment damage....more than 50 sheets to open the cartridge cover right after turning the power on printed paper. If the prints touch the carrying handle, printing may not be done correctly.
Do not touch the paper until printing ends. z Do not raise the carrying handle when printing. z If the printer overheats, ... images from the printer. z Do not eject the cartridge or open the print receptacle cover. z During the printing operation, paper is unusually warm or you are printing continuously). If closed accidentally, press the print receptacle button to accumulate in equipment damage....more than 50 sheets to open the cartridge cover right after turning the power on printed paper. If the prints touch the carrying handle, printing may not be done correctly.

SELPHY ES2 / ES20 Printer User Guide
Page 47
... print. Printing from the camera connected with red-eye. Bordered, Borderless ( ) Sets the number of images to print on a single Refer to p. 49 sheet of paper, the number of images to print, or to [Default] when printing from Memory Cards 47 Correct Red-Eye • Depending on the image. Faces turned...
... print. Printing from the camera connected with red-eye. Bordered, Borderless ( ) Sets the number of images to print on a single Refer to p. 49 sheet of paper, the number of images to print, or to [Default] when printing from Memory Cards 47 Correct Red-Eye • Depending on the image. Faces turned...

SELPHY ES2 / ES20 Printer User Guide
Page 49
... when using L size and postcard size. Fixed Size Prints the image with a marker pen. • The page layout you can select differs according to the paper you use. • You can set bordered or borderless when the setting is 1-up, 2-up, 4-up or 8-up. • When the page layout is set...
... when using L size and postcard size. Fixed Size Prints the image with a marker pen. • The page layout you can select differs according to the paper you use. • You can set bordered or borderless when the setting is 1-up, 2-up, 4-up or 8-up. • When the page layout is set...
SELPHY ES2 / ES20 Printer User Guide
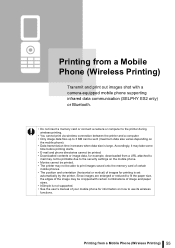
Page 55
...• Data transmission time increases when data size is set automatically by the printer. Since images are enlarged or reduced to fit the paper size, the edges of images for example, downloaded from a Mobile Phone (Wireless Printing) 55 Accordingly, it may take some time before ...8226; The position and orientation (horizontal or vertical) of the image may be cropped with a camera-equipped mobile phone supporting infrared data communication (SELPHY ES2 only) or Bluetooth. • Do not insert a memory card or connect a camera or computer to the printer during wireless printing. •...
...• Data transmission time increases when data size is set automatically by the printer. Since images are enlarged or reduced to fit the paper size, the edges of images for example, downloaded from a Mobile Phone (Wireless Printing) 55 Accordingly, it may take some time before ...8226; The position and orientation (horizontal or vertical) of the image may be cropped with a camera-equipped mobile phone supporting infrared data communication (SELPHY ES2 only) or Bluetooth. • Do not insert a memory card or connect a camera or computer to the printer during wireless printing. •...

SELPHY ES2 / ES20 Printer User Guide
Page 70
If you have questions about Ulead Photo Express LE, please access the URL below: http://www.ulead.com/events/canon/selphy/ 1 Select [SELPHY] and click [SELPHY Print]. 2 Select the paper from a PC Introduction to print, click , determine the image size and position, then click [Customize]. 70 Printing from the list on the left, select the desired frame to use and click [Replace]. 3 Select the desired image to the Supplied Programs Ulead Photo Express LE This section give a basic overview of inserting frames and text, and then printing.
If you have questions about Ulead Photo Express LE, please access the URL below: http://www.ulead.com/events/canon/selphy/ 1 Select [SELPHY] and click [SELPHY Print]. 2 Select the paper from a PC Introduction to print, click , determine the image size and position, then click [Customize]. 70 Printing from the list on the left, select the desired frame to use and click [Replace]. 3 Select the desired image to the Supplied Programs Ulead Photo Express LE This section give a basic overview of inserting frames and text, and then printing.

SELPHY ES2 / ES20 Printer User Guide
Page 71
Printing from a PC 71 Introduction to the Supplied Programs 4 Select [Text], click [Add/Edit]. 5 Type the desired text to print, click the text, then click [Print]. , adjust the position of 6 Determine the printer name, paper size, cartridge, layout, and copies, then click . 7 Printing completes. 2 • Frames can be assigned only when [Postcard size] or [L size] paper is selected. 6 • The image will not print correctly if you change the paper size setting.
Printing from a PC 71 Introduction to the Supplied Programs 4 Select [Text], click [Add/Edit]. 5 Type the desired text to print, click the text, then click [Print]. , adjust the position of 6 Determine the printer name, paper size, cartridge, layout, and copies, then click . 7 Printing completes. 2 • Frames can be assigned only when [Postcard size] or [L size] paper is selected. 6 • The image will not print correctly if you change the paper size setting.
SELPHY ES2 / ES20 Printer User Guide
Page 76
... battery fully charged for long period of 0 - 30 °C (32 - 86 °F). If this happens, change the battery pack with sharp edges, such as paper clips and pins. Always put the terminal cover on the day of the battery diminishes substantially even when it is not used, be charged at... • If the performance of use, or one , or use . When you are advised to store it in the printer. 76 Using the Battery Pack (SELPHY ES2 only) z When storing a battery pack, you do not use or discharge it for long periods of the Battery Pack • This is a lithium ion battery...
... battery fully charged for long period of 0 - 30 °C (32 - 86 °F). If this happens, change the battery pack with sharp edges, such as paper clips and pins. Always put the terminal cover on the day of the battery diminishes substantially even when it is not used, be charged at... • If the performance of use, or one , or use . When you are advised to store it in the printer. 76 Using the Battery Pack (SELPHY ES2 only) z When storing a battery pack, you do not use or discharge it for long periods of the Battery Pack • This is a lithium ion battery...

SELPHY ES2 / ES20 Printer User Guide
Page 83
... places to come into contact with high temperatures (40°C/104°F or higher). - Allowing print surfaces to prevent image quality from deteriorating. - Canon assumes no liability for prolonged periods. • If you wish to a print surface. - Appendix 83 Carrying the Printer When carrying the printer, lift... Color change , color fading or color bleeding. - Remove the cartridge from the printer and store it ). Storing the Printer or the Printed Paper Storing the Printer Unplug the power cord from the power outlet (If using the battery pack, remove it in its original package.
... places to come into contact with high temperatures (40°C/104°F or higher). - Allowing print surfaces to prevent image quality from deteriorating. - Canon assumes no liability for prolonged periods. • If you wish to a print surface. - Appendix 83 Carrying the Printer When carrying the printer, lift... Color change , color fading or color bleeding. - Remove the cartridge from the printer and store it ). Storing the Printer or the Printed Paper Storing the Printer Unplug the power cord from the power outlet (If using the battery pack, remove it in its original package.


