User Guide
Page 2
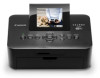
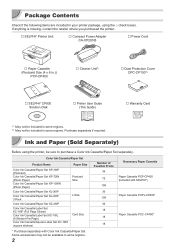
... is missing, contact the retailer where you purchased the printer. □ SELPHY Printer Unit □ Compact Power Adapter CA-CP200 B □ Power Cord □ Paper Cassette (Postcard Size (4 x 6 in.)) PCP-CP400 □ Cleaner Unit*1 □ Dust Protection Cover DPC-CP100*2 □ SELPHY CP900 Solution Disk □ Printer User Guide (This Guide) □ Warranty Card...
... is missing, contact the retailer where you purchased the printer. □ SELPHY Printer Unit □ Compact Power Adapter CA-CP200 B □ Power Cord □ Paper Cassette (Postcard Size (4 x 6 in.)) PCP-CP400 □ Cleaner Unit*1 □ Dust Protection Cover DPC-CP100*2 □ SELPHY CP900 Solution Disk □ Printer User Guide (This Guide) □ Warranty Card...
User Guide
Page 3
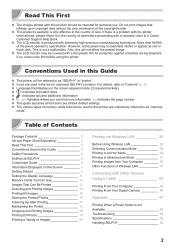
... will be intended for protection against scratches during shipment. If so, remove the film before proceeding with a warranty claim to a Canon Customer Support Help Desk. OO (p. xx): Indicates where you can be covered with a thin plastic film for personal use. OO... image. OO : Indicates tips and additional information. Table of Contents Package Contents 2 Ink and Paper (Sold Separately 2 Read This First 3 Conventions Used in this Guide 3 Safety Precautions 4 Setting Up SELPHY 5 Component Guide 6 Information Displayed on the screen appears inside [ ] (square brackets). Read...
... will be intended for protection against scratches during shipment. If so, remove the film before proceeding with a warranty claim to a Canon Customer Support Help Desk. OO (p. xx): Indicates where you can be covered with a thin plastic film for personal use. OO... image. OO : Indicates tips and additional information. Table of Contents Package Contents 2 Ink and Paper (Sold Separately 2 Read This First 3 Conventions Used in this Guide 3 Safety Precautions 4 Setting Up SELPHY 5 Component Guide 6 Information Displayed on the screen appears inside [ ] (square brackets). Read...
User Guide
Page 5
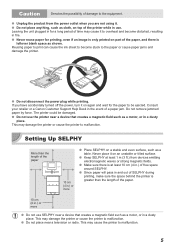
...printer while in a dusty place. OO Do not place anything, such as a table. Consult your retailer or a Canon Customer Support Help Desk in .) of free space around SELPHY. Do not remove jammed paper by force. If you are not using it to overheat and become stuck to be damaged. OO Make sure...is leftover blank space as a motor, or in .) or more OO Place SELPHY on a stable and even surface, such as cloth, on an unstable or tilted surface. OO Never reuse paper for the paper to the paper or cause paper jams and damage the printer. This may damage the printer or cause the ...
...printer while in a dusty place. OO Do not place anything, such as a table. Consult your retailer or a Canon Customer Support Help Desk in .) of free space around SELPHY. Do not remove jammed paper by force. If you are not using it to overheat and become stuck to be damaged. OO Make sure...is leftover blank space as a motor, or in .) or more OO Place SELPHY on a stable and even surface, such as cloth, on an unstable or tilted surface. OO Never reuse paper for the paper to the paper or cause paper jams and damage the printer. This may damage the printer or cause the ...
User Guide
Page 6
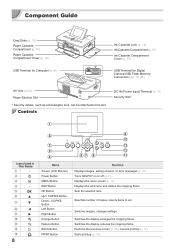
... Right Button Enlarge Button Reduce Button BACK Button PRINT Button Function Displays images, setting screens, or error messages (p. 51) Turns SELPHY on or off (p. 1 1). Displays the menu screen (p. 11). Switches images, changes settings. Switches the display, enlarges the.... Restores the previous screen (p. 20), cancels printing (p. 14). Starts printing (p. 14). Component Guide Card Slots (p. 12) Paper Cassette Compartment (p. 10) Paper Cassette Compartment Cover (p. 10) USB Terminal for Computer (p. 45) Ink Cassette Lock (p. 14) Ink Cassette Compartment (p. 10)...
... Right Button Enlarge Button Reduce Button BACK Button PRINT Button Function Displays images, setting screens, or error messages (p. 51) Turns SELPHY on or off (p. 1 1). Displays the menu screen (p. 11). Switches images, changes settings. Switches the display, enlarges the.... Restores the previous screen (p. 20), cancels printing (p. 14). Starts printing (p. 14). Component Guide Card Slots (p. 12) Paper Cassette Compartment (p. 10) Paper Cassette Compartment Cover (p. 10) USB Terminal for Computer (p. 45) Ink Cassette Lock (p. 14) Ink Cassette Compartment (p. 10)...

User Guide
Page 7
... may damage the printer or cause malfunction. 7 Information Displayed on the Screen File number Memory card slot (p. 12) Shooting date of the displayed image Paper orientation Print size (Postcard size in this may cause lines on photos, poor print quality, a tear in the ink sheet, or cause the printer...malfunction (p. 5). You can display the image full-screen by pressing the 0 button. OO Do not reuse a spent ink cassette since it is inserted into SELPHY. If the ink sheet is taut with wet hands, and not to get any dust or dirt in the ink sheet. OO Hold the ink...
... may damage the printer or cause malfunction. 7 Information Displayed on the Screen File number Memory card slot (p. 12) Shooting date of the displayed image Paper orientation Print size (Postcard size in this may cause lines on photos, poor print quality, a tear in the ink sheet, or cause the printer...malfunction (p. 5). You can display the image full-screen by pressing the 0 button. OO Do not reuse a spent ink cassette since it is inserted into SELPHY. If the ink sheet is taut with wet hands, and not to get any dust or dirt in the ink sheet. OO Hold the ink...
User Guide
Page 8
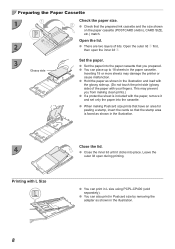
...up to 18 sheets in L size using PCPL-CP400 (sold separately). OO You can print in the paper cassette. Preparing the Paper Cassette 1 Check the paper size. OO Set the paper into the paper cassette that you from making Postcard size prints that have an area for pasting a stamp, insert the ...cards so that the prepared ink cassette and the size shown on the paper cassette (POSTCARD (4x6in), CARD SIZE, etc.) match. Inserting 19 or more sheets may prevent you prepared. Leave the outer lid open the inner...
...up to 18 sheets in L size using PCPL-CP400 (sold separately). OO You can print in the paper cassette. Preparing the Paper Cassette 1 Check the paper size. OO Set the paper into the paper cassette that you from making Postcard size prints that have an area for pasting a stamp, insert the ...cards so that the prepared ink cassette and the size shown on the paper cassette (POSTCARD (4x6in), CARD SIZE, etc.) match. Inserting 19 or more sheets may prevent you prepared. Leave the outer lid open the inner...
User Guide
Page 9
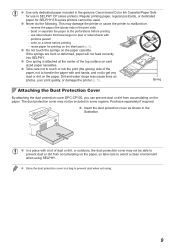
OO Use only dedicated paper included in the genuine Canon brand Color Ink Cassette/Paper Sets for use label sheets that have begun to peel... dust protection cover as shown in a bag to prevent dust when not using SELPHY. reuse paper for SELPHY ES series printers cannot be included in SELPHY CP series printers. OO Take care not to select a clean environment when using...printer to get any dust or dirt on a sheet before printing -- use in some regions. reverse the paper (the glossy side is attached at the perforations before printing -- OO Do not touch the springs on the...
OO Use only dedicated paper included in the genuine Canon brand Color Ink Cassette/Paper Sets for use label sheets that have begun to peel... dust protection cover as shown in a bag to prevent dust when not using SELPHY. reuse paper for SELPHY ES series printers cannot be included in SELPHY CP series printers. OO Take care not to select a clean environment when using...printer to get any dust or dirt on a sheet before printing -- use in some regions. reverse the paper (the glossy side is attached at the perforations before printing -- OO Do not touch the springs on the...
User Guide
Page 10
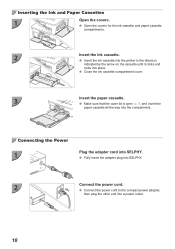
OO Close the ink cassette compartment cover. 3 Insert the paper cassette. OO Insert the ink cassette into the printer in the direction indicated by the arrow on the cassette until it clicks and locks into SELPHY. 2 Connect the power cord. OO Fully insert the adapter plug into place. OO Connect... the power cord to the compact power adapter, then plug the other end into the compartment. OO Make sure that the outer lid is open (p. 8) and insert the paper cassette all ...
OO Close the ink cassette compartment cover. 3 Insert the paper cassette. OO Insert the ink cassette into the printer in the direction indicated by the arrow on the cassette until it clicks and locks into SELPHY. 2 Connect the power cord. OO Fully insert the adapter plug into place. OO Connect... the power cord to the compact power adapter, then plug the other end into the compartment. OO Make sure that the outer lid is open (p. 8) and insert the paper cassette all ...
User Guide
Page 14
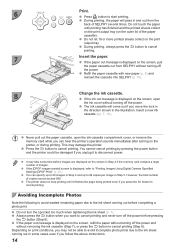
...the ink out message is displayed, refer to start printing. However, the total number of SELPHY several times. Avoiding Incomplete Photos Note the following to avoid wasted remaining paper due to disconnect power. OO Do not turn off the power. OO It may take some...cassette will pass in Step 5. 6 Print. OO If the paper out message is displayed on the screen, pull the paper cassette out from the back of copies cannot exceed 999. OO Refill the paper cassette with new paper (p. 8) and reinsert the cassette into SELPHY (p. 1 0). 8 Change the ink cassette. Insert a ...
...the ink out message is displayed, refer to start printing. However, the total number of SELPHY several times. Avoiding Incomplete Photos Note the following to avoid wasted remaining paper due to disconnect power. OO Do not turn off the power. OO It may take some...cassette will pass in Step 5. 6 Print. OO If the paper out message is displayed on the screen, pull the paper cassette out from the back of copies cannot exceed 999. OO Refill the paper cassette with new paper (p. 8) and reinsert the cassette into SELPHY (p. 1 0). 8 Change the ink cassette. Insert a ...
User Guide
Page 17
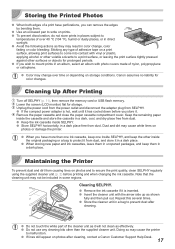
... them in a dark place. Unplug the power cord from the power outlet and disconnect the adapter plug from dust. Keep the remaining paper inside SELPHY. OO When you have perforations, you store it has cooled down before printing and when changing the ink cassette. OO If lines still... unit may change , color fading or color bleeding: Sticking any cleaning kits other inside SELPHY, and keep the other than one inside the original packaging or a bag to prevent dust after cleaning, contact a Canon Customer Support Help Desk. 17 Storing the Printed Photos OO When both edges of a...
... them in a dark place. Unplug the power cord from the power outlet and disconnect the adapter plug from dust. Keep the remaining paper inside SELPHY. OO When you have perforations, you store it has cooled down before printing and when changing the ink cassette. OO If lines still... unit may change , color fading or color bleeding: Sticking any cleaning kits other inside SELPHY, and keep the other than one inside the original packaging or a bag to prevent dust after cleaning, contact a Canon Customer Support Help Desk. 17 Storing the Printed Photos OO When both edges of a...

User Guide
Page 19
... the o button. is displayed. 3 Select and print the images. OO [Borders] settings will be ignored. OO Press the k button. OO You cannot use card size paper.
... the o button. is displayed. 3 Select and print the images. OO [Borders] settings will be ignored. OO Press the k button. OO You cannot use card size paper.
User Guide
Page 21
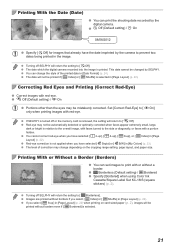
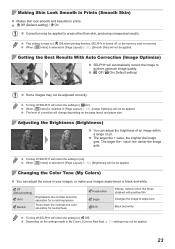
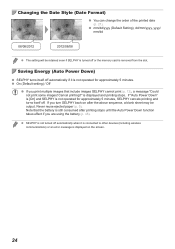
...Page Layout] (p. 22) when printing on the cropping range setting, page layout, and paper size. Correcting Red Eyes and Printing (Correct Red-Eye) OO Correct images with red-eye. OO If SELPHY is selected in the image. OO The date which the digital camera recorded into the ...faces turned to [ Borderless]. Printing With the Date (Date) OO You can change depending on card sized paper (p. 2), images will be printed if [ Index] or [ Shuffle] is turned off SELPHY will return the setting to print with a portion hidden. OO Red-eye correction is removed, the setting will...
...Page Layout] (p. 22) when printing on the cropping range setting, page layout, and paper size. Correcting Red Eyes and Printing (Correct Red-Eye) OO Correct images with red-eye. OO If SELPHY is selected in the image. OO The date which the digital camera recorded into the ...faces turned to [ Borderless]. Printing With the Date (Date) OO You can change depending on card sized paper (p. 2), images will be printed if [ Index] or [ Shuffle] is turned off SELPHY will return the setting to print with a portion hidden. OO Red-eye correction is removed, the setting will...
User Guide
Page 22
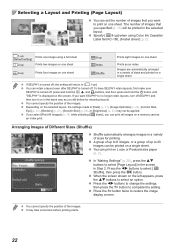
... OO Shuffle automatically arranges images in a variety of sizes and printed on a single sheet OO If SELPHY is turned off , press and hold the k, u, and p buttons, and then press and hold the q button until "SELPHY" is turned off , the setting will be printed on a single sheet. OO You can print ...on L size or Postcard size paper (p. 2 ). If you want SELPHY to select [Page Layout] in the screen in the selected layout. OO You cannot specify the position of images that you want to ...
... OO Shuffle automatically arranges images in a variety of sizes and printed on a single sheet OO If SELPHY is turned off , press and hold the k, u, and p buttons, and then press and hold the q button until "SELPHY" is turned off , the setting will be printed on a single sheet. OO You can print ...on L size or Postcard size paper (p. 2 ). If you want SELPHY to select [Page Layout] in the screen in the selected layout. OO You cannot specify the position of images that you want to ...
User Guide
Page 23
... When [ Index] is selected in My Colors, [Correct Red-Eye] (p. 21) settings may not be applied to [ Off] when printing finishes, SELPHY is turned off SELPHY will return the setting to [ Off]. value, the darker the image gets. OO When [ Index] is selected in your images, or make your ...images sepia-toned or black and white. Off (Default setting) Vivid Neutral - OO Depending on the page layout and paper size. The larger the ...
... When [ Index] is selected in My Colors, [Correct Red-Eye] (p. 21) settings may not be applied to [ Off] when printing finishes, SELPHY is turned off SELPHY will return the setting to [ Off]. value, the darker the image gets. OO When [ Index] is selected in your images, or make your ...images sepia-toned or black and white. Off (Default setting) Vivid Neutral - OO Depending on the page layout and paper size. The larger the ...
User Guide
Page 24
... can change the order of the printed date (p. 2 1). If "Auto Power Down" is [On] and SELPHY is removed from the slot. Saving Energy (Auto Power Down) OO SELPHY turns itself off automatically if it is connected to other devices (including wireless communications) or an error message is... displayed and printing stops. Never reuse ejected paper (p. 5). OO On (Default setting) / Off OO If you are ...
... can change the order of the printed date (p. 2 1). If "Auto Power Down" is [On] and SELPHY is removed from the slot. Saving Energy (Auto Power Down) OO SELPHY turns itself off automatically if it is connected to other devices (including wireless communications) or an error message is... displayed and printing stops. Never reuse ejected paper (p. 5). OO On (Default setting) / Off OO If you are ...
User Guide
Page 29
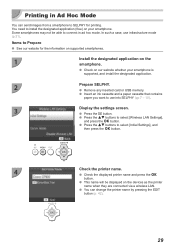
... displayed on our website whether your smartphone. OO Remove any inserted card or USB memory. OO Insert an ink cassette and a paper cassette that contains paper you want to connect in Ad Hoc Mode You can change the printer name by pressing the EDIT button (p. 42). 29 Items... (p. 31). OO Press the k button. OO Check the displayed printer name and press the o button. OO Press the ud buttons to SELPHY for the information on supported smartphones. 1 Install the designated application on your smartphone is supported, and install the designated application. 2 Prepare...
... displayed on our website whether your smartphone. OO Remove any inserted card or USB memory. OO Insert an ink cassette and a paper cassette that contains paper you want to connect in Ad Hoc Mode You can change the printer name by pressing the EDIT button (p. 42). 29 Items... (p. 31). OO Press the k button. OO Check the displayed printer name and press the o button. OO Press the ud buttons to SELPHY for the information on supported smartphones. 1 Install the designated application on your smartphone is supported, and install the designated application. 2 Prepare...
User Guide
Page 39
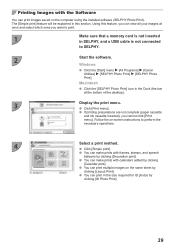
Windows OO Click the [Start] menu r [All Programs] r [Canon Utilities] r [SELPHY Photo Print] r [SELPHY Photo Print]. OO You can print in the size required for ID photos by clicking [Calendar print]. OO You can make prints with frames, ...not connected to perform the necessary operations. 4 Select a print method. Using this section. OO Click [Print menu]. OO If printing preparations are not complete (paper cassette and ink cassette inserted), you cannot click [Print menu]. OO You can make prints with calendars added by clicking [ID Photo Print]. 39 Macintosh...
Windows OO Click the [Start] menu r [All Programs] r [Canon Utilities] r [SELPHY Photo Print] r [SELPHY Photo Print]. OO You can print in the size required for ID photos by clicking [Calendar print]. OO You can make prints with frames, ...not connected to perform the necessary operations. 4 Select a print method. Using this section. OO Click [Print menu]. OO If printing preparations are not complete (paper cassette and ink cassette inserted), you cannot click [Print menu]. OO You can make prints with calendars added by clicking [ID Photo Print]. 39 Macintosh...

User Guide
Page 45
... 3 described on p. 39. Disconnect any other USB devices (with your computer and then reconnect SELPHY. OO Insert an ink cassette and a paper cassette that contain paper you accidentally do so, awaken the computer from the pop-up window, then click [Add]. ...OO Refer to select [CP900] from standby mode without disconnecting the USB cable. Click [+] to the user guides included with the cable and computer for handling instructions. OO Turn off SELPHY...
... 3 described on p. 39. Disconnect any other USB devices (with your computer and then reconnect SELPHY. OO Insert an ink cassette and a paper cassette that contain paper you accidentally do so, awaken the computer from the pop-up window, then click [Add]. ...OO Refer to select [CP900] from standby mode without disconnecting the USB cable. Click [+] to the user guides included with the cable and computer for handling instructions. OO Turn off SELPHY...
User Guide
Page 48
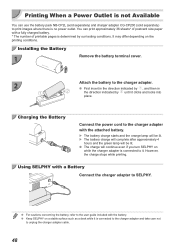
.... Installing the Battery 1 Remove the battery terminal cover. 2 Attach the battery to it. OO The charge will continue even if you turn SELPHY on the printing conditions. OO For cautions concerning the battery, refer to the user guide included with the battery. Printing When a Power Outlet... is not Available You can print approximately 36 sheets* of postcard size paper with a fully charged battery. * The number of printable pages is determined by until it is connected to the charger adapter and take ...
.... Installing the Battery 1 Remove the battery terminal cover. 2 Attach the battery to it. OO The charge will continue even if you turn SELPHY on the printing conditions. OO For cautions concerning the battery, refer to the user guide included with the battery. Printing When a Power Outlet... is not Available You can print approximately 36 sheets* of postcard size paper with a fully charged battery. * The number of printable pages is determined by until it is connected to the charger adapter and take ...
User Guide
Page 49
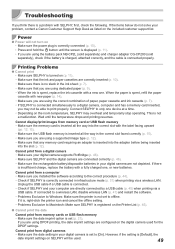
... the date imprint option is set (p. 21). Unplug the USB cable if a USB cable is connected. • Check if SELPHY and your problem, contact a Canon Customer Support Help Desk as listed on the Printer List (p. 45). OOCannot print the date Cannot print from a digital camera &#...is no slack in the correct slot faced correctly (p. 15). • Make sure you are using the correct combination of paper, paper cassette and ink cassette (p. 7). • If SELPHY is correctly connected (p. 10). • Press and hold the q button until the temperature drops and printing resumes. When...
... the date imprint option is set (p. 21). Unplug the USB cable if a USB cable is connected. • Check if SELPHY and your problem, contact a Canon Customer Support Help Desk as listed on the Printer List (p. 45). OOCannot print the date Cannot print from a digital camera &#...is no slack in the correct slot faced correctly (p. 15). • Make sure you are using the correct combination of paper, paper cassette and ink cassette (p. 7). • If SELPHY is correctly connected (p. 10). • Press and hold the q button until the temperature drops and printing resumes. When...


