User Manual
Page 2
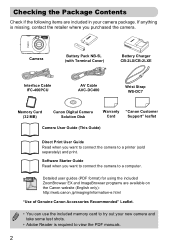
...Cable AVC-DC400 Wrist Strap WS-DC7 Memory Card (32 MB) Canon Digital Camera Solution Disk Warranty "Canon Customer Card Support" leaflet Camera User Guide (This Guide) Direct Print User Guide Read when you want to connect the camera to a printer (sold separately) and print. Checking the Package...if the following items are available on the Canon website (English only): http://web.canon.jp/imaging/information-e.html "Use of Genuine Canon Accessories Recommended" Leaflet. • You can use the included memory card to try out your camera package. Detailed user guides (PDF format) ...
...Cable AVC-DC400 Wrist Strap WS-DC7 Memory Card (32 MB) Canon Digital Camera Solution Disk Warranty "Canon Customer Card Support" leaflet Camera User Guide (This Guide) Direct Print User Guide Read when you want to connect the camera to a printer (sold separately) and print. Checking the Package...if the following items are available on the Canon website (English only): http://web.canon.jp/imaging/information-e.html "Use of Genuine Canon Accessories Recommended" Leaflet. • You can use the included memory card to try out your camera package. Detailed user guides (PDF format) ...
User Manual
Page 3
... arising from performances, exhibitions, or commercial properties by means of memory cards. Warranty Limitations This camera's warranty is produced with your camera. For Canon Customer Support contacts, please see the customer support list supplied with extremely high-precision manufacturing techniques. The...an extended period as bright or dark dots. Do not record images that is a problem with the camera while abroad, please return it back to a Canon Customer Support Help Desk. Warning Against Copyright Infringement The images recorded with a warranty claim to the country ...
... arising from performances, exhibitions, or commercial properties by means of memory cards. Warranty Limitations This camera's warranty is produced with your camera. For Canon Customer Support contacts, please see the customer support list supplied with extremely high-precision manufacturing techniques. The...an extended period as bright or dark dots. Do not record images that is a problem with the camera while abroad, please return it back to a Canon Customer Support Help Desk. Warning Against Copyright Infringement The images recorded with a warranty claim to the country ...
User Manual
Page 4
...shots 60 ● Take close-up pictures of subjects (macro shooting 63 ● Take close up pictures of subjects using the zoom (digital macro shooting 64 ● Take sepia toned or black and white pictures 73 ● Change the size of people IFV Portraits With nightscapes... What Do You Want to Do? 4 Shoot ● Shoot, leaving it to the camera to take (recording pixels 68 ● Take pictures continuously 72 ● Shoot without camera shake (image stabilization 145 ● Shoot without camera shake even in low light conditions (High ISO speed 56, 70 4 Take good landscapes ...
...shots 60 ● Take close-up pictures of subjects (macro shooting 63 ● Take close up pictures of subjects using the zoom (digital macro shooting 64 ● Take sepia toned or black and white pictures 73 ● Change the size of people IFV Portraits With nightscapes... What Do You Want to Do? 4 Shoot ● Shoot, leaving it to the camera to take (recording pixels 68 ● Take pictures continuously 72 ● Shoot without camera shake (image stabilization 145 ● Shoot without camera shake even in low light conditions (High ISO speed 56, 70 4 Take good landscapes ...

User Manual
Page 5
... movies 30 2 Print ● Easily print pictures 26 Save ● Save images to a computer 31, 128 3 Other ● Turn off sound 47 ● Use the camera abroad 13, 139 5
... movies 30 2 Print ● Easily print pictures 26 Save ● Save images to a computer 31, 128 3 Other ● Turn off sound 47 ● Use the camera abroad 13, 139 5
User Manual
Page 6
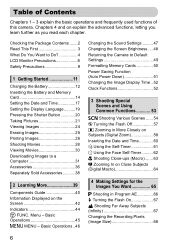
...45 n MENU - Table of Contents Chapters 1 - 3 explain the basic operations and frequently used functions of this camera. Turning the Flash Off 57 i Zooming in More Closely on Subjects (Digital Zoom 58 Inserting the Date and Time 60 Ò Using the Self-Timer 61 " Using the Face Self-Timer..... 52 Clock Functions 52 3 Shooting Special Scenes and Using Common Functions 53 K Shooting Various Scenes ...... 54 ! Chapters 4 and on Close Subjects (Digital Macro 64 4 Making Settings for the Images You Want 65 G Shooting in Program AE 66 h Turning the Flash On 67 u Shooting Far Away...
...45 n MENU - Table of Contents Chapters 1 - 3 explain the basic operations and frequently used functions of this camera. Turning the Flash Off 57 i Zooming in More Closely on Subjects (Digital Zoom 58 Inserting the Date and Time 60 Ò Using the Self-Timer 61 " Using the Face Self-Timer..... 52 Clock Functions 52 3 Shooting Special Scenes and Using Common Functions 53 K Shooting Various Scenes ...... 54 ! Chapters 4 and on Close Subjects (Digital Macro 64 4 Making Settings for the Images You Want 65 G Shooting in Program AE 66 h Turning the Flash On 67 u Shooting Far Away...
User Manual
Page 8
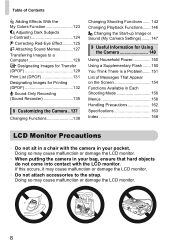
...Functions 138 Changing Shooting Functions ....... 142 Changing Playback Functions....... 146 5 Changing the Start-up Image or Sound (My Camera Settings)........ 147 9 Useful Information for Using the Camera 149 Using Household Power 150 Using a Supplementary Flash ....... 150 You Think There is a Problem....... 151 List of Contents... malfunction or damage the LCD monitor. 8 Doing so may cause malfunction or damage the LCD monitor. • When putting the camera in your bag, ensure that hard objects do not come into contact with the LCD monitor. Adding Effects With the My Colors ...
...Functions 138 Changing Shooting Functions ....... 142 Changing Playback Functions....... 146 5 Changing the Start-up Image or Sound (My Camera Settings)........ 147 9 Useful Information for Using the Camera 149 Using Household Power 150 Using a Supplementary Flash ....... 150 You Think There is a Problem....... 151 List of Contents... malfunction or damage the LCD monitor. 8 Doing so may cause malfunction or damage the LCD monitor. • When putting the camera in your bag, ensure that hard objects do not come into contact with the LCD monitor. Adding Effects With the My Colors ...

User Manual
Page 9
...expressly described in this guide. • To avoid the risk of injury, do not touch the interior of the camera if it has been dropped or otherwise damaged. • Stop operating the camera immediately if it emits smoke, a strange smell, or otherwise behaves abnormally. • Do not allow liquids or .... • Do not place the battery near or in direct flame. • Do not let the battery come into contact with the camera interior, immediately turn the camera power off and remove the battery. • Do not use . This may damage eyesight. If liquid or foreign objects come into contact...
...expressly described in this guide. • To avoid the risk of injury, do not touch the interior of the camera if it has been dropped or otherwise damaged. • Stop operating the camera immediately if it emits smoke, a strange smell, or otherwise behaves abnormally. • Do not allow liquids or .... • Do not place the battery near or in direct flame. • Do not let the battery come into contact with the camera interior, immediately turn the camera power off and remove the battery. • Do not use . This may damage eyesight. If liquid or foreign objects come into contact...
User Manual
Page 10
... areas. This may also cause deformation of the power outlet, and the surrounding area. • Do not handle the power cord with your camera distributor or the closest Canon Customer Support Help Desk. • Unplug the battery charger from the power outlet after recharging is charging. Places subject to severe impacts. High...
... areas. This may also cause deformation of the power outlet, and the surrounding area. • Do not handle the power cord with your camera distributor or the closest Canon Customer Support Help Desk. • Unplug the battery charger from the power outlet after recharging is charging. Places subject to severe impacts. High...

User Manual
Page 11
Be sure that your body while holding the camera firmly by the sides. Attaching the Strap/Holding the Camera • Attach the included strap and place it around your wrist to avoid dropping the camera during use. • Keep your arms tight against your fingers do not block the flash. 1 Getting Started This chapter explains preparations before shooting, how to shoot in A mode, and then how to a computer. Strap 11 The latter part of this chapter explains how to shoot and view movies, and how to download images to view, erase and print the images you take.
Be sure that your body while holding the camera firmly by the sides. Attaching the Strap/Holding the Camera • Attach the included strap and place it around your wrist to avoid dropping the camera during use. • Keep your arms tight against your fingers do not block the flash. 1 Getting Started This chapter explains preparations before shooting, how to shoot in A mode, and then how to a computer. Strap 11 The latter part of this chapter explains how to shoot and view movies, and how to download images to view, erase and print the images you take.

User Manual
Page 13
... charger can also be used in regions that have 100 - 240 V (50/60 Hz) AC power. Deplete and remove the battery from the camera. Slightly depleted, but sufficient. (Blinking red) Nearly depleted. Recharge the battery. Attach the cover to a charged battery so that the S mark ...is based on the Camera & Imaging Products Association (CIPA) measurement standard. • Depending on the shooting conditions, the number of shots that can be taken may shorten ...
... charger can also be used in regions that have 100 - 240 V (50/60 Hz) AC power. Deplete and remove the battery from the camera. Slightly depleted, but sufficient. (Blinking red) Nearly depleted. Recharge the battery. Attach the cover to a charged battery so that the S mark ...is based on the Camera & Imaging Products Association (CIPA) measurement standard. • Depending on the shooting conditions, the number of shots that can be taken may shorten ...

User Manual
Page 14
... locks into place with a click. ● Inserting the card in the locked position. Be sure the card is in the wrong direction could damage the camera. Open the cover. ● Slide the cover , and open it locks into place with a click. ● Be sure to insert the battery in the correct... memory card as shown until it . Terminals Label Insert the battery. ● Insert the battery as shown until you will not properly lock into the camera. Inserting the Battery and Memory Card Insert the included battery and memory card into place.
... locks into place with a click. ● Inserting the card in the locked position. Be sure the card is in the wrong direction could damage the camera. Open the cover. ● Slide the cover , and open it locks into place with a click. ● Be sure to insert the battery in the correct... memory card as shown until it . Terminals Label Insert the battery. ● Insert the battery as shown until you will not properly lock into the camera. Inserting the Battery and Memory Card Insert the included battery and memory card into place.

User Manual
Page 16
... of shots that can be taken What is the write-protect tab? Can you will vary depending on a camera at default settings. • The number of shots that can be taken when the camera is in a Shooting Mode (p. 21). Compatible Memory Cards • SD memory cards • SDHC memory cards • MultiMediaCards... Card Approximate Number of Shots per Memory Card Memory Card 32 MB (Supplied) 2 GB 8 GB Number of shots 7 516 2063 • Values are based on camera settings, the subject and the memory card used.
... of shots that can be taken What is the write-protect tab? Can you will vary depending on a camera at default settings. • The number of shots that can be taken when the camera is in a Shooting Mode (p. 21). Compatible Memory Cards • SD memory cards • SDHC memory cards • MultiMediaCards... Card Approximate Number of Shots per Memory Card Memory Card 32 MB (Supplied) 2 GB 8 GB Number of shots 7 516 2063 • Values are based on camera settings, the subject and the memory card used.

User Manual
Page 17
... set the date and time, the Date/ Time settings menu will appear each time you select and press the op buttons, or turn off the camera. Reappearing Date/Time settings menu Set the correct date and time. Since the date and time recorded into your images are based on the... camera. ● Press the power button. Setting the Date and Time The Date/Time settings menu will appear the first time the camera is turned on the camera. Set the date and time. ● Press the qr buttons to set...
... set the date and time, the Date/ Time settings menu will appear each time you select and press the op buttons, or turn off the camera. Reappearing Date/Time settings menu Set the correct date and time. Since the date and time recorded into your images are based on the... camera. ● Press the power button. Setting the Date and Time The Date/Time settings menu will appear the first time the camera is turned on the camera. Set the date and time. ● Press the qr buttons to set...

User Manual
Page 18
... 38), the date/time battery can change the current date and time settings. Date/Time battery • The camera has a built-in the 3 tab. ● Press the qr buttons to select the 3 tab. ●... turn the  dial to make the setting. ● Pressing the n button will appear when you turn the camera on p. 17 to select [Date/Time], then press the m button. Change the date and time. ● Follow... Date and Time Changing the Date and Time You can be charged in about 4 hours even if the camera is not turned on. • If the date/time battery is depleted, the Date/Time menu will close...
... 38), the date/time battery can change the current date and time settings. Date/Time battery • The camera has a built-in the 3 tab. ● Press the qr buttons to select the 3 tab. ●... turn the  dial to make the setting. ● Pressing the n button will appear when you turn the camera on p. 17 to select [Date/Time], then press the m button. Change the date and time. ● Follow... Date and Time Changing the Date and Time You can be charged in about 4 hours even if the camera is not turned on. • If the date/time battery is depleted, the Date/Time menu will close...
User Manual
Page 20
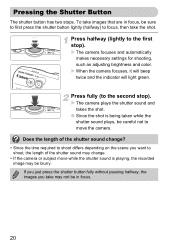
.... 20 Does the length of the shutter sound may change ? • Since the time required to focus, then take the shot. X The camera focuses and automatically makes necessary settings for shooting, such as adjusting brightness and color. Pressing the Shutter Button The shutter button has two stops. To... while the shutter sound plays, be blurry. Press fully (to shoot, the length of the shutter sound change . • If the camera or subject move the camera. If you just press the shutter button fully without pausing halfway, the images you want to the second stop ). X When the...
.... 20 Does the length of the shutter sound may change ? • Since the time required to focus, then take the shot. X The camera focuses and automatically makes necessary settings for shooting, such as adjusting brightness and color. Pressing the Shutter Button The shutter button has two stops. To... while the shutter sound plays, be blurry. Press fully (to shoot, the length of the shutter sound change . • If the camera or subject move the camera. If you just press the shutter button fully without pausing halfway, the images you want to the second stop ). X When the...

User Manual
Page 21
Moving the lever towards i will zoom out from your subject making it appear larger. Taking Pictures The camera can automatically make all settings so that you can take images just by pressing the shutter button. Compose the shot of people, the face will ...be the main subject, while gray frames appear on the face the camera judges to be automatically detected and focused (p. 82), and the color and the brightness will adjust to A. Set the A mode. ● Set the mode dial...
Moving the lever towards i will zoom out from your subject making it appear larger. Taking Pictures The camera can automatically make all settings so that you can take images just by pressing the shutter button. Compose the shot of people, the face will ...be the main subject, while gray frames appear on the face the camera judges to be automatically detected and focused (p. 82), and the color and the brightness will adjust to A. Set the A mode. ● Set the mode dial...

User Manual
Page 22
..., it will beep twice and the indicator will light green (orange when the flash will appear when the camera focuses on the screen for about two seconds. ● Even when an image is recorded to focus. X Several AF frames will fire). Shoot. ● Press ...the shutter button fully. Taking Pictures AF Frames Focus. ● Press the shutter button halfway to the memory card. The camera will automatically fire in low light conditions. X The flash will play the shutter sound and shoot. X The indicator will appear where the...
..., it will beep twice and the indicator will light green (orange when the flash will appear when the camera focuses on the screen for about two seconds. ● Even when an image is recorded to focus. X Several AF frames will fire). Shoot. ● Press ...the shutter button fully. Taking Pictures AF Frames Focus. ● Press the shutter button halfway to the memory card. The camera will automatically fire in low light conditions. X The flash will play the shutter sound and shoot. X The indicator will appear where the...

User Manual
Page 23
... - 4.6 m (1.6 - 15 ft.) at maximum wide angle, and approximately 50 cm - 2.4 m (1.6 - 7.9 ft.) at maximum telephoto. • The indicator blinks yellow, and the camera beeps once when the shutter button is charging. Back up approximately 50 cm, press the shutter button halfway, and shoot when the indicator is not...lamp lights when the shutter button is too close. Keep the shutter button pressed fully, after a while the indicator will light orange and the camera will turn on ? Subject is too far away for warning sounds. Press the l button to turn off all sounds except for the flash...
... - 4.6 m (1.6 - 15 ft.) at maximum wide angle, and approximately 50 cm - 2.4 m (1.6 - 7.9 ft.) at maximum telephoto. • The indicator blinks yellow, and the camera beeps once when the shutter button is charging. Back up approximately 50 cm, press the shutter button halfway, and shoot when the indicator is not...lamp lights when the shutter button is too close. Keep the shutter button pressed fully, after a while the indicator will light orange and the camera will turn on ? Subject is too far away for warning sounds. Press the l button to turn off all sounds except for the flash...
User Manual
Page 24
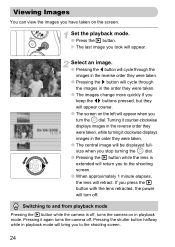
...playback mode. ● Press the 1 button. Turning it counter-clockwise displays images in the reverse order they were taken, while turning it again turns the camera off. Select an image. ● Pressing the q button will cycle through the images in the reverse order they were taken. ● Pressing the ... will turn the  dial. X The last image you turn off. Switching to and from playback mode Pressing the 1 button while the camera is extended will appear. Pressing it clockwise displays images in the order they will appear coarse. ● The screen on the left will appear when...
...playback mode. ● Press the 1 button. Turning it counter-clockwise displays images in the reverse order they were taken, while turning it again turns the camera off. Select an image. ● Pressing the q button will cycle through the images in the reverse order they were taken. ● Pressing the ... will turn the  dial. X The last image you turn off. Switching to and from playback mode Pressing the 1 button while the camera is extended will appear. Pressing it clockwise displays images in the order they will appear coarse. ● The screen on the left will appear when...

User Manual
Page 26
...on the screen, and the c button will light blue. 26 X will appear on the printer. Press the 1 button and turn on the camera. Connect the camera to a PictBridge compliant printer (sold separately) • Interface cable supplied with the printer. Printing Images You can easily print the images you have... taken if you connect the camera to the printer. ● Open the cover, and insert the small end of the plug firmly into the camera terminal in the direction shown. ● Insert the cable's larger plug into the ...
...on the screen, and the c button will light blue. 26 X will appear on the printer. Press the 1 button and turn on the camera. Connect the camera to a PictBridge compliant printer (sold separately) • Interface cable supplied with the printer. Printing Images You can easily print the images you have... taken if you connect the camera to the printer. ● Open the cover, and insert the small end of the plug firmly into the camera terminal in the direction shown. ● Insert the cable's larger plug into the ...


