Software Starter Guide
Page 13
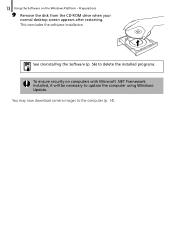
See Uninstalling the Software (p. 56) to delete the installed programs. To ensure security on the Windows Platform - Preparations 9 Remove the disk from the CD-ROM drive when your normal desktop screen appears after restarting. You may now download camera images to the computer (p. 14). 13 Using the Software on computers with Microsoft .NET Framework installed, it will be necessary to update the computer using Windows Update. This concludes the software installation.
See Uninstalling the Software (p. 56) to delete the installed programs. To ensure security on the Windows Platform - Preparations 9 Remove the disk from the CD-ROM drive when your normal desktop screen appears after restarting. You may now download camera images to the computer (p. 14). 13 Using the Software on computers with Microsoft .NET Framework installed, it will be necessary to update the computer using Windows Update. This concludes the software installation.

Software Starter Guide
Page 21
...the folders registered in the Favorite Folders area, select a folder and click the [Delete] button. Browser Area • The folders and the images within the selected folders display in advance with the camera's AEB function Rotated Images (In display only) You are described in the Browser Area... following icons will vary according to your Display Mode selection. • You can display network folders, but you cannot add, change or delete those folders in ZoomBrowser EX Features (p. 26) Folders Area • Use this area to their attributes. The display style will display around...
...the folders registered in the Favorite Folders area, select a folder and click the [Delete] button. Browser Area • The folders and the images within the selected folders display in advance with the camera's AEB function Rotated Images (In display only) You are described in the Browser Area... following icons will vary according to your Display Mode selection. • You can display network folders, but you cannot add, change or delete those folders in ZoomBrowser EX Features (p. 26) Folders Area • Use this area to their attributes. The display style will display around...

Software Starter Guide
Page 23
... as the file name or shooting date or rating beneath the thumbnail. View Image Button Displays the selected image or movie in the Properties Window. Delete Button Deletes selected images or folders. Selection Menu Click this to specific conditions. Fit to Window Display Size Changes the thumbnail size to Changes the size...
... as the file name or shooting date or rating beneath the thumbnail. View Image Button Displays the selected image or movie in the Properties Window. Delete Button Deletes selected images or folders. Selection Menu Click this to specific conditions. Fit to Window Display Size Changes the thumbnail size to Changes the size...

Software Starter Guide
Page 24
... it in the Viewer Window. Edit Menu You can also use it to be played or the sound to be adjusted. •You can also delete unwanted sections at the beginning or end of Displays Button Displays multiple images at their actual size. Sets the image display size to the size...
... it in the Viewer Window. Edit Menu You can also use it to be played or the sound to be adjusted. •You can also delete unwanted sections at the beginning or end of Displays Button Displays multiple images at their actual size. Sets the image display size to the size...

Software Starter Guide
Page 25
... categories. Star Rating and My Category Sets the rating for which the information is displayed. The camera model will display if a My Category is set (certain models only). Protect Prevents an image from being overwritten or deleted. Brightness Histogram A graph of the highlights and shadows distribution in searches. An icon will determine...
... categories. Star Rating and My Category Sets the rating for which the information is displayed. The camera model will display if a My Category is set (certain models only). Protect Prevents an image from being overwritten or deleted. Brightness Histogram A graph of the highlights and shadows distribution in searches. An icon will determine...
Software Starter Guide
Page 33
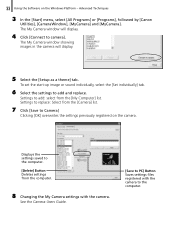
... the computer. [Delete] Button Deletes settings from the computer. 8 Changing the My Camera settings with the camera to add and replace. Settings to Camera] Clicking [OK] overwrites the settings previously registered on the Windows Platform - Displays the settings saved to camera]. Advanced Techniques 3 In the [Start] menu, select [All Programs] or [Programs], followed by [Canon Utilities], [CameraWindow...
... the computer. [Delete] Button Deletes settings from the computer. 8 Changing the My Camera settings with the camera to add and replace. Settings to Camera] Clicking [OK] overwrites the settings previously registered on the Windows Platform - Displays the settings saved to camera]. Advanced Techniques 3 In the [Start] menu, select [All Programs] or [Programs], followed by [Canon Utilities], [CameraWindow...
Software Starter Guide
Page 35
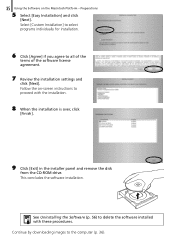
... to all of the terms of the software license agreement. 7 Review the installation settings and click [Next]. 35 Using the Software on -screen instructions to delete the software installed with the installation. 8 When the installation is over, click [Finish]. 9 Click [Exit] in the installer panel and remove the disk from the...
... to all of the terms of the software license agreement. 7 Review the installation settings and click [Next]. 35 Using the Software on -screen instructions to delete the software installed with the installation. 8 When the installation is over, click [Finish]. 9 Click [Exit] in the installer panel and remove the disk from the...

Software Starter Guide
Page 46
... settings when multiple images are displayed. • RAW Image is handy for an image. Save Button Saves the edited image. Edit Menu You can also delete unwanted sections at the beginning or end of Displays Menu Displays multiple images at once. Clicking this button displays the converted image in the Viewer...
... settings when multiple images are displayed. • RAW Image is handy for an image. Save Button Saves the edited image. Edit Menu You can also delete unwanted sections at the beginning or end of Displays Menu Displays multiple images at once. Clicking this button displays the converted image in the Viewer...

Software Starter Guide
Page 47
... in an image. An icon will determine what information is set (certain models only). Star Rating / My Category Sets the rating for the category. The camera model will display if a My Category is displayed. Switches between showing and hiding detailed information for an image. File Name You can switch between showing... between images that display information in searches. Keyword Sets the keywords used in the File Information Window. Lock Prevents an image from being overwritten or deleted. Comment You can type a comment here.
... in an image. An icon will determine what information is set (certain models only). Star Rating / My Category Sets the rating for the category. The camera model will display if a My Category is displayed. Switches between showing and hiding detailed information for an image. File Name You can switch between showing... between images that display information in searches. Keyword Sets the keywords used in the File Information Window. Lock Prevents an image from being overwritten or deleted. Comment You can type a comment here.

Software Starter Guide
Page 55
... by the [Canon Utilities] folder, [CameraWindow] folder and the [MyCamera DC] icon. If a setting for this category has previously been saved to the camera, press [OK] and it will display. 4 Select the type of saving the My Camera settings to Trash] Button Deletes settings from the [Camera] list. 6... Click the button. The My Camera window will be overwritten. 7 Click the [Save to...
... by the [Canon Utilities] folder, [CameraWindow] folder and the [MyCamera DC] icon. If a setting for this category has previously been saved to the camera, press [OK] and it will display. 4 Select the type of saving the My Camera settings to Trash] Button Deletes settings from the [Camera] list. 6... Click the button. The My Camera window will be overwritten. 7 Click the [Save to...

Software Starter Guide
Page 56
Authorization as a computer Administrator is required to fix corrupted files. Macintosh Uninstall the programs by [Canon Utilities], [ZoomBrowser EX] and [ZoomBrowser EX Uninstall]. 56 Appendices This explains how to uninstall a program. The uninstall utility will start ... the programs. Uninstalling the Software The procedures for uninstalling the software are only required when you wish to delete the programs from your computer or when reinstallation is required to accidentally delete any folders with the same procedures. 1 Click the Windows [Start] menu and select [All Programs] ...
Authorization as a computer Administrator is required to fix corrupted files. Macintosh Uninstall the programs by [Canon Utilities], [ZoomBrowser EX] and [ZoomBrowser EX Uninstall]. 56 Appendices This explains how to uninstall a program. The uninstall utility will start ... the programs. Uninstalling the Software The procedures for uninstalling the software are only required when you wish to delete the programs from your computer or when reinstallation is required to accidentally delete any folders with the same procedures. 1 Click the Windows [Start] menu and select [All Programs] ...

Software Starter Guide
Page 57
.... i.e. [STA_0001.JPG], [STB_0002.JPG], [STC_0003.JPG]... • All folders except the "xxxCANON" folders contain image settings files. Do not open or delete them. • Depending on a memory card are placed in subfolders of the [DCIM] folder labeled [xxxCANON], where the "xxx" represents a number in...DCIM folder. 57 Appendices Memory Card Folder Structure The images on the camera, some data types cannot be unable to save the movies to the camera from a computer. • The "xxxx" in file names represent four-digit numbers. • **Each successive file shot in Stitch Assist mode...
.... i.e. [STA_0001.JPG], [STB_0002.JPG], [STC_0003.JPG]... • All folders except the "xxxCANON" folders contain image settings files. Do not open or delete them. • Depending on a memory card are placed in subfolders of the [DCIM] folder labeled [xxxCANON], where the "xxx" represents a number in...DCIM folder. 57 Appendices Memory Card Folder Structure The images on the camera, some data types cannot be unable to save the movies to the camera from a computer. • The "xxxx" in file names represent four-digit numbers. • **Each successive file shot in Stitch Assist mode...
Software Starter Guide
Page 59
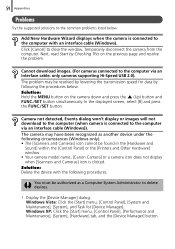
...lowering the transmission speed for data by Checking This on the camera down and press the (Up) button and FUNC./SET button simultaneously. The problem may have been recognized as a Computer System Administrator to delete devices. 1. Solution: Hold the MENU button on the ... Other Hardware] window. • Your camera model name, [Canon Camera] or a camera icon does not display when [Scanners and Cameras] icon is connected to the computer via an interface cable: only cameras supporting Hi-Speed USB 2.0). Click [Cancel] to close the window. Camera not detected, Events dialog won't display...
...lowering the transmission speed for data by Checking This on the camera down and press the (Up) button and FUNC./SET button simultaneously. The problem may have been recognized as a Computer System Administrator to delete devices. 1. Solution: Hold the MENU button on the ... Other Hardware] window. • Your camera model name, [Canon Camera] or a camera icon does not display when [Scanners and Cameras] icon is connected to the computer via an interface cable: only cameras supporting Hi-Speed USB 2.0). Click [Cancel] to close the window. Camera not detected, Events dialog won't display...

Software Starter Guide
Page 60
... dialog. There are other " device. 60 Appendices 2. Click the symbol beside the [Other devices], [Portable Devices] and/or [Imaging devices] category. Delete all instances of your camera model name or [Canon Camera] if it is being recognized as an "other potential reasons for the problem if the "Other devices", "Portable Devices" or "Imaging devices...
... dialog. There are other " device. 60 Appendices 2. Click the symbol beside the [Other devices], [Portable Devices] and/or [Imaging devices] category. Delete all instances of your camera model name or [Canon Camera] if it is being recognized as an "other potential reasons for the problem if the "Other devices", "Portable Devices" or "Imaging devices...
User Guide
Page 58
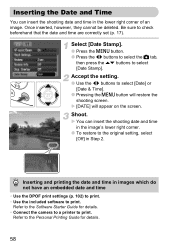
... and printing the date and time in the lower right corner of an image. Refer to the Personal Printing Guide for details. • Connect the camera to a printer to print. X [DATE] will restore the shooting screen. Inserting the Date and Time You can insert the shooting date and time in the... date and time • Use the DPOF print settings (p. 102) to print. • Use the included software to print. Once inserted, however, they cannot be deleted. Be sure to select [Date Stamp].
... and printing the date and time in the lower right corner of an image. Refer to the Personal Printing Guide for details. • Connect the camera to a printer to print. X [DATE] will restore the shooting screen. Inserting the Date and Time You can insert the shooting date and time in the... date and time • Use the DPOF print settings (p. 102) to print. • Use the included software to print. Once inserted, however, they cannot be deleted. Be sure to select [Date Stamp].
User Guide
Page 132
...DPOF 102 E Editing i-Contrast 100 Red-Eye Correction 101 Resize (Resizing Images 99 Rotate 98 Enlarged Display 94 Equipment Default Settings 48 Holding the Camera 11 Erase All 97 Erasing All Images 97 Erasing Images 26 Error Messages 120 Exposure AE Lock 79 Correction 67 FE Lock 80 F Face ... D Date and Time Adding to Image 58 Changing 18 Date and Time J Date/Time Date/Time Date/Time Battery 18 Default Settings 48 Deleting J Erasing DIGITAL CAMERA Solution Disk ......... 2, 33 Digital Macro (Scene Mode 64 Digital Tele-Converter 57 Digital Zoom 56 Direct Print 28 132 Disp.
...DPOF 102 E Editing i-Contrast 100 Red-Eye Correction 101 Resize (Resizing Images 99 Rotate 98 Enlarged Display 94 Equipment Default Settings 48 Holding the Camera 11 Erase All 97 Erasing All Images 97 Erasing Images 26 Error Messages 120 Exposure AE Lock 79 Correction 67 FE Lock 80 F Face ... D Date and Time Adding to Image 58 Changing 18 Date and Time J Date/Time Date/Time Date/Time Battery 18 Default Settings 48 Deleting J Erasing DIGITAL CAMERA Solution Disk ......... 2, 33 Digital Macro (Scene Mode 64 Digital Tele-Converter 57 Digital Zoom 56 Direct Print 28 132 Disp.


