PowerShot S500/410, DIGITAL IXUS 500/430 Quick Start Guide
Page 2
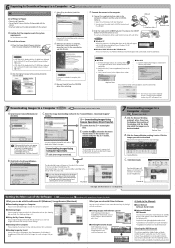
... from the following website. See the Camera User Guide. B. Place the Canon Digital Camera Solution Disk into the DIGITAL terminal and the USB port. C. Open the terminal cover with the installation while reviewing installation settings. Click [Canon Camera] in the [CameraWindow - button lights...does not appear, click the [Start] menu, then select [Programs] or [All Programs], followed by the [Mac OS 9] and [Canon Digital Camera Installer] ( ) icons. Set Auto-Launch] window. You can use the Direct Transfer menu. Click [Download]. c. a. C. All...
... from the following website. See the Camera User Guide. B. Place the Canon Digital Camera Solution Disk into the DIGITAL terminal and the USB port. C. Open the terminal cover with the installation while reviewing installation settings. Click [Canon Camera] in the [CameraWindow - button lights...does not appear, click the [Start] menu, then select [Programs] or [All Programs], followed by the [Mac OS 9] and [Canon Digital Camera Installer] ( ) icons. Set Auto-Launch] window. You can use the Direct Transfer menu. Click [Download]. c. a. C. All...

PowerShot S500/410, DIGITAL IXUS 500/430 Camera User Guide
Page 6
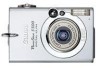
... or Read This First 7 Please Read 7 Safety Precautions 8 Preventing Malfunctions 13 Components Guide 14 Preparing the Camera Charging the Battery Pack 18 Installing the Battery Pack 21 Installing the CF Card 23 Setting the Date and Time 26 Setting the Language ...41 Selecting Menus and Settings 43 Menu Settings and Factory Defaults 47 Resetting Settings to Their Default Values 52 Shooting Shooting in Auto Mode 53 Reviewing an Image Right after Shooting 54 Changing Resolution/Compression Settings 55 Quick Shots 57 Using the Flash 58 Shooting Close-Ups/ Infinity Shots 60 ...
... or Read This First 7 Please Read 7 Safety Precautions 8 Preventing Malfunctions 13 Components Guide 14 Preparing the Camera Charging the Battery Pack 18 Installing the Battery Pack 21 Installing the CF Card 23 Setting the Date and Time 26 Setting the Language ...41 Selecting Menus and Settings 43 Menu Settings and Factory Defaults 47 Resetting Settings to Their Default Values 52 Shooting Shooting in Auto Mode 53 Reviewing an Image Right after Shooting 54 Changing Resolution/Compression Settings 55 Quick Shots 57 Using the Flash 58 Shooting Close-Ups/ Infinity Shots 60 ...
PowerShot S500/410, DIGITAL IXUS 500/430 Camera User Guide
Page 37
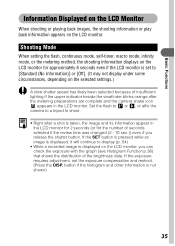
...shooting or playing back images, the shooting information or play back information appears on the LCD monitor for the number of seconds selected if the review time was changed (2 - 10 sec.)) even if you can check the exposure with the graph (see Histogram Function p.38) that shows ...the distribution of insufficient lighting if the upper indicator beside the viewfinder blinks orange after the metering preparations are complete and the camera shake icon appears in the LCD monitor for 2 seconds (or for approximately 6 seconds even if the LCD monitor is set the exposure ...
...shooting or playing back images, the shooting information or play back information appears on the LCD monitor for the number of seconds selected if the review time was changed (2 - 10 sec.)) even if you can check the exposure with the graph (see Histogram Function p.38) that shows ...the distribution of insufficient lighting if the upper indicator beside the viewfinder blinks orange after the metering preparations are complete and the camera shake icon appears in the LCD monitor for 2 seconds (or for approximately 6 seconds even if the LCD monitor is set the exposure ...

PowerShot S500/410, DIGITAL IXUS 500/430 Camera User Guide
Page 49
Shooting Self-timer AF-assist Beam Digital Zoom Review Long Shutter Options Sets the Quick Shot option to on or off. • On • Off* Sets whether or not the camera automatically selects the AF frame or a fixed center AF frame. • On* • Off Sets the speeds of the continuous shooting mode. •... of the self-timer delay. • 10 seconds* • 2 seconds Sets the AF-assist Beam to on or off. • On* • Off Sets the digital zoom to on or off. • On • Off* Sets the duration images display on the LCD monitor after the shutter button releases. • Off...
Shooting Self-timer AF-assist Beam Digital Zoom Review Long Shutter Options Sets the Quick Shot option to on or off. • On • Off* Sets whether or not the camera automatically selects the AF frame or a fixed center AF frame. • On* • Off Sets the speeds of the continuous shooting mode. •... of the self-timer delay. • 10 seconds* • 2 seconds Sets the AF-assist Beam to on or off. • On* • Off Sets the digital zoom to on or off. • On • Off* Sets the duration images display on the LCD monitor after the shutter button releases. • Off...

PowerShot S500/410, DIGITAL IXUS 500/430 Camera User Guide
Page 55
Shooting 2 Aim the camera at all you can change the length of the shutter when the shutter activates. • The picture appears for two seconds on the LCD monitor. •See Functions Available in Each Shooting Mode (p. 160). • With the Review function, you have to do is ...composition (relative subject size in the viewfinder) (p. 40). 4 Press the shutter button halfway (p. 41). • Two beeps will sound when the camera has finished metering, and the upper indicator beside the viewfinder will light green or orange. Shooting Shooting in Auto Mode In this mode, all (p. ...
Shooting 2 Aim the camera at all you can change the length of the shutter when the shutter activates. • The picture appears for two seconds on the LCD monitor. •See Functions Available in Each Shooting Mode (p. 160). • With the Review function, you have to do is ...composition (relative subject size in the viewfinder) (p. 40). 4 Press the shutter button halfway (p. 41). • Two beeps will sound when the camera has finished metering, and the upper indicator beside the viewfinder will light green or orange. Shooting Shooting in Auto Mode In this mode, all (p. ...

PowerShot S500/410, DIGITAL IXUS 500/430 Camera User Guide
Page 56
...of the setting. 54 In addition, the images will continue to 10 seconds in the range of 2 to display for 2 seconds. Changing the Review Duration The default review time is displayed. - Press the shutter button halfway to [10 sec.] range, the image will keep on the LCD monitor. See Selecting ...Menus and Settings (p. 43). 2 Use the or button to select review setting and press the MENU button. • With the [Off] option, the image will not automatically display. • In the [2 sec.] to stop...
...of the setting. 54 In addition, the images will continue to 10 seconds in the range of 2 to display for 2 seconds. Changing the Review Duration The default review time is displayed. - Press the shutter button halfway to [10 sec.] range, the image will keep on the LCD monitor. See Selecting ...Menus and Settings (p. 43). 2 Use the or button to select review setting and press the MENU button. • With the [Off] option, the image will not automatically display. • In the [2 sec.] to stop...

PowerShot S500/410, DIGITAL IXUS 500/430 Camera User Guide
Page 158
... port 120 V Video Output System 128 W White Balance 81 Wide Angle 40 Wrist Strap 14 Menu 47 Red-eye Reduction Function...... 59 156 Resolution 55 Review Duration 54 Rotate 97 S Self-Timer 64 Set up Menu 48 Messages List of Messages during Shooting/Playback 134 Metering Modes 77 Mode Dial 16... Mode switch 32 Movie 70 Edit 95 Playback 93 Shooting 70 Mute Mode 48 My Camera Menu Changing 129 Registering 131 My Camera Setting File Format 133 My Camera Settings 129 O ON/OFF Button 30 P Photo Effect 84 Play Menu 48 Playback Mode 32 Power-saving 31 ...
... port 120 V Video Output System 128 W White Balance 81 Wide Angle 40 Wrist Strap 14 Menu 47 Red-eye Reduction Function...... 59 156 Resolution 55 Review Duration 54 Rotate 97 S Self-Timer 64 Set up Menu 48 Messages List of Messages during Shooting/Playback 134 Metering Modes 77 Mode Dial 16... Mode switch 32 Movie 70 Edit 95 Playback 93 Shooting 70 Mute Mode 48 My Camera Menu Changing 129 Registering 131 My Camera Setting File Format 133 My Camera Settings 129 O ON/OFF Button 30 P Photo Effect 84 Play Menu 48 Playback Mode 32 Power-saving 31 ...
Software starter Guide Ver.16/17
Page 16
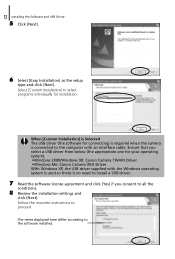
...as the setup type and click [Next]. When [Custom Installation] is Selected The USB driver (the software for connecting) is required when the camera is no need to install a USB driver. 7 Read the software license agreement and click [Yes] if you consent to the computer with ...according to proceed. Select [Custom Installation] to select programs individually for your operating system). •Windows 2000/Windows 98: Canon Camera TWAIN Driver •Windows Me: Canon Camera WIA Driver With Windows XP, the USB driver supplied with the Windows operating system is used so there is connected to...
...as the setup type and click [Next]. When [Custom Installation] is Selected The USB driver (the software for connecting) is required when the camera is no need to install a USB driver. 7 Read the software license agreement and click [Yes] if you consent to the computer with ...according to proceed. Select [Custom Installation] to select programs individually for your operating system). •Windows 2000/Windows 98: Canon Camera TWAIN Driver •Windows Me: Canon Camera WIA Driver With Windows XP, the USB driver supplied with the Windows operating system is used so there is connected to...

Software starter Guide Ver.16/17
Page 52
Follow the onscreen instructions to all the conditions. 7 Review the installation settings and click [Next]. Select [Custom Installation] to select programs individually for installation. 6 Read the software license agreement and click [Agree] if you consent to proceed. 8 When the installation is over, click [OK]. 9 Remove the disk from the CD-ROM drive. This concludes the software installation. 48 Installing the Software 5 Select [Easy Installation] and click [Next].
Follow the onscreen instructions to all the conditions. 7 Review the installation settings and click [Next]. Select [Custom Installation] to select programs individually for installation. 6 Read the software license agreement and click [Agree] if you consent to proceed. 8 When the installation is over, click [OK]. 9 Remove the disk from the CD-ROM drive. This concludes the software installation. 48 Installing the Software 5 Select [Easy Installation] and click [Next].


