
Getting Started Guide
Page 1
Getting Started Please refer to the complete user guide included on the CD-ROM for more detailed information. • Before use, be sure to read this guide, including the safety precautions. • This guide will familiarize you with how to use the camera correctly. • Keep the guide handy for future reference. ENGLISH
Getting Started Please refer to the complete user guide included on the CD-ROM for more detailed information. • Before use, be sure to read this guide, including the safety precautions. • This guide will familiarize you with how to use the camera correctly. • Keep the guide handy for future reference. ENGLISH

Getting Started Guide
Page 10
.... Do not use the stylus attached to change the magnified image area, among other than the included stylus to shoot, configure camera functions, and so on. Drag Touch the screen and move your finger. To correct any discrepancy between the position you have difficulty ...camera by touching or tapping the screen. z This gesture is used in Playback mode to switch to the next image, or to the strap. Touch Touch the screen briefly with your finger across it. For Easier Touch-Screen Operations z If you touch and the position detected, calibrate the screen (see Camera User Guide...
.... Do not use the stylus attached to change the magnified image area, among other than the included stylus to shoot, configure camera functions, and so on. Drag Touch the screen and move your finger. To correct any discrepancy between the position you have difficulty ...camera by touching or tapping the screen. z This gesture is used in Playback mode to switch to the next image, or to the strap. Touch Touch the screen briefly with your finger across it. For Easier Touch-Screen Operations z If you touch and the position detected, calibrate the screen (see Camera User Guide...

Getting Started Guide
Page 14
... it ( ). 14 ELPH 530 HS IXUS 510 HS Open the battery cover. z While pressing the battery lock in the direction of the arrow, insert the battery facing as shown and push it in another device), you slide it until it down as you should format the memory card with this camera (see Camera User Guide). z Lower the...
... it ( ). 14 ELPH 530 HS IXUS 510 HS Open the battery cover. z While pressing the battery lock in the direction of the arrow, insert the battery facing as shown and push it in another device), you slide it until it down as you should format the memory card with this camera (see Camera User Guide). z Lower the...
Getting Started Guide
Page 18
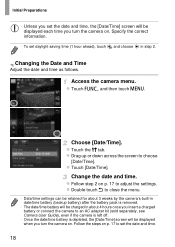
... on . z Touch [Date/Time]. z Touch the 3 tab. z Drag up or down across the screen to an AC adapter kit (sold separately, see Camera User Guide), even if the camera is left off. • Once the date/time battery is depleted, the [Date/Time] screen will be displayed when you turn the...information. • To set daylight saving time (1 hour ahead), touch and choose in about 4 hours once you insert a charged battery or connect the camera to choose [Date/Time]. Choose [Date/Time]. Changing the Date and Time Adjust the date and time as follows. z Touch H, and then touch ...
... on . z Touch [Date/Time]. z Touch the 3 tab. z Drag up or down across the screen to an AC adapter kit (sold separately, see Camera User Guide), even if the camera is left off. • Once the date/time battery is depleted, the [Date/Time] screen will be displayed when you turn the...information. • To set daylight saving time (1 hour ahead), touch and choose in about 4 hours once you insert a charged battery or connect the camera to choose [Date/Time]. Choose [Date/Time]. Changing the Date and Time Adjust the date and time as follows. z Touch H, and then touch ...

Getting Started Guide
Page 24
...erase. X The current image is displayed, touch [Erase]. z To cancel erasure, touch [Cancel]. • Images can also erase all images at once (see Camera User Guide). • You can also be recovered. Choose an image to choose it. z After [Erase?] is now erased. Trying the... Camera Out Erasing the Images You can choose and erase unneeded images one . z Drag left or right across the screen to choose an image. Erase the image. Be careful when erasing images, because they cannot be erased by one by using Touch Actions (see Camera User Guide). 24
...erase. X The current image is displayed, touch [Erase]. z To cancel erasure, touch [Cancel]. • Images can also erase all images at once (see Camera User Guide). • You can also be recovered. Choose an image to choose it. z After [Erase?] is now erased. Trying the... Camera Out Erasing the Images You can choose and erase unneeded images one . z Drag left or right across the screen to choose an image. Erase the image. Be careful when erasing images, because they cannot be erased by one by using Touch Actions (see Camera User Guide). 24

Getting Started Guide
Page 25
...is required to this for installation, saving images to the latest version, and download new functions via the Internet (some software excluded). Features of camera operation. Camera User Guide Once you can do the following PDF manuals on the included CD-ROM are familiar with instructions for a more indepth understanding of the Included ... use this function, and any ISP account charges and access fees must be paid separately. • This function may not be referenced from the Canon website. 25 Included Software, PDF Manuals The software and PDF manuals on your computer.
...is required to this for installation, saving images to the latest version, and download new functions via the Internet (some software excluded). Features of camera operation. Camera User Guide Once you can do the following PDF manuals on the included CD-ROM are familiar with instructions for a more indepth understanding of the Included ... use this function, and any ISP account charges and access fees must be paid separately. • This function may not be referenced from the Canon website. 25 Included Software, PDF Manuals The software and PDF manuals on your computer.

Getting Started Guide
Page 30
X Images are saved, close CameraWindow, press the 1 button to the Pictures folder on a computer, refer to the computer. CameraWindow Save the images to the ImageBrowser EX User Guide. 30 z Click [Import Images from Camera], and then click [Import Untransferred Images]. z Double click . z For instructions on viewing images on the computer, in separate folders named by date. Included Software, PDF Manuals z Choose [Downloads Images From Canon Camera using Canon CameraWindow] and then click [OK]. z After images are now saved to turn the camera off, and unplug the cable.
X Images are saved, close CameraWindow, press the 1 button to the Pictures folder on a computer, refer to the computer. CameraWindow Save the images to the ImageBrowser EX User Guide. 30 z Click [Import Images from Camera], and then click [Import Untransferred Images]. z Double click . z For instructions on viewing images on the computer, in separate folders named by date. Included Software, PDF Manuals z Choose [Downloads Images From Canon Camera using Canon CameraWindow] and then click [OK]. z After images are now saved to turn the camera off, and unplug the cable.

Getting Started Guide
Page 35
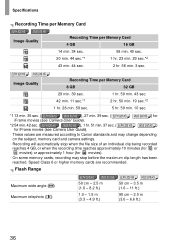
... measured according to Canon standards and may change depending on the subject, memory card and camera settings. • Table values are based on images with a 4:3 aspect ratio. Shots per image than for 4:3 images. Changing the aspect ratio (see Camera User Guide) will enable more data than for 4:3 images. 35 Specifications ELPH 320 HS IXUS 240 HS Resolution (Pixels) Compression...
... measured according to Canon standards and may change depending on the subject, memory card and camera settings. • Table values are based on images with a 4:3 aspect ratio. Shots per image than for 4:3 images. Changing the aspect ratio (see Camera User Guide) will enable more data than for 4:3 images. 35 Specifications ELPH 320 HS IXUS 240 HS Resolution (Pixels) Compression...
Getting Started Guide
Page 36
... measured according to Canon standards and may stop when the file size of an individual clip being recorded reaches 4 GB, or when the recording time reaches approximately 10 minutes (for or movies) or approximately 1 hour (for iFrame movies (see Camera User Guide). IXUS 240 HS ) • These values are recommended. ELPH 320 HS IXUS 240 HS Image Quality Recording...
... measured according to Canon standards and may stop when the file size of an individual clip being recorded reaches 4 GB, or when the recording time reaches approximately 10 minutes (for or movies) or approximately 1 hour (for iFrame movies (see Camera User Guide). IXUS 240 HS ) • These values are recommended. ELPH 320 HS IXUS 240 HS Image Quality Recording...

Getting Started Guide
Page 41
English w-1 Wireless LAN Guide • This guide explains how to send and receive images wirelessly. For instructions on how to operate the camera, and safety precautions, be sure to read the Camera User Guide. • This guide will familiarize you with how to use the camera to use the camera correctly. • Keep the guide handy for future reference.
English w-1 Wireless LAN Guide • This guide explains how to send and receive images wirelessly. For instructions on how to operate the camera, and safety precautions, be sure to read the Camera User Guide. • This guide will familiarize you with how to use the camera to use the camera correctly. • Keep the guide handy for future reference.

Getting Started Guide
Page 43
w-3 See the Canon website for details. For details on the smartphone or tablet is required. Installation of a dedicated application on the included software, see the ImageBrowser EX User Guide. Connect to another camera Use the wireless function to a computer. Connect to a Computer Use the included software to wirelessly send images from the camera to send images between Canon-brand cameras. Connect to a Smartphone Send images to smartphones and tablet computers that have wireless functions.
w-3 See the Canon website for details. For details on the smartphone or tablet is required. Installation of a dedicated application on the included software, see the ImageBrowser EX User Guide. Connect to another camera Use the wireless function to a computer. Connect to a Computer Use the included software to wirelessly send images from the camera to send images between Canon-brand cameras. Connect to a Smartphone Send images to smartphones and tablet computers that have wireless functions.

Getting Started Guide
Page 50
...) (p.w-32) Send/ Import Sending images (p.w-39) Transferring images to a computer (p.w-36) * Instructions in this guide apply when the software on the included CD-ROM has been correctly installed. w-10 See the Camera User Guide for using web services from CANON iMAGE GATEWAY (p.w-15) • Installing the dedicated CameraWindow application on the smartphone • Installing the...
...) (p.w-32) Send/ Import Sending images (p.w-39) Transferring images to a computer (p.w-36) * Instructions in this guide apply when the software on the included CD-ROM has been correctly installed. w-10 See the Camera User Guide for using web services from CANON iMAGE GATEWAY (p.w-15) • Installing the dedicated CameraWindow application on the smartphone • Installing the...

Getting Started Guide
Page 55
w-28). 2 Start CameraWindow. ●● Press the 1 button to turn the camera on. ●● For details on how to CANON iMAGE GATEWAY. ●● Enter your CANON iMAGE GATEWAY login name and password, and then click [Login]. Installation instructions can connect wirelessly, without using ...CameraWindow." (p. w-15 Adjusting Settings for Using Web Services From CANON iMAGE GATEWAY Adjust account settings for the Web services you can be found in "Included Software, PDF Manuals" in the Camera User Guide. 1 Connect the camera to a computer with the interface cable. ●● ...
w-28). 2 Start CameraWindow. ●● Press the 1 button to turn the camera on. ●● For details on how to CANON iMAGE GATEWAY. ●● Enter your CANON iMAGE GATEWAY login name and password, and then click [Login]. Installation instructions can connect wirelessly, without using ...CameraWindow." (p. w-15 Adjusting Settings for Using Web Services From CANON iMAGE GATEWAY Adjust account settings for the Web services you can be found in "Included Software, PDF Manuals" in the Camera User Guide. 1 Connect the camera to a computer with the interface cable. ●● ...

Getting Started Guide
Page 57
... after connecting to an access point, see "Connecting to a WPS Supported Access Point" (p. Connecting to Web Services Connect to Web services registered to the camera. 1 Access the wireless LAN screen. ●● Touch . 2 Choose a Web service. ●● Touch the icon for details on the ...9679;● Touch [Add an Access Point]. ▶▶ A list of detected access points will be displayed in the List" (p. See the Camera User Guide for the Web service you want to send images to in the [Select Destination] screen. 3 Connect to the last connected destination from the next...
... after connecting to an access point, see "Connecting to a WPS Supported Access Point" (p. Connecting to Web Services Connect to Web services registered to the camera. 1 Access the wireless LAN screen. ●● Touch . 2 Choose a Web service. ●● Touch the icon for details on the ...9679;● Touch [Add an Access Point]. ▶▶ A list of detected access points will be displayed in the List" (p. See the Camera User Guide for the Web service you want to send images to in the [Select Destination] screen. 3 Connect to the last connected destination from the next...

Getting Started Guide
Page 62
... next time by just dragging on the screen without needing to perform the connection operation. To connect to a smartphone via ad hoc mode. - See the Camera User Guide for movies that can automatically access the function to connect to the last connected destination from step 1. • Once a smartphone is added, the smartphone name...
... next time by just dragging on the screen without needing to perform the connection operation. To connect to a smartphone via ad hoc mode. - See the Camera User Guide for movies that can automatically access the function to connect to the last connected destination from step 1. • Once a smartphone is added, the smartphone name...

Getting Started Guide
Page 64
... step 3. You cannot connect to PowerShot SD430 DIGITAL ELPH WIRELESS/ DIGITAL IXUS WIRELESS cameras with a wireless LAN function can automatically access the function to connect to perform the connection operation. w-24 See the Camera User Guide for details on the screen in ad hoc mode. • Only Canon-brand cameras equipped with this camera. 1 Access the wireless LAN screen...
... step 3. You cannot connect to PowerShot SD430 DIGITAL ELPH WIRELESS/ DIGITAL IXUS WIRELESS cameras with a wireless LAN function can automatically access the function to connect to perform the connection operation. w-24 See the Camera User Guide for details on the screen in ad hoc mode. • Only Canon-brand cameras equipped with this camera. 1 Access the wireless LAN screen...

Getting Started Guide
Page 65
w-25 5 Connect to a Computer This chapter explains necessary settings for connecting to a computer, how to register settings on the camera, and how to use the included software CameraWindow to wirelessly transfer images to a computer. • When connected to a computer, the camera is used to establish the connection and then the computer (included software CameraWindow) is used to transfer images. • For details on the included software, see the ImageBrowser EX User Guide.
w-25 5 Connect to a Computer This chapter explains necessary settings for connecting to a computer, how to register settings on the camera, and how to use the included software CameraWindow to wirelessly transfer images to a computer. • When connected to a computer, the camera is used to establish the connection and then the computer (included software CameraWindow) is used to transfer images. • For details on the included software, see the ImageBrowser EX User Guide.

Getting Started Guide
Page 72
... choose the computer name from the next time by just dragging on Touch Action settings. w-32 See the Camera User Guide for wireless LAN connection to a computer. • Be sure to also read the user guide included with your list of detected access points will be displayed on the screen in the List". ▶▶...
... choose the computer name from the next time by just dragging on Touch Action settings. w-32 See the Camera User Guide for wireless LAN connection to a computer. • Be sure to also read the user guide included with your list of detected access points will be displayed on the screen in the List". ▶▶...

Getting Started Guide
Page 91
...determine access point • The WPS button on again, and retry the connection. • Check the device you are in the Camera User Guide. Incorrect wireless LAN encryption key/Incorrect wireless LAN security settings • Check the access point security settings (p. IP address conflict &#...8226; Reset the IP address so that you have inserted a formatted memory card facing the correct way, contact a Canon customer support. w-27). • A device could not be suitable for connection. No access points found . w-27). w-51 Also refer ...
...determine access point • The WPS button on again, and retry the connection. • Check the device you are in the Camera User Guide. Incorrect wireless LAN encryption key/Incorrect wireless LAN security settings • Check the access point security settings (p. IP address conflict &#...8226; Reset the IP address so that you have inserted a formatted memory card facing the correct way, contact a Canon customer support. w-27). • A device could not be suitable for connection. No access points found . w-27). w-51 Also refer ...

Getting Started Guide
Page 94
See the Camera User Guide for camera specifications. w-54 Wireless Standard IEEE802.11b/g/n* * 2.4 GHz band only Transmission Method OFDM modulation (IEEE 802.11g/n) DSSS modulation (IEEE 802.11b) Connection Method Infrastructure mode*, ...
See the Camera User Guide for camera specifications. w-54 Wireless Standard IEEE802.11b/g/n* * 2.4 GHz band only Transmission Method OFDM modulation (IEEE 802.11g/n) DSSS modulation (IEEE 802.11b) Connection Method Infrastructure mode*, ...


