
User Guide
Page 4
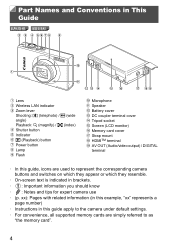
... are simply referred to represent the corresponding camera buttons and switches on which they appear or which they resemble. • On-screen text is indicated in This Guide ELPH 530 HS IXUS 510 HS Lens Wireless LAN indicator Zoom lever Shooting: i (telephoto) / j (wide angle) Playback: k (magnify) / g (index) Shutter button Indicator 1 (Playback) button Power button...
... are simply referred to represent the corresponding camera buttons and switches on which they appear or which they resemble. • On-screen text is indicated in This Guide ELPH 530 HS IXUS 510 HS Lens Wireless LAN indicator Zoom lever Shooting: i (telephoto) / j (wide angle) Playback: k (magnify) / g (index) Shutter button Indicator 1 (Playback) button Power button...
User Guide
Page 5
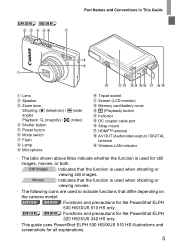
...Screen (LCD monitor) Memory card/battery cover 1 (Playback) button Indicator DC coupler cable port Strap mount HDMITM terminal AV OUT (Audio/video output) / DIGITAL terminal Wireless LAN indicator • The tabs shown above titles indicate whether the function is used for all explanations. 5 ELPH 320 HS IXUS 240 HS : Functions and precautions for the PowerShot ELPH 320 HS.../IXUS 240 HS only. • This guide uses PowerShot ELPH 530 HS/IXUS 510 HS illustrations and screenshots ...
...Screen (LCD monitor) Memory card/battery cover 1 (Playback) button Indicator DC coupler cable port Strap mount HDMITM terminal AV OUT (Audio/video output) / DIGITAL terminal Wireless LAN indicator • The tabs shown above titles indicate whether the function is used for all explanations. 5 ELPH 320 HS IXUS 240 HS : Functions and precautions for the PowerShot ELPH 320 HS.../IXUS 240 HS only. • This guide uses PowerShot ELPH 530 HS/IXUS 510 HS illustrations and screenshots ...

User Guide
Page 6
... 86 Shooting Various Movies 94 4 G mode 97 Shooting in This Guide 4 Contents 6 Contents: Basic Operations 8 Safety Precautions 10 Preliminary Notes and Legal Information 13 Touch-Screen Operations 14 Initial Preparations 15 Trying the Camera Out 24 Included Software, PDF Manuals ....29 Accessories 36 1 Camera Basics 37 On/Off 38 Shutter Button...
... 86 Shooting Various Movies 94 4 G mode 97 Shooting in This Guide 4 Contents 6 Contents: Basic Operations 8 Safety Precautions 10 Preliminary Notes and Legal Information 13 Touch-Screen Operations 14 Initial Preparations 15 Trying the Camera Out 24 Included Software, PDF Manuals ....29 Accessories 36 1 Camera Basics 37 On/Off 38 Shutter Button...
User Guide
Page 7
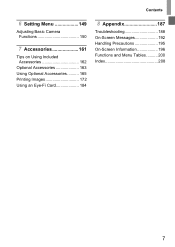
Contents 6 Setting Menu 149 Adjusting Basic Camera Functions 150 7 Accessories 161 Tips on Using Included Accessories 162 Optional Accessories 163 Using Optional Accessories .......... 165 Printing Images 172 Using an Eye-Fi Card 184 8 Appendix 187 Troubleshooting 188 On-Screen Messages 192 Handling Precautions 195 On-Screen Information 196 Functions and Menu Tables .......... 200 Index 208 7
Contents 6 Setting Menu 149 Adjusting Basic Camera Functions 150 7 Accessories 161 Tips on Using Included Accessories 162 Optional Accessories 163 Using Optional Accessories .......... 165 Printing Images 172 Using an Eye-Fi Card 184 8 Appendix 187 Troubleshooting 188 On-Screen Messages 192 Handling Precautions 195 On-Screen Information 196 Functions and Menu Tables .......... 200 Index 208 7
User Guide
Page 11
... as inside airplanes and medical facilities. • Do not play the supplied CD-ROM(s) in any dust and dirt that has collected on the camera screen for prolonged periods may explode or leak, resulting in electrical shock or fire. Exercise adequate caution when using the camera in places where use is...
... as inside airplanes and medical facilities. • Do not play the supplied CD-ROM(s) in any dust and dirt that has collected on the camera screen for prolonged periods may explode or leak, resulting in electrical shock or fire. Exercise adequate caution when using the camera in places where use is...
User Guide
Page 12
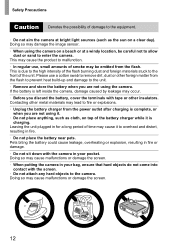
... on top of the battery charger while it is charging. Leaving the unit plugged in fire or damage. • Do not sit down with the screen. • Do not attach any hard objects to the camera. Pets biting the battery could cause leakage, overheating or explosion, resulting in for a long period...; Remove and store the battery when you discard the battery, cover the terminals with tape or other metal materials may cause malfunctions or damage the screen. • When putting the camera in your bag, ensure that hard objects do not come into contact with the camera in fire. • Do not...
... on top of the battery charger while it is charging. Leaving the unit plugged in fire or damage. • Do not sit down with the screen. • Do not attach any hard objects to the camera. Pets biting the battery could cause leakage, overheating or explosion, resulting in for a long period...; Remove and store the battery when you discard the battery, cover the terminals with tape or other metal materials may cause malfunctions or damage the screen. • When putting the camera in your bag, ensure that hard objects do not come into contact with the camera in fire. • Do not...
User Guide
Page 14
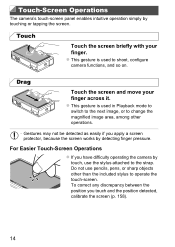
.... Do not use the stylus attached to the strap. z This gesture is used to operate the touch-screen. For Easier Touch-Screen Operations z If you touch and the position detected, calibrate the screen (p. 158). 14 z This gesture is used in Playback mode to switch to the next image, or ...to change the magnified image area, among other operations. • Gestures may not be detected as easily if you apply a screen protector, because the screen works by touch, use pencils, pens, or sharp objects other than the included stylus to shoot, configure camera functions, and so on. ...
.... Do not use the stylus attached to the strap. z This gesture is used to operate the touch-screen. For Easier Touch-Screen Operations z If you touch and the position detected, calibrate the screen (p. 158). 14 z This gesture is used in Playback mode to switch to the next image, or ...to change the magnified image area, among other operations. • Gestures may not be detected as easily if you apply a screen protector, because the screen works by touch, use pencils, pens, or sharp objects other than the included stylus to shoot, configure camera functions, and so on. ...

User Guide
Page 21
...The battery will pop up . Turn the camera on . Set the date and time. Remove the memory card. Finish the setup process. X The [Date/Time] screen is displayed the first time you turn off the camera, press the power button. 21 z Press the power button. z When finished, touch ^. z Touch the ...images. z Open the cover and press the battery lock in until it clicks, and then slowly release it. Setting the Date and Time A screen for dates and times added to specify the date and time. Initial Preparations Removing the Battery and Memory Card Remove the battery. z To turn the...
...The battery will pop up . Turn the camera on . Set the date and time. Remove the memory card. Finish the setup process. X The [Date/Time] screen is displayed the first time you turn off the camera, press the power button. 21 z Press the power button. z When finished, touch ^. z Touch the ...images. z Open the cover and press the battery lock in until it clicks, and then slowly release it. Setting the Date and Time A screen for dates and times added to specify the date and time. Initial Preparations Removing the Battery and Memory Card Remove the battery. z To turn the...

User Guide
Page 22
...touch and choose in about 3 weeks by the camera's built-in date/time battery (backup battery) after the battery pack is depleted, the [Date/Time] screen will be displayed each time you turn the camera on. z Follow step 2 on p. 21 to an AC adapter kit (sold separately, p. 163), even ...Touch the 3 tab. Follow the steps on p. 21 to choose [Date/Time]. Initial Preparations • Unless you set the date and time, the [Date/Time] screen will be displayed when you turn the camera on. z Touch H, and then touch n. Choose [Date/Time]. Changing the Date and Time Adjust the date and...
...touch and choose in about 3 weeks by the camera's built-in date/time battery (backup battery) after the battery pack is depleted, the [Date/Time] screen will be displayed each time you turn the camera on. z Follow step 2 on p. 21 to an AC adapter kit (sold separately, p. 163), even ...Touch the 3 tab. Follow the steps on p. 21 to choose [Date/Time]. Initial Preparations • Unless you set the date and time, the [Date/Time] screen will be displayed when you turn the camera on. z Touch H, and then touch n. Choose [Date/Time]. Changing the Date and Time Adjust the date and...

User Guide
Page 23
... no longer displayed. • If there are images on the 3 tab. 23 Set the display language. ELPH 320 HS IXUS 240 HS Access the setting screen. X Once the display language has been set, the setting screen is displayed. z Press the 1 button. Initial Preparations Display Language The display language can also change the display language by touching... memory card, touch H in the lower left to choose it, and then touch ^. z Touch a display language to access n. • You can be changed as needed. ELPH 530 HS IXUS 510 HS Enter Playback mode.
... no longer displayed. • If there are images on the 3 tab. 23 Set the display language. ELPH 320 HS IXUS 240 HS Access the setting screen. X Once the display language has been set, the setting screen is displayed. z Press the 1 button. Initial Preparations Display Language The display language can also change the display language by touching... memory card, touch H in the lower left to choose it, and then touch ^. z Touch a display language to access n. • You can be changed as needed. ELPH 530 HS IXUS 510 HS Enter Playback mode.
User Guide
Page 24
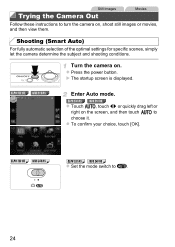
...images or movies, and then view them. ELPH 530 HS IXUS 510 HS Enter Auto mode. Still Images Movies Trying the Camera Out Follow these instructions to turn the camera on . X The startup screen is displayed. ELPH 320 HS IXUS 240 HS ELPH 320 HS IXUS 240 HS z Set the mode switch to choose it.... z To confirm your choice, touch [OK]. z Press the power button. ELPH 530 HS IXUS 510 HS z Touch , touch qr or quickly drag left ...
...images or movies, and then view them. ELPH 530 HS IXUS 510 HS Enter Auto mode. Still Images Movies Trying the Camera Out Follow these instructions to turn the camera on . X The startup screen is displayed. ELPH 320 HS IXUS 240 HS ELPH 320 HS IXUS 240 HS z Set the mode switch to choose it.... z To confirm your choice, touch [OK]. z Press the power button. ELPH 530 HS IXUS 510 HS z Touch , touch qr or quickly drag left ...
User Guide
Page 25
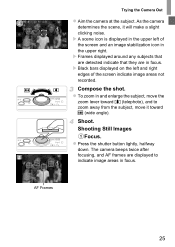
X Black bars displayed on the left of the screen indicate image areas not recorded. The camera beeps twice after focusing, and AF frames are in the upper right. Shooting Still Images Focus. Compose the ... the zoom lever toward i (telephoto), and to indicate image areas in focus. X A scene icon is displayed in the upper left and right edges of the screen and an image stabilization icon in focus. Trying the Camera Out z Aim the camera at the subject.
X Black bars displayed on the left of the screen indicate image areas not recorded. The camera beeps twice after focusing, and AF frames are in the upper right. Shooting Still Images Focus. Compose the ... the zoom lever toward i (telephoto), and to indicate image areas in focus. X A scene icon is displayed in the upper left and right edges of the screen and an image stabilization icon in focus. Trying the Camera Out z Aim the camera at the subject.

User Guide
Page 26
... about two seconds. z Touch . X Recording will stop automatically when the memory card becomes full. 26 X Your shot remains displayed on the screen is displayed, you can take another shot by pressing the shutter button again. z Even while the shot is recorded. X Frames displayed around any faces that ...
... about two seconds. z Touch . X Recording will stop automatically when the memory card becomes full. 26 X Your shot remains displayed on the screen is displayed, you can take another shot by pressing the shutter button again. z Even while the shot is recorded. X Frames displayed around any faces that ...
User Guide
Page 27
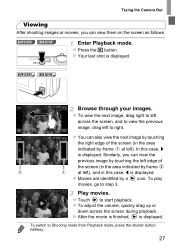
... playback. z To adjust the volume, quickly drag up or down across the screen, and to view the previous image, drag left ). X Your last shot is displayed. • To switch to right. ELPH 320 HS IXUS 240 HS Browse through your images. To play movies, go to start playback. z Touch to step 3. ...z You can also view the next image by touching the right edge of the screen (in the area indicated by frame at left to ...
... playback. z To adjust the volume, quickly drag up or down across the screen, and to view the previous image, drag left ). X Your last shot is displayed. • To switch to right. ELPH 320 HS IXUS 240 HS Browse through your images. To play movies, go to start playback. z Touch to step 3. ...z You can also view the next image by touching the right edge of the screen (in the area indicated by frame at left to ...
User Guide
Page 28
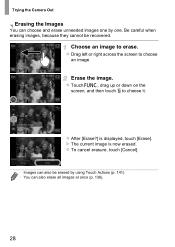
...?] is now erased. Be careful when erasing images, because they cannot be erased by one. Erase the image. z Touch H, drag up or down on the screen, and then touch a to erase. z To cancel erasure, touch [Cancel]. • Images can also erase all images at once (p. 136). 28 Choose an image ...to choose it. X The current image is displayed, touch [Erase]. z Drag left or right across the screen to choose an image. Trying the Camera Out Erasing the Images You can choose and erase unneeded images one by using Touch Actions (p. 141). •...
...?] is now erased. Be careful when erasing images, because they cannot be erased by one. Erase the image. z Touch H, drag up or down on the screen, and then touch a to erase. z To cancel erasure, touch [Cancel]. • Images can also erase all images at once (p. 136). 28 Choose an image ...to choose it. X The current image is displayed, touch [Erase]. z Drag left or right across the screen to choose an image. Trying the Camera Out Erasing the Images You can choose and erase unneeded images one by using Touch Actions (p. 141). •...

User Guide
Page 31
... to open it, and then double-click the icon displayed. z Insert the included CD-ROM (DIGITAL CAMERA Solution Disk) (p. 2) in the computer's CD-ROM drive. screen instructions to install the software on - Begin the installation. When a message is displayed prompting you can update to the latest version and download new functions...
... to open it, and then double-click the icon displayed. z Insert the included CD-ROM (DIGITAL CAMERA Solution Disk) (p. 2) in the computer's CD-ROM drive. screen instructions to install the software on - Begin the installation. When a message is displayed prompting you can update to the latest version and download new functions...
User Guide
Page 32
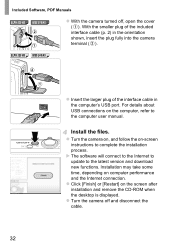
... installation and remove the CD-ROM when the desktop is displayed. Installation may take some time, depending on -screen instructions to the latest version and download new functions. ELPH 320 HS IXUS 240 HS z Insert the larger plug of the included interface cable (p. 2) in the computer's USB port. With the smaller plug of the interface...
... installation and remove the CD-ROM when the desktop is displayed. Installation may take some time, depending on -screen instructions to the latest version and download new functions. ELPH 320 HS IXUS 240 HS z Insert the larger plug of the included interface cable (p. 2) in the computer's USB port. With the smaller plug of the interface...
User Guide
Page 33
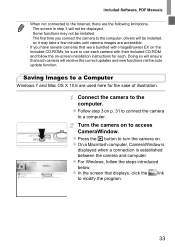
...- z Press the 1 button to turn the camera on to access CameraWindow. z Follow step 3 on the included CD-ROMs, be installed. - z For Windows, follow the on-screen installation instructions for the sake of illustration. The first time you have several cameras that displays, click the link to use each camera with their... you connect the camera to a computer. Doing so will be installed, so it may not be sure to modify the program. 33 z In the screen that were bundled with ImageBrowser EX on p. 31 to connect the camera to the computer, drivers will ensure that each . The...
...- z Press the 1 button to turn the camera on to access CameraWindow. z Follow step 3 on the included CD-ROMs, be installed. - z For Windows, follow the on-screen installation instructions for the sake of illustration. The first time you have several cameras that displays, click the link to use each camera with their... you connect the camera to a computer. Doing so will be installed, so it may not be sure to modify the program. 33 z In the screen that were bundled with ImageBrowser EX on p. 31 to connect the camera to the computer, drivers will ensure that each . The...
User Guide
Page 35
... version, the software in use, or image file sizes. - Some functions provided by connecting your camera to the computer without using Canon CameraWindow] on the screen displayed when you turn the camera on in step 2. Adobe Reader is required to view the PDF manuals. • It may ...the Dock (the bar at the bottom of using Adobe Reader. 35 If CameraWindow is not displayed, click the [Start] menu and choose [All Programs] X [Canon Utilities] X [CameraWindow] X [CameraWindow]. • On a Macintosh computer, if CameraWindow is not displayed, click the icon in the taskbar. • To ...
... version, the software in use, or image file sizes. - Some functions provided by connecting your camera to the computer without using Canon CameraWindow] on the screen displayed when you turn the camera on in step 2. Adobe Reader is required to view the PDF manuals. • It may ...the Dock (the bar at the bottom of using Adobe Reader. 35 If CameraWindow is not displayed, click the [Start] menu and choose [All Programs] X [Canon Utilities] X [CameraWindow] X [CameraWindow]. • On a Macintosh computer, if CameraWindow is not displayed, click the icon in the taskbar. • To ...

User Guide
Page 38
... off after about two more minutes, the lens is retracted by pressing the 1 button. Power Saving in Shooting Mode The screen is in Playback Mode The camera turns itself off but the lens is still out, press the shutter button halfway (p. 39). z To turn the .... Power-Saving Features (Auto Power Down) As a way to conserve battery power, the camera automatically deactivates the screen and then turns itself off , press the power button again. On/Off ELPH 530 HS IXUS 510 HS ELPH 320 HS IXUS 240 HS Shooting Mode z Press the power button to turn the camera on and view your shots.
... off after about two more minutes, the lens is retracted by pressing the 1 button. Power Saving in Shooting Mode The screen is in Playback Mode The camera turns itself off but the lens is still out, press the shutter button halfway (p. 39). z To turn the .... Power-Saving Features (Auto Power Down) As a way to conserve battery power, the camera automatically deactivates the screen and then turns itself off , press the power button again. On/Off ELPH 530 HS IXUS 510 HS ELPH 320 HS IXUS 240 HS Shooting Mode z Press the power button to turn the camera on and view your shots.


