User Guide
Page 4
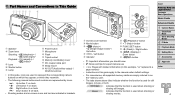
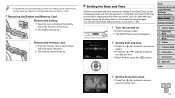
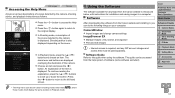
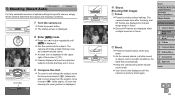
Screen (LCD monitor) Movie button / / Up button < > / Left button Indicator button < (Help)> button FUNC./SET button / Right button / Down button button • : Important information you should ... guide apply to the camera under default settings. • For convenience, all supported memory cards are simply referred to represent the corresponding camera buttons on -screen icons and text are indicated in This Guide Speaker Zoom lever Shooting: / Playback: / Lens Shutter button Lamp Power button Microphone Flash Tripod socket Memory card...
Screen (LCD monitor) Movie button / / Up button < > / Left button Indicator button < (Help)> button FUNC./SET button / Right button / Down button button • : Important information you should ... guide apply to the camera under default settings. • For convenience, all supported memory cards are simply referred to represent the corresponding camera buttons on -screen icons and text are indicated in This Guide Speaker Zoom lever Shooting: / Playback: / Lens Shutter button Lamp Power button Microphone Flash Tripod socket Memory card...
User Guide
Page 5
... 7 Accessories 79 Optional Accessories 80 Using Optional Accessories..........81 Printing Images 83 Using an Eye-Fi Card 90 8 Appendix 92 Troubleshooting 93 On-Screen Messages 95 On-Screen Information 97 Functions and Menu Tables..........99 Handling Precautions 103 Specifications 103 Index 106 Cover Preliminary Notes and Legal Information Contents: Basic Operations Basic...
... 7 Accessories 79 Optional Accessories 80 Using Optional Accessories..........81 Printing Images 83 Using an Eye-Fi Card 90 8 Appendix 92 Troubleshooting 93 On-Screen Messages 95 On-Screen Information 97 Functions and Menu Tables..........99 Handling Precautions 103 Specifications 103 Index 106 Cover Preliminary Notes and Legal Information Contents: Basic Operations Basic...
User Guide
Page 8
...to enter the camera. Please use , small amounts of smoke may cause malfunctions or damage the screen. • When putting the camera in for a long period of time may cause malfunctions or damage the screen. Leaving the unit plugged in your bag, ensure that hard objects do not come into contact ...burns or damage to the camera. Pets biting the battery could lead to injury or damage the camera. • Be careful not to subject the screen to cover it is left inside the camera, damage caused by the strap, be careful not to strong impacts. This could cause leakage, overheating or...
...to enter the camera. Please use , small amounts of smoke may cause malfunctions or damage the screen. • When putting the camera in for a long period of time may cause malfunctions or damage the screen. Leaving the unit plugged in your bag, ensure that hard objects do not come into contact ...burns or damage to the camera. Pets biting the battery could lead to injury or damage the camera. • Be careful not to subject the screen to cover it is left inside the camera, damage caused by the strap, be careful not to strong impacts. This could cause leakage, overheating or...
User Guide
Page 12
.... zzPress the buttons to choose an option. Setting the Date and Time Set the current date and time correctly as follows if the [Date/Time] screen is recorded in image properties when you shoot, and it . Removing the Battery and Memory Card Remove the battery. zzPress the buttons to specify the... date and time. zzPress the buttons to choose your home time zone. 12 You can be saved on . Remove the memory card. XXThe [Date/Time] screen is used when you turn the camera on. • For guidelines on how many shots or hours of recording can also add a date stamp to...
.... zzPress the buttons to choose an option. Setting the Date and Time Set the current date and time correctly as follows if the [Date/Time] screen is recorded in image properties when you shoot, and it . Removing the Battery and Memory Card Remove the battery. zzPress the buttons to specify the... date and time. zzPress the buttons to choose your home time zone. 12 You can be saved on . Remove the memory card. XXThe [Date/Time] screen is used when you turn the camera on. • For guidelines on how many shots or hours of recording can also add a date stamp to...
User Guide
Page 13
...the steps in about 3 weeks by pressing the buttons. 4 Finish the setup process. zzMove the zoom lever to complete the setting. The setting screen is no longer displayed. zzPress the button to choose the [3] tab. Specify the correct information. • To set the date and time, ...removed. • The date/time battery will be charged in "Setting the Date and Time" (=12) to set , the [Date/Time] screen is no longer displayed. zzPress the buttons to adjust the settings. Cover Preliminary Notes and Legal Information Contents: Basic Operations Basic Guide Advanced Guide 1...
...the steps in about 3 weeks by pressing the buttons. 4 Finish the setup process. zzMove the zoom lever to complete the setting. The setting screen is no longer displayed. zzPress the button to choose the [3] tab. Specify the correct information. • To set the date and time, ...removed. • The date/time battery will be charged in "Setting the Date and Time" (=12) to set , the [Date/Time] screen is no longer displayed. zzPress the buttons to adjust the settings. Cover Preliminary Notes and Legal Information Contents: Basic Operations Basic Guide Advanced Guide 1...
User Guide
Page 14
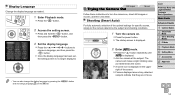
... language as it determines the scene. zzPress and hold the button, and then press the button. 3 Set the display language. XXThe startup screen is displayed. zzPress the button repeatedly until [ ] is displayed. 2 Enter [ ] mode. zzAim the camera at the subject. XXFrames ...You can also change the display language by pressing the button and choosing [Language ] on . zzPress the button. 2 Access the setting screen. Still Images Trying the Camera Out Movies Follow these instructions to choose a language, and then press the button. Cover Preliminary Notes and...
... language as it determines the scene. zzPress and hold the button, and then press the button. 3 Set the display language. XXThe startup screen is displayed. zzPress the button repeatedly until [ ] is displayed. 2 Enter [ ] mode. zzAim the camera at the subject. XXFrames ...You can also change the display language by pressing the button and choosing [Language ] on . zzPress the button. 2 Access the setting screen. Still Images Trying the Camera Out Movies Follow these instructions to choose a language, and then press the button. Cover Preliminary Notes and...
User Guide
Page 15
...that they are displayed to shoot again. Viewing After shooting images or movies, you can view them on the top and bottom edges of the screen indicate image areas not recorded. zzKeep the camera still until the camera is played, and in and enlarge the subject, move it toward (... as recording begins, and [ Rec] is displayed. 15 zzOnce recording begins, take your finger off the movie button. XXBlack bars displayed on the screen as recording stops. zzTo zoom in low-light conditions, the flash fires automatically. Shoot. zzPress the movie button. zzPress the button.
...that they are displayed to shoot again. Viewing After shooting images or movies, you can view them on the top and bottom edges of the screen indicate image areas not recorded. zzKeep the camera still until the camera is played, and in and enlarge the subject, move it toward (... as recording begins, and [ Rec] is displayed. 15 zzOnce recording begins, take your finger off the movie button. XXBlack bars displayed on the screen as recording stops. zzTo zoom in low-light conditions, the flash fires automatically. Shoot. zzPress the movie button. zzPress the button.
User Guide
Page 17
...same as follows. Software Guide Refer to the original display. zzChoose an item and press the button. The guide can be accessed from the Canon website is introduced below, with instructions for download from the help system of software (some software excluded). zzPress the < > button again to... continue reading the explanation, press the buttons to access the Help menu. Still Images Accessing the Help Menu Movies Access on-screen descriptions of scenes detected by the camera is also displayed depending on your computer. zzPress the < > button to scroll up or down the...
...same as follows. Software Guide Refer to the original display. zzChoose an item and press the button. The guide can be accessed from the Canon website is introduced below, with instructions for download from the help system of software (some software excluded). zzPress the < > button again to... continue reading the explanation, press the buttons to access the Help menu. Still Images Accessing the Help Menu Movies Access on-screen descriptions of scenes detected by the camera is also displayed depending on your computer. zzPress the < > button to scroll up or down the...
User Guide
Page 18
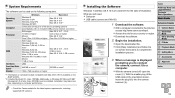
...or more*2 550 MB or more*2 1024 x 768 resolution or higher *1 Information on computer models compatible with Mac OS X 10.8 is available on -screen instructions to complete the installation process. 3 When a message is displayed prompting you will need: zzComputer zzUSB cable (camera end: Mini-B) 1 Download the ...software. Installing the Software Windows 7 and Mac OS X 10.6 are used on computer performance. • Check the Canon website for the sake of the USB cable in Windows XP, Microsoft .NET Framework 3.0 or later (max. 500 MB) must be used here for...
...or more*2 550 MB or more*2 1024 x 768 resolution or higher *1 Information on computer models compatible with Mac OS X 10.8 is available on -screen instructions to complete the installation process. 3 When a message is displayed prompting you will need: zzComputer zzUSB cable (camera end: Mini-B) 1 Download the ...software. Installing the Software Windows 7 and Mac OS X 10.6 are used on computer performance. • Check the Canon website for the sake of the USB cable in Windows XP, Microsoft .NET Framework 3.0 or later (max. 500 MB) must be used here for...
User Guide
Page 19
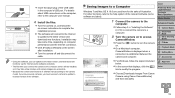
... on to the computer user manual. 4 Install the files. zzPress the button to modify the program. zzChoose [Downloads Images From Canon Camera using Canon CameraWindow] and then click [OK]. zzClick [Finish] or [Restart] on computer performance and the Internet connection. Saving Images to ...the latest version and download new functions. zzFollow step 3 in the computer's USB port. For details about USB connections on -screen instructions to its latest version of illustration. zzFor Windows, follow the on the computer, refer to access CameraWindow. XXThe software will...
... on to the computer user manual. 4 Install the files. zzPress the button to modify the program. zzChoose [Downloads Images From Canon Camera using Canon CameraWindow] and then click [OK]. zzClick [Finish] or [Restart] on computer performance and the Internet connection. Saving Images to ...the latest version and download new functions. zzFollow step 3 in the computer's USB port. For details about USB connections on -screen instructions to its latest version of illustration. zzFor Windows, follow the on the computer, refer to access CameraWindow. XXThe software will...
User Guide
Page 20
... close CameraWindow, press the button to turn the camera on a computer, refer to the Software Guide (= 17). • In Windows 7, if the screen in step 2 is not displayed after you connect the camera to the computer until camera images are now saved to the Pictures folder on the... screen displayed when you can save images to the computer. zzFor instructions on viewing images on in Windows Vista or XP, click [Downloads Images From Canon Camera using the software, the following limitations apply. -
... close CameraWindow, press the button to turn the camera on a computer, refer to the Software Guide (= 17). • In Windows 7, if the screen in step 2 is not displayed after you connect the camera to the computer until camera images are now saved to the Pictures folder on the... screen displayed when you can save images to the computer. zzFor instructions on viewing images on in Windows Vista or XP, click [Downloads Images From Canon Camera using the software, the following limitations apply. -
User Guide
Page 23
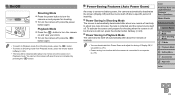
...Down and adjust the timing of inactivity. Power-Saving Features (Auto Power Down) As a way to conserve battery power, the camera automatically deactivates the screen (Display Off) and then turns itself off after about one minute of inactivity. • You can turn the camera off , press the button...minute once the camera is in Playback mode. Playback Mode zzPress the button to turn the camera on and prepare for shooting when the screen is off automatically after about five minutes of inactivity. zzTo turn the camera off . Power Saving in Playback Mode The camera turns itself...
...Down and adjust the timing of inactivity. Power-Saving Features (Auto Power Down) As a way to conserve battery power, the camera automatically deactivates the screen (Display Off) and then turns itself off after about one minute of inactivity. • You can turn the camera off , press the button...minute once the camera is in Playback mode. Playback Mode zzPress the button to turn the camera on and prepare for shooting when the screen is off automatically after about five minutes of inactivity. zzTo turn the camera off . Power Saving in Playback Mode The camera turns itself...
User Guide
Page 24
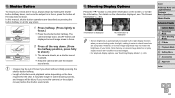
..."Switching Display Modes" (=62). In this manual, shutter button operations are composed. Information is displayed No information is displayed • Screen brightness is automatically increased by holding the shutter button halfway down . 1 Press halfway. (Press lightly to focus.) zzPress the shutter ...button halfway. Shooting Display Options Press the button to hide the information. However, on-screen image brightness may be blurry if you shoot without initially pressing the shutter button halfway. • Length of focus if you ...
..."Switching Display Modes" (=62). In this manual, shutter button operations are composed. Information is displayed No information is displayed • Screen brightness is automatically increased by holding the shutter button halfway down . 1 Press halfway. (Press lightly to focus.) zzPress the shutter ...button halfway. Shooting Display Options Press the button to hide the information. However, on-screen image brightness may be blurry if you shoot without initially pressing the shutter button halfway. • Length of focus if you ...
User Guide
Page 25
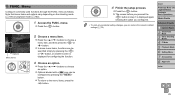
... button. 4 Finish the setup process. menu. zzOptions labeled with a [ ] icon can be configured by pressing the or button, or another screen is displayed again, showing the option you configured. • To undo any accidental setting changes, you can restore the camera's default settings (=78...can be specified simply by pressing the button. zzPress the buttons to choose a menu item, and then press the or button. XXThe screen before you pressed the button in step 1 is displayed for configuring the function. 3 Choose an option. Cover Preliminary Notes and Legal ...
... button. 4 Finish the setup process. menu. zzOptions labeled with a [ ] icon can be configured by pressing the or button, or another screen is displayed again, showing the option you configured. • To undo any accidental setting changes, you can restore the camera's default settings (=78...can be specified simply by pressing the button. zzPress the buttons to choose a menu item, and then press the or button. XXThe screen before you pressed the button in step 1 is displayed for configuring the function. 3 Choose an option. Cover Preliminary Notes and Legal ...
User Guide
Page 26
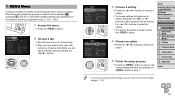
.... zzAfter you can restore the camera's default settings (=78). 26 Note that available settings vary depending on . zzPress the buttons to the previous screen, press the button. 4 Choose an option. zzTo return to choose a setting. zzPress the button to return to choose a tab. zzMove the... button in step 1. zzPress the button. 2 Choose a tab. zzTo choose settings with options not shown, first press the or button to switch screens, and then press the buttons to select the setting. Menu items are grouped by pressing the buttons. 3 Choose a setting. MENU Menu Configure a...
.... zzAfter you can restore the camera's default settings (=78). 26 Note that available settings vary depending on . zzPress the buttons to the previous screen, press the button. 4 Choose an option. zzTo return to choose a setting. zzPress the button to return to choose a tab. zzMove the... button in step 1. zzPress the button. 2 Choose a tab. zzTo choose settings with options not shown, first press the or button to switch screens, and then press the buttons to select the setting. Menu items are grouped by pressing the buttons. 3 Choose a setting. MENU Menu Configure a...
User Guide
Page 29
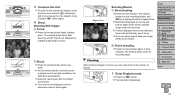
... P Mode 5 Playback Mode 6 Setting Menu 7 Accessories 8 Appendix Index 29 XXA scene icon is played, and in the upper right of the screen (=31). zzPress the shutter button all the way down. XXAs the camera shoots, a shutter sound is displayed in low-light conditions, the flash ... conditions. 1 Turn the camera on. XXFrames displayed around any detected subjects indicate that they are in focus. 3 Compose the shot. XXThe startup screen is displayed. Zoom Bar 2 Enter [ ] mode. The camera will make a slight clicking noise as it toward (telephoto), and to indicate image...
... P Mode 5 Playback Mode 6 Setting Menu 7 Accessories 8 Appendix Index 29 XXA scene icon is played, and in the upper right of the screen (=31). zzPress the shutter button all the way down. XXAs the camera shoots, a shutter sound is displayed in low-light conditions, the flash ... conditions. 1 Turn the camera on. XXFrames displayed around any detected subjects indicate that they are in focus. 3 Compose the shot. XXThe startup screen is displayed. Zoom Bar 2 Enter [ ] mode. The camera will make a slight clicking noise as it toward (telephoto), and to indicate image...
User Guide
Page 30
...; To reduce red-eye and to stop automatically when the memory card becomes full. Still Images • A flashing [ ] icon warns that the sound of the screen indicate image areas not recorded. For details on the focusing range (shooting range), see "Flash Range" (=104). • The subject may be activated when shooting...
...; To reduce red-eye and to stop automatically when the memory card becomes full. Still Images • A flashing [ ] icon warns that the sound of the screen indicate image areas not recorded. For details on the focusing range (shooting range), see "Flash Range" (=104). • The subject may be activated when shooting...
User Guide
Page 32
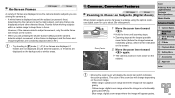
.... White range: optical zoom range where the image will appear grainy. 32 Common, Convenient Features Still Images Movies Zooming In Closer on the screen. 2 Move the zoom lever toward . Blue range: digital zoom range where the image will not appear grainy. - On...-Screen Frames Still Images Movies A variety of the zoom bar will remain on the screen. • When you are aiming the camera at the largest possible zoom factor (before the image becomes noticeably ...
.... White range: optical zoom range where the image will appear grainy. 32 Common, Convenient Features Still Images Movies Zooming In Closer on the screen. 2 Move the zoom lever toward . Blue range: digital zoom range where the image will not appear grainy. - On...-Screen Frames Still Images Movies A variety of the zoom bar will remain on the screen. • When you are aiming the camera at the largest possible zoom factor (before the image becomes noticeably ...
User Guide
Page 35
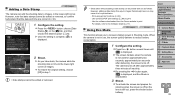
...shooting date or time to the lower-right corner of inactivity. approximately ten seconds after approximately three minutes of images. zzTo activate the screen and prepare for approximately two seconds; However, note that date stamps cannot be printed twice. - However, adding a date stamp ...Accessories 8 Appendix Index 35 XXOnce the setting is complete, [ ] is still out, press the shutter button halfway. Use the software downloaded from the Canon website to print For details, refer to print - zzPress the button, choose [Date Stamp ] on the [4] tab, and then choose the desired...
...shooting date or time to the lower-right corner of inactivity. approximately ten seconds after approximately three minutes of images. zzTo activate the screen and prepare for approximately two seconds; However, note that date stamps cannot be printed twice. - However, adding a date stamp ...Accessories 8 Appendix Index 35 XXOnce the setting is complete, [ ] is still out, press the shutter button halfway. Use the software downloaded from the Canon website to print For details, refer to print - zzPress the button, choose [Date Stamp ] on the [4] tab, and then choose the desired...
User Guide
Page 36
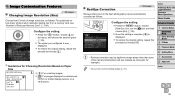
... Size A2 (16.5 x 23.4 in.) A3 - Red-Eye Correction Still Images Red-eye that occurs in . zzPress the button, choose [Red-Eye Corr.] on a 16:9 screen. zzTo restore the original setting, repeat this process but choose [Off]. • Red-eye correction may be automatically corrected as follows. For guidelines on how...
... Size A2 (16.5 x 23.4 in.) A3 - Red-Eye Correction Still Images Red-eye that occurs in . zzPress the button, choose [Red-Eye Corr.] on a 16:9 screen. zzTo restore the original setting, repeat this process but choose [Off]. • Red-eye correction may be automatically corrected as follows. For guidelines on how...


