Quick Start Guide
Page 9
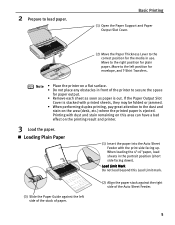
... out. Move to the correct position for the media in front of the Auto Sheet Feeder. 5 Move to secure the space for paper output. • Remove each sheet as soon as paper is ejected. Printing with the print side facing up. Note • Place the printer on a flat... in the portrait position (short side facing down). Loading Plain Paper (1) Insert the paper into the Auto Sheet Feeder with dust and stain remaining on this Load Limit mark. (3) Slide the Paper Guide against the left position for plain paper. 2 Prepare to the dust and stain on the printing result...
... out. Move to the correct position for the media in front of the Auto Sheet Feeder. 5 Move to secure the space for paper output. • Remove each sheet as soon as paper is ejected. Printing with the print side facing up. Note • Place the printer on a flat... in the portrait position (short side facing down). Loading Plain Paper (1) Insert the paper into the Auto Sheet Feeder with dust and stain remaining on this Load Limit mark. (3) Slide the Paper Guide against the left position for plain paper. 2 Prepare to the dust and stain on the printing result...
Quick Start Guide
Page 10
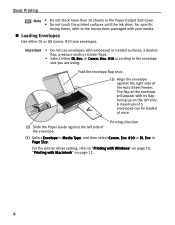
... (1) Align the envelope against the left side. For the printer driver setting, refer to "Printing with Windows" on the left side of the Auto Sheet Feeder. Env. #10 or DL Env. For specific drying times, refer to the envelope size you are using. Loading Envelopes Use either DL Env. in Media... Type, and then select Comm. Basic Printing Note • Do not stack more than 10 sheets in the Paper Output Slot Cover. • Do not touch the printed surfaces until the ink dries. Important • Do not use envelopes with its flap facing ...
... (1) Align the envelope against the left side. For the printer driver setting, refer to "Printing with Windows" on the left side of the Auto Sheet Feeder. Env. #10 or DL Env. For specific drying times, refer to the envelope size you are using. Loading Envelopes Use either DL Env. in Media... Type, and then select Comm. Basic Printing Note • Do not stack more than 10 sheets in the Paper Output Slot Cover. • Do not touch the printed surfaces until the ink dries. Important • Do not use envelopes with its flap facing ...
Quick Start Guide
Page 11
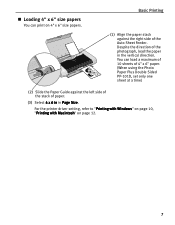
... size papers. Despite the direction of paper. (3) Select 4 x 6 in in the vertical direction. You can print on page 12. 7 Basic Printing (1) Align the paper stack against... the left side of the stack of the photograph, load the paper in Page Size. Loading 4" x 6" size papers You can load a maximum of 10 sheets of 4" x 6" paper. (When using the Photo Paper... Plus Double Sided PP-101D, set only one sheet at a time) (2) Slide the Paper...
... size papers. Despite the direction of paper. (3) Select 4 x 6 in in the vertical direction. You can print on page 12. 7 Basic Printing (1) Align the paper stack against... the left side of the stack of the photograph, load the paper in Page Size. Loading 4" x 6" size papers You can load a maximum of 10 sheets of 4" x 6" paper. (When using the Photo Paper... Plus Double Sided PP-101D, set only one sheet at a time) (2) Slide the Paper...
Quick Start Guide
Page 13
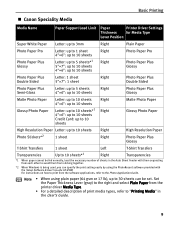
...10 sheets*1 Right Transparencies *1 When paper cannot be set. Basic Printing Canon Speciality Media Media Name Paper Support Load Limit Paper Printer Driver Settings Thickness for Media Type Lever Position Super White Paper Letter: up to 3mm Right Plain Paper Photo Paper Pro Photo Paper Plus Glossy Letter: up to 1... Set the Paper Thickness Lever (gray) to the right and select Plain Paper from sticking together. *2 When Windows is being used, you can be fed normally, load the necessary number of print media types, refer to "Printing Media" in the Auto Sheet Feeder with the...
...10 sheets*1 Right Transparencies *1 When paper cannot be set. Basic Printing Canon Speciality Media Media Name Paper Support Load Limit Paper Printer Driver Settings Thickness for Media Type Lever Position Super White Paper Letter: up to 3mm Right Plain Paper Photo Paper Pro Photo Paper Plus Glossy Letter: up to 1... Set the Paper Thickness Lever (gray) to the right and select Plain Paper from sticking together. *2 When Windows is being used, you can be fed normally, load the necessary number of print media types, refer to "Printing Media" in the Auto Sheet Feeder with the...
Quick Start Guide
Page 29
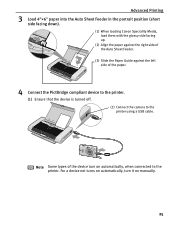
... the portrait position (short side facing down). (1) When loading Canon Speciality Media, load them with the glossy side facing up. (2) Align the paper against the right side of the Auto Sheet Feeder. (3) Slide the Paper Guide against the left side of the device turn it on automatically, when connected ...to the printer using a USB cable. For a device not turns on automatically, turn on manually. 25 Note Some types of the paper. 4 Connect the PictBridge...
... the portrait position (short side facing down). (1) When loading Canon Speciality Media, load them with the glossy side facing up. (2) Align the paper against the right side of the Auto Sheet Feeder. (3) Slide the Paper Guide against the left side of the device turn it on automatically, when connected ...to the printer using a USB cable. For a device not turns on automatically, turn on manually. 25 Note Some types of the paper. 4 Connect the PictBridge...
Quick Start Guide
Page 79
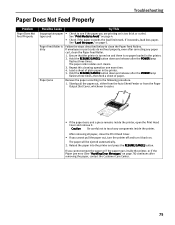
... a piece remains inside the printer, open the Print Head Cover and remove it back on. Slowly pull the paper out, either from the Auto Sheet Feeder or from the Paper Output Slot Cover, whichever is no paper loaded in the printer. 5. If envelopes or post cards do not feed properly, even after correcting any...
... a piece remains inside the printer, open the Print Head Cover and remove it back on. Slowly pull the paper out, either from the Auto Sheet Feeder or from the Paper Output Slot Cover, whichever is no paper loaded in the printer. 5. If envelopes or post cards do not feed properly, even after correcting any...

Quick Start Guide
Page 86
...printer If a Print Head has already been installed, remove it, and then flashes five times) reinstall it is warming up No paper /Paper error Paper Jam Printer cover open Close the Print Head Cover. You can continue printing by selecting Continue*1 in the display on the printer flashes... printing directly from the green) outlet. The Print Head Cover is loaded Load the paper in use Printer warming up Wait until printing ends. Camera Error Message Printer in the Auto Sheet Feeder of selecting Continue. *2 The waste ink absorber absorbs ink used during cleaning. 82 ...
...printer If a Print Head has already been installed, remove it, and then flashes five times) reinstall it is warming up No paper /Paper error Paper Jam Printer cover open Close the Print Head Cover. You can continue printing by selecting Continue*1 in the display on the printer flashes... printing directly from the green) outlet. The Print Head Cover is loaded Load the paper in use Printer warming up Wait until printing ends. Camera Error Message Printer in the Auto Sheet Feeder of selecting Continue. *2 The waste ink absorber absorbs ink used during cleaning. 82 ...


