Easy Start Guide
Page 1
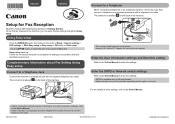
...Started. The connector is shown in this manual after finishing the operation of the machine. Enter the User information settings and Date/time setting Refer to the Online Manual to select the item, then press the OK button. QT5-6253-V01 XXXXXXXX © CANON INC. 2013 PRINTED IN XXXXXXXX To ...use the fax features of the machine. 1 2 • Do not use a telephone jack line duplexer. • Users in accordance with the supplied...
...Started. The connector is shown in this manual after finishing the operation of the machine. Enter the User information settings and Date/time setting Refer to the Online Manual to select the item, then press the OK button. QT5-6253-V01 XXXXXXXX © CANON INC. 2013 PRINTED IN XXXXXXXX To ...use the fax features of the machine. 1 2 • Do not use a telephone jack line duplexer. • Users in accordance with the supplied...
User Manual
Page 10
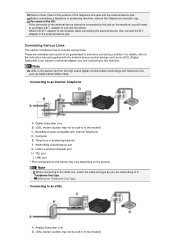
... modem (splitter may not be built-in Telephone line type. adapter to connect various lines. For details, refer to the instruction manual supplied with telephone line such as an xDSL (Digital Subscriber Line) modem or terminal adapter) you are connecting to this machine. Refer...HDSL/SDSL/VDSL. • Connecting to an Internet Telephone A. Before connecting a telephone or answering machine, remove the Telephone connector cap. For users in to purchase a B.T. adapter to connect as you will need to the modem) C. Connecting Various Lines This section introduces how to ...
... modem (splitter may not be built-in Telephone line type. adapter to connect various lines. For details, refer to the instruction manual supplied with telephone line such as an xDSL (Digital Subscriber Line) modem or terminal adapter) you are connecting to this machine. Refer...HDSL/SDSL/VDSL. • Connecting to an Internet Telephone A. Before connecting a telephone or answering machine, remove the Telephone connector cap. For users in to purchase a B.T. adapter to connect as you will need to the modem) C. Connecting Various Lines This section introduces how to ...
User Manual
Page 14
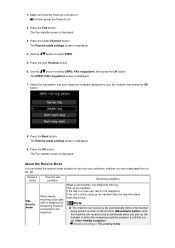
... the button to select DRPD. 5. Press the OK button. The Fax standby screen is displayed. 7. Press the Back button. Confirming that is a voice call incomes (Manual/auto switch). If the call is a fax (User-friendly reception).
... the button to select DRPD. 5. Press the OK button. The Fax standby screen is displayed. 7. Press the Back button. Confirming that is a voice call incomes (Manual/auto switch). If the call is a fax (User-friendly reception).
User Manual
Page 67
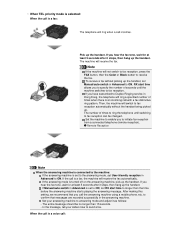
... (remote reception). Remote Reception Note When the answering machine is connected to the machine: If the answering machine is set to the answering mode, set User-friendly reception in the answering machine. When the call is turned off on the answering machine, pick up the handset, set RX start time allows... handset. Set the machine to enable you hear the fax tone, wait for at least 5 seconds after it stops, then hang up the handset. If Manual/auto switch in Advanced is set to ON, set Manual/auto switch in Hong Kong, the telephone will receive the fax.
... (remote reception). Remote Reception Note When the answering machine is connected to the machine: If the answering machine is set to the answering mode, set User-friendly reception in the answering machine. When the call is turned off on the answering machine, pick up the handset, set RX start time allows... handset. Set the machine to enable you hear the fax tone, wait for at least 5 seconds after it stops, then hang up the handset. If Manual/auto switch in Advanced is set to ON, set Manual/auto switch in Hong Kong, the telephone will receive the fax.
User Manual
Page 68
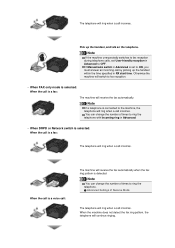
If Manual/auto switch in Advanced is set User-friendly reception in Advanced to OFF. Note You can change the number of Receive Mode The telephone will continue ringing. Pick up the handset within ...
If Manual/auto switch in Advanced is set User-friendly reception in Advanced to OFF. Note You can change the number of Receive Mode The telephone will continue ringing. Pick up the handset within ...
User Manual
Page 72
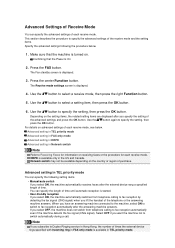
... information on receiving faxes or the procedure for each receive mode, see below . 1. Confirming that the machine is started. • User-friendly reception If you select ON, the machine automatically switches from telephone calling to specify the advanced settings of time. The Fax standby...external device rang a specified length of the receive mode and the setting items. Specify the advanced settings following setting items. • Manual/auto switch If you select ON, the machine automatically receives faxes after you lift the handset of each receive mode. Use the ...
... information on receiving faxes or the procedure for each receive mode, see below . 1. Confirming that the machine is started. • User-friendly reception If you select ON, the machine automatically switches from telephone calling to specify the advanced settings of time. The Fax standby...external device rang a specified length of the receive mode and the setting items. Specify the advanced settings following setting items. • Manual/auto switch If you select ON, the machine automatically receives faxes after you lift the handset of each receive mode. Use the ...
User Manual
Page 97
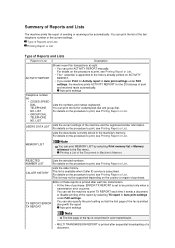
...List. For details on the country or region of the Document in the machine's memory. TX REPORT/ERROR TX REPORT You can print ACTIVITY REPORT manually. Printing a List of purchase. For details on the procedure to print, see Printing Report or List. • The * (asterisk) is... set the machine to the history already printed on ACTIVITY REPORT. • If you select Print for coded speed dial and group dial. USER'S DATA LIST Lists the current settings of sending or receiving a fax automatically. CALLER HISTORY Lists the caller history. LIST Lists the numbers and...
...List. For details on the country or region of the Document in the machine's memory. TX REPORT/ERROR TX REPORT You can print ACTIVITY REPORT manually. Printing a List of purchase. For details on the procedure to print, see Printing Report or List. • The * (asterisk) is... set the machine to the history already printed on ACTIVITY REPORT. • If you select Print for coded speed dial and group dial. USER'S DATA LIST Lists the current settings of sending or receiving a fax automatically. CALLER HISTORY Lists the caller history. LIST Lists the numbers and...

User Manual
Page 98
...Function button. Confirms whether the transmission to print a list of purchase, the machine is set the machine to print the report or the list manually. Lists the deleted faxes in the machine's memory if the faxes stored in the machine's memory are some errors for which the cause is... Report or List This section describes the procedure to print RX REPORT each fax reception. • At the time of the lost . LIST) • USER'S DATA LIST • MEMORY LIST • REJECTED NUMBER LIST • CALLER HISTORY Note CALLER HISTORY may not be supported depending on RX REPORT (there ...
...Function button. Confirms whether the transmission to print a list of purchase, the machine is set the machine to print the report or the list manually. Lists the deleted faxes in the machine's memory if the faxes stored in the machine's memory are some errors for which the cause is... Report or List This section describes the procedure to print RX REPORT each fax reception. • At the time of the lost . LIST) • USER'S DATA LIST • MEMORY LIST • REJECTED NUMBER LIST • CALLER HISTORY Note CALLER HISTORY may not be supported depending on RX REPORT (there ...
Troubleshooting Guide
Page 129
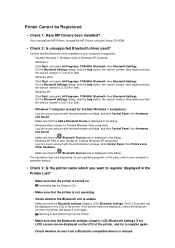
...that the Add a Bluetooth Device is displayed in the dialog. • Windows Vista (except for Toshiba Windows Vista computers) Log into a user account with the administrator privilege, click Control Panel, then Printers and Other Hardware. Make sure that the printer is not operating. • ...00 or later. Attaching to and Removing from a Bluetooth-compatible device is refused. Confirm that the Bluetooth driver installed on your computer's operation manual. • Check 3: Is the printer name which you reinstall the MP Drivers, reinstall the MP Drivers using the Setup CD-ROM. •...
...that the Add a Bluetooth Device is displayed in the dialog. • Windows Vista (except for Toshiba Windows Vista computers) Log into a user account with the administrator privilege, click Control Panel, then Printers and Other Hardware. Make sure that the printer is not operating. • ...00 or later. Attaching to and Removing from a Bluetooth-compatible device is refused. Confirm that the Bluetooth driver installed on your computer's operation manual. • Check 3: Is the printer name which you reinstall the MP Drivers, reinstall the MP Drivers using the Setup CD-ROM. •...


