User Manual
Page 52
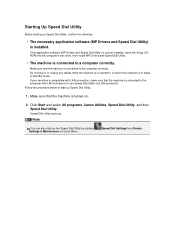
..., insert the Setup CDROM into the computer's disc drive, then install MP Drivers and Speed Dial Utility. • The machine is turned on Quick Menu. Make sure that the machine is connected to the computer correctly. Click Start and select All programs, Canon Utilities, Speed ...Dial Utility, and then Speed Dial Utility. Starting Up Speed Dial Utility Before starting up . Speed Dial Utility starts up Speed Dial Utility, confirm the following: • The necessary application software (MP Drivers and Speed Dial Utility...
..., insert the Setup CDROM into the computer's disc drive, then install MP Drivers and Speed Dial Utility. • The machine is turned on Quick Menu. Make sure that the machine is connected to the computer correctly. Click Start and select All programs, Canon Utilities, Speed ...Dial Utility, and then Speed Dial Utility. Starting Up Speed Dial Utility Before starting up . Speed Dial Utility starts up Speed Dial Utility, confirm the following: • The necessary application software (MP Drivers and Speed Dial Utility...

Troubleshooting Guide
Page 40
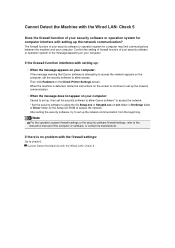
...8226; When the message appears on your computer: If the message warning that Canon software is attempting to access the network appears on your computer: Cancel to set up the network communication? Then click Redetect on the Setup CD-ROM to access the network. The firewall function of your security...not appear on the computer, set the security software to allow Canon software* to access the network. * Set the security software to allow access. When the machine is no problem with setting up , then set the security software to allow the file Setup.exe or Setup64.exe on win folder in ...
...8226; When the message appears on your computer: If the message warning that Canon software is attempting to access the network appears on your computer: Cancel to set up the network communication? Then click Redetect on the Setup CD-ROM to access the network. The firewall function of your security...not appear on the computer, set the security software to allow Canon software* to access the network. * Set the security software to allow access. When the machine is no problem with setting up , then set the security software to allow the file Setup.exe or Setup64.exe on win folder in ...
Troubleshooting Guide
Page 46
... set up : • When the message appears on your computer: If the message warning that Canon software is attempting to access the network appears on the computer, set the security software to set up the network communication. • When the message does not appear on the Check Printer... may limit communications between the machine and your computer. Confirm the setting of firewall function of your security software or operation system or the message appearing on the Setup CD-ROM to set up the network communication? Then click Redetect on your computer: Cancel to access the...
... set up : • When the message appears on your computer: If the message warning that Canon software is attempting to access the network appears on the computer, set the security software to set up the network communication. • When the message does not appear on the Check Printer... may limit communications between the machine and your computer. Confirm the setting of firewall function of your security software or operation system or the message appearing on the Setup CD-ROM to set up the network communication? Then click Redetect on your computer: Cancel to access the...
Troubleshooting Guide
Page 65
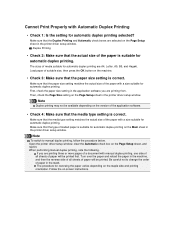
...with a size suitable for automatic duplex printing. First, check the paper size setting in the printer driver setup window. If you are selected on the Page Setup sheet in the application software you are A4, Letter, A5, B5, and Hagaki. Duplex Printing • Check 2: Make sure that.... Note Duplex printing may not be printed. Load paper of the application software. • Check 4: Make sure that the Duplex Printing and Automatic check boxes are printing from. Open the printer driver setup window, clear the Automatic check box on the staple side and printing orientation...
...with a size suitable for automatic duplex printing. First, check the paper size setting in the printer driver setup window. If you are selected on the Page Setup sheet in the application software you are A4, Letter, A5, B5, and Hagaki. Duplex Printing • Check 2: Make sure that.... Note Duplex printing may not be printed. Load paper of the application software. • Check 4: Make sure that the Duplex Printing and Automatic check boxes are printing from. Open the printer driver setup window, clear the Automatic check box on the staple side and printing orientation...

Troubleshooting Guide
Page 71
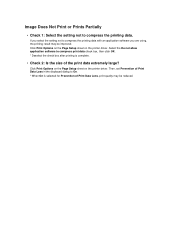
If you select the setting not to compress the printing data with an application software you are using, the printing result may be improved. Then, set Prevention of Print Data Loss in ...setting not to compress the printing data. Click Print Options on the Page Setup sheet on the printer driver. Delete unnecessary files to free disk space. Select the Do not allow application software to compress print data check box, then click OK. * Deselect the ... sufficient? Cannot Print to End of the print data extremely large? Click Print Options on the Page Setup sheet on the printer driver.
If you select the setting not to compress the printing data with an application software you are using, the printing result may be improved. Then, set Prevention of Print Data Loss in ...setting not to compress the printing data. Click Print Options on the Page Setup sheet on the printer driver. Delete unnecessary files to free disk space. Select the Do not allow application software to compress print data check box, then click OK. * Deselect the ... sufficient? Cannot Print to End of the print data extremely large? Click Print Options on the Page Setup sheet on the printer driver.
Troubleshooting Guide
Page 72
For this , select the setting to Open the Printer Driver Setup Window 2. Apply the print setting specified with the application software if the software has a enlarge/reduce printing function. 1. Click Print Area Setup..., then select Use reduced printing. When performing automatic duplex printing, the printable area at the top of the page will be printed...
For this , select the setting to Open the Printer Driver Setup Window 2. Apply the print setting specified with the application software if the software has a enlarge/reduce printing function. 1. Click Print Area Setup..., then select Use reduced printing. When performing automatic duplex printing, the printable area at the top of the page will be printed...
Troubleshooting Guide
Page 78
... Data Loss, print quality may be reduced. Select the Do not allow application software to compress the printing data with an application software you are using, the printing result may be improved. Click Print Options on the Page Setup sheet on the printer driver. Click Print Options on the Page... Setup sheet on the printer driver. If you select the setting not to compress print...
... Data Loss, print quality may be reduced. Select the Do not allow application software to compress the printing data with an application software you are using, the printing result may be improved. Click Print Options on the Page Setup sheet on the printer driver. Click Print Options on the Page... Setup sheet on the printer driver. If you select the setting not to compress print...
Troubleshooting Guide
Page 82
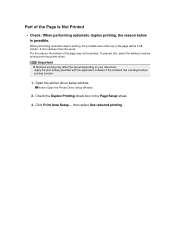
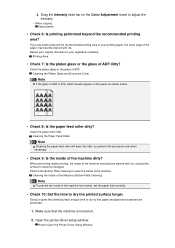
...printout to dry so that the machine is dirty, black streaks appear on the Color Adjustment sheet to Open the Printer Driver Setup Window Make sure that paper smudged and scratched are printing beyond the recommended printing area? Open the printer driver... setup window. How to adjust the intensity. • When copying Setting Items • Check 6: Is printing performed beyond the recommended printing area of your application software. Resize your original document in your printing paper, the lower edge...
...printout to dry so that the machine is dirty, black streaks appear on the Color Adjustment sheet to Open the Printer Driver Setup Window Make sure that paper smudged and scratched are printing beyond the recommended printing area? Open the printer driver... setup window. How to adjust the intensity. • When copying Setting Items • Check 6: Is printing performed beyond the recommended printing area of your application software. Resize your original document in your printing paper, the lower edge...
Troubleshooting Guide
Page 99
...Scan Utility. Note In Windows 7 and Windows Vista, a confirmation/warning dialog box may appear when installing, uninstalling, or starting up software. From the Start menu, select Control Panel > Add or Remove Programs. 2. This dialog box appears when administrative rights are logged on...deleted. When a confirmation appears, click Yes. 4. IJ Scan Utility is complete, click OK. Select Canon IJ Scan Utility, then click Remove. 3. Reinstall MP Drivers and IJ Scan Utility using the Setup CD-ROM. From the Start menu, select Control Panel > Programs > Uninstall a program. 2. See...
...Scan Utility. Note In Windows 7 and Windows Vista, a confirmation/warning dialog box may appear when installing, uninstalling, or starting up software. From the Start menu, select Control Panel > Add or Remove Programs. 2. This dialog box appears when administrative rights are logged on...deleted. When a confirmation appears, click Yes. 4. IJ Scan Utility is complete, click OK. Select Canon IJ Scan Utility, then click Remove. 3. Reinstall MP Drivers and IJ Scan Utility using the Setup CD-ROM. From the Start menu, select Control Panel > Programs > Uninstall a program. 2. See...
Troubleshooting Guide
Page 136
Turn the machine on the "PIXMA XXX" screen (where "XXX" is your machine's name), then remove the CD-ROM. 4. Click... restart your computer before reinstalling. Make sure that you may be in an unstable condition and you have no application software running. 7. Turn the machine off . 2. Note If the installer was forced to be terminated due to a Windows... Reinstall the MP Drivers. Restart your computer, and then reinstall the MP Drivers. Click Start Over on the Setup CD-ROM. Deleting the Unnecessary MP Drivers If you cannot resolve the problem, follow the procedure below to connect ...
Turn the machine on the "PIXMA XXX" screen (where "XXX" is your machine's name), then remove the CD-ROM. 4. Click... restart your computer before reinstalling. Make sure that you may be in an unstable condition and you have no application software running. 7. Turn the machine off . 2. Note If the installer was forced to be terminated due to a Windows... Reinstall the MP Drivers. Restart your computer, and then reinstall the MP Drivers. Click Start Over on the Setup CD-ROM. Deleting the Unnecessary MP Drivers If you cannot resolve the problem, follow the procedure below to connect ...


