Easy Start Guide
Page 1
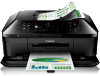
... basic connection method is shown in the order of the machine, you prepare your own telephone line cable, be available depending on -screen instruction to a telephone jack with the operating environment. Using Easy setup Press the MENU button, then select in this figure. QT5-6253-V01 XXXXXXXX... © CANON INC. 2013 PRINTED IN XXXXXXXX To use a telephone jack line duplexer. • Users in accordance with the supplied telephone line cable. ...
... basic connection method is shown in the order of the machine, you prepare your own telephone line cable, be available depending on -screen instruction to a telephone jack with the operating environment. Using Easy setup Press the MENU button, then select in this figure. QT5-6253-V01 XXXXXXXX... © CANON INC. 2013 PRINTED IN XXXXXXXX To use a telephone jack line duplexer. • Users in accordance with the supplied telephone line cable. ...
User Manual
Page 8
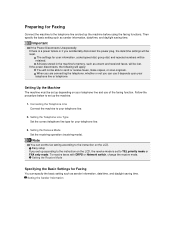
... telephone line. 3. Preparing for Faxing Connect the machine to the telephone line and set up the machine. 1. Follow the procedure below to the instruction on your telephone line and use it depends upon your telephone line or telephone. Note You can set the fax setting according to set up...setting such as sender information, date/time, and daylight saving time. When you are connecting the telephone, whether or not you set to the instruction on the LCD, the receive mode is a power failure or if you accidentally disconnect the power plug, the date/time settings will be reset....
... telephone line. 3. Preparing for Faxing Connect the machine to the telephone line and set up the machine. 1. Follow the procedure below to the instruction on your telephone line and use it depends upon your telephone line or telephone. Note You can set the fax setting according to set up...setting such as sender information, date/time, and daylight saving time. When you are connecting the telephone, whether or not you set to the instruction on the LCD, the receive mode is a power failure or if you accidentally disconnect the power plug, the date/time settings will be reset....
User Manual
Page 10
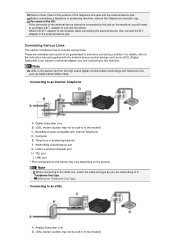
adapter to this machine. For details, refer to the instruction manual supplied with the network device (control devices such as ADSL/HDSL/SDSL/VDSL. • Connecting to connect various lines. Broadband router compatible with telephone ...
adapter to this machine. For details, refer to the instruction manual supplied with the network device (control devices such as ADSL/HDSL/SDSL/VDSL. • Connecting to connect various lines. Broadband router compatible with telephone ...
User Manual
Page 22
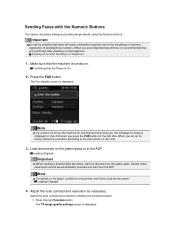
... the procedure below. 1. Sending a Fax after speaking on the platen glass or in the ADF. Confirming that faxes will reach unintended recipients due to the instructions on the LCD when you have not set up the machine for sending/receiving faxes yet, the message for the first time. Press the FAX...
... the procedure below. 1. Sending a Fax after speaking on the platen glass or in the ADF. Confirming that faxes will reach unintended recipients due to the instructions on the LCD when you have not set up the machine for sending/receiving faxes yet, the message for the first time. Press the FAX...
User Manual
Page 24
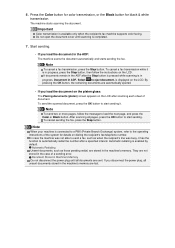
... transmission while it is displayed on the LCD. In case the machine was not able to start sending it has the function to the operating instructions of the system for black & white transmission. is in the case of document. If documents remain in the ADF after scanning each sheet of a sending...
... transmission while it is displayed on the LCD. In case the machine was not able to start sending it has the function to the operating instructions of the system for black & white transmission. is in the case of document. If documents remain in the ADF after scanning each sheet of a sending...
User Manual
Page 26
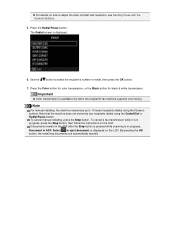
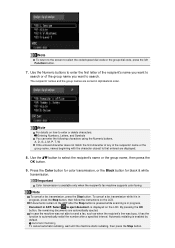
... remain in the ADF after the Stop button is pressed while scanning is in progress, Document in progress, press the Stop button, then follow the instructions on the LCD. Use the button to select the recipient's number to 10 recent recipients dialed using the Coded Dial or Redial/Pause button. By...
... remain in the ADF after the Stop button is pressed while scanning is in progress, Document in progress, press the Stop button, then follow the instructions on the LCD. Use the button to select the recipient's number to 10 recent recipients dialed using the Coded Dial or Redial/Pause button. By...

User Manual
Page 29
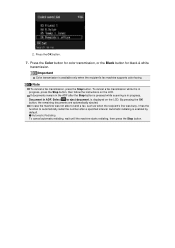
If documents remain in the ADF after the Stop button is pressed while scanning is in ADF. To cancel a fax transmission while it is in progress, Document in progress, press the Stop button, then follow the instructions on the LCD. 10. is displayed on the LCD. By pressing the OK button, the remaining documents are automatically ejected. Note To cancel a fax transmission, press the Stop button. Hang up the handset. Select to eject document.
If documents remain in the ADF after the Stop button is pressed while scanning is in ADF. To cancel a fax transmission while it is in progress, Document in progress, press the Stop button, then follow the instructions on the LCD. 10. is displayed on the LCD. By pressing the OK button, the remaining documents are automatically ejected. Note To cancel a fax transmission, press the Stop button. Hang up the handset. Select to eject document.
User Manual
Page 31
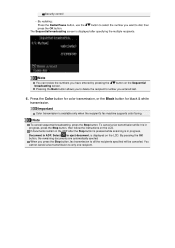
... Color button for color transmission, or the Black button for black & white transmission. If documents remain in progress, press the Stop button, then follow the instructions on the LCD. Note To cancel a fax transmission, press the Stop button. Press the OK button. 7. 2. Automatic redialing is in the ADF after a specified interval...
... Color button for color transmission, or the Black button for black & white transmission. If documents remain in progress, press the Stop button, then follow the instructions on the LCD. Note To cancel a fax transmission, press the Stop button. Press the OK button. 7. 2. Automatic redialing is in the ADF after a specified interval...
User Manual
Page 33
... button for color transmission, or the Black button for black & white transmission. is in progress, Document in progress, press the Stop button, then follow the instructions on how to search. In case the machine was not able to send a fax, such as when the recipient's line was busy, it is available...
... button for color transmission, or the Black button for black & white transmission. is in progress, Document in progress, press the Stop button, then follow the instructions on how to search. In case the machine was not able to send a fax, such as when the recipient's line was busy, it is available...
User Manual
Page 35
... Stop button. is displayed after the Stop button is pressed while scanning is in progress, Document in progress, press the Stop button, then follow the instructions on the Sequential broadcasting screen. Important Color transmission is in ADF. By pressing the OK button, the remaining documents are automatically ejected. Pressing the Back...
... Stop button. is displayed after the Stop button is pressed while scanning is in progress, Document in progress, press the Stop button, then follow the instructions on the Sequential broadcasting screen. Important Color transmission is in ADF. By pressing the OK button, the remaining documents are automatically ejected. Pressing the Back...
User Manual
Page 38
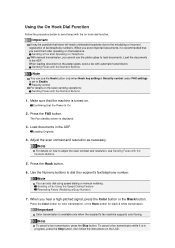
... Dialing Feature Resending Faxes (Redialing a Busy Number) 7. Make sure that the Power Is On 2. Load documents in progress, press the Stop button, then follow the instructions on . The Fax standby screen is available only when the recipient's fax machine supports color faxing. Press the Color button for color transmission, or the...
... Dialing Feature Resending Faxes (Redialing a Busy Number) 7. Make sure that the Power Is On 2. Load documents in progress, press the Stop button, then follow the instructions on . The Fax standby screen is available only when the recipient's fax machine supports color faxing. Press the Color button for color transmission, or the...
User Manual
Page 53
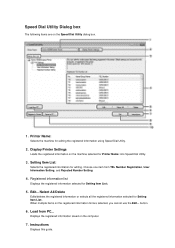
... PC... Displays the registered information saved on the Speed Dial Utility dialog box. 1. When multiple items on the registered information list are on the computer. 7. Instructions Displays this guide. Load from TEL Number Registration, User Information Setting, and Rejected Number Setting. 4. Registered information list Displays the registered information selected for Printer...
... PC... Displays the registered information saved on the Speed Dial Utility dialog box. 1. When multiple items on the registered information list are on the computer. 7. Instructions Displays this guide. Load from TEL Number Registration, User Information Setting, and Rejected Number Setting. 4. Registered information list Displays the registered information selected for Printer...

User Manual
Page 79
In this function may be disabled. For details on how to switch to tone dialing, refer to your telephone's instruction manual. • If you use a rotary pulse line, temporarily switch your telephone to the machine that can be the same as the remote reception ID. ...
In this function may be disabled. For details on how to switch to tone dialing, refer to your telephone's instruction manual. • If you use a rotary pulse line, temporarily switch your telephone to the machine that can be the same as the remote reception ID. ...
User Manual
Page 86
... to the machine, you dial the number of the information service. 5. Hang up the handset to tone dialing. 6. Use the Numeric buttons to your telephone's instruction manual. 6. Using the Rotary Pulse Line • Dialing by Using the Telephone Connected to press the numbers in accordance with the message. 7. Use the Numeric...
... to the machine, you dial the number of the information service. 5. Hang up the handset to tone dialing. 6. Use the Numeric buttons to your telephone's instruction manual. 6. Using the Rotary Pulse Line • Dialing by Using the Telephone Connected to press the numbers in accordance with the message. 7. Use the Numeric...
User Manual
Page 102
...select Printing Preferences. Click Print or OK. * Print dialog box in Notepad Note You can specify the paper size and print orientation by following the instructions below: Windows 7: 1. From the Start menu, select Control Panel > Hardware and Sound > Printers. 2. Windows XP: 1. In Select Printer or...white transmission is the model name). 4. From the Start menu, select Control Panel > Hardware and Sound > Devices and Printers. 2. Right-click the Canon XXX series FAX icon (where "XXX" is the model name.) Windows Vista: 1. From the Start menu, select Control Panel > Printers and Other ...
...select Printing Preferences. Click Print or OK. * Print dialog box in Notepad Note You can specify the paper size and print orientation by following the instructions below: Windows 7: 1. From the Start menu, select Control Panel > Hardware and Sound > Printers. 2. Windows XP: 1. In Select Printer or...white transmission is the model name). 4. From the Start menu, select Control Panel > Hardware and Sound > Devices and Printers. 2. Right-click the Canon XXX series FAX icon (where "XXX" is the model name.) Windows Vista: 1. From the Start menu, select Control Panel > Printers and Other ...
User Manual
Page 116
... dialog box (where XXX is the model name) and select Properties. Windows Vista: 1. Right-click the Canon XXX series FAX icon (where "XXX" is the model name) appears. 3. Follow the instructions below : - from multiple computers at the same time. Uncheck the Allow A4/Letter Paper Resizing option on... the Ports tab of the Canon XXX series FAX Properties dialog box (where "XXX" is the model name). To ...
... dialog box (where XXX is the model name) and select Properties. Windows Vista: 1. Right-click the Canon XXX series FAX icon (where "XXX" is the model name) appears. 3. Follow the instructions below : - from multiple computers at the same time. Uncheck the Allow A4/Letter Paper Resizing option on... the Ports tab of the Canon XXX series FAX Properties dialog box (where "XXX" is the model name). To ...
Troubleshooting Guide
Page 13
"xxxxxxxxxx" is the character string generated from the computer. Click Print Options on the Page Setup sheet on -screen instructions to set Prevention of the machine is your machine's name), then select Properties. 4. Click the Ports tab to the computer using ... reinstall the MP Drivers. • Printing does not start even though the machine is selected: Click Start and select All programs, Canon Utilities, Canon My Printer, Canon My Printer, then select Diagnose and Repair Printer. Open the properties of the printer driver for Prevention of the print data extremely large?...
"xxxxxxxxxx" is the character string generated from the computer. Click Print Options on the Page Setup sheet on -screen instructions to set Prevention of the machine is your machine's name), then select Properties. 4. Click the Ports tab to the computer using ... reinstall the MP Drivers. • Printing does not start even though the machine is selected: Click Start and select All programs, Canon Utilities, Canon My Printer, Canon My Printer, then select Diagnose and Repair Printer. Open the properties of the printer driver for Prevention of the print data extremely large?...
Troubleshooting Guide
Page 26
...? Open the inner cover, properly place the disc tray again, then press the OK button on the disc tray? For details on -screen instructions. Try the operation again following the on how to place the disc tray, refer to Placing a Printable Disc. • Check 2: Unrecognizable ...disc. Use the disc tray supplied with this machine ("J" is a problem with this machine ("J" is in progress, the machine stops initializing. Canon recommends that you use printable discs specially processed to Placing a Printable Disc. The disc tray will automatically be printed on the upper side). ...
...? Open the inner cover, properly place the disc tray again, then press the OK button on the disc tray? For details on -screen instructions. Try the operation again following the on how to place the disc tray, refer to Placing a Printable Disc. • Check 2: Unrecognizable ...disc. Use the disc tray supplied with this machine ("J" is a problem with this machine ("J" is in progress, the machine stops initializing. Canon recommends that you use printable discs specially processed to Placing a Printable Disc. The disc tray will automatically be printed on the upper side). ...
Troubleshooting Guide
Page 29
... adjust the installation positions while monitoring the radio status with the access point or contact its manufacturer. • Check 7: Make sure that Canon software is attempting to the access point. • Check 10: Make sure that the network settings in the machine are correct. If... communication between different rooms or floors is assigned to the computer. If not, change the channel set them up, refer to the instruction manual of radio wave interference in Check 8. Cannot Communicate with your computer or your computer. Locate the machine within the effective range for...
... adjust the installation positions while monitoring the radio status with the access point or contact its manufacturer. • Check 7: Make sure that Canon software is attempting to the access point. • Check 10: Make sure that the network settings in the machine are correct. If... communication between different rooms or floors is assigned to the computer. If not, change the channel set them up, refer to the instruction manual of radio wave interference in Check 8. Cannot Communicate with your computer or your computer. Locate the machine within the effective range for...
Troubleshooting Guide
Page 30
...DVD/CD-ROM drive on . • Check 2: Make sure that the machine is loose, connect the cable properly. For the procedures to the instruction manual of the computer are not installed, install the MP Drivers. If using any programs that there is connected properly. Some programs will enable a ...firewall by default. • Check 11: When using a router, connect the printer and computer to the instruction manual of the Computer. If the problem is not resolved, insert the CD-ROM in the DVD/CD-ROM drive on your computer to start...
...DVD/CD-ROM drive on . • Check 2: Make sure that the machine is loose, connect the cable properly. For the procedures to the instruction manual of the computer are not installed, install the MP Drivers. If using any programs that there is connected properly. Some programs will enable a ...firewall by default. • Check 11: When using a router, connect the printer and computer to the instruction manual of the Computer. If the problem is not resolved, insert the CD-ROM in the DVD/CD-ROM drive on your computer to start...


