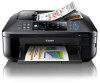
Setting Up the FAX
Page 1
... prepare your own telephone line cable, be available depending on the back of the machine. 1 2 • Do not use the fax features of > Device settings > FAX settings > Start Easy setup or Easy setup > OK button or Start setup. The connector is labeled on -screen instruction to a ...with the operating environment. Easy setup starts up. The connector is labeled on the region or country. QT5-4896-V01 XXXXXXXX ©CANON INC.2012 PRINTED IN XXXXXXXX Connect to complete the settings in accordance with the supplied telephone line cable. ENGLISH ESPAÑOL K10376 ...
... prepare your own telephone line cable, be available depending on the back of the machine. 1 2 • Do not use the fax features of > Device settings > FAX settings > Start Easy setup or Easy setup > OK button or Start setup. The connector is labeled on -screen instruction to a ...with the operating environment. Easy setup starts up. The connector is labeled on the region or country. QT5-4896-V01 XXXXXXXX ©CANON INC.2012 PRINTED IN XXXXXXXX Connect to complete the settings in accordance with the supplied telephone line cable. ENGLISH ESPAÑOL K10376 ...
MX890 series Specifications
Page 1
...max. 33.6 kbps (Automatic fallback) Transmission speed Black: Approx. 3 seconds/page at 33.6 kbps (Based on ITU-T No.1 chart for US specifications and Canon FAX Standard chart No.1 for others , both in standard mode.) Color: Approx. 1 minute/page at minimum. Gradation (Input/Output) Gray: 16 bit/8 bit ... speed obtained. PRINTED IN XXXXXXXX The necessary amount of hard disk The necessary amount of 1/9600 inch at 33.6 kbps (Based on Canon COLOR FAX TEST SHEET.) Gradation Black: 256 levels Color: 24 bit Full Color (RGB each 16 bit/8 bit) Network Specifications Communication protocol TCP/...
...max. 33.6 kbps (Automatic fallback) Transmission speed Black: Approx. 3 seconds/page at 33.6 kbps (Based on ITU-T No.1 chart for US specifications and Canon FAX Standard chart No.1 for others , both in standard mode.) Color: Approx. 1 minute/page at minimum. Gradation (Input/Output) Gray: 16 bit/8 bit ... speed obtained. PRINTED IN XXXXXXXX The necessary amount of hard disk The necessary amount of 1/9600 inch at 33.6 kbps (Based on Canon COLOR FAX TEST SHEET.) Gradation Black: 256 levels Color: 24 bit Full Color (RGB each 16 bit/8 bit) Network Specifications Communication protocol TCP/...

Configuraci?n del FAX [Spanish Version]
Page 1
...accordance with the supplied telephone line cable. ENGLISH ESPAÑOL K10376 Setting Up the FAX To use a telephone jack line duplexer. • Users in UK: Use a B.T. Complementary Information about Fax Setting Using Easy setup Connect to a Telephone Jack Connect the machine to enter the settings...then connect a telephone or an answering machine with a telephone line cable. Connect to enter the settings. QT5-4896-V01 XXXXXXXX ©CANON INC.2012 PRINTED IN XXXXXXXX Enter the DRPD or Network switch settings Refer to the On-screen Manual to a telephone jack with the...
...accordance with the supplied telephone line cable. ENGLISH ESPAÑOL K10376 Setting Up the FAX To use a telephone jack line duplexer. • Users in UK: Use a B.T. Complementary Information about Fax Setting Using Easy setup Connect to a Telephone Jack Connect the machine to enter the settings...then connect a telephone or an answering machine with a telephone line cable. Connect to enter the settings. QT5-4896-V01 XXXXXXXX ©CANON INC.2012 PRINTED IN XXXXXXXX Enter the DRPD or Network switch settings Refer to the On-screen Manual to a telephone jack with the...

MX890 series Especificaciones [Spanish Version]
Page 1
... max. 33.6 kbps (Automatic fallback) Transmission speed Black: Approx. 3 seconds/page at 33.6 kbps (Based on ITU-T No.1 chart for US specifications and Canon FAX Standard chart No.1 for Windows 7/Windows Vista/Windows XP) Maximum scanning size A4/Letter, 8.5" X 11.7"/216 X 297 mm (Platen Glass), 8.5" X 14.0"/... nozzles, C/M each 8 bit) Density adjustment 3 levels Memory Transmission/reception: approx. 250 pages (Based on ITU-T No.1 chart for US specifications and Canon FAX Standard chart No.1 for others , both in height Legal size: max. 30 sheets (20 lb/75 gsm paper), up to 0.20 inches/5 mm...
... max. 33.6 kbps (Automatic fallback) Transmission speed Black: Approx. 3 seconds/page at 33.6 kbps (Based on ITU-T No.1 chart for US specifications and Canon FAX Standard chart No.1 for Windows 7/Windows Vista/Windows XP) Maximum scanning size A4/Letter, 8.5" X 11.7"/216 X 297 mm (Platen Glass), 8.5" X 14.0"/... nozzles, C/M each 8 bit) Density adjustment 3 levels Memory Transmission/reception: approx. 250 pages (Based on ITU-T No.1 chart for US specifications and Canon FAX Standard chart No.1 for others , both in height Legal size: max. 30 sheets (20 lb/75 gsm paper), up to 0.20 inches/5 mm...
Setup Guide
Page 2
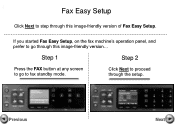
Click Next to proceed through this image-friendly version of Fax Easy Setup. Previous Next Step 1 Step 2 Press the FAX button at any screen to go through the setup. If you started Fax Easy Setup, on the fax machine's operation panel, and prefer to go to fax standby mode. Fax Easy Setup Click Next to step through this image-friendly version...
Click Next to proceed through this image-friendly version of Fax Easy Setup. Previous Next Step 1 Step 2 Press the FAX button at any screen to go through the setup. If you started Fax Easy Setup, on the fax machine's operation panel, and prefer to go to fax standby mode. Fax Easy Setup Click Next to step through this image-friendly version...
Setup Guide
Page 4
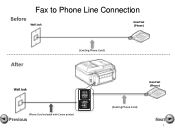
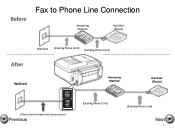
Fax to Phone Line Connection Before Wall Jack Hand Set (Phone) After Wall Jack (Existing Phone Cord) Hand Set (Phone) (Phone Cord included with Canon printer) Previous (Existing Phone Cord) Next 4
Fax to Phone Line Connection Before Wall Jack Hand Set (Phone) After Wall Jack (Existing Phone Cord) Hand Set (Phone) (Phone Cord included with Canon printer) Previous (Existing Phone Cord) Next 4
Setup Guide
Page 5
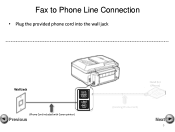
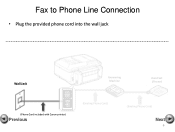
Fax to Phone Line Connection • Plug the provided phone cord into the wall jack Wall Jack (Phone Cord included with Canon printer) Previous Hand Set (Phone) (Existing Phone Cord) Next 5
Fax to Phone Line Connection • Plug the provided phone cord into the wall jack Wall Jack (Phone Cord included with Canon printer) Previous Hand Set (Phone) (Existing Phone Cord) Next 5
Setup Guide
Page 6
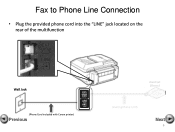
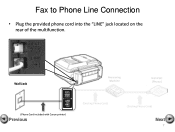
Fax to Phone Line Connection • Plug the provided phone cord into the "LINE" jack located on the rear of the multifunction Wall Jack (Phone Cord included with Canon printer) Previous Hand Set (Phone) (Existing Phone Cord) Next 6
Fax to Phone Line Connection • Plug the provided phone cord into the "LINE" jack located on the rear of the multifunction Wall Jack (Phone Cord included with Canon printer) Previous Hand Set (Phone) (Existing Phone Cord) Next 6
Setup Guide
Page 7
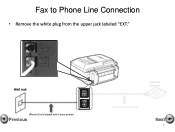
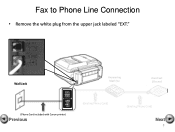
Fax to Phone Line Connection • Remove the white plug from the upper jack labeled "EXT." Wall Jack (Phone Cord included with Canon printer) Previous Hand Set (Phone) (Existing Phone Cord) Next 7
Fax to Phone Line Connection • Remove the white plug from the upper jack labeled "EXT." Wall Jack (Phone Cord included with Canon printer) Previous Hand Set (Phone) (Existing Phone Cord) Next 7

Setup Guide
Page 8
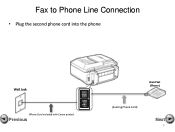
jack located on the rear of the multifunction Wall Jack (Phone Cord included with Canon printer) Previous Hand Set (Phone) (Existing Phone Cord) Next 8 Fax to Phone Line Connection • Plug the second phone cord into the "EXT."
jack located on the rear of the multifunction Wall Jack (Phone Cord included with Canon printer) Previous Hand Set (Phone) (Existing Phone Cord) Next 8 Fax to Phone Line Connection • Plug the second phone cord into the "EXT."
Setup Guide
Page 9
Fax to Phone Line Connection • Plug the second phone cord into the phone Wall Jack (Phone Cord included with Canon printer) Previous Hand Set (Phone) (Existing Phone Cord) Next 9
Fax to Phone Line Connection • Plug the second phone cord into the phone Wall Jack (Phone Cord included with Canon printer) Previous Hand Set (Phone) (Existing Phone Cord) Next 9
Setup Guide
Page 11
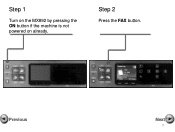
Step 1 Turn on the MX892 by pressing the ON button if the machine is not powered on already. Step 2 Press the FAX button. Previous Next 11
Step 1 Turn on the MX892 by pressing the ON button if the machine is not powered on already. Step 2 Press the FAX button. Previous Next 11

Setup Guide
Page 12
Step 4 Press the center FUNCTION button. Step 3 The fax standby screen will appear. Previous Next 12
Step 4 Press the center FUNCTION button. Step 3 The fax standby screen will appear. Previous Next 12
Setup Guide
Page 19
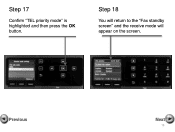
Step 18 You will return to the "Fax standby screen" and the receive mode will appear on the screen. Step 17 Confirm "TEL priority mode" is highlighted and then press the OK button. Previous Next 19
Step 18 You will return to the "Fax standby screen" and the receive mode will appear on the screen. Step 17 Confirm "TEL priority mode" is highlighted and then press the OK button. Previous Next 19
Setup Guide
Page 20
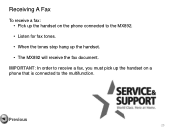
Previous 20 Receiving A Fax To receive a fax: • Pick up the handset. • The MX892 will receive the fax document. IMPORTANT: In order to receive a fax, you must pick up the handset on the phone connected to the MX892. • Listen for fax tones. • When the tones stop hang up the handset on a phone that is connected to the multifunction.
Previous 20 Receiving A Fax To receive a fax: • Pick up the handset. • The MX892 will receive the fax document. IMPORTANT: In order to receive a fax, you must pick up the handset on the phone connected to the MX892. • Listen for fax tones. • When the tones stop hang up the handset on a phone that is connected to the multifunction.

Setup Guide
Page 2
If you started Fax Easy Setup, on the fax machine's operation panel, and prefer to proceed through the setup. Click Next to go to step through this image-friendly version of Fax Easy Setup. Previous Next Fax Easy Setup Click Next to fax standby mode. Step 1 Step 2 Press the FAX button at any screen to go through this image-friendly version...
If you started Fax Easy Setup, on the fax machine's operation panel, and prefer to proceed through the setup. Click Next to go to step through this image-friendly version of Fax Easy Setup. Previous Next Fax Easy Setup Click Next to fax standby mode. Step 1 Step 2 Press the FAX button at any screen to go through this image-friendly version...
Setup Guide
Page 5
Before Fax to Phone Line Connection Answering Machine Hand Set (Phone) Wall Jack (Existing Phone Cord) (Existing Phone Cord) After Wall Jack Answering Machine Hand Set (Phone) (Phone Cord included with Canon printer) Previous (Existing Phone Cord) (Existing Phone Cord) Next 5
Before Fax to Phone Line Connection Answering Machine Hand Set (Phone) Wall Jack (Existing Phone Cord) (Existing Phone Cord) After Wall Jack Answering Machine Hand Set (Phone) (Phone Cord included with Canon printer) Previous (Existing Phone Cord) (Existing Phone Cord) Next 5
Setup Guide
Page 6
Fax to Phone Line Connection • Plug the provided phone cord into the wall jack Wall Jack Answering Machine Hand Set (Phone) (Phone Cord included with Canon printer) Previous (Existing Phone Cord) (Existing Phone Cord) Next 6
Fax to Phone Line Connection • Plug the provided phone cord into the wall jack Wall Jack Answering Machine Hand Set (Phone) (Phone Cord included with Canon printer) Previous (Existing Phone Cord) (Existing Phone Cord) Next 6
Setup Guide
Page 7
Wall Jack Answering Machine Hand Set (Phone) (Phone Cord included with Canon printer) Previous (Existing Phone Cord) (Existing Phone Cord) Next 7 Fax to Phone Line Connection • Plug the provided phone cord into the "LINE" jack located on the rear of the multifunction.
Wall Jack Answering Machine Hand Set (Phone) (Phone Cord included with Canon printer) Previous (Existing Phone Cord) (Existing Phone Cord) Next 7 Fax to Phone Line Connection • Plug the provided phone cord into the "LINE" jack located on the rear of the multifunction.
Setup Guide
Page 8
Wall Jack Answering Machine Hand Set (Phone) (Phone Cord included with Canon printer) Previous (Existing Phone Cord) (Existing Phone Cord) Next 8 Fax to Phone Line Connection • Remove the white plug from the upper jack labeled "EXT."
Wall Jack Answering Machine Hand Set (Phone) (Phone Cord included with Canon printer) Previous (Existing Phone Cord) (Existing Phone Cord) Next 8 Fax to Phone Line Connection • Remove the white plug from the upper jack labeled "EXT."


