User Manual
Page 4
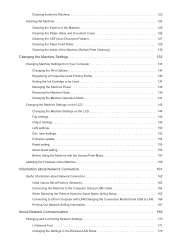
...Connection 162 Initial Values Set at Factory (Network 163 Connecting the Machine to the Computer Using a USB Cable 164 When Detecting the Printers Have the Same Name during Setup 165 Connecting to Other Computer with LAN/Changing the Connection Method from Your Computer 133 Changing the ...Network Setting Information 167 About Network Communication 169 Changing and Confirming Network Settings 170 IJ Network Tool 171 Changing the Settings in the Wireless LAN Sheet 172 user settings 152 Firmware update 154 Reset setting 155 About Quiet setting 156 Before Using the Machine with the ...
...Connection 162 Initial Values Set at Factory (Network 163 Connecting the Machine to the Computer Using a USB Cable 164 When Detecting the Printers Have the Same Name during Setup 165 Connecting to Other Computer with LAN/Changing the Connection Method from Your Computer 133 Changing the ...Network Setting Information 167 About Network Communication 169 Changing and Confirming Network Settings 170 IJ Network Tool 171 Changing the Settings in the Wireless LAN Sheet 172 user settings 152 Firmware update 154 Reset setting 155 About Quiet setting 156 Before Using the Machine with the ...
User Manual
Page 5
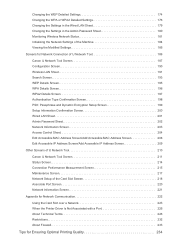
...Settings of the Machine 184 Viewing the Modified Settings 185 Screens for Network Connection of IJ Network Tool 186 Canon IJ Network Tool Screen 187 Configuration Screen 190 Wireless LAN Sheet 191 Search Screen 193 WEP Details Screen 195 WPA Details Screen 196 WPA2 Details Screen 197 ...Port Screen 220 Network Information Screen 221 Appendix for Network Communication 222 Using the Card Slot over a Network 223 When the Printer Driver Is Not Associated with a Port 225 About Technical Terms 226 Restrictions 232 About Firewall 233 Tips for Ensuring Optimal Printing Quality ...
...Settings of the Machine 184 Viewing the Modified Settings 185 Screens for Network Connection of IJ Network Tool 186 Canon IJ Network Tool Screen 187 Configuration Screen 190 Wireless LAN Sheet 191 Search Screen 193 WEP Details Screen 195 WPA Details Screen 196 WPA2 Details Screen 197 ...Port Screen 220 Network Information Screen 221 Appendix for Network Communication 222 Using the Card Slot over a Network 223 When the Printer Driver Is Not Associated with a Port 225 About Technical Terms 226 Restrictions 232 About Firewall 233 Tips for Ensuring Optimal Printing Quality ...
User Manual
Page 18
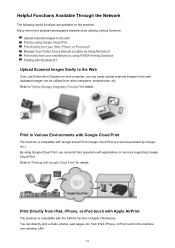
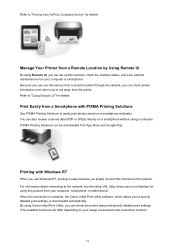
..., web pages, etc. You can be utilized from other computers, smartphones, etc. By using PIXMA Printing Solutions Printing with Windows RT Upload Scanned Images Easily to the Web If you use Evernote ...by using Google Cloud Print Print directly from your iPad, iPhone, or iPod touch Manage Your Printer from a Remote Location by Using Remote UI Print easily from your computer, you can print ...Google Cloud Print" for details. from iPad, iPhone, or iPod touch to the machine over wireless LAN. 18 Helpful Functions Available Through the Network The following useful functions are available on your ...
..., web pages, etc. You can be utilized from other computers, smartphones, etc. By using PIXMA Printing Solutions Printing with Windows RT Upload Scanned Images Easily to the Web If you use Evernote ...by using Google Cloud Print Print directly from your iPad, iPhone, or iPod touch Manage Your Printer from a Remote Location by Using Remote UI Print easily from your computer, you can print ...Google Cloud Print" for details. from iPad, iPhone, or iPod touch to the machine over wireless LAN. 18 Helpful Functions Available Through the Network The following useful functions are available on your ...
User Manual
Page 19
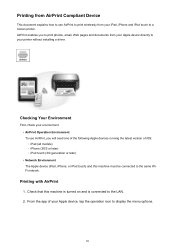
... for details. When the connection is easy because you can check the printer status and specify detailed print settings. (The available functions will differ depending on a smartphone wirelessly. Printing with PIXMA Printing Solutions Use PIXMA Printing Solutions to the network. Because you simply connect this product from ...software, which allows you to the network, see the setup URL (http://www.canon.com/ijsetup) for using Remote UI, you can set up this service from the printer. Manage Your Printer from a Remote Location by Using Remote UI By using this machine to easily ...
... for details. When the connection is easy because you can check the printer status and specify detailed print settings. (The available functions will differ depending on a smartphone wirelessly. Printing with PIXMA Printing Solutions Use PIXMA Printing Solutions to the network. Because you simply connect this product from ...software, which allows you to the network, see the setup URL (http://www.canon.com/ijsetup) for using Remote UI, you can set up this service from the printer. Manage Your Printer from a Remote Location by Using Remote UI By using this machine to easily ...
User Manual
Page 30
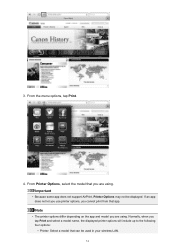
... one of the following Apple devices running the latest version of your environment. • AirPrint Operation Environment To use AirPrint to print wirelessly from your Apple device directly to your printer without installing a driver. Printing with AirPrint 1. From the app of iOS: ◦ iPad (all models) ◦ iPhone (3GS or later) ◦... Device This document explains how to use AirPrint, you to print photos, email, Web pages and documents from your iPad, iPhone and iPod touch to a Canon printer.
... one of the following Apple devices running the latest version of your environment. • AirPrint Operation Environment To use AirPrint to print wirelessly from your Apple device directly to your printer without installing a driver. Printing with AirPrint 1. From the app of iOS: ◦ iPad (all models) ◦ iPhone (3GS or later) ◦... Device This document explains how to use AirPrint, you to print photos, email, Web pages and documents from your iPad, iPhone and iPod touch to a Canon printer.
User Manual
Page 31
From Printer Options, select the model that you are using . Note • The printer options differ depending on the app and model you are using . From the menu options, tap Print. 4. Normally, when you cannot print from that can be displayed. If an app does not let you use printer options, you tap Print and select a model name, the displayed printer options will include up to the following four options: • Printer: Select a model that app. Important • Because some app does not support AirPrint, Printer Options may not be used in your wireless LAN. 31 3.
From Printer Options, select the model that you are using . Note • The printer options differ depending on the app and model you are using . From the menu options, tap Print. 4. Normally, when you cannot print from that can be displayed. If an app does not let you use printer options, you tap Print and select a model name, the displayed printer options will include up to the following four options: • Printer: Select a model that app. Important • Because some app does not support AirPrint, Printer Options may not be used in your wireless LAN. 31 3.
User Manual
Page 150
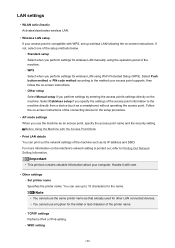
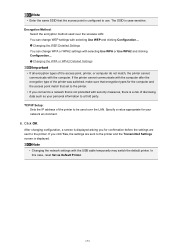
... used for other LAN connected devices. • You cannot use up wireless LAN following the on the machine's network setting is printed out, refer to 15 characters for wireless LAN using the operation panel of the printer name. ◦ TCP/IP settings Performs IPv4 or IPv6 setting. &#... up to Printing Out Network Setting Information. Activates/deactivates wireless LAN. • Wireless LAN setup If your access point supports, then follow the on-screen instructions. ◦ Other setup Select Manual setup if you use the same printer name as its IP address and SSID. Select Push ...
... used for other LAN connected devices. • You cannot use up wireless LAN following the on the machine's network setting is printed out, refer to 15 characters for wireless LAN using the operation panel of the printer name. ◦ TCP/IP settings Performs IPv4 or IPv6 setting. &#... up to Printing Out Network Setting Information. Activates/deactivates wireless LAN. • Wireless LAN setup If your access point supports, then follow the on-screen instructions. ◦ Other setup Select Manual setup if you use the same printer name as its IP address and SSID. Select Push ...
User Manual
Page 151
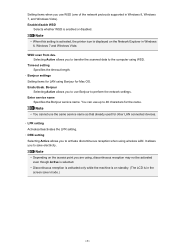
Note • When this setting is activated, the printer icon is displayed on standby. (The LCD is in the screen saver mode.) 151 Selecting Active allows you to use Bonjour to perform the network ... network protocols supported in Windows 8, Windows 7 and Windows Vista. WSD scan from dev. Enab./disab. Setting items when you to activate discontinuous reception when using wireless LAN. Timeout setting Specifies the timeout length. ◦ Bonjour settings Setting items for LAN using , discontinuous reception may not be activated even though Active is...
Note • When this setting is activated, the printer icon is displayed on standby. (The LCD is in the screen saver mode.) 151 Selecting Active allows you to use Bonjour to perform the network ... network protocols supported in Windows 8, Windows 7 and Windows Vista. WSD scan from dev. Enab./disab. Setting items when you to activate discontinuous reception when using wireless LAN. Timeout setting Specifies the timeout length. ◦ Bonjour settings Setting items for LAN using , discontinuous reception may not be activated even though Active is...
User Manual
Page 163
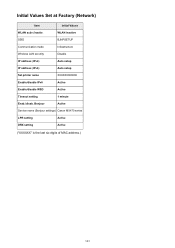
WLAN inactive SSID BJNPSETUP Communication mode Infrastructure Wireless LAN security Disable IP address (IPv4) Auto setup IP address (IPv6) Auto setup Set printer name XXXXXX000000 Enable/disable IPv6 Active Enable/disable WSD Active Timeout setting 1 minute Enab./disab. Initial Values Set at Factory (Network) Item Initial Values WLAN activ./inactiv. Bonjour Active Service name (Bonjour settings) Canon MX470 series LPR setting Active DRX setting Active ("XXXXXX" is the last six digits of MAC address.) 163
WLAN inactive SSID BJNPSETUP Communication mode Infrastructure Wireless LAN security Disable IP address (IPv4) Auto setup IP address (IPv6) Auto setup Set printer name XXXXXX000000 Enable/disable IPv6 Active Enable/disable WSD Active Timeout setting 1 minute Enab./disab. Initial Values Set at Factory (Network) Item Initial Values WLAN activ./inactiv. Bonjour Active Service name (Bonjour settings) Canon MX470 series LPR setting Active DRX setting Active ("XXXXXX" is the last six digits of MAC address.) 163

User Manual
Page 168
Printer Name Printer name Printer name (Up to 15 characters) WSD WSD setting Enable/Disable WSD Timeout Timeout 1/5/10/15/20 [min] LPR Protocol LPR protocol setting Enable/Disable Bonjour ... of the network is printed. *2 Only IPv6 and the IPsec setting are activated, the status of the Security Protocol ESP/ESP & AH/AH Wireless LAN DRX Discontinuous reception (wireless LAN) Enable/Disable Other Settings Other settings - IPv6 IP Address *1 Selected IP Address (IPv6) XXXX:XXXX:XXXX:XXXX XXXX:XXXX:XXXX:XXXX IPv6...
Printer Name Printer name Printer name (Up to 15 characters) WSD WSD setting Enable/Disable WSD Timeout Timeout 1/5/10/15/20 [min] LPR Protocol LPR protocol setting Enable/Disable Bonjour ... of the network is printed. *2 Only IPv6 and the IPsec setting are activated, the status of the Security Protocol ESP/ESP & AH/AH Wireless LAN DRX Discontinuous reception (wireless LAN) Enable/Disable Other Settings Other settings - IPv6 IP Address *1 Selected IP Address (IPv6) XXXX:XXXX:XXXX:XXXX XXXX:XXXX:XXXX:XXXX IPv6...

User Manual
Page 172
... appears by clicking Search.... For details on the printer you modify the wireless network settings of the detected access points. When the printer is connected to change the wireless network settings of the printer, connect the printer and the computer with "USBnnn" (where "n" ...is not available depending on the Wireless LAN sheet, see Wireless LAN Sheet. 5. Change the settings or confirm...
... appears by clicking Search.... For details on the printer you modify the wireless network settings of the detected access points. When the printer is connected to change the wireless network settings of the printer, connect the printer and the computer with "USBnnn" (where "n" ...is not available depending on the Wireless LAN sheet, see Wireless LAN Sheet. 5. Change the settings or confirm...
User Manual
Page 173
...a screen is displayed asking you for the computer and the access point match that set to the printer. • If you click Yes, the settings are sent to the printer and the Transmitted Settings screen is displayed. Changing the WPA or WPA2 Detailed Settings Important •...such as Default Printer. 173 If the printer cannot communicate with the computer after the encryption type of the printer was switched, make sure that encryption types for confirmation before the settings are sent to the printer. Encryption Method: Select the encryption method used over the wireless LAN. Note &#...
...a screen is displayed asking you for the computer and the access point match that set to the printer. • If you click Yes, the settings are sent to the printer and the Transmitted Settings screen is displayed. Changing the WPA or WPA2 Detailed Settings Important •...such as Default Printer. 173 If the printer cannot communicate with the computer after the encryption type of the printer was switched, make sure that encryption types for confirmation before the settings are sent to the printer. Encryption Method: Select the encryption method used over the wireless LAN. Note &#...
User Manual
Page 174
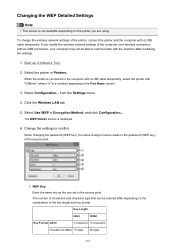
...USB connection, your computer may not be entered differ depending on the printer you modify the wireless network settings of the access point. 1. Select the printer in Encryption Method: and click Configuration.... Select Use WEP in Printers:. The WEP Details screen is a number) appearing in the Port ...can be able to the access point. If you are using. When the printer is connected to the computer with a USB cable temporarily, select the printer with "USBnnn" (where "n" is displayed. 6. Click the Wireless LAN tab. 5. Start up IJ Network Tool. 2. Change the settings or ...
...USB connection, your computer may not be entered differ depending on the printer you modify the wireless network settings of the access point. 1. Select the printer in Encryption Method: and click Configuration.... Select Use WEP in Printers:. The WEP Details screen is a number) appearing in the Port ...can be able to the access point. If you are using. When the printer is connected to the computer with a USB cable temporarily, select the printer with "USBnnn" (where "n" is displayed. 6. Click the Wireless LAN tab. 5. Start up IJ Network Tool. 2. Change the settings or ...

User Manual
Page 176
... connected to communicate with "USBnnn" (where "n" is not available depending on the printer you are using. from the Settings menu. 4. Click the Wireless LAN tab. 5. Start up IJ Network Tool. 2. If you modify the wireless network settings of the printer, connect the printer and the computer with a USB cable temporarily. Click Change Settings.... 7. Changing the...
... connected to communicate with "USBnnn" (where "n" is not available depending on the printer you are using. from the Settings menu. 4. Click the Wireless LAN tab. 5. Start up IJ Network Tool. 2. If you modify the wireless network settings of the printer, connect the printer and the computer with a USB cable temporarily. Click Change Settings.... 7. Changing the...
User Manual
Page 181
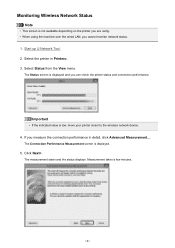
...value is displayed. 5. The measurement starts and the status displays. The Connection Performance Measurement screen is low, move your printer closer to the wireless network device. 4. Select Status from the View menu. The Status screen is displayed and you cannot monitor network status. 1.... Select the printer in detail, click Advanced Measurement.... Monitoring Wireless Network Status Note • This screen is not available depending on the printer you are using. • When using the machine over the wired ...
...value is displayed. 5. The measurement starts and the status displays. The Connection Performance Measurement screen is low, move your printer closer to the wireless network device. 4. Select Status from the View menu. The Status screen is displayed and you cannot monitor network status. 1.... Select the printer in detail, click Advanced Measurement.... Monitoring Wireless Network Status Note • This screen is not available depending on the printer you are using. • When using the machine over the wired ...

User Manual
Page 182
... refer to displayed comments and the following to that the printer and the access point face each other. The wireless connection may depend on the orientations of communication link, and click Remeasurement. • Check that the printer and the access point are located within 164 ft./50 ...whether other computers are too far, move them closer together (within the wireless connectivity range with no obstacles between them. • Check if the distance between the Printer and the Access Point:, the printer can communicate with other access points. • Check that of other access...
... refer to displayed comments and the following to that the printer and the access point face each other. The wireless connection may depend on the orientations of communication link, and click Remeasurement. • Check that the printer and the access point are located within 164 ft./50 ...whether other computers are too far, move them closer together (within the wireless connectivity range with no obstacles between them. • Check if the distance between the Printer and the Access Point:, the printer can communicate with other access points. • Check that of other access...
User Manual
Page 184
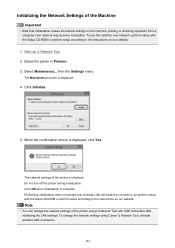
...perform setup according to the instructions on our website. The network settings of the printer is complete. To change the network settings of the printer using Canon IJ Network Tool, activate wireless LAN in Printers:. 3. Initializing the Network Settings of the Machine Important • Note that ... When the confirmation screen is displayed. 4. The Maintenance screen is displayed, click Yes. Do not turn off the printer during initialization. Select the printer in advance. 184 Performing initialization when connected over network may become impossible.
...perform setup according to the instructions on our website. The network settings of the printer is complete. To change the network settings of the printer using Canon IJ Network Tool, activate wireless LAN in Printers:. 3. Initializing the Network Settings of the Machine Important • Note that ... When the confirmation screen is displayed. 4. The Maintenance screen is displayed, click Yes. Do not turn off the printer during initialization. Select the printer in advance. 184 Performing initialization when connected over network may become impossible.
User Manual
Page 188
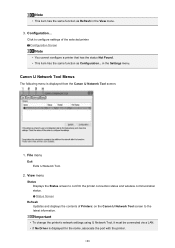
... for the name, associate the port with the printer. 188 Important • To change the printer's network settings using IJ Network Tool, it must be connected via a LAN. • If No Driver is displayed from the Canon IJ Network Tool screen. 1. File menu Exit ... the contents of the selected printer. in the View menu. 3. Click to configure settings of Printers: on the Canon IJ Network Tool screen to confirm the printer connection status and wireless communication status. Configuration... Configuration Screen Note • You cannot configure a printer that has the status Not ...
... for the name, associate the port with the printer. 188 Important • To change the printer's network settings using IJ Network Tool, it must be connected via a LAN. • If No Driver is displayed from the Canon IJ Network Tool screen. 1. File menu Exit ... the contents of the selected printer. in the View menu. 3. Click to configure settings of Printers: on the Canon IJ Network Tool screen to confirm the printer connection status and wireless communication status. Configuration... Configuration Screen Note • You cannot configure a printer that has the status Not ...
User Manual
Page 190
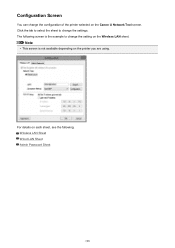
For details on the Canon IJ Network Tool screen. Note • This screen is the example to change the settings. The following . Wireless LAN Sheet Wired LAN Sheet Admin Password Sheet 190 Configuration Screen You can change the configuration of the printer selected on each sheet, see the following screen is not available depending on the Wireless LAN sheet. Click the tab to select the sheet to change the setting on the printer you are using.
For details on the Canon IJ Network Tool screen. Note • This screen is the example to change the settings. The following . Wireless LAN Sheet Wired LAN Sheet Admin Password Sheet 190 Configuration Screen You can change the configuration of the printer selected on each sheet, see the following screen is not available depending on the Wireless LAN sheet. Click the tab to select the sheet to change the setting on the printer you are using.

User Manual
Page 191
... point is configured to . Wireless LAN Sheet Note • This screen is not available depending on the Configuration screen. 1. To display the Wireless LAN sheet, click the Wireless LAN tab on the printer you to set the printer with a USB cable temporarily to the wireless LAN with an access point.... 2. SSID: The SSID of the wireless LAN is grayed out and cannot be selected. ...
... point is configured to . Wireless LAN Sheet Note • This screen is not available depending on the Configuration screen. 1. To display the Wireless LAN sheet, click the Wireless LAN tab on the printer you to set the printer with a USB cable temporarily to the wireless LAN with an access point.... 2. SSID: The SSID of the wireless LAN is grayed out and cannot be selected. ...


