User Manual
Page 4
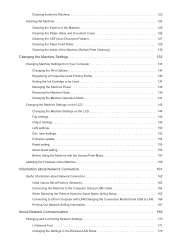
... Values Set at Factory (Network 163 Connecting the Machine to the Computer Using a USB Cable 164 When Detecting the Printers Have the Same Name during Setup 165 Connecting to Other Computer with the Access Point Mode 157 Updating the Firmware of the Machine (Bottom Plate Cleaning 130 Changing the Machine Settings... Machine Noise 139 Changing the Machine Operation Mode 141 Changing the Machine Settings on the LCD 143 Changing the Machine Settings on the LCD 144 Fax settings 145 Output settings 149 LAN settings 150 Dev.
... Values Set at Factory (Network 163 Connecting the Machine to the Computer Using a USB Cable 164 When Detecting the Printers Have the Same Name during Setup 165 Connecting to Other Computer with the Access Point Mode 157 Updating the Firmware of the Machine (Bottom Plate Cleaning 130 Changing the Machine Settings... Machine Noise 139 Changing the Machine Operation Mode 141 Changing the Machine Settings on the LCD 143 Changing the Machine Settings on the LCD 144 Fax settings 145 Output settings 149 LAN settings 150 Dev.
User Manual
Page 52
.... (15) SCAN button Switches the machine to the previous screen. user settings 52 (13) Back button Returns the LCD to the scan mode. (16) FAX Memory lamp Lights when there are received or unsent documents stored in Sound control of Dev. With this menu, you can be adjusted in the... machine's memory. (17) Menu button Displays the Copy menu, Scan menu, or FAX menu screen. user settings. Dev. This button is also used to delete a character under the cursor when entering characters, such as when entering a name for...
.... (15) SCAN button Switches the machine to the previous screen. user settings 52 (13) Back button Returns the LCD to the scan mode. (16) FAX Memory lamp Lights when there are received or unsent documents stored in Sound control of Dev. With this menu, you can be adjusted in the... machine's memory. (17) Menu button Displays the Copy menu, Scan menu, or FAX menu screen. user settings. Dev. This button is also used to delete a character under the cursor when entering characters, such as when entering a name for...
User Manual
Page 58
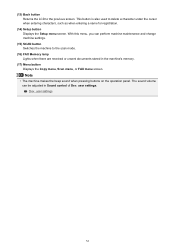
..., press the OK button (D). Press the Menu button in the respective modes shows the menu screen to switch between the copy mode, scan mode, fax mode, or setup menu screen. Press the or button (C) to change the contrast, then press the OK button (D). 58 Use the or button to select... FAX TX settings. Pressing the Menu button (B) in the Fax standby screen. LCD and Operation Panel The mode button (A) on the operation panel allows you to select various...
..., press the OK button (D). Press the Menu button in the respective modes shows the menu screen to switch between the copy mode, scan mode, fax mode, or setup menu screen. Press the or button (C) to change the contrast, then press the OK button (D). 58 Use the or button to select... FAX TX settings. Pressing the Menu button (B) in the Fax standby screen. LCD and Operation Panel The mode button (A) on the operation panel allows you to select various...

User Manual
Page 100
... OK button. Example: The ink is shown in the area (A). LCD and Operation Panel 3. Take appropriate action according to inform you press the COPY, FAX, SCAN, or Setup button. Checking the Ink Status with the LCD on the Machine Note • The ink level detector is mounted on the machine to select... Remaining ink, then press the OK button. Checking the Ink Status from Setup menu, then select Print ink number. • You can also check the ink status on , and press the...
... OK button. Example: The ink is shown in the area (A). LCD and Operation Panel 3. Take appropriate action according to inform you press the COPY, FAX, SCAN, or Setup button. Checking the Ink Status with the LCD on the Machine Note • The ink level detector is mounted on the machine to select... Remaining ink, then press the OK button. Checking the Ink Status from Setup menu, then select Print ink number. • You can also check the ink status on , and press the...
User Manual
Page 138
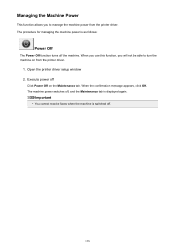
... Maintenance tab is switched off Click Power Off on from the printer driver. The machine power switches off the machine. Important • You cannot receive faxes when the machine is displayed again. When you use this function, you to turn the machine on the Maintenance tab. When the confirmation message appears... Managing the Machine Power This function allows you will not be able to manage the machine power from the printer driver. 1. Open the printer driver setup window 2.
... Maintenance tab is switched off Click Power Off on from the printer driver. The machine power switches off the machine. Important • You cannot receive faxes when the machine is displayed again. When you use this function, you to turn the machine on the Maintenance tab. When the confirmation message appears... Managing the Machine Power This function allows you will not be able to manage the machine power from the printer driver. 1. Open the printer driver setup window 2.

User Manual
Page 144
...setting. 1. Note • The * (asterisk) on each setting item: Fax settings Output settings LAN settings Dev. Use the button to select Extended copy amt., then press the OK button. 6. Press the Setup button. Changing the Machine Settings on the LCD This section describes the procedure... to change the fax settings, press the Setup button, then select Fax settings. 4. user settings Firmware update Reset setting Note • You ...
...setting. 1. Note • The * (asterisk) on each setting item: Fax settings Output settings LAN settings Dev. Use the button to select Extended copy amt., then press the OK button. 6. Press the Setup button. Changing the Machine Settings on the LCD This section describes the procedure... to change the fax settings, press the Setup button, then select Fax settings. 4. user settings Firmware update Reset setting Note • You ...

User Manual
Page 145
... Auto print settings Security control Note • Before changing the settings, you can specify the setup setting individually or the advanced setting. Registering Recipients Using the Operation Panel of the faxing function. Registers your name printed on the LCD. Setting the Telephone Line Type 145 Follow the procedure according to the machine...
... Auto print settings Security control Note • Before changing the settings, you can specify the setup setting individually or the advanced setting. Registering Recipients Using the Operation Panel of the faxing function. Registers your name printed on the LCD. Setting the Telephone Line Type 145 Follow the procedure according to the machine...
User Manual
Page 155
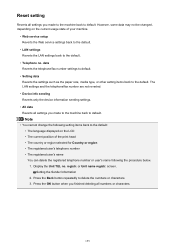
...characters. 155 However, some data may not be changed, depending on the LCD • The current position of your machine. • Web service setup Reverts the Web service settings back to the default. • LAN settings Reverts the LAN settings back to the default. • Telephone no ...telephone number or user's name following the procedure below. 1. Press the Back button repeatedly to the default. The LAN settings and the telephone/fax number are not reverted. • Device info sending Reverts only the device information sending settings. • All data Reverts all settings you ...
...characters. 155 However, some data may not be changed, depending on the LCD • The current position of your machine. • Web service setup Reverts the Web service settings back to the default. • LAN settings Reverts the LAN settings back to the default. • Telephone no ...telephone number or user's name following the procedure below. 1. Press the Back button repeatedly to the default. The LAN settings and the telephone/fax number are not reverted. • Device info sending Reverts only the device information sending settings. • All data Reverts all settings you ...

User Manual
Page 159
...; If the firmware update is storing the unprinted fax in machine's memory (memory reception) • When the unsent faxes are stored in the machine's memory are deleted. 1. Check the status of the machine via Internet. Press the Setup button. Note • You cannot update the... firmware under the following conditions: • While the machine is sending or receiving a fax • While the machine is carried out, all faxes stored in the machine's memory 6. If the...
...; If the firmware update is storing the unprinted fax in machine's memory (memory reception) • When the unsent faxes are stored in the machine's memory are deleted. 1. Check the status of the machine via Internet. Press the Setup button. Note • You cannot update the... firmware under the following conditions: • While the machine is sending or receiving a fax • While the machine is carried out, all faxes stored in the machine's memory 6. If the...
User Manual
Page 244
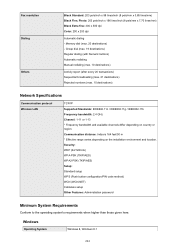
Communication distance: Indoors 164 feet/50 m * Effective range varies depending on country or region. Fax resolution Dialing Others Black Standard: 203 pels/inch x 98 lines/inch (8 pels/mm x 3.85 lines/mm) Black Fine, Photo: 203 pels/inch x 196 ... environment and location. Security: WEP (64/128 bits) WPA-PSK (TKIP/AES) WPA2-PSK (TKIP/AES) Setup: Standard setup WPS (Push button configuration/PIN code method) WCN (WCN-NET) Cableless setup Other Features: Administration password Minimum System Requirements Conform to the operating system's requirements when higher than those given here...
Communication distance: Indoors 164 feet/50 m * Effective range varies depending on country or region. Fax resolution Dialing Others Black Standard: 203 pels/inch x 98 lines/inch (8 pels/mm x 3.85 lines/mm) Black Fine, Photo: 203 pels/inch x 196 ... environment and location. Security: WEP (64/128 bits) WPA-PSK (TKIP/AES) WPA2-PSK (TKIP/AES) Setup: Standard setup WPS (Push button configuration/PIN code method) WCN (WCN-NET) Cableless setup Other Features: Administration password Minimum System Requirements Conform to the operating system's requirements when higher than those given here...

Fax Guide
Page 3
... Printing a Document in Machine's Memory 82 Deleting a Document in Machine's Memory 84 Summary of Reports and Lists 86 Sending Faxes from a Computer 91 Sending a FAX (Fax Driver 92 Creating an Address Book (Fax Driver 96 Setup when Opening the Address Book for the First Time (Windows XP 100 Edit or Remove a Recipient from an Address...
... Printing a Document in Machine's Memory 82 Deleting a Document in Machine's Memory 84 Summary of Reports and Lists 86 Sending Faxes from a Computer 91 Sending a FAX (Fax Driver 92 Creating an Address Book (Fax Driver 96 Setup when Opening the Address Book for the First Time (Windows XP 100 Edit or Remove a Recipient from an Address...

Fax Guide
Page 5
... up depending on your telephone line. 2. Setting the Telephone Line Type Set the correct telephone line type for your telephone line or telephone. Easy setup If you accidentally disconnect the power plug, the date/time settings will be reset. • The settings for user information, coded memory dial,..., date/time, and daylight saving time. If the power disconnects, the following will apply: • You will be able to send or receive faxes, make copies, or scan originals. • When you are connecting the telephone, whether or not you can specify the basic setting such as sender...
... up depending on your telephone line. 2. Setting the Telephone Line Type Set the correct telephone line type for your telephone line or telephone. Easy setup If you accidentally disconnect the power plug, the date/time settings will be reset. • The settings for user information, coded memory dial,..., date/time, and daylight saving time. If the power disconnects, the following will apply: • You will be able to send or receive faxes, make copies, or scan originals. • When you are connecting the telephone, whether or not you can specify the basic setting such as sender...

Fax Guide
Page 9
If you set the correct telephone line type for your telephone line. Press the Setup button. The Setup menu screen is tone dialing. Use the button to select FAX user settings, then press the OK button. 5. Note • The * (asterisk) on . 2. Make sure that the machine is turned on... select a telephone line type, then press the OK button. For xDSL or ISDN connections, contact the telephone company or service provider to select Fax settings, then press the OK button. 4. Use the button to confirm your line type. Touch tone Select when your telephone line type is ...
If you set the correct telephone line type for your telephone line. Press the Setup button. The Setup menu screen is tone dialing. Use the button to select FAX user settings, then press the OK button. 5. Note • The * (asterisk) on . 2. Make sure that the machine is turned on... select a telephone line type, then press the OK button. For xDSL or ISDN connections, contact the telephone company or service provider to select Fax settings, then press the OK button. 4. Use the button to confirm your line type. Touch tone Select when your telephone line type is ...

Fax Guide
Page 15
...information of all countries or regions is applied for DST setting by registering the date and time that the machine is displayed. 3. Press the Setup button. Enter only the last two digits of purchase. 1. Make sure that daylight saving time (summer time) begins and ends. Set ...time. 1. user settings, then press the OK button. 5. You can set your country or region. The Setup menu screen is turned on. 2. Use the button to the Fax standby screen. Make sure that shifts the clock time forward at certain periods of your machine to automatically change the...
...information of all countries or regions is applied for DST setting by registering the date and time that the machine is displayed. 3. Press the Setup button. Enter only the last two digits of purchase. 1. Make sure that daylight saving time (summer time) begins and ends. Set ...time. 1. user settings, then press the OK button. 5. You can set your country or region. The Setup menu screen is turned on. 2. Use the button to the Fax standby screen. Make sure that shifts the clock time forward at certain periods of your machine to automatically change the...

Fax Guide
Page 17
Press the Setup button. Make sure that Unit TEL no . is selected, then press the OK button. 2. Press the OK button. is selected, then press the OK button. 2. Note • Before sending a fax, be sure to enter your name and fax/telephone number in Unit TEL no . and Unit name..., then press the OK button. 4. Use the button to enter the unit fax/telephone number. 3. Make sure that Unit name registr. Use the Numeric buttons to register the user information. The Setup menu screen is turned on how to 24 characters, including spaces. • For details on . 2. Note ...
Press the Setup button. Make sure that Unit TEL no . is selected, then press the OK button. 2. Press the OK button. is selected, then press the OK button. 2. Note • Before sending a fax, be sure to enter your name and fax/telephone number in Unit TEL no . and Unit name..., then press the OK button. 4. Use the button to enter the unit fax/telephone number. 3. Make sure that Unit name registr. Use the Numeric buttons to register the user information. The Setup menu screen is turned on how to 24 characters, including spaces. • For details on . 2. Note ...

Fax Guide
Page 33
..., then press the OK button. 4. Enter the recipient's fax/telephone number using the Numeric buttons again. The Setup menu screen is turned on. 2. Sending Faxes after the machine checks the recipient's fax machine information Before sending a fax, the machine checks whether the recipient's fax machine information matches the dialed number. re-entry to ON following the...
..., then press the OK button. 4. Enter the recipient's fax/telephone number using the Numeric buttons again. The Setup menu screen is turned on. 2. Sending Faxes after the machine checks the recipient's fax machine information Before sending a fax, the machine checks whether the recipient's fax machine information matches the dialed number. re-entry to ON following the...

Fax Guide
Page 34
.... Use the button to select Security control, then press the OK button. 5. Sending a Fax after Speaking on . 2. Press the Setup button. Use the button to receive the recipient's fax information or if the received information does not match the fax/telephone number. 34 Make sure that the machine is displayed. 3. Important • Transmission will...
.... Use the button to select Security control, then press the OK button. 5. Sending a Fax after Speaking on . 2. Press the Setup button. Use the button to receive the recipient's fax information or if the received information does not match the fax/telephone number. 34 Make sure that the machine is displayed. 3. Important • Transmission will...

Fax Guide
Page 39
... procedure below to select Memory dial, then press the OK button. If you select a code already used as a coded memory dial, the fax/telephone number is displayed. The Setup menu screen is displayed. 3. The screen to select an unoccupied coded memory dial code, then press the OK button. Use the button or...
... procedure below to select Memory dial, then press the OK button. If you select a code already used as a coded memory dial, the fax/telephone number is displayed. The Setup menu screen is displayed. 3. The screen to select an unoccupied coded memory dial code, then press the OK button. Use the button or...

Fax Guide
Page 42
...button. Note • If you select a code already used as a coded memory dial, (Not available) is displayed. Choose a member to select Fax settings, then press the OK button. 4. You can be switched by pressing the button. • When Add to group is displayed on the LCD...select a code already used as a group dial, the registered group name is displayed. The screen to select TEL no. The Setup menu screen is displayed. 3. Press the Setup button. registration, then press the OK button. 5. Use the button to select a group dial code is displayed. 6. Registering ...
...button. Note • If you select a code already used as a coded memory dial, (Not available) is displayed. Choose a member to select Fax settings, then press the OK button. 4. You can be switched by pressing the button. • When Add to group is displayed on the LCD...select a code already used as a group dial, the registered group name is displayed. The screen to select TEL no. The Setup menu screen is displayed. 3. Press the Setup button. registration, then press the OK button. 5. Use the button to select a group dial code is displayed. 6. Registering ...

Fax Guide
Page 44
...9702; From call logs is displayed. Change the recipient's fax/telephone number, then press the OK button. Changing Registered Information To change information registered for coded memory dial and group dial, follow the procedure below. 1. The Setup menu screen is displayed. registration, then press the OK... to select Memory dial, then press the OK button. 2. Use the button to select Fax settings, then press the OK button. 4. Press the Setup button. Use the button to select a fax/telephone number or a name and press the OK button, the editing screen is displayed.
...9702; From call logs is displayed. Change the recipient's fax/telephone number, then press the OK button. Changing Registered Information To change information registered for coded memory dial and group dial, follow the procedure below. 1. The Setup menu screen is displayed. registration, then press the OK... to select Memory dial, then press the OK button. 2. Use the button to select Fax settings, then press the OK button. 4. Press the Setup button. Use the button to select a fax/telephone number or a name and press the OK button, the editing screen is displayed.


