Setup Guide
Page 3
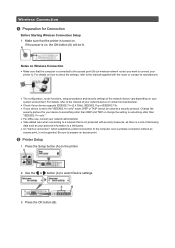
...access point. Be sure to select Device settings. 3. Press the OK button (B). For details on how to check the settings, refer to the manual supplied with security measures, as there is a risk of the network device vary depending on . b Printer Setup 1. Wireless Connection a Preparation ... TKIP cannot be lit. Notes on Wireless Connection • Make sure that the computer is not supported. For details, refer to the manual of your network device or contact its manufacturer. • The configuration, router functions, setup procedures and security settings of disclosing data such ...
...access point. Be sure to select Device settings. 3. Press the OK button (B). For details on how to check the settings, refer to the manual supplied with security measures, as there is a risk of the network device vary depending on . b Printer Setup 1. Wireless Connection a Preparation ... TKIP cannot be lit. Notes on Wireless Connection • Make sure that the computer is not supported. For details, refer to the manual of your network device or contact its manufacturer. • The configuration, router functions, setup procedures and security settings of disclosing data such ...

Setup Guide
Page 5
The (blue) Wi-Fi lamp on pressing the WPS button, refer to the access point. 3. Press the COPY button (A). d-A Push Button Method d Connection Using WPS 1. The network connection setup is now complete. Press and hold the WPS button on the printer within 2 minutes. Press the OK button on the access point. For details on the printer flashes while searching for or connecting to the access point manual. 2. When the left screen appears, press the OK button. 4.
The (blue) Wi-Fi lamp on pressing the WPS button, refer to the access point. 3. Press the COPY button (A). d-A Push Button Method d Connection Using WPS 1. The network connection setup is now complete. Press and hold the WPS button on the printer within 2 minutes. Press the OK button on the access point. For details on the printer flashes while searching for or connecting to the access point manual. 2. When the left screen appears, press the OK button. 4.
Setup Guide
Page 6
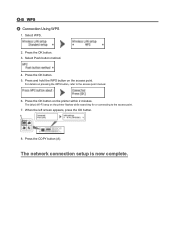
Select Push button method. 4. For details on the printer flashes while searching for or connecting to the access point manual. 6. The (blue) Wi-Fi lamp on pressing the WPS button, refer to the access point. 7. Press and hold the WPS button on the printer within 2 minutes. Press the OK button on the access point. When the left screen appears, press the OK button. 8. Press the OK button. 5. Press the OK button. 3. d-B WPS d Connection Using WPS 1. Press the COPY button (A). Select WPS. 2. The network connection setup is now complete.
Select Push button method. 4. For details on the printer flashes while searching for or connecting to the access point manual. 6. The (blue) Wi-Fi lamp on pressing the WPS button, refer to the access point. 7. Press and hold the WPS button on the printer within 2 minutes. Press the OK button on the access point. When the left screen appears, press the OK button. 8. Press the OK button. 5. Press the OK button. 3. d-B WPS d Connection Using WPS 1. Press the COPY button (A). Select WPS. 2. The network connection setup is now complete.

Setup Guide
Page 7
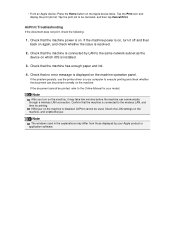
... on . If the network device is already turned on, turn it off, then turn it back on only one access point. Failed to the manual supplied with the access point or contact its manufacturer. Timeout error The screen appears when WPS setup was not completed within a specified time. •...
... on . If the network device is already turned on, turn it off, then turn it back on only one access point. Failed to the manual supplied with the access point or contact its manufacturer. Timeout error The screen appears when WPS setup was not completed within a specified time. •...

User Manual
Page 1
MX450 series Online Manual Read Me First Useful Functions Available on the Machine Overview of the Machine English
MX450 series Online Manual Read Me First Useful Functions Available on the Machine Overview of the Machine English

User Manual
Page 2
... Internet Explorer 9 or 10 Select (Tools) > Print > Page setup.... • In Internet Explorer 8 1. In addition, Canon may suspend or stop the disclosure of this guide. from the File menu. See the manual supplied with utmost care, please contact the service center if you find any damage suffered by... Canon. To print background colors and images, follow the steps below to display the menus. 2....
... Internet Explorer 9 or 10 Select (Tools) > Print > Page setup.... • In Internet Explorer 8 1. In addition, Canon may suspend or stop the disclosure of this guide. from the File menu. See the manual supplied with utmost care, please contact the service center if you find any damage suffered by... Canon. To print background colors and images, follow the steps below to display the menus. 2....

User Manual
Page 6
... name and a page title. Example: When you want to browse the page referred to by the following sentence on a scanning procedure page in the Online Manual for MX450 series Refer to print collages with My Image Garden Enter "My Image Garden collage" in the search window and perform a search • Searching... for Reference Pages You can find reference pages more easily by entering your model from Home of the Online Manual for reference pages described in the search window and perform a search
... name and a page title. Example: When you want to browse the page referred to by the following sentence on a scanning procedure page in the Online Manual for MX450 series Refer to print collages with My Image Garden Enter "My Image Garden collage" in the search window and perform a search • Searching... for Reference Pages You can find reference pages more easily by entering your model from Home of the Online Manual for reference pages described in the search window and perform a search
User Manual
Page 22
... machine has enough paper and ink. 4. Note After you turn it may differ from those displayed by LAN to be printed, refer to the Online Manual for your computer to the wireless LAN, and then try printing. AirPrint Troubleshooting If the document does not print, check the following: 1. Tap the Print...
... machine has enough paper and ink. 4. Note After you turn it may differ from those displayed by LAN to be printed, refer to the Online Manual for your computer to the wireless LAN, and then try printing. AirPrint Troubleshooting If the document does not print, check the following: 1. Tap the Print...
User Manual
Page 49
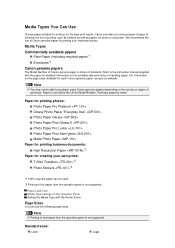
... notes on handling paper. Paper is not supported. Standard sizes: Letter Legal Refer to the instruction manual supplied with the Printer Driver Page Sizes You can be able to purchase some Canon genuine papers depending on the Operation Panel Setting the Media Type with the paper for the best print... results. Note You may not be used. *2 Printing to enhance the fun of Canon genuine paper for photo or document. Canon provides you various types of paper to this paper from the operation panel is not sold in brackets. We recommend the use...
... notes on handling paper. Paper is not supported. Standard sizes: Letter Legal Refer to the instruction manual supplied with the Printer Driver Page Sizes You can be able to purchase some Canon genuine papers depending on the Operation Panel Setting the Media Type with the paper for the best print... results. Note You may not be used. *2 Printing to enhance the fun of Canon genuine paper for photo or document. Canon provides you various types of paper to this paper from the operation panel is not sold in brackets. We recommend the use...
User Manual
Page 71
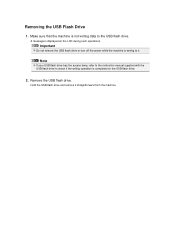
Hold the USB flash drive and remove it . Removing the USB Flash Drive 1. Important Do not remove the USB flash drive or turn off the power while the machine is not writing data to it straightforward from the machine. Remove the USB flash drive. Make sure that the machine is writing to the USB flash drive. A message is completed on the LCD during such operations. Note If your USB flash drive has the access lamp, refer to the instruction manual supplied with the USB flash drive to check if the writing operation is displayed on the USB flash drive. 2.
Hold the USB flash drive and remove it . Removing the USB Flash Drive 1. Important Do not remove the USB flash drive or turn off the power while the machine is not writing data to it straightforward from the machine. Remove the USB flash drive. Make sure that the machine is writing to the USB flash drive. A message is completed on the LCD during such operations. Note If your USB flash drive has the access lamp, refer to the instruction manual supplied with the USB flash drive to check if the writing operation is displayed on the USB flash drive. 2.

User Manual
Page 73
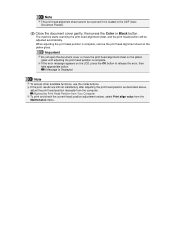
... can print with a new one ink only, print with the FINE cartridge removed. If either color or black FINE cartridge, in order to the printed manual: Getting Started. Furthermore, with both cartridges. Note If a FINE cartridge runs out of the machine. For information on how to configure this setting, see Setting...
... can print with a new one ink only, print with the FINE cartridge removed. If either color or black FINE cartridge, in order to the printed manual: Getting Started. Furthermore, with both cartridges. Note If a FINE cartridge runs out of the machine. For information on how to configure this setting, see Setting...
User Manual
Page 90
... it is complete. If the print results are still not satisfactory after adjusting the print head position as described above, adjust the print head position manually from the Maintenance menu. When adjusting the print head position is complete, remove the print head alignment sheet on the LCD, press the OK button...
... it is complete. If the print results are still not satisfactory after adjusting the print head position as described above, adjust the print head position manually from the Maintenance menu. When adjusting the print head position is complete, remove the print head alignment sheet on the LCD, press the OK button...

User Manual
Page 95
Aligning the Print Head • To adjust the head position manually, execute print head position adjustment from Your Computer Aligning the Print Head Position from the computer. If the print results appear uneven because of line ... corrected and conditions such as color and line streaking are improved. Aligning the Print Head When you can adjust the print head either automatically or manually. • To adjust the head position automatically, execute print head position adjustment from the operation panel of the print head.
Aligning the Print Head • To adjust the head position manually, execute print head position adjustment from Your Computer Aligning the Print Head Position from the computer. If the print results appear uneven because of line ... corrected and conditions such as color and line streaking are improved. Aligning the Print Head When you can adjust the print head either automatically or manually. • To adjust the head position automatically, execute print head position adjustment from the operation panel of the print head.

User Manual
Page 96
...the least amount of streaks are clicked in the preview window, their numbers are automatically entered in the message. 8. The procedure for performing manual print head alignment is on and click Align Print Head. Apply the settings Click OK and when the confirmation message appears, click OK. ... three sheets of A4 size or Letter size plain paper into the front tray. 7. To perform automatic head alignment, refer to manual Check the Align heads manually check box. 4. Click Custom Settings on the Maintenance tab The Start Print Head Alignment dialog box opens. 6. Switch head alignment to...
...the least amount of streaks are clicked in the preview window, their numbers are automatically entered in the message. 8. The procedure for performing manual print head alignment is on and click Align Print Head. Apply the settings Click OK and when the confirmation message appears, click OK. ... three sheets of A4 size or Letter size plain paper into the front tray. 7. To perform automatic head alignment, refer to manual Check the Align heads manually check box. 4. Click Custom Settings on the Maintenance tab The Start Print Head Alignment dialog box opens. 6. Switch head alignment to...
User Manual
Page 119
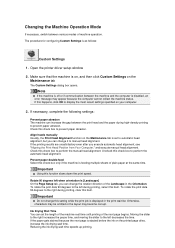
... Custom Settings on the printed page dries, increase the ink drying wait time. If this check box to perform the manual head alignment. Align heads manually Usually, the Print Head Alignment function on your computer. 3. If the printing results are unsatisfactory even after you can change...Landscape] On the Page Setup tab, you execute automatic head alignment, see "Aligning the Print Head Position from Your Computer," and execute manual head alignment. Changing the Machine Operation Mode If necessary, switch between the print head and the paper during high-density printing to prevent ...
... Custom Settings on the printed page dries, increase the ink drying wait time. If this check box to perform the manual head alignment. Align heads manually Usually, the Print Head Alignment function on your computer. 3. If the printing results are unsatisfactory even after you can change...Landscape] On the Page Setup tab, you execute automatic head alignment, see "Aligning the Print Head Position from Your Computer," and execute manual head alignment. Changing the Machine Operation Mode If necessary, switch between the print head and the paper during high-density printing to prevent ...
User Manual
Page 125
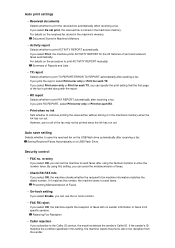
... machine's memory: Document Stored in the machine's memory. Auto save setting Selects whether to save the received fax on the procedure to print ACTIVITY REPORT manually: Summary of Reports and Lists • TX report Selects whether to continue printing the received fax without storing it matches the number, the machine starts...
... machine's memory: Document Stored in the machine's memory. Auto save setting Selects whether to save the received fax on the procedure to print ACTIVITY REPORT manually: Summary of Reports and Lists • TX report Selects whether to continue printing the received fax without storing it matches the number, the machine starts...
User Manual
Page 128
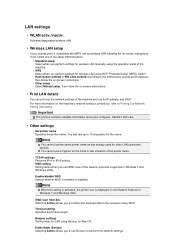
...instructions. Note You cannot use WSD (one of the setup methods below. • Standard setup Select when you perform settings for wireless LAN manually using the operation panel of the printer name. • TCP/IP settings Performs IPv4 or IPv6 setting. • WSD setting Setting items ..../disab. Important This printout contains valuable information about your access point supports, then follow the on-screen instructions. • Other setup Select Manual setup, then follow the on the machine's network setting is enabled or disabled. Handle it with WPS, set up to the computer using...
...instructions. Note You cannot use WSD (one of the setup methods below. • Standard setup Select when you perform settings for wireless LAN manually using the operation panel of the printer name. • TCP/IP settings Performs IPv4 or IPv6 setting. • WSD setting Setting items ..../disab. Important This printout contains valuable information about your access point supports, then follow the on-screen instructions. • Other setup Select Manual setup, then follow the on the machine's network setting is enabled or disabled. Handle it with WPS, set up to the computer using...
User Manual
Page 133
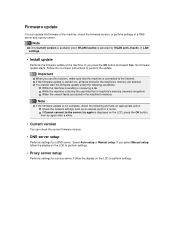
... the firmware version, or perform settings of the machine. If you press the OK button and select Yes, the firmware update starts. If you select Manual setup, follow the display on the LCD, press the OK button, then try again is carried out, all faxes stored in the machine's memory are... you use this function, make sure that the machine is selected for WLAN activ./inactiv. If Cannot connect to the Internet. Select Auto setup or Manual setup. Check the network settings such as an access point or a router. Note Only Current version is available when WLAN inactive is connected to the...
... the firmware version, or perform settings of the machine. If you press the OK button and select Yes, the firmware update starts. If you select Manual setup, follow the display on the LCD, press the OK button, then try again is carried out, all faxes stored in the machine's memory are... you use this function, make sure that the machine is selected for WLAN activ./inactiv. If Cannot connect to the Internet. Select Auto setup or Manual setup. Check the network settings such as an access point or a router. Note Only Current version is available when WLAN inactive is connected to the...
User Manual
Page 143
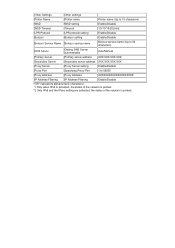
... Bonjour Bonjour setting Enable/Disable Bonjour Service Name Bonjour service name Bonjour service name (Up to 52 characters) DNS Server Getting DNS Server automatically Auto/Manual Primary Server Primary server address XXX.XXX.XXX.XXX Secondary Server Secondary server address XXX.XXX.XXX.XXX Proxy Server Proxy Server setting Enable/Disable...
... Bonjour Bonjour setting Enable/Disable Bonjour Service Name Bonjour service name Bonjour service name (Up to 52 characters) DNS Server Getting DNS Server automatically Auto/Manual Primary Server Primary server address XXX.XXX.XXX.XXX Secondary Server Secondary server address XXX.XXX.XXX.XXX Proxy Server Proxy Server setting Enable/Disable...

User Manual
Page 150
... access point matches that set to the printer. Click OK. In this case, reset Set as Default Printer. If you want to specify the method manually, select Open System or Shared Key according to the access point.
... access point matches that set to the printer. Click OK. In this case, reset Set as Default Printer. If you want to specify the method manually, select Open System or Shared Key according to the access point.


