
Getting Started
Page 3
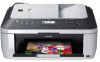
..., remove all the orange tapes and the protective sheets. 12 3 4 5 6 7 8 □ Choosing a Location Color Black FINE cartridges power cord telephone line cable • Manuals • Setup CD-ROM (containing the drivers, applications and on-screen manuals) • Warranty • Do not install the machine where an object may fall into the Rear Tray...
..., remove all the orange tapes and the protective sheets. 12 3 4 5 6 7 8 □ Choosing a Location Color Black FINE cartridges power cord telephone line cable • Manuals • Setup CD-ROM (containing the drivers, applications and on-screen manuals) • Warranty • Do not install the machine where an object may fall into the Rear Tray...

Getting Started
Page 13
... Vista") and Mac OS X v.10.5.x. • Quit all running applications before installation. • You need to log on -screen instructions and do not remove the Setup CD-ROM during the installation process. • It may be necessary to the computer's hard disk. The screens below are not supported. 1 2 3 4 5 678 Windows (P.12) Macintosh (P.19...
... Vista") and Mac OS X v.10.5.x. • Quit all running applications before installation. • You need to log on -screen instructions and do not remove the Setup CD-ROM during the installation process. • It may be necessary to the computer's hard disk. The screens below are not supported. 1 2 3 4 5 678 Windows (P.12) Macintosh (P.19...
Getting Started
Page 14
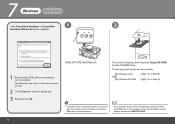
.... Make sure that the ON button (A) stops flashing. • If the program does not start automatically. The setup program should start automatically, double-click the CD-ROM icon on the computer, then insert the Setup CD-ROM into the CD-ROM drive. 7 Windows Macintosh If the Found New Hardware or Found New 1 2 Hardware Wizard dialog box appears: A 1 Remove...
.... Make sure that the ON button (A) stops flashing. • If the program does not start automatically. The setup program should start automatically, double-click the CD-ROM icon on the computer, then insert the Setup CD-ROM into the CD-ROM drive. 7 Windows Macintosh If the Found New Hardware or Found New 1 2 Hardware Wizard dialog box appears: A 1 Remove...

Getting Started
Page 20
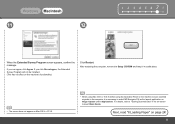
If you can agree, click Agree. If you click Do not agree, the Extended Survey Program will not be installed. (This has no effect on page 24! 18 Next, read "8 Loading Paper" on the machine's functionality.) Click Exit. 7 Windows Macintosh 14 15 When the Extended Survey Program screen appears, confirm the message. After restarting the computer, remove the Setup CD-ROM and keep it in a safe place. If Restart is displayed, make sure that the Restart the system now (recommended) check box is selected, then click Restart.
If you can agree, click Agree. If you click Do not agree, the Extended Survey Program will not be installed. (This has no effect on page 24! 18 Next, read "8 Loading Paper" on the machine's functionality.) Click Exit. 7 Windows Macintosh 14 15 When the Extended Survey Program screen appears, confirm the message. After restarting the computer, remove the Setup CD-ROM and keep it in a safe place. If Restart is displayed, make sure that the Restart the system now (recommended) check box is selected, then click Restart.
Getting Started
Page 21
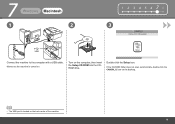
If the CD-ROM folder does not open automatically, double-click the CANON_IJ icon on the desktop. • The USB port is turned on. Double-click the Setup icon. Make sure the machine is located on the computer, then insert the Setup CD-ROM into the CDROM drive. Turn on the back center of the machine. 19 7 Windows Macintosh 1 2 1 2 3 4 5 678 3 Connect the machine to the computer with a USB cable.
If the CD-ROM folder does not open automatically, double-click the CANON_IJ icon on the desktop. • The USB port is turned on. Double-click the Setup icon. Make sure the machine is located on the computer, then insert the Setup CD-ROM into the CDROM drive. Turn on the back center of the machine. 19 7 Windows Macintosh 1 2 1 2 3 4 5 678 3 Connect the machine to the computer with a USB cable.
Getting Started
Page 25
If you can agree, click Agree. Next, read "8 Loading Paper" on the machine's functionality.) Click Restart. After restarting the computer, remove the Setup CD-ROM and keep it in the on Image Capture under Applications. For details, refer to "Saving Scanned Data" in a safe place. • The screen does not ...
If you can agree, click Agree. Next, read "8 Loading Paper" on the machine's functionality.) Click Restart. After restarting the computer, remove the Setup CD-ROM and keep it in the on Image Capture under Applications. For details, refer to "Saving Scanned Data" in a safe place. • The screen does not ...
On-Screen Manual
Page 47
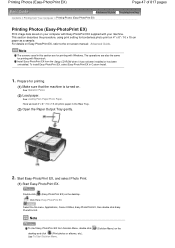
...sample. Prepare for printing with Macintosh. See Loading Plain Paper/Photo Paper. Click Here: Easy-PhotoPrint EX Select the Go menu, Applications, Canon Utilities, Easy-PhotoPrint EX, then double-click EasyPhotoPrint EX. Note The screens used in this section are also the same for printing. (1)... and click (Print photos or albums, etc.). See Operation Panel. (2) Load paper. Note To start Easy-PhotoPrint EX from the Setup CD-ROM when it has not been installed or has been uninstalled. This section describes the procedure, using print setting for printing with your computer...
...sample. Prepare for printing with Macintosh. See Loading Plain Paper/Photo Paper. Click Here: Easy-PhotoPrint EX Select the Go menu, Applications, Canon Utilities, Easy-PhotoPrint EX, then double-click EasyPhotoPrint EX. Note The screens used in this section are also the same for printing. (1)... and click (Print photos or albums, etc.). See Operation Panel. (2) Load paper. Note To start Easy-PhotoPrint EX from the Setup CD-ROM when it has not been installed or has been uninstalled. This section describes the procedure, using print setting for printing with your computer...
On-Screen Manual
Page 82
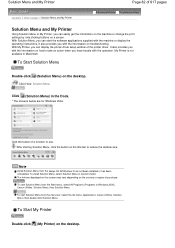
..., Solution Menu, then Solution Menu. Note Install Solution Menu from the menu bar, select the Go menu, Applications, Canon Utilities, Solution Menu, then double-click Solution Menu. To start Solution Menu from the Setup CD-ROM when it has not been installed or has been uninstalled. My Printer is not available in the Dock...
..., Solution Menu, then Solution Menu. Note Install Solution Menu from the menu bar, select the Go menu, Applications, Canon Utilities, Solution Menu, then double-click Solution Menu. To start Solution Menu from the Setup CD-ROM when it has not been installed or has been uninstalled. My Printer is not available in the Dock...
On-Screen Manual
Page 83
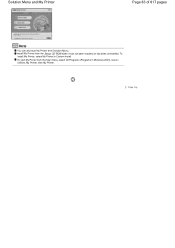
To install My Printer, select My Printer in Windows 2000), Canon Utilities, My Printer, then My Printer. To start My Printer from Solution Menu. Install My Printer from the Setup CD-ROM when it has not been installed or has been uninstalled. Page top Solution Menu and My Printer Page 83 of 817 pages Note You can also start My Printer from the Start menu, select All Programs (Programs in Custom Install.
To install My Printer, select My Printer in Windows 2000), Canon Utilities, My Printer, then My Printer. To start My Printer from Solution Menu. Install My Printer from the Setup CD-ROM when it has not been installed or has been uninstalled. Page top Solution Menu and My Printer Page 83 of 817 pages Note You can also start My Printer from the Start menu, select All Programs (Programs in Custom Install.
On-Screen Manual
Page 92
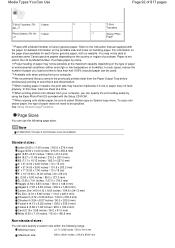
... continuously printing to avoid blurs and discoloration. *5 When loading paper in the US by using the Easy-Photo Print EX provided with the Setup CD-ROM. *7 When copying onto sticker paper, be specified. In this case, load one sheet at the maximum capacity depending on handling paper....can also specify a custom size within the following page sizes. T-Shirt Transfers -*7 Glossy Photo Paper *1 Paper with the paper for each Canon genuine paper, visit our website. Refer to select Sticker copy on the country or region of paper or environmental conditions (either very high ...
... continuously printing to avoid blurs and discoloration. *5 When loading paper in the US by using the Easy-Photo Print EX provided with the Setup CD-ROM. *7 When copying onto sticker paper, be specified. In this case, load one sheet at the maximum capacity depending on handling paper....can also specify a custom size within the following page sizes. T-Shirt Transfers -*7 Glossy Photo Paper *1 Paper with the paper for each Canon genuine paper, visit our website. Refer to select Sticker copy on the country or region of paper or environmental conditions (either very high ...

On-Screen Manual
Page 297
... color space of the selected image data. Complete the setup Click OK on your computer, Adobe RGB (1998) is printed with ICC Profiles Page 297 of 817 pages becomes invalid. If no ICC profiles are installed on the Main tab. You can install ICC profiles from the Setup CD-ROM that accompanies the machine. 7.
... color space of the selected image data. Complete the setup Click OK on your computer, Adobe RGB (1998) is printed with ICC Profiles Page 297 of 817 pages becomes invalid. If no ICC profiles are installed on the Main tab. You can install ICC profiles from the Setup CD-ROM that accompanies the machine. 7.
On-Screen Manual
Page 485
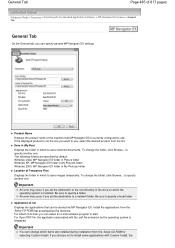
.... to use . Be sure to run Displays the applications that can be started via MP Navigator EX. Install the applications from the Setup CD-ROM by the operating system is not the one you choose not to install some applications with the Bundled Application Software > MP Navigator EX ... of the drive on which to specify another one . Application to specify a folder. The following folders are installed during installation from the Setup CD-ROM that MP Navigator EX is installed. Be sure to E-mail, you can specify general MP Navigator EX settings. If the displayed product is...
.... to use . Be sure to run Displays the applications that can be started via MP Navigator EX. Install the applications from the Setup CD-ROM by the operating system is not the one you choose not to install some applications with the Bundled Application Software > MP Navigator EX ... of the drive on which to specify another one . Application to specify a folder. The following folders are installed during installation from the Setup CD-ROM that MP Navigator EX is installed. Be sure to E-mail, you can specify general MP Navigator EX settings. If the displayed product is...

On-Screen Manual
Page 711
... If other discs are displayed, double-click MSETUP4.EXE. Double-click the CD-ROM icon on your desktop to start even after the Setup CD-ROM is inserted into the USB port of the machine and is a problem with the Setup CD-ROM. In Windows 2000, double-click the My Computer icon on the displayed ...window. Note If the CD-ROM icon is securely plugged into your computer's ...
... If other discs are displayed, double-click MSETUP4.EXE. Double-click the CD-ROM icon on your desktop to start even after the Setup CD-ROM is inserted into the USB port of the machine and is a problem with the Setup CD-ROM. In Windows 2000, double-click the My Computer icon on the displayed ...window. Note If the CD-ROM icon is securely plugged into your computer's ...
On-Screen Manual
Page 712
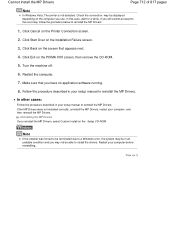
... the connection. If you have no application software running. 8. Page top Click Start Over on the Setup CD-ROM. may be in your setup manual to reinstall the MP Drivers. 1. Click Cancel on the PIXMA XXX screen, then remove the CD-ROM. 5. Cannot Install the MP Drivers Page 712 of 817 pages Note In Windows Vista, The...
... the connection. If you have no application software running. 8. Page top Click Start Over on the Setup CD-ROM. may be in your setup manual to reinstall the MP Drivers. 1. Click Cancel on the PIXMA XXX screen, then remove the CD-ROM. 5. Cannot Install the MP Drivers Page 712 of 817 pages Note In Windows Vista, The...
On-Screen Manual
Page 755
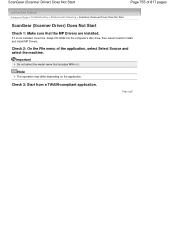
... > ScanGear (Scanner Driver) Does Not Start ScanGear (Scanner Driver) Does Not Start Check 1: Make sure that includes WIA in it is not installed, insert the Setup CD-ROM into the computer's disc drive, then select Custom Install and install MP Drivers. Note The operation may differ depending on the application. Page top Important...
... > ScanGear (Scanner Driver) Does Not Start ScanGear (Scanner Driver) Does Not Start Check 1: Make sure that includes WIA in it is not installed, insert the Setup CD-ROM into the computer's disc drive, then select Custom Install and install MP Drivers. Note The operation may differ depending on the application. Page top Important...
On-Screen Manual
Page 756
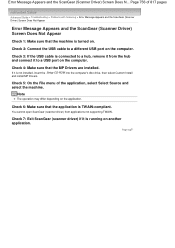
... application, select Select Source and select the machine. Check 7: Exit ScanGear (scanner driver) if it is running on . If it is not installed, insert the Setup CD-ROM into the computer's disc drive, then select Custom Install and install MP Drivers. Check 5: On the File menu of 817 pages Advanced Guide > Troubleshooting > Problems...
... application, select Select Source and select the machine. Check 7: Exit ScanGear (scanner driver) if it is running on . If it is not installed, insert the Setup CD-ROM into the computer's disc drive, then select Custom Install and install MP Drivers. Check 5: On the File menu of 817 pages Advanced Guide > Troubleshooting > Problems...
On-Screen Manual
Page 764
... Not Work After Upgrading Windows Check: Disconnect the machine from the computer, then uninstall and reinstall the MP Drivers and MP Navigator EX. Insert the Setup CD-ROM into the computer's disc drive, then select Custom Install and reinstall the MP Drivers and MP Navigator EX. See "Uninstalling the MP Drivers " for... Drivers. Step 3: Reinstall the MP Drivers and MP Navigator EX. Page top Step 2: Uninstall MP Navigator EX. 1. From the Start menu, select (All) Programs > Canon Utilities > MP Navigator EX 2.1 > MP Navigator EX Uninstall. 2. When a confirmation appears, click Yes. 3.
... Not Work After Upgrading Windows Check: Disconnect the machine from the computer, then uninstall and reinstall the MP Drivers and MP Navigator EX. Insert the Setup CD-ROM into the computer's disc drive, then select Custom Install and reinstall the MP Drivers and MP Navigator EX. See "Uninstalling the MP Drivers " for... Drivers. Step 3: Reinstall the MP Drivers and MP Navigator EX. Page top Step 2: Uninstall MP Navigator EX. 1. From the Start menu, select (All) Programs > Canon Utilities > MP Navigator EX 2.1 > MP Navigator EX Uninstall. 2. When a confirmation appears, click Yes. 3.
On-Screen Manual
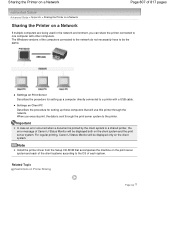
Page 807
... Windows versions of the computers connected to the network do not necessarily have to be displayed only on the client system. For regular printing, Canon IJ Status Monitor will be the same. Settings on Print Server Describes the procedure for setting up a computer directly connected to a shared printer... Sharing Page top When you can share the printer connected to one computer with a USB cable. Note Install the printer driver from the Setup CD-ROM that will be displayed both on the client system and the print server system. Sharing the Printer on a Network Page 807 of 817 ...
... Windows versions of the computers connected to the network do not necessarily have to be displayed only on the client system. For regular printing, Canon IJ Status Monitor will be the same. Settings on Print Server Describes the procedure for setting up a computer directly connected to a shared printer... Sharing Page top When you can share the printer connected to one computer with a USB cable. Note Install the printer driver from the Setup CD-ROM that will be displayed both on the client system and the print server system. Sharing the Printer on a Network Page 807 of 817 ...
On-Screen Manual
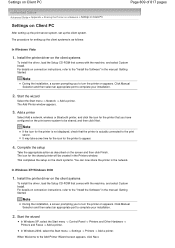
Page 809
... the appropriate action as follows: In Windows Vista 1. Install the printer driver on the client systems To install the driver, load the Setup CD-ROM that you to the "Install the Software" in the network. It may take some time for the icon for the printer is not displayed, ...the client systems is as described on the screen and then click Finish. For details on the client systems To install the driver, load the Setup CD-ROM that the printer is actually connected to the Add Printer Wizard screen appears, click Next. Click Manual Selection and then select an appropriate port to...
... the appropriate action as follows: In Windows Vista 1. Install the printer driver on the client systems To install the driver, load the Setup CD-ROM that you to the "Install the Software" in the network. It may take some time for the icon for the printer is not displayed, ...the client systems is as described on the screen and then click Finish. For details on the client systems To install the driver, load the Setup CD-ROM that the printer is actually connected to the Add Printer Wizard screen appears, click Next. Click Manual Selection and then select an appropriate port to...
On-Screen Manual
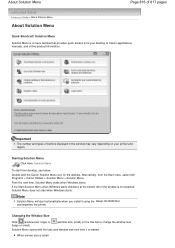
Page 816
Double-click the Canon Solution Menu icon on your desktop to change the window size Solution Menu opens with the last used window size next time it using the Setup CD-ROM that accompanies the printer. Alternatively, from desktop, see below. If the Start Solution Menu when Windows ...started. Changing the Window Size Click (window size: large) or (large or small). (window size: small) on the title bar to Canon applications, manuals, and online product information. Important The number and types of 817 pages Advanced Guide > About Solution Menu About Solution Menu Quick ...
Double-click the Canon Solution Menu icon on your desktop to change the window size Solution Menu opens with the last used window size next time it using the Setup CD-ROM that accompanies the printer. Alternatively, from desktop, see below. If the Start Solution Menu when Windows ...started. Changing the Window Size Click (window size: large) or (large or small). (window size: small) on the title bar to Canon applications, manuals, and online product information. Important The number and types of 817 pages Advanced Guide > About Solution Menu About Solution Menu Quick ...


