

PIXMA MP130 Quick Start Guide
Page 1
Quick Start Guide Table of Contents Introduction 9 Copying 14 Photo Printing From A Memory Card 17 Printing from Your Computer 23 Scanning 25 Maintenance 26 Troubleshooting 28
Quick Start Guide Table of Contents Introduction 9 Copying 14 Photo Printing From A Memory Card 17 Printing from Your Computer 23 Scanning 25 Maintenance 26 Troubleshooting 28

PIXMA MP130 Quick Start Guide
Page 5
...CD-ROM, describes details of all steps in the Quick Start Guide, or if you want to read this guide when starting to scan data, various printing methods, and details of the MP Drivers and MP Navigator. Quick Start Guide (This guide) Read this sheet ...PhotoPrint and Easy-WebPrint, including instructions on the Setup CD-ROM. This guide, included as a HTML file, describes the utility software on printing and scanning from your machine. After following information: • Machine parts and their functions • Copying • Printing from a computer • Routine maintenance...
...CD-ROM, describes details of all steps in the Quick Start Guide, or if you want to read this guide when starting to scan data, various printing methods, and details of the MP Drivers and MP Navigator. Quick Start Guide (This guide) Read this sheet ...PhotoPrint and Easy-WebPrint, including instructions on the Setup CD-ROM. This guide, included as a HTML file, describes the utility software on printing and scanning from your machine. After following information: • Machine parts and their functions • Copying • Printing from a computer • Routine maintenance...
PIXMA MP130 Quick Start Guide
Page 8
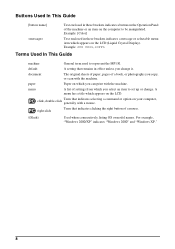
default A setting that indicates clicking the right button of a book, or photographs you copy, or scan with the machine. Buttons Used In This Guide [button name] Text enclosed in these brackets indicates a message or selectable menu item which appears on ... right-click Term that remains in these brackets indicates a button on the Operation Panel of settings from which you select an item to represent the MP130. Example: [Color] Text enclosed in effect unless you can print with the machine. For example, "Windows 2000/XP" indicates "Windows 2000" and "Windows XP." 8 ...
default A setting that indicates clicking the right button of a book, or photographs you copy, or scan with the machine. Buttons Used In This Guide [button name] Text enclosed in these brackets indicates a message or selectable menu item which appears on ... right-click Term that remains in these brackets indicates a button on the Operation Panel of settings from which you select an item to represent the MP130. Example: [Color] Text enclosed in effect unless you can print with the machine. For example, "Windows 2000/XP" indicates "Windows 2000" and "Windows XP." 8 ...

PIXMA MP130 Quick Start Guide
Page 9
... card, without using the utility software supplied. 1 Introduction X Features Of Your Machine Thank you will have a fully integrated desktop printer/copier/scanner. Scans high-resolution images to your computer and processes them easily using a computer. Chapter 1 Introduction 9 Also, applies advanced copy features to your copies. ... photo printer Copier PC Printer PC Scanner Prints photo-quality images from your machine as a stand-alone device for purchasing the Canon MP130. Your machine incorporates the following functions in one simple-to use your computer.
... card, without using the utility software supplied. 1 Introduction X Features Of Your Machine Thank you will have a fully integrated desktop printer/copier/scanner. Scans high-resolution images to your computer and processes them easily using a computer. Chapter 1 Introduction 9 Also, applies advanced copy features to your copies. ... photo printer Copier PC Printer PC Scanner Prints photo-quality images from your machine as a stand-alone device for purchasing the Canon MP130. Your machine incorporates the following functions in one simple-to use your computer.

PIXMA MP130 Quick Start Guide
Page 11
... Cover open may result in injury. (13) Access Lamp Lights when a memory card is reading data from or scanning to the computer. (9) Power Connector Used to connect the power cord to the machine. (10) Scan Unit Lift this cover when replacing the ink tanks or clearing a paper jam. z Rear view and interior...
... Cover open may result in injury. (13) Access Lamp Lights when a memory card is reading data from or scanning to the computer. (9) Power Connector Used to connect the power cord to the machine. (10) Scan Unit Lift this cover when replacing the ink tanks or clearing a paper jam. z Rear view and interior...

PIXMA MP130 Quick Start Guide
Page 12
... messages, menu selections, and the operation status. (6) [Black] Button Starts black & white copying or scanning. (7) [Color] Button Starts color copying or scanning. (8) [Stop/Reset] Button Cancels operations and returns the machine to the settings selected. In scan mode, the machine scans a document to your computer according to standby mode. 12 Introduction Chapter 1 Operation Panel...
... messages, menu selections, and the operation status. (6) [Black] Button Starts black & white copying or scanning. (7) [Color] Button Starts color copying or scanning. (8) [Stop/Reset] Button Cancels operations and returns the machine to the settings selected. In scan mode, the machine scans a document to your computer according to standby mode. 12 Introduction Chapter 1 Operation Panel...
PIXMA MP130 Quick Start Guide
Page 19
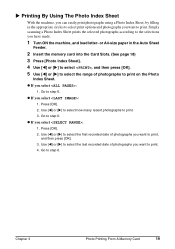
... Sheet]. 4 Use [W] or [X] to select , and then press [OK]. 5 Use [W] or [X] to select the range of photographs to print on the Photo Index Sheet. Simply scanning a Photo Index Sheet prints the selected photographs according to print. z If you have made. 1 Turn ON the machine, and load letter- Use [W] or [X] to select...
... Sheet]. 4 Use [W] or [X] to select , and then press [OK]. 5 Use [W] or [X] to select the range of photographs to print on the Photo Index Sheet. Simply scanning a Photo Index Sheet prints the selected photographs according to print. z If you have made. 1 Turn ON the machine, and load letter- Use [W] or [X] to select...

PIXMA MP130 Quick Start Guide
Page 20
z If you select any paper type other than : 1. Use [W] or [X] to select date printing or not, and then press [OK]. 5 Press [Color]. 20 Photo Printing From A Memory Card Chapter 3 Use [W] or [X] to select borderless printing or not, and then press [OK]. 2. X Printing All Images This printing method creates individual prints of all photographs stored on a memory card. 1 Press [PHOTO], and then press [Menu] once until appears. 2 Use [W] or [X] to select , and then press [OK]. 3 Use [W] or [X] to select the paper size, and then press [OK]. 4 Use [W] or [X] to select , and then ...
z If you select any paper type other than : 1. Use [W] or [X] to select date printing or not, and then press [OK]. 5 Press [Color]. 20 Photo Printing From A Memory Card Chapter 3 Use [W] or [X] to select borderless printing or not, and then press [OK]. 2. X Printing All Images This printing method creates individual prints of all photographs stored on a memory card. 1 Press [PHOTO], and then press [Menu] once until appears. 2 Use [W] or [X] to select , and then press [OK]. 3 Use [W] or [X] to select the paper size, and then press [OK]. 4 Use [W] or [X] to select , and then ...

PIXMA MP130 Quick Start Guide
Page 25
... contours]. • [Continuous] Check this to scan multiple documents continuously. 5 Click [Scan]. 6 Edit the scanned image as required. 7 Select what to do with the Operation Panel of the machine (See Software Guide) Scanning Using The MP Navigator MP Navigator contains menu for scanning documents to preference. Chapter 5 Scanning 25 5 PC Scanning X Scanning Methods • Using the MP Navigator...
... contours]. • [Continuous] Check this to scan multiple documents continuously. 5 Click [Scan]. 6 Edit the scanned image as required. 7 Select what to do with the Operation Panel of the machine (See Software Guide) Scanning Using The MP Navigator MP Navigator contains menu for scanning documents to preference. Chapter 5 Scanning 25 5 PC Scanning X Scanning Methods • Using the MP Navigator...

PIXMA MP130 Quick Start Guide
Page 26
6 Maintenance X Replacing An Ink Tank 1 Make sure the power is turned ON. 2 Lift the Scan Unit until it locks into place. 3 Open the Paper Output Tray. 4 Open the Inner Cover. CAUTION • Do not remove the print head from the ...
6 Maintenance X Replacing An Ink Tank 1 Make sure the power is turned ON. 2 Lift the Scan Unit until it locks into place. 3 Open the Paper Output Tray. 4 Open the Inner Cover. CAUTION • Do not remove the print head from the ...

PIXMA MP130 Quick Start Guide
Page 27
... you remove it. • Do not place the ink port in contact with any other surface. (B) 7 Insert the ink tank into place. 10 Return the Scan Unit to 7. 9 Close the Inner Cover. Performs deep print head cleaning. 4 Press [OK]. If you did not, press [X]. X Cleaning The Print Head If the printed...
... you remove it. • Do not place the ink port in contact with any other surface. (B) 7 Insert the ink tank into place. 10 Return the Scan Unit to 7. 9 Close the Inner Cover. Performs deep print head cleaning. 4 Press [OK]. If you did not, press [X]. X Cleaning The Print Head If the printed...

PIXMA MP130 Easy Setup Instructions
Page 1
... Lever. • The Print Head Holder moves to the center. HT7-0095-000-V.1.0 xx2004A © CANON INC. 2004 PRINTED IN CHINA Please read these guides. • A printer cable is complete. Do ...your machine may vary depending on the country of their respective owners. If you are registered trademarks and PIXMA is a trademark of the stack. (3) (1) (2) Setup is not included. X Check the contents....setup the machine. 1 Carefully remove all shipping tape and the protective sheet. 5 Lift the Scan Unit (1) until it locks into place, and remove the packing material (2) from the box....
... Lever. • The Print Head Holder moves to the center. HT7-0095-000-V.1.0 xx2004A © CANON INC. 2004 PRINTED IN CHINA Please read these guides. • A printer cable is complete. Do ...your machine may vary depending on the country of their respective owners. If you are registered trademarks and PIXMA is a trademark of the stack. (3) (1) (2) Setup is not included. X Check the contents....setup the machine. 1 Carefully remove all shipping tape and the protective sheet. 5 Lift the Scan Unit (1) until it locks into place, and remove the packing material (2) from the box....


