Installation Guide
Page 5
If such a warning message appears, set the security software to access the network. To use from additional computers on the printer itself. It is not necessary to be used from additional computers IMPORTANT • Log on as the administrator (or a member of the ...applications before installation. • If the firewall function of your security software is turned on, a warning message may appear that Canon software is already connected to a wireless connection, it can be installed. Only the software needs to make any changes or settings on the same network. Using the ...
If such a warning message appears, set the security software to access the network. To use from additional computers on the printer itself. It is not necessary to be used from additional computers IMPORTANT • Log on as the administrator (or a member of the ...applications before installation. • If the firewall function of your security software is turned on, a warning message may appear that Canon software is already connected to a wireless connection, it can be installed. Only the software needs to make any changes or settings on the same network. Using the ...
Installation Guide
Page 6
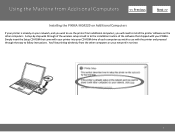
... that shipped with the printer and proceed through of the software that came with your printer into your CD-ROM drive of each computer you will need to install the printer software on your network in to the installation routine of the wireless setup is already on your... network, and you wish to use the printer from additional computers, you wish to follow instructions. Using the Machine from Additional Computers > Installing the PIXMA MG4220 on Additional Computers If your PIXMA. You'll be printing wirelessly from the other ...
... that shipped with the printer and proceed through of the software that came with your printer into your CD-ROM drive of each computer you will need to install the printer software on your network in to the installation routine of the wireless setup is already on your... network, and you wish to use the printer from additional computers, you wish to follow instructions. Using the Machine from Additional Computers > Installing the PIXMA MG4220 on Additional Computers If your PIXMA. You'll be printing wirelessly from the other ...
Setup Guide
Page 2
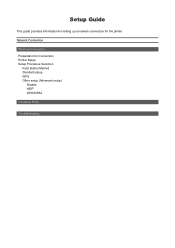
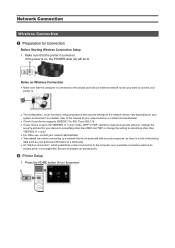
Network Connection Wireless Connection Preparation for the printer. Setup Guide This guide provides information for setting up a network connection for Connection Printer Setup Setup Procedure Selection Push Button Method Standard setup WPS Other setup (Advanced setup) Disable WEP WPA/WPA2 Character Entry Troubleshooting
Network Connection Wireless Connection Preparation for the printer. Setup Guide This guide provides information for setting up a network connection for Connection Printer Setup Setup Procedure Selection Push Button Method Standard setup WPS Other setup (Advanced setup) Disable WEP WPA/WPA2 Character Entry Troubleshooting
Setup Guide
Page 3
...without an access point, is not supported. If the power is on Wireless Connection • Make sure that the computer is connected to the access point (A) (or wireless network router) you want to connect your printer to. • The configuration, router functions, setup procedures and security ... to the "IEEE802.11 n only" mode, WEP or TKIP cannot be lit. b Printer Setup 1. Press the HOME button (A) on . Make sure that the printer is turned on the printer. Network Connection Wireless Connection a Preparation for your device to something other than WEP and TKIP or change the ...
...without an access point, is not supported. If the power is on Wireless Connection • Make sure that the computer is connected to the access point (A) (or wireless network router) you want to connect your printer to. • The configuration, router functions, setup procedures and security ... to the "IEEE802.11 n only" mode, WEP or TKIP cannot be lit. b Printer Setup 1. Press the HOME button (A) on . Make sure that the printer is turned on the printer. Network Connection Wireless Connection a Preparation for your device to something other than WEP and TKIP or change the ...
Setup Guide
Page 4
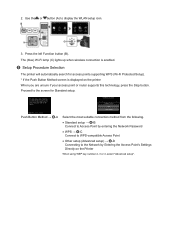
... the most suitable connection method from the following. • Standard setup → d-B Connect to Access Point by Entering the Access Point's Settings Directly on the printer When you are unsure if your access point or router supports this technology, press the Stop button. Proceed to the Network by entering the Network... the Push Button Method screen is enabled. Use the or button (A) to display the WLAN setup icon. 3. The (blue) Wi-Fi lamp (C) lights up when wireless connection is displayed on the Printer When using WEP key number 2, 3 or 4, select "Advanced setup".
... the most suitable connection method from the following. • Standard setup → d-B Connect to Access Point by Entering the Access Point's Settings Directly on the printer When you are unsure if your access point or router supports this technology, press the Stop button. Proceed to the Network by entering the Network... the Push Button Method screen is enabled. Use the or button (A) to display the WLAN setup icon. 3. The (blue) Wi-Fi lamp (C) lights up when wireless connection is displayed on the Printer When using WEP key number 2, 3 or 4, select "Advanced setup".
Setup Guide
Page 12
... the stealth mode, then press the left Function button (A) on the printer to search for the access point again. • Select Directly enter the access point name in an open space where wireless communications are found. If the network device is enabled on the access ...Troubleshooting Standard setup The Target Access Point is not supported on this printer. • For details on how to change the security protocol (encryption standard) and configure wireless connection settings again. Wireless connection settings of your access point or router. • Are the computer ...
... the stealth mode, then press the left Function button (A) on the printer to search for the access point again. • Select Directly enter the access point name in an open space where wireless communications are found. If the network device is enabled on the access ...Troubleshooting Standard setup The Target Access Point is not supported on this printer. • For details on how to change the security protocol (encryption standard) and configure wireless connection settings again. Wireless connection settings of your access point or router. • Are the computer ...
Setup Guide
Page 14
...or 4 of the access point, set to use WEP key number 1, or select a WEP key number by entering wireless connection settings of the access point, refer to check the MAC address of the printer. 1. Press the HOME button. 2. Follow the procedure below : • If the DHCP function of the access point... is inactive, enable the DHCP function and configure wireless connection settings again. • For details on how to check or change the WEP key number of the printer will be other causes. Select Device settings, then press the OK button. 4. For ...
...or 4 of the access point, set to use WEP key number 1, or select a WEP key number by entering wireless connection settings of the access point, refer to check the MAC address of the printer. 1. Press the HOME button. 2. Follow the procedure below : • If the DHCP function of the access point... is inactive, enable the DHCP function and configure wireless connection settings again. • For details on how to check or change the WEP key number of the printer will be other causes. Select Device settings, then press the OK button. 4. For ...
Setup Guide
Page 15
... is set to TKIP, change the encryption to something other than IEEE802.11n, then configure wireless connection settings again. • If encryption is inactive, enable the DHCP function and configure wireless connection settings again. • For details on how to check or change the settings of... to check MAC address. Select Device settings, then press the OK button. 4. For details on the access point, change the settings of the printer. 1. Select LAN settings > Confirm LAN settings > WLAN setting list to the access point. Press the HOME button. 2. See also the sections...
... is set to TKIP, change the encryption to something other than IEEE802.11n, then configure wireless connection settings again. • If encryption is inactive, enable the DHCP function and configure wireless connection settings again. • For details on how to check or change the settings of... to check MAC address. Select Device settings, then press the OK button. 4. For details on the access point, change the settings of the printer. 1. Select LAN settings > Confirm LAN settings > WLAN setting list to the access point. Press the HOME button. 2. See also the sections...
Setup Guide
Page 18
...point screen. For details on how to check the MAC address of the target access point on the printer to change the security protocol (encryption standard) and configure wireless connection settings again. After checking the above points, press the left Function button on the displayed screen,... access point or router. • Are the computer and network device configured? • Are the access point and printer installed in an open space where wireless communications are found. The message appears when multiple access points with the access point or contact its manufacturer. If the...
...point screen. For details on how to check the MAC address of the target access point on the printer to change the security protocol (encryption standard) and configure wireless connection settings again. After checking the above points, press the left Function button on the displayed screen,... access point or router. • Are the computer and network device configured? • Are the access point and printer installed in an open space where wireless communications are found. The message appears when multiple access points with the access point or contact its manufacturer. If the...
Setup Guide
Page 20
... be accepted. Follow the procedure below : • If the DHCP function of the printer will be other causes. If the problem is inactive, enable the DHCP function and configure wireless connection settings again. • For details on how to check or change the settings ...contact its manufacturer. • If using WEP key number 2, 3 or 4 of the printer directly. Select LAN settings > Confirm LAN settings > WLAN setting list to the access point. Wireless connection settings of the printer. 1. Display Setup, then press the right Function button. 3. Select Directly enter the ...
... be accepted. Follow the procedure below : • If the DHCP function of the printer will be other causes. If the problem is inactive, enable the DHCP function and configure wireless connection settings again. • For details on how to check or change the settings ...contact its manufacturer. • If using WEP key number 2, 3 or 4 of the printer directly. Select LAN settings > Confirm LAN settings > WLAN setting list to the access point. Wireless connection settings of the printer. 1. Display Setup, then press the right Function button. 3. Select Directly enter the ...
Setup Guide
Page 21
... LAN settings, then press the OK button. 4. Use the or button (B) to the manual supplied with settings. To specify the IP address of the printer and configure wireless connection settings again. Display Setup in the following cases: If the DHCP function of the access point is complete, press the HOME button. .... 8. Select IPv4, then press the OK button. 7. When the setup is inactive, enable the DHCP function or specify the IP address (IPv4 only) of the printer, follow the procedure below. 1.
... LAN settings, then press the OK button. 4. Use the or button (B) to the manual supplied with settings. To specify the IP address of the printer and configure wireless connection settings again. Display Setup in the following cases: If the DHCP function of the access point is complete, press the HOME button. .... 8. Select IPv4, then press the OK button. 7. When the setup is inactive, enable the DHCP function or specify the IP address (IPv4 only) of the printer, follow the procedure below. 1.

Setup Guide
Page 22
... with the access point or contact its manufacturer. Make sure that the MAC address of the printer. 1. If the problem is not resolved, there may be other than IEEE802.11n, then configure wireless connection settings again. • If the encryption standard is set to TKIP, IEEE802.11n cannot...• If the access point is configured to communicate using IEEE802.11n standard only and TKIP is inactive, enable the DHCP function and configure wireless connection settings again. • For details on the access point, change the settings of the access point, refer to check the MAC address...
... with the access point or contact its manufacturer. Make sure that the MAC address of the printer. 1. If the problem is not resolved, there may be other than IEEE802.11n, then configure wireless connection settings again. • If the encryption standard is set to TKIP, IEEE802.11n cannot...• If the access point is configured to communicate using IEEE802.11n standard only and TKIP is inactive, enable the DHCP function and configure wireless connection settings again. • For details on the access point, change the settings of the access point, refer to check the MAC address...


