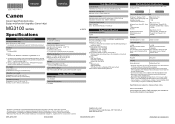
MG3100 series Specifications
Page 1
.../or other countries. • Windows Vista is a trademark or registered trademark of 1/4800 inch at USB 1.1. *2 Setup possible through Standard setup, WPS (Wi-Fi Protected Setup) or WCN (Windows Connect Now). Print width 8 inches/203.2 mm (for Borderless Printing: 8.5 inches/216 mm)...Equipo multifunción fotográfico Canon Inkjet MG3100 series K10372 Specifications General Specifications Printing resolution (dpi) 4800* (horizontal) X 1200 (vertical) * Ink droplets can be used at minimum. Interface USB Port: Hi-Speed USB *1 LAN Port: Wireless LAN: IEEE802.11n/IEEE802.11g/...
.../or other countries. • Windows Vista is a trademark or registered trademark of 1/4800 inch at USB 1.1. *2 Setup possible through Standard setup, WPS (Wi-Fi Protected Setup) or WCN (Windows Connect Now). Print width 8 inches/203.2 mm (for Borderless Printing: 8.5 inches/216 mm)...Equipo multifunción fotográfico Canon Inkjet MG3100 series K10372 Specifications General Specifications Printing resolution (dpi) 4800* (horizontal) X 1200 (vertical) * Ink droplets can be used at minimum. Interface USB Port: Hi-Speed USB *1 LAN Port: Wireless LAN: IEEE802.11n/IEEE802.11g/...
Network Installation Guide
Page 4
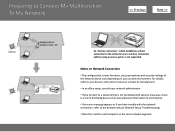
...-hoc connection," which establishes a direct connection to a network that is not protected with the network connection, refer to the printed manual: Network Setup Troubleshooting. • Place the machine and computer on your personal information to a third party. • If an error message appears or if... you connect to the computer over a wireless connection without using an access point, is a risk of disclosing data such as your system environment. Notes on Network Connection • The...
...-hoc connection," which establishes a direct connection to a network that is not protected with the network connection, refer to the printed manual: Network Setup Troubleshooting. • Place the machine and computer on your personal information to a third party. • If an error message appears or if... you connect to the computer over a wireless connection without using an access point, is a risk of disclosing data such as your system environment. Notes on Network Connection • The...
Network Installation Guide
Page 6
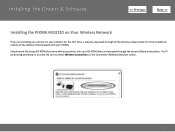
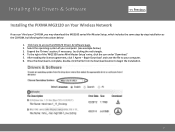
Be sure to follow instructions. You'll be printing wirelessly in to the installation routine of the wireless setup is built in no time. Simply insert the Setup CD-ROM that shipped with your printer into your CD-ROM drive and proceed through the easy to select Wireless Connection on your network for the first time, a step-by-step walk through of the software that came with your printer on the Connection Method Selection screen. 6 Installing the Drivers & Software > Installing the PIXMA MG3120 on Your Wireless Network If you are installing your PIXMA.
Be sure to follow instructions. You'll be printing wirelessly in to the installation routine of the wireless setup is built in no time. Simply insert the Setup CD-ROM that shipped with your printer into your CD-ROM drive and proceed through the easy to select Wireless Connection on your network for the first time, a step-by-step walk through of the software that came with your printer on the Connection Method Selection screen. 6 Installing the Drivers & Software > Installing the PIXMA MG3120 on Your Wireless Network If you are installing your PIXMA.
Network Installation Guide
Page 7
Installing the Drivers & Software
Installing the Drivers & Software
Network Guide
Page 4
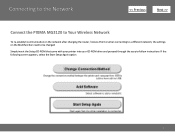
Connecting to the Network > Connect the PIXMA MG3120 to Your Wireless Network To re-establish communication on the network after changing the router / Access Point or when connecting to a different network, the settings on the Multifunction need to be changed Simply insert the Setup CD-ROM that came with your printer into your CD-ROM drive and proceed through the easy to follow instructions If the following screen appears, select the Start Setup Again option 4
Connecting to the Network > Connect the PIXMA MG3120 to Your Wireless Network To re-establish communication on the network after changing the router / Access Point or when connecting to a different network, the settings on the Multifunction need to be changed Simply insert the Setup CD-ROM that came with your printer into your CD-ROM drive and proceed through the easy to follow instructions If the following screen appears, select the Start Setup Again option 4
Network Guide
Page 5
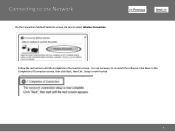
It is now finished 5 Connecting to the Network On the Connection Method Selection screen, be sure to re-install the software. Setup is not necessary to select Wireless Connection > Follow the instructions until the Completion of Connection screen, then click Back, then Exit. Click Next on the Completion of Connection screen.
It is now finished 5 Connecting to the Network On the Connection Method Selection screen, be sure to re-install the software. Setup is not necessary to select Wireless Connection > Follow the instructions until the Completion of Connection screen, then click Back, then Exit. Click Next on the Completion of Connection screen.


