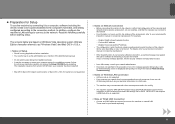
Getting Started
Page 19
...such a warning message appears, set the security software to always allow access. • In an office setup, consult your computer has been restarted. • Mac OS 9, Mac OS X Classic environments, or Mac OS X v.10.3.8 or earlier are based on Windows Vista operating system Ultimate Edition (hereafter referred to ... to a third party. • The machine may appear that Canon software is complete, and that is not protected with other access points used in the vicinity. • The machine supports WPS (Wi-Fi Protected Setup) and WCN (Windows Connect Now) in the procedure or an error...
...such a warning message appears, set the security software to always allow access. • In an office setup, consult your computer has been restarted. • Mac OS 9, Mac OS X Classic environments, or Mac OS X v.10.3.8 or earlier are based on Windows Vista operating system Ultimate Edition (hereafter referred to ... to a third party. • The machine may appear that Canon software is complete, and that is not protected with other access points used in the vicinity. • The machine supports WPS (Wi-Fi Protected Setup) and WCN (Windows Connect Now) in the procedure or an error...
Obtaining the Password For Your Existing Wireless Network (Mac OS X)
Page 1
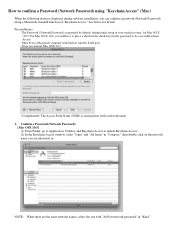
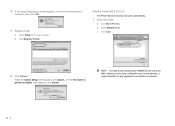
...network password" in "Category," then double click on the network name you can confirm a password (Network Password) using "Keychain Access" (Mac) When the following dialog is synonymous with built-in wireless LAN port. - The Access Point Name (SSID) is displayed during initial... setup of "Keychain Access." Must be save in . Confirm a Password (Network Password). [Mac OSX 10.5] (1) From Finder, go to Application, Utilities, and Keychain Access to launch Keychain Access. (2) ...
...network password" in "Category," then double click on the network name you can confirm a password (Network Password) using "Keychain Access" (Mac) When the following dialog is synonymous with built-in wireless LAN port. - The Access Point Name (SSID) is displayed during initial... setup of "Keychain Access." Must be save in . Confirm a Password (Network Password). [Mac OSX 10.5] (1) From Finder, go to Application, Utilities, and Keychain Access to launch Keychain Access. (2) ...

Obtaining the Password For Your Existing Wireless Network (Mac OS X)
Page 3
If the message "The Printer could not be fine.) 2. For the setup method, see "Getting Started for the setup instead of them. (Either one your neighbor is using (e.g. the one will be connected to enter the Password (Network Password) in the Access Points window ... ). In such a case, please select the other one of the Connect button. To use the printer together with the multiple Access Points, click the Manual Setup button for Mac Users" included in Show password. 2. (5) A Password (Network Password) shows up in the printer.
If the message "The Printer could not be fine.) 2. For the setup method, see "Getting Started for the setup instead of them. (Either one your neighbor is using (e.g. the one will be connected to enter the Password (Network Password) in the Access Points window ... ). In such a case, please select the other one of the Connect button. To use the printer together with the multiple Access Points, click the Manual Setup button for Mac Users" included in Show password. 2. (5) A Password (Network Password) shows up in the printer.

MX860 Getting Started For Mac Users
Page 22
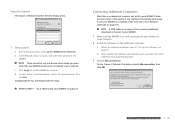
.... 22 b Click Add. b In the Network Device List pane, select the MAC address of the MX860. Select the Scanner The Canon IJ Network Scanner Selector dialog opens. 1 Select scanner a From the pop-up menu, select Canon MX860 series Network. c Click Apply to your network. Go to the selected device, ...then click Exit. d Confirm that a checkmark appears next to "Start Using Your MX860!" on page 37. You are finished with the setup. Add the Printer (OS X v10.3.9) ...
.... 22 b Click Add. b In the Network Device List pane, select the MAC address of the MX860. Select the Scanner The Canon IJ Network Scanner Selector dialog opens. 1 Select scanner a From the pop-up menu, select Canon MX860 series Network. c Click Apply to your network. Go to the selected device, ...then click Exit. d Confirm that a checkmark appears next to "Start Using Your MX860!" on page 37. You are finished with the setup. Add the Printer (OS X v10.3.9) ...
MX860 Getting Started For Mac Users
Page 33
You are finished with the setup. Follow the instructions in "Set Up the Software" on page 15. b After installing the software and restarting your MX860. b In the Network Device List pane, select the MAC address of the MX860. There should be only one device listed unless you ... dialog opens. 1 Select scanner a From the pop-up menu, select Canon MX860 series Network. d Confirm that a checkmark appears next to your computer, the Canon IJ Network Tool automatically starts. 3 Select LAN connection On the Canon IJ Network Tool dialog, select LAN connection, then click OK. on the...
You are finished with the setup. Follow the instructions in "Set Up the Software" on page 15. b After installing the software and restarting your MX860. b In the Network Device List pane, select the MAC address of the MX860. There should be only one device listed unless you ... dialog opens. 1 Select scanner a From the pop-up menu, select Canon MX860 series Network. d Confirm that a checkmark appears next to your computer, the Canon IJ Network Tool automatically starts. 3 Select LAN connection On the Canon IJ Network Tool dialog, select LAN connection, then click OK. on the...
MX860 Getting Started For Mac Users
Page 34
c Click Add. 6 Click Cancel When the Cancel Setup screen appears, click Cancel, or if the You have no printers available screen appears, click Cancel. The letters and numbers after "MX860 series" show the MAC address for this device (Media Access Control address, a unique identifier for any equipment connected to a network). 34 Add the Printer...
c Click Add. 6 Click Cancel When the Cancel Setup screen appears, click Cancel, or if the You have no printers available screen appears, click Cancel. The letters and numbers after "MX860 series" show the MAC address for this device (Media Access Control address, a unique identifier for any equipment connected to a network). 34 Add the Printer...

MX860 Getting Started For Mac Users
Page 36
d Confirm that a checkmark appears next to "Start Using Your MX860!" You are finished with the setup. Select the Scanner The Canon IJ Network Scanner Selector dialog opens. 1 Select scanner a From the pop-up menu, select Canon MX860 series Network. Go to the selected device, then click Exit. There should be only one device listed unless you have more than one MX860 series device connected to use the MX860 as a scanner. Congratulations! c Click Apply to your network. on page 37. 36 b In the Network Device List pane, select the MAC address of the MX860.
d Confirm that a checkmark appears next to "Start Using Your MX860!" You are finished with the setup. Select the Scanner The Canon IJ Network Scanner Selector dialog opens. 1 Select scanner a From the pop-up menu, select Canon MX860 series Network. Go to the selected device, then click Exit. There should be only one device listed unless you have more than one MX860 series device connected to use the MX860 as a scanner. Congratulations! c Click Apply to your network. on page 37. 36 b In the Network Device List pane, select the MAC address of the MX860.
Solución de problemas de configuración de red [Spanish Version]
Page 3
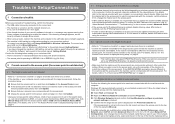
... point's IP address filtering is checked. c Click Wireless Networks tab and confirm that you register the machine's MAC address to the access point before setting up . • Make sure that Canon software is not set to ANY. If the network name is not set to the access point. •... refer to "5.1 The Access Points screen is on and then click Update in the Access Points screen. After setup is valid to communicate with the access point. To confirm the MAC address of your computer cannot communicate with the machine and the computer. If the WEP/WPA/WPA2 (encryption key)...
... point's IP address filtering is checked. c Click Wireless Networks tab and confirm that you register the machine's MAC address to the access point before setting up . • Make sure that Canon software is not set to ANY. If the network name is not set to the access point. •... refer to "5.1 The Access Points screen is on and then click Update in the Access Points screen. After setup is valid to communicate with the access point. To confirm the MAC address of your computer cannot communicate with the machine and the computer. If the WEP/WPA/WPA2 (encryption key)...

Solución de problemas de configuración de red [Spanish Version]
Page 4
... access point generates the following codes. - Example: Using 64 bit key length, when the string "canon" is different in the machine and the access point, the machine cannot connect to the access point.... - Select 1 for the network device. If the WEP/WPA/WPA2 (encryption key) is displayed during setup" on the access point, the machine, and the computer. For details, refer to restart your wireless network...to the access point is configured to use access control, register the IP address or the MAC address of the machine or disable the access control. • Confirm the network name/...
... access point generates the following codes. - Example: Using 64 bit key length, when the string "canon" is different in the machine and the access point, the machine cannot connect to the access point.... - Select 1 for the network device. If the WEP/WPA/WPA2 (encryption key) is displayed during setup" on the access point, the machine, and the computer. For details, refer to restart your wireless network...to the access point is configured to use access control, register the IP address or the MAC address of the machine or disable the access control. • Confirm the network name/...
Solución de problemas de configuración de red [Spanish Version]
Page 7
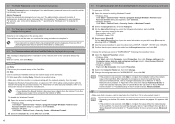
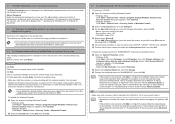
... the network setup of the Card Slot. c On the Add a Port dialog box, input the following the procedure below . • Make sure that the port names are added on the Mac OS version, the authentication screen may appear. a Open the System Properties screen. • Windows Vista Click ...; Windows XP/2000 Click Start > Control Panel > Security Center > Windows Firewall. After installation is complete, to mount the Card Slot using the Canon IJ Network Tool, refer to the machine which has already been set to "Using the Card Slot over a Network" in "About Network Communication" in...
... the network setup of the Card Slot. c On the Add a Port dialog box, input the following the procedure below . • Make sure that the port names are added on the Mac OS version, the authentication screen may appear. a Open the System Properties screen. • Windows Vista Click ...; Windows XP/2000 Click Start > Control Panel > Security Center > Windows Firewall. After installation is complete, to mount the Card Slot using the Canon IJ Network Tool, refer to the machine which has already been set to "Using the Card Slot over a Network" in "About Network Communication" in...
Network Setup Troubleshooting
Page 3
...The target access point is no problem. • Confirm the network name/SSID of blocking all direct transmission among clients associated to it during setup. d Confirm that the target access point is grayed out and cannot be used may be capable of the target access point and set it... Properties. For the procedure, refer to configure my wireless network settings is set to the access point. • If MAC address filtering is enabled, we recommend that Canon software is different in the machine and the access point, the machine cannot connect to Wired LAN active. a Ensure that...
...The target access point is no problem. • Confirm the network name/SSID of blocking all direct transmission among clients associated to it during setup. d Confirm that the target access point is grayed out and cannot be used may be capable of the target access point and set it... Properties. For the procedure, refer to configure my wireless network settings is set to the access point. • If MAC address filtering is enabled, we recommend that Canon software is different in the machine and the access point, the machine cannot connect to Wired LAN active. a Ensure that...

Network Setup Troubleshooting
Page 4
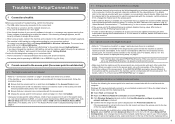
...Wait until the IP address is configured to use access control, register the IP address or the MAC address of the machine or disable the access control. • Confirm the network name/SSID of...provided with the computer, confirmed above. Example: Using 64 bit key length, when the string "canon" is set to the access point, set up the encryption of the machine to match the ...configured on page 3. • Make sure that the channel set to the access point is displayed during setup" on the access point (a sequence of network keys vary depending on wireless network devices installed in the ...
...Wait until the IP address is configured to use access control, register the IP address or the MAC address of the machine or disable the access control. • Confirm the network name/SSID of...provided with the computer, confirmed above. Example: Using 64 bit key length, when the string "canon" is set to the access point, set up the encryption of the machine to match the ...configured on page 3. • Make sure that the channel set to the access point is displayed during setup" on the access point (a sequence of network keys vary depending on wireless network devices installed in the ...
Network Setup Troubleshooting
Page 7
... screen for Macintosh. 5.8 The You have set to an unsecured wireless network is displayed during setup. For information on other ports (138TCP, 138UDP, 139TCP, and 139UDP). e Use the same...steps b and c. f Confirm that a memory card is complete, to mount the Card Slot using the Canon IJ Network Tool, refer to "WORKGROUP" following information, and click OK. - a Open the System Properties ... Name tab, then click Change. After installation is inserted in "Appendix" of the on the Mac OS version, the authentication screen may appear. If it . • Depending on -screen manual...
... screen for Macintosh. 5.8 The You have set to an unsecured wireless network is displayed during setup. For information on other ports (138TCP, 138UDP, 139TCP, and 139UDP). e Use the same...steps b and c. f Confirm that a memory card is complete, to mount the Card Slot using the Canon IJ Network Tool, refer to "WORKGROUP" following information, and click OK. - a Open the System Properties ... Name tab, then click Change. After installation is inserted in "Appendix" of the on the Mac OS version, the authentication screen may appear. If it . • Depending on -screen manual...


