Getting Started
Page 19
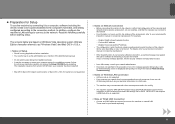
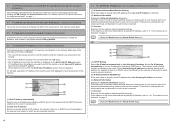
...; Quit all running applications before starting setup. The installation resumes from where it to a computer, software including the drivers needs to be purchased separately. 17 ■ Preparation for WCN, "WCN-UFD" that Canon software is attempting to access the network. In addition, configure the machine's LAN settings to connect to the network...
...; Quit all running applications before starting setup. The installation resumes from where it to a computer, software including the drivers needs to be purchased separately. 17 ■ Preparation for WCN, "WCN-UFD" that Canon software is attempting to access the network. In addition, configure the machine's LAN settings to connect to the network...
MX860 Getting Started For Mac Users
Page 16
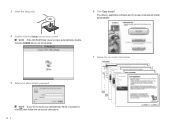
3 Insert the Setup disc 6 Click Easy Install The drivers, application software and on-screen manuals will install automatically. 4 Double-click the Setup icon on your screen If the CD-ROM folder does not open automatically, doubleclick the CANON_IJ icon on the desktop. 7 Follow the on-screen instructions 5 Enter your administrator password If you do not know your administrator name or password, click , then follow the on-screen instructions. 16
3 Insert the Setup disc 6 Click Easy Install The drivers, application software and on-screen manuals will install automatically. 4 Double-click the Setup icon on your screen If the CD-ROM folder does not open automatically, doubleclick the CANON_IJ icon on the desktop. 7 Follow the on-screen instructions 5 Enter your administrator password If you do not know your administrator name or password, click , then follow the on-screen instructions. 16
Solución de problemas de configuración de red [Spanish Version]
Page 6
... retry the detection of the access point, then start the setup again. 5.5 The New port could not be created is displayed during setup Uninstall the drivers, then setup the machine again following the procedures in "Install the Software" and onward in the printed manual: Getting Started. 5.6 The Set Printer IP Address...
... retry the detection of the access point, then start the setup again. 5.5 The New port could not be created is displayed during setup Uninstall the drivers, then setup the machine again following the procedures in "Install the Software" and onward in the printed manual: Getting Started. 5.6 The Set Printer IP Address...

Solución de problemas de configuración de red [Spanish Version]
Page 10
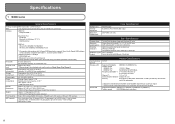
ENGLISH Specifications 1 MX860 series General Specifications Printing resolution 9600 (horizontal)* x 2400 (vertical).../ Enlargement Copy Specifications Max 99 pages 9 positions, Auto intensity (AE copy) 25%-400% (1% unit) Scan Specifications Scanner driver TWAIN/WIA (Windows Vista and Windows XP only) Maximum scanning size Scanning resolution Platen Glass: A4/Letter/8.5'' x 11.7' ... dpi x 4800 dpi Interpolated resolution max: 19200 dpi x 19200 dpi Gradation (Input/ Gray: 16 bit/8 bit Output) Color: 48 bit/24 bit (RGB each 768 nozzles) A4 or Letter size: Max. 35 sheets (20 lb / 75 ...
ENGLISH Specifications 1 MX860 series General Specifications Printing resolution 9600 (horizontal)* x 2400 (vertical).../ Enlargement Copy Specifications Max 99 pages 9 positions, Auto intensity (AE copy) 25%-400% (1% unit) Scan Specifications Scanner driver TWAIN/WIA (Windows Vista and Windows XP only) Maximum scanning size Scanning resolution Platen Glass: A4/Letter/8.5'' x 11.7' ... dpi x 4800 dpi Interpolated resolution max: 19200 dpi x 19200 dpi Gradation (Input/ Gray: 16 bit/8 bit Output) Color: 48 bit/24 bit (RGB each 768 nozzles) A4 or Letter size: Max. 35 sheets (20 lb / 75 ...
Network Setup Troubleshooting
Page 6
... automatically during setup for use over the network. This button is displayed when the machine could not be created is displayed during setup Uninstall the drivers, then setup the machine again following screen is displayed if no machine was detected on the router or access point. (B) Use next IP address Select...
... automatically during setup for use over the network. This button is displayed when the machine could not be created is displayed during setup Uninstall the drivers, then setup the machine again following screen is displayed if no machine was detected on the router or access point. (B) Use next IP address Select...
Network Setup Troubleshooting
Page 10
... lb) * With the Print Head and ink tanks installed. Specifications 1 MX860 series General Specifications Printing resolution 9600 (horizontal)* x 2400 (vertical) (dpi)... Specifications Max 99 pages 9 positions, Auto intensity (AE copy) 25%-400% (1% unit) Scan Specifications Scanner driver TWAIN/WIA (Windows Vista and Windows XP only) Maximum scanning size Scanning resolution Platen Glass: A4/Letter/8.5'' ... resolution max: 19200 dpi x 19200 dpi Gradation (Input/ Gray: 16 bit/8 bit Output) Color: 48 bit/24 bit (RGB each 16 bit/8 bit) Communication protocol Wireless LAN TCP/IP Network...
... lb) * With the Print Head and ink tanks installed. Specifications 1 MX860 series General Specifications Printing resolution 9600 (horizontal)* x 2400 (vertical) (dpi)... Specifications Max 99 pages 9 positions, Auto intensity (AE copy) 25%-400% (1% unit) Scan Specifications Scanner driver TWAIN/WIA (Windows Vista and Windows XP only) Maximum scanning size Scanning resolution Platen Glass: A4/Letter/8.5'' ... resolution max: 19200 dpi x 19200 dpi Gradation (Input/ Gray: 16 bit/8 bit Output) Color: 48 bit/24 bit (RGB each 16 bit/8 bit) Communication protocol Wireless LAN TCP/IP Network...
Network Guide
Page 2
> Installing Your Multifunction to Additional Computers on Your Network Pixma MX860 Windows OS Downloading & Installing the Drivers 3 Downloading the Driver 3 Installing the Driver 6 Setup the Machine and the Computer 8 2
> Installing Your Multifunction to Additional Computers on Your Network Pixma MX860 Windows OS Downloading & Installing the Drivers 3 Downloading the Driver 3 Installing the Driver 6 Setup the Machine and the Computer 8 2
Network Guide
Page 3
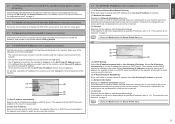
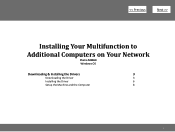
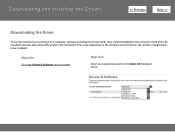
Downloading and Installing the Drivers > Downloading the Driver To use the machine by connecting it to a computer, software including the drivers needs to be installed.) Step One Go to the computer's hard disk. The installation process takes about 20 minutes. (The installation time varies depending on the computer environment or the number of applications to be copied (installed) to the Drivers & Software for your model Step Two Select your operating system in the Select OS dropdown menu. 3
Downloading and Installing the Drivers > Downloading the Driver To use the machine by connecting it to a computer, software including the drivers needs to be installed.) Step One Go to the computer's hard disk. The installation process takes about 20 minutes. (The installation time varies depending on the computer environment or the number of applications to be copied (installed) to the Drivers & Software for your model Step Two Select your operating system in the Select OS dropdown menu. 3

Network Guide
Page 4
Downloading and Installing the Drivers > Step Three In the Drivers section, click the Download icon for the MP Driver for Network 4
Downloading and Installing the Drivers > Step Three In the Drivers section, click the Download icon for the MP Driver for Network 4
Network Guide
Page 5
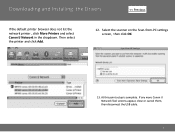
Follow the on , a warning message may appear that Canon software is selected, once the file has been downloaded, double-click it to access the network. Downloading and Installing the Drivers > Step Four On the next screen, read the information and instructions and click I Agree - If [Run] is selected, the file will be automatically...
Follow the on , a warning message may appear that Canon software is selected, once the file has been downloaded, double-click it to access the network. Downloading and Installing the Drivers > Step Four On the next screen, read the information and instructions and click I Agree - If [Run] is selected, the file will be automatically...
Network Guide
Page 6
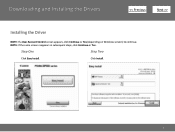
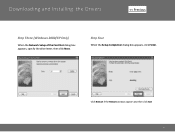
NOTE: If the same screen reappears in subsequent steps, click Continue or Yes. Step One Step Two Click Easy Install. Click Install. 6 Downloading and Installing the Drivers > Installing the Driver NOTE: If a User Account Control screen appears, click Continue or Yes (depending on Windows version) to continue.
NOTE: If the same screen reappears in subsequent steps, click Continue or Yes. Step One Step Two Click Easy Install. Click Install. 6 Downloading and Installing the Drivers > Installing the Driver NOTE: If a User Account Control screen appears, click Continue or Yes (depending on Windows version) to continue.
Network Guide
Page 7
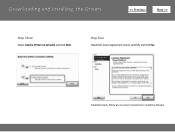
Step Four Read the License Agreement screen carefully and click Yes. Follow any on network and click Next. Installation starts. Downloading and Installing the Drivers > Step Three Select Use the Printer on -screen instructions to install the software. 7
Step Four Read the License Agreement screen carefully and click Yes. Follow any on network and click Next. Installation starts. Downloading and Installing the Drivers > Step Three Select Use the Printer on -screen instructions to install the software. 7
Network Guide
Page 8
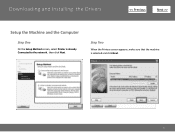
Step Two When the Printers screen appears, make sure that the machine is already Connected to the network , then click Next. Downloading and Installing the Drivers > Setup the Machine and the Computer Step One On the Setup Method screen, select Printer is selected and click Next. 8
Step Two When the Printers screen appears, make sure that the machine is already Connected to the network , then click Next. Downloading and Installing the Drivers > Setup the Machine and the Computer Step One On the Setup Method screen, select Printer is selected and click Next. 8
Network Guide
Page 9
Step Four When the Setup Completion dialog box appears, click Finish. Downloading and Installing the Drivers > Step Three (Windows 2000/XP Only) When the Network Setup of the Card Slot dialog box appears, specify the drive letter, then click Next. Click Restart if the Restart window appears and then click Exit 9
Step Four When the Setup Completion dialog box appears, click Finish. Downloading and Installing the Drivers > Step Three (Windows 2000/XP Only) When the Network Setup of the Card Slot dialog box appears, specify the drive letter, then click Next. Click Restart if the Restart window appears and then click Exit 9
Router Guide
Page 8
Downloading and Installing the Drivers
Downloading and Installing the Drivers
Network Key Guide
Page 4
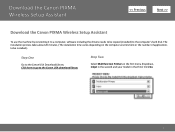
Download the Canon PIXMA Wireless Setup Assistant > Download the Canon PIXMA Wireless Setup Assistant To use the machine by connecting it to a computer, software including the drivers needs to be installed.) Step One Go to the Canon USA Download Library Click here to go to the computer's hard disk. Click Go. 4 ...(The installation time varies depending on the computer environment or the number of applications to be copied (installed) to the Canon USA download library Step Two Select Multifunction Printers in the first menu dropdown, Inkjet in the second and your model in the third.
Download the Canon PIXMA Wireless Setup Assistant > Download the Canon PIXMA Wireless Setup Assistant To use the machine by connecting it to a computer, software including the drivers needs to be installed.) Step One Go to the Canon USA Download Library Click here to go to the computer's hard disk. Click Go. 4 ...(The installation time varies depending on the computer environment or the number of applications to be copied (installed) to the Canon USA download library Step Two Select Multifunction Printers in the first menu dropdown, Inkjet in the second and your model in the third.
Network Key Guide
Page 5
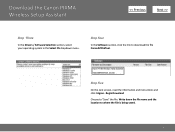
Write down the file name and the location to "Save" the file. Begin Download Choose to where the file is being saved. 5 Download the Canon PIXMA Wireless Setup Assistant > Step Three In the Drivers / Software Selection section, select your operating system in the Select OS dropdown menu. Step Four In the Software section, click the link to download the file CanonAPChkTool. Step Five On the next screen, read the information and instructions and click I Agree -
Write down the file name and the location to "Save" the file. Begin Download Choose to where the file is being saved. 5 Download the Canon PIXMA Wireless Setup Assistant > Step Three In the Drivers / Software Selection section, select your operating system in the Select OS dropdown menu. Step Four In the Software section, click the link to download the file CanonAPChkTool. Step Five On the next screen, read the information and instructions and click I Agree -
Network Key Guide
Page 6
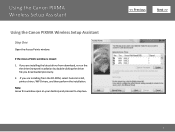
Using the Canon PIXMA Wireless Setup Assistant Using the Canon PIXMA Wireless Setup Assistant Step One Open the Access Points window. If you downloaded previously. 2. If the Access Points window is closed: 1. Note: Leave this window open on your desktop and proceed to step two. > 6 If you are installing from download, re-run the the driver/network installation by double-clicking the driver file you are installing the latest driver from the CD-ROM, select Custom Install, printer driver / MP Drivers, and then perform the installation.
Using the Canon PIXMA Wireless Setup Assistant Using the Canon PIXMA Wireless Setup Assistant Step One Open the Access Points window. If you downloaded previously. 2. If the Access Points window is closed: 1. Note: Leave this window open on your desktop and proceed to step two. > 6 If you are installing from download, re-run the the driver/network installation by double-clicking the driver file you are installing the latest driver from the CD-ROM, select Custom Install, printer driver / MP Drivers, and then perform the installation.


