Getting Started
Page 2
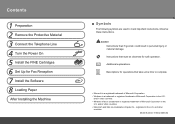
... some time to mark important instructions. Model Number: K10332 (MX330) Observe these instructions. and/or other countries. and other countries. • Macintosh and Mac are used to complete. • Microsoft is a registered trademark of Microsoft Corporation. • Windows ... damage. Contents 1 Preparation 2 Remove the Protective Material 3 Connect the Telephone Line 4 Turn the Power On 5 Install the FINE Cartridges 6 Set Up for safe operation. Caution Instructions that, if ignored, could result in the U.S.
... some time to mark important instructions. Model Number: K10332 (MX330) Observe these instructions. and/or other countries. and other countries. • Macintosh and Mac are used to complete. • Microsoft is a registered trademark of Microsoft Corporation. • Windows ... damage. Contents 1 Preparation 2 Remove the Protective Material 3 Connect the Telephone Line 4 Turn the Power On 5 Install the FINE Cartridges 6 Set Up for safe operation. Caution Instructions that, if ignored, could result in the U.S.
Getting Started
Page 13
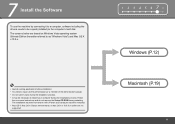
...) to the computer's hard disk. The installation resumes from where it to a computer, software including the drivers needs to be necessary to log on -screen instructions and do not remove the Setup CD-ROM during the installation process. Follow the on as "Windows Vista") and Mac OS X v.10.5.x. • Quit all...
...) to the computer's hard disk. The installation resumes from where it to a computer, software including the drivers needs to be necessary to log on -screen instructions and do not remove the Setup CD-ROM during the installation process. Follow the on as "Windows Vista") and Mac OS X v.10.5.x. • Quit all...

Getting Started
Page 16
Drivers, application software, and on-screen manuals are installed automatically. 7 Windows Macintosh 5 6 Click Easy Install. Click Install. • If you want to select particular items to install, click Custom Install and follow the onscreen instructions to proceed with the installation. • Move the cursor over items to display explanations. 14
Drivers, application software, and on-screen manuals are installed automatically. 7 Windows Macintosh 5 6 Click Easy Install. Click Install. • If you want to select particular items to install, click Custom Install and follow the onscreen instructions to proceed with the installation. • Move the cursor over items to display explanations. 14

Getting Started
Page 17
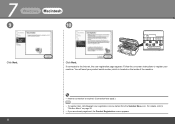
Installation starts. • During installation, follow any on-screen instructions to install the software. 15 When the Please Allow All Install Wizard Processes screen appears, click Next. Windows Macintosh 7 1 2 3 4 5 678 8 Read the License Agreement screen carefully and click Yes.
Installation starts. • During installation, follow any on-screen instructions to install the software. 15 When the Please Allow All Install Wizard Processes screen appears, click Next. Windows Macintosh 7 1 2 3 4 5 678 8 Read the License Agreement screen carefully and click Yes.
Getting Started
Page 19
..."Solution Menu" on page 26. • If you are already registered, the Product Registration screen appears. 17 User registration can be started from the Canon Solution Menu icon. Click Next only once. Follow the on the inside of the machine. • Internet connection is required. (Connection fees apply.) ...• To register later, click Cancel. If connected to register your product serial number, which is located on -screen instructions to the Internet, the user registration page appears. Windows Macintosh 12 13 1 2 3 4 5 678 Serial No Click Next.
..."Solution Menu" on page 26. • If you are already registered, the Product Registration screen appears. 17 User registration can be started from the Canon Solution Menu icon. Click Next only once. Follow the on the inside of the machine. • Internet connection is required. (Connection fees apply.) ...• To register later, click Cancel. If connected to register your product serial number, which is located on -screen instructions to the Internet, the user registration page appears. Windows Macintosh 12 13 1 2 3 4 5 678 Serial No Click Next.

Getting Started
Page 22
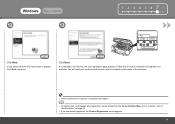
7 Windows Macintosh 4 5 Enter your administrator name or password, click Help, then follow the on -screen instructions. If you want to select particular items to install, click Custom Install and follow the on -screen instructions to proceed with the installation. 20 Drivers, application software, and on-screen manuals are installed automatically. • If you do not know your administrator name and password. Click Easy Install. Click OK.
7 Windows Macintosh 4 5 Enter your administrator name or password, click Help, then follow the on -screen instructions. If you want to select particular items to install, click Custom Install and follow the on -screen instructions to proceed with the installation. 20 Drivers, application software, and on-screen manuals are installed automatically. • If you do not know your administrator name and password. Click Easy Install. Click OK.

Getting Started
Page 23
Read the License Agreement screen carefully and click Yes. Installation starts. Refer to "When Printing Becomes Faint or Colors Are Incorrect" in the on -screen instructions to install the software. • If straight lines are misaligned or print quality is not satisfactory after installation, you may need to display explanations. • During installation, follow any on -screen manual: Basic Guide. 21 Windows Macintosh 6 7 1 2 3 4 5 678 8 Click Install. Click Next. • Move the cursor over items to align the Print Head.
Read the License Agreement screen carefully and click Yes. Installation starts. Refer to "When Printing Becomes Faint or Colors Are Incorrect" in the on -screen instructions to install the software. • If straight lines are misaligned or print quality is not satisfactory after installation, you may need to display explanations. • During installation, follow any on -screen manual: Basic Guide. 21 Windows Macintosh 6 7 1 2 3 4 5 678 8 Click Install. Click Next. • Move the cursor over items to align the Print Head.
Getting Started
Page 24
..., click Cancel. User registration can be started from the Solution Menu icon. 7 Windows Macintosh 9 10 Click Next. For details, refer to "Solution Menu" on -screen instructions to the Internet, the user registration page appears. Follow the on page 26. • If you are already registered, the Product Registration screen appears. 22...
..., click Cancel. User registration can be started from the Solution Menu icon. 7 Windows Macintosh 9 10 Click Next. For details, refer to "Solution Menu" on -screen instructions to the Internet, the user registration page appears. Follow the on page 26. • If you are already registered, the Product Registration screen appears. 22...

