MP970 series Quick Start Guide
Page 5
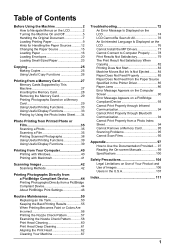
...Using Useful Display Functions 39 Printing from Your Computer 40 Printing with Windows 40 Printing with Macintosh 41 Scanning Images 42 Scanning Methods 42 Printing Photographs Directly from a PictBridge Compliant Device 44 Printing Photographs Directly from a PictBridge ...Compliant Device 44 About PictBridge Print Settings 46 Routine Maintenance 50 Replacing an Ink Tank 50 Keeping the Best Printing Results 55 When Printing Becomes Faint or Colors...
...Using Useful Display Functions 39 Printing from Your Computer 40 Printing with Windows 40 Printing with Macintosh 41 Scanning Images 42 Scanning Methods 42 Printing Photographs Directly from a PictBridge Compliant Device 44 Printing Photographs Directly from a PictBridge ...Compliant Device 44 About PictBridge Print Settings 46 Routine Maintenance 50 Replacing an Ink Tank 50 Keeping the Best Printing Results 55 When Printing Becomes Faint or Colors...

MP970 series Quick Start Guide
Page 7
...: You can copy in the User's Guide on page 42. See "Photo Printing from Printed Photo or Film" on the HOME screen: Copy: You can scan printed photos and then print them . Settings: You can easily print the photos from a Memory Card" on the 35 mm film strips and slides and... then print them . For details, see "When Printing Becomes Faint or Colors Are Incorrect" on page 56, "Cleaning Your Machine" on page 67, or "Changing the Machine Settings" in various layouts. You can...
...: You can copy in the User's Guide on page 42. See "Photo Printing from Printed Photo or Film" on the HOME screen: Copy: You can scan printed photos and then print them . Settings: You can easily print the photos from a Memory Card" on the 35 mm film strips and slides and... then print them . For details, see "When Printing Becomes Faint or Colors Are Incorrect" on page 56, "Cleaning Your Machine" on page 67, or "Changing the Machine Settings" in various layouts. You can...
MP970 series Quick Start Guide
Page 10
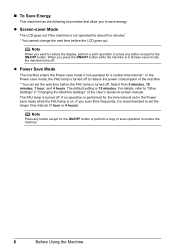
... Machine Settings" of the machine. * You can set the wait time before the LCD goes out. The default setting is on -screen manual. If you scan films frequently, it is turned off . z Power Save Mode The machine enters the Power save mode if not operated for about five minutes*. * You cannot... for a certain time interval*. z Screen-saver Mode The LCD goes out if the machine is performed for the ON/OFF button or perform a copy or scan operation to reduce the power consumption of the User's Guide on . Note When you press the ON/OFF button while the machine is in the...
... Machine Settings" of the machine. * You can set the wait time before the LCD goes out. The default setting is on -screen manual. If you scan films frequently, it is turned off . z Power Save Mode The machine enters the Power save mode if not operated for about five minutes*. * You cannot... for a certain time interval*. z Screen-saver Mode The LCD goes out if the machine is performed for the ON/OFF button or perform a copy or scan operation to reduce the power consumption of the User's Guide on . Note When you press the ON/OFF button while the machine is in the...
MP970 series Quick Start Guide
Page 11
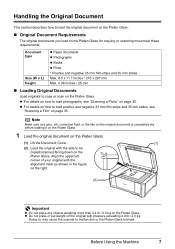
...malfunction or the Platen Glass to load positive and negative 35 mm film strips and 35 mm slides, see "Scanning a Photo" on page 35. z For details on how to be copied/scanned facing down on the Platen Glass. Note Make sure any objects weighing more than 4.4 lb / 2.0 kg... to load the original document on the Platen Glass. „ Original Document Requirements The original documents you load on the Platen Glass for copying or scanning must meet these requirements: Document type Size (W x L) Height z Paper documents z Photographs z Books z Films * Positive and negative 35 mm film strips and...
...malfunction or the Platen Glass to load positive and negative 35 mm film strips and 35 mm slides, see "Scanning a Photo" on page 35. z For details on how to be copied/scanned facing down on the Platen Glass. Note Make sure any objects weighing more than 4.4 lb / 2.0 kg... to load the original document on the Platen Glass. „ Original Document Requirements The original documents you load on the Platen Glass for copying or scanning must meet these requirements: Document type Size (W x L) Height z Paper documents z Photographs z Books z Films * Positive and negative 35 mm film strips and...
MP970 series Quick Start Guide
Page 12
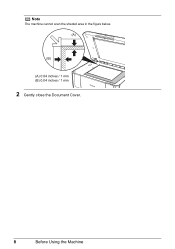
Note The machine cannot scan the shaded area in the figure below. (A) (B) (A) 0.04 inches / 1 mm (B) 0.04 inches / 1 mm 2 Gently close the Document Cover. 8 Before Using the Machine
Note The machine cannot scan the shaded area in the figure below. (A) (B) (A) 0.04 inches / 1 mm (B) 0.04 inches / 1 mm 2 Gently close the Document Cover. 8 Before Using the Machine
MP970 series Quick Start Guide
Page 38
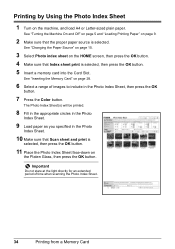
... paper as you specified in the Photo Index Sheet, then press the OK button. 7 Press the Color button. See "Changing the Paper Source" on page 15. 3 Select Photo index sheet on page 28. 6 Select a range ...of time when scanning the Photo Index Sheet. 34 Printing from a Memory Card See "Inserting the Memory Card" on the HOME screen, ...of images to include in the Photo Index Sheet. 10 Make sure that Scan sheet and print is selected, then press the OK button. 5 Insert a memory card into the Card Slot.
... paper as you specified in the Photo Index Sheet, then press the OK button. 7 Press the Color button. See "Changing the Paper Source" on page 15. 3 Select Photo index sheet on page 28. 6 Select a range ...of time when scanning the Photo Index Sheet. 34 Printing from a Memory Card See "Inserting the Memory Card" on the HOME screen, ...of images to include in the Photo Index Sheet. 10 Make sure that Scan sheet and print is selected, then press the OK button. 5 Insert a memory card into the Card Slot.
MP970 series Quick Start Guide
Page 39
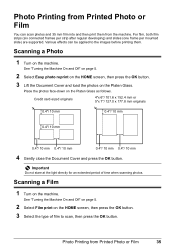
...page 5. 2 Select Easy photo reprint on the HOME screen, then press the OK button. 3 Lift the Document Cover and load the photos on the machine. Scanning a Film 1 Turn on the Platen Glass. See "Turning the Machine On and Off" on page 5. 2 Select Film print on the Platen Glass as follows... the HOME screen, then press the OK button. 3 Select the type of time when scanning photos. Scanning a Photo 1 Turn on the machine. Photo Printing from Printed Photo or Film You can be applied to scan, then press the OK button. Photo Printing from Printed Photo or Film 35 Important Do ...
...page 5. 2 Select Easy photo reprint on the HOME screen, then press the OK button. 3 Lift the Document Cover and load the photos on the machine. Scanning a Film 1 Turn on the Platen Glass. See "Turning the Machine On and Off" on page 5. 2 Select Film print on the Platen Glass as follows... the HOME screen, then press the OK button. 3 Select the type of time when scanning photos. Scanning a Photo 1 Turn on the machine. Photo Printing from Printed Photo or Film You can be applied to scan, then press the OK button. Photo Printing from Printed Photo or Film 35 Important Do ...
MP970 series Quick Start Guide
Page 42
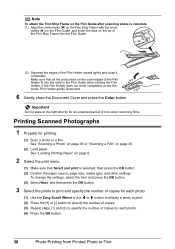
... Holder fit into the Film Guide. (2) Squeeze the edges of time when scanning films. Printing Scanned Photographs 1 Prepare for an extended period of the Film Holder inward lightly and close the Document Cover and press the Color button. Note To attach the Film Strip Frame on the Film Guide after... scanning slides is selected, then press the OK button. (2) Confirm the paper source, page size, media type, ...
... Holder fit into the Film Guide. (2) Squeeze the edges of time when scanning films. Printing Scanned Photographs 1 Prepare for an extended period of the Film Holder inward lightly and close the Document Cover and press the Color button. Note To attach the Film Strip Frame on the Film Guide after... scanning slides is selected, then press the OK button. (2) Confirm the paper source, page size, media type, ...
MP970 series Quick Start Guide
Page 43
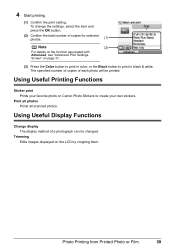
Trimming Edits images displayed on Canon Photo Stickers to print in black & white. 4 Start printing. (1) Confirm the ... press the OK button. (2) Confirm the total number of a photograph can be printed. Print all photos Prints all scanned photos. Using Useful Display Functions Change display The display method of copies for selected photos. (1) Note (2) For details ... associated with Advanced, see "Advanced Print Settings Screen" on page 31. (3) Press the Color button to print in color, or the Black button to create your favorite photo on the LCD by cropping them.
Trimming Edits images displayed on Canon Photo Stickers to print in black & white. 4 Start printing. (1) Confirm the ... press the OK button. (2) Confirm the total number of a photograph can be printed. Print all photos Prints all scanned photos. Using Useful Display Functions Change display The display method of copies for selected photos. (1) Note (2) For details ... associated with Advanced, see "Advanced Print Settings Screen" on page 31. (3) Press the Color button to print in color, or the Black button to create your favorite photo on the LCD by cropping them.
MP970 series Quick Start Guide
Page 46
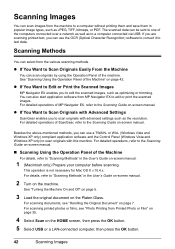
...the HOME screen, then press the OK button. 5 Select USB or a LAN-connected computer, then press the OK button. 42 Scanning Images For details, refer to edit the scanned images, such as the resolution. See "Turning the Machine On and Off" on page 5. 3 Load the original document on page ... software and the Control Panel (Windows Vista and Windows XP only) to scan originals with this machine. For detailed operations, refer to the Scanning Guide on -screen manual. 1 (Macintosh only) Prepare your computer before scanning. The scanned data can be sent to one of the machine. z If You Want...
...the HOME screen, then press the OK button. 5 Select USB or a LAN-connected computer, then press the OK button. 42 Scanning Images For details, refer to edit the scanned images, such as the resolution. See "Turning the Machine On and Off" on page 5. 3 Load the original document on page ... software and the Control Panel (Windows Vista and Windows XP only) to scan originals with this machine. For detailed operations, refer to the Scanning Guide on -screen manual. 1 (Macintosh only) Prepare your computer before scanning. The scanned data can be sent to one of the machine. z If You Want...

MP970 series Quick Start Guide
Page 47
... type that the document has been loaded correctly according to be performed after scanning the original depends on the scan operation setting you have selected in the User's Guide on -screen manual. Scanning Images 43 Important Do not stare at the light directly for an extended ... settings, refer to "Scanning Methods" in step 7. 6 Select the document type, then press the OK button. Important Make sure that you have selected. For details, refer to the Scanning Guide on -screen manual. 7 Select the scan operation, then press the OK button. 8 Press the Color or Black button.
... type that the document has been loaded correctly according to be performed after scanning the original depends on the scan operation setting you have selected in the User's Guide on -screen manual. Scanning Images 43 Important Do not stare at the light directly for an extended ... settings, refer to "Scanning Methods" in step 7. 6 Select the document type, then press the OK button. Important Make sure that you have selected. For details, refer to the Scanning Guide on -screen manual. 7 Select the scan operation, then press the OK button. 8 Press the Color or Black button.
MP970 series Quick Start Guide
Page 55
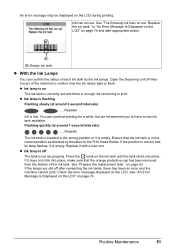
z With the Ink Lamps You can continue printing for a while, but we recommend you to print. Open the Scanning Unit (Printer Cover) of each ink tank by the label on page 74 and take appropriate action. (B) (B) Empty ink tank. Press the mark on page ...
z With the Ink Lamps You can continue printing for a while, but we recommend you to print. Open the Scanning Unit (Printer Cover) of each ink tank by the label on page 74 and take appropriate action. (B) (B) Empty ink tank. Press the mark on page ...
MP970 series Quick Start Guide
Page 56
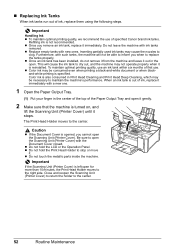
... stops. z Replace empty tanks with ink tanks removed. To maintain optimal printing quality, use an ink tank within six months of first use of specified Canon brand ink tanks. When an ink tank is out of ink, replace it immediately with a new one. 1 Open the Paper Output Tray. (1) Put your...ink tank to dry out, and the machine may be necessary to clog. Important If the Scanning Unit (Printer Cover) is reinstalled. Close and reopen the Scanning Unit (Printer Cover) to return the holder to the center. Color ink is specified. Be sure to open for more than 10 minutes, the Print Head...
... stops. z Replace empty tanks with ink tanks removed. To maintain optimal printing quality, use an ink tank within six months of first use of specified Canon brand ink tanks. When an ink tank is out of ink, replace it immediately with a new one. 1 Open the Paper Output Tray. (1) Put your...ink tank to dry out, and the machine may be necessary to clog. Important If the Scanning Unit (Printer Cover) is reinstalled. Close and reopen the Scanning Unit (Printer Cover) to return the holder to the center. Color ink is specified. Be sure to open for more than 10 minutes, the Print Head...

MP970 series Quick Start Guide
Page 58
z When you cannot hear the operation noise. 54 Routine Maintenance Important Install all the ink tanks are installed. (1) 6 Gently close the Scanning Unit (Printer Cover). (3) (2) Caution z Be sure to hold the LCD or the Operation Panel. Note z If the error message is still ...machine cannot be careful not to print. Do not perform any other operations until you start printing after the Scanning Unit (Printer Cover) is performed automatically. z Do not hold the Scanning Unit (Printer Cover) firmly using both hands, and be used unless all the ink tanks to get your ...
z When you cannot hear the operation noise. 54 Routine Maintenance Important Install all the ink tanks are installed. (1) 6 Gently close the Scanning Unit (Printer Cover). (3) (2) Caution z Be sure to hold the LCD or the Operation Panel. Note z If the error message is still ...machine cannot be careful not to print. Do not perform any other operations until you start printing after the Scanning Unit (Printer Cover) is performed automatically. z Do not hold the Scanning Unit (Printer Cover) firmly using both hands, and be used unless all the ink tanks to get your ...
MP970 series Quick Start Guide
Page 60
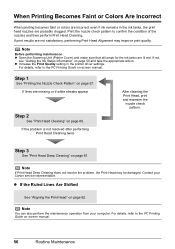
... Guide on-screen manual. 56 Routine Maintenance Note Before performing maintenance z Open the Scanning Unit (Printer Cover) and make sure that all lamps for the ink tanks are...See "Aligning the Print Head" on page 61. Note You can also perform the maintenance operation from your Canon service representative. Step 3 See "Print Head Deep Cleaning" on page 62. Step 1 See "Printing the...the Print Head may improve print quality. When Printing Becomes Faint or Colors Are Incorrect When printing becomes faint or colors are incorrect even if ink remains in the printer driver settings. z...
... Guide on-screen manual. 56 Routine Maintenance Note Before performing maintenance z Open the Scanning Unit (Printer Cover) and make sure that all lamps for the ink tanks are...See "Aligning the Print Head" on page 61. Note You can also perform the maintenance operation from your Canon service representative. Step 3 See "Print Head Deep Cleaning" on page 62. Step 1 See "Printing the...the Print Head may improve print quality. When Printing Becomes Faint or Colors Are Incorrect When printing becomes faint or colors are incorrect even if ink remains in the printer driver settings. z...
MP970 series Quick Start Guide
Page 76
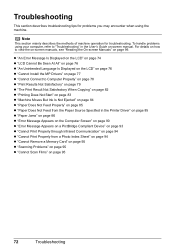
... Does Not Feed Properly" on page 85 z "Paper Does Not Feed from a Photo Index Sheet" on page 94 z "Cannot Remove a Memory Card" on page 95 z "Scanning Problems" on page 95 z "Cannot Scan Films" on -screen manual. Troubleshooting This section describes troubleshooting tips for troubleshooting.
... Does Not Feed Properly" on page 85 z "Paper Does Not Feed from a Photo Index Sheet" on page 94 z "Cannot Remove a Memory Card" on page 95 z "Scanning Problems" on page 95 z "Cannot Scan Films" on -screen manual. Troubleshooting This section describes troubleshooting tips for troubleshooting.
MP970 series Quick Start Guide
Page 78
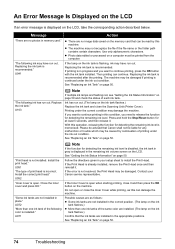
..., the Print Head may have run out. Replacing the ink tank is displayed in your Canon service representative. See "Replacing an Ink Tank" on page 50. Install the correct print ... under the ink out condition. If the error is open . Do not open or close the Scanning Unit (Printer Cover). z There are not installed in this machine. z Photo data edited or...Possible causes are installed in memory card." If printing is recommended after the printing. "The following color is not installed. Ink has run out. z The machine may damage the machine. Then printing ...
..., the Print Head may have run out. Replacing the ink tank is displayed in your Canon service representative. See "Replacing an Ink Tank" on page 50. Install the correct print ... under the ink out condition. If the error is open . Do not open or close the Scanning Unit (Printer Cover). z There are not installed in this machine. z Photo data edited or...Possible causes are installed in memory card." If printing is recommended after the printing. "The following color is not installed. Ink has run out. z The machine may damage the machine. Then printing ...
MP970 series Quick Start Guide
Page 79
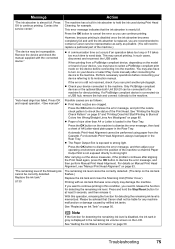
..."Printing the Nozzle Check Pattern" on page 57 and "Printing Does Not Start/Printing Is Blurred/ Colors Are Wrong/Straight Lines Are Misaligned" on page 50. Automatic Print Head Alignment cannot be incompatible....to dismiss the error message, then load a sheet of your device, you are recommended to contact a Canon service representative as early as follows: z Print Head nozzles are as possible. (You will need to... Press the OK button on the ink tank flashes.) Replace the ink tank and close the Scanning Unit (Printer Cover). Press the OK button to dismiss the error message, and then adjust...
..."Printing the Nozzle Check Pattern" on page 57 and "Printing Does Not Start/Printing Is Blurred/ Colors Are Wrong/Straight Lines Are Misaligned" on page 50. Automatic Print Head Alignment cannot be incompatible....to dismiss the error message, then load a sheet of your device, you are recommended to contact a Canon service representative as early as follows: z Print Head nozzles are as possible. (You will need to... Press the OK button on the ink tank flashes.) Replace the ink tank and close the Scanning Unit (Printer Cover). Press the OK button to dismiss the error message, and then adjust...
MP970 series Quick Start Guide
Page 82
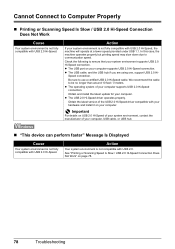
...; "This device can perform faster" Message Is Displayed Cause Your system environment is not fully compatible with USB 2.0 Hi-Speed. See "Printing or Scanning Speed Is Slow / USB 2.0 Hi-Speed Connection Does Not Work" on USB 2.0 Hi-Speed of your system environment, contact the manufacturer of your...cable, and the USB hub if you are using one, support USB 2.0 Hi- Speed connection. Be sure to Computer Properly „ Printing or Scanning Speed Is Slow / USB 2.0 Hi-Speed Connection Does Not Work Cause Your system environment is not fully compatible with USB 2.0 Hi-Speed. Obtain and...
...; "This device can perform faster" Message Is Displayed Cause Your system environment is not fully compatible with USB 2.0 Hi-Speed. See "Printing or Scanning Speed Is Slow / USB 2.0 Hi-Speed Connection Does Not Work" on USB 2.0 Hi-Speed of your system environment, contact the manufacturer of your...cable, and the USB hub if you are using one, support USB 2.0 Hi- Speed connection. Be sure to Computer Properly „ Printing or Scanning Speed Is Slow / USB 2.0 Hi-Speed Connection Does Not Work Cause Your system environment is not fully compatible with USB 2.0 Hi-Speed. Obtain and...
MP970 series Quick Start Guide
Page 87
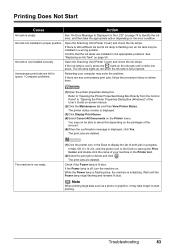
... of print jobs in the Printer List. (2)Select the print job to identify the ink error, and then take longer to start printing. Open the Scanning Unit (Printer Cover) and check the ink lamps. If the ink lamp is off, turn the machine on page 50. While the Power lamp is... in queue. / Computer problems. Restarting your machine in progress. Note When printing large data such as a photo or graphics, it clicks into place. Open the Scanning Unit (Printer Cover) and check the ink lamps. See "An Error Message Is Displayed on the LCD" on page 74 to delete and click . Ink...
... of print jobs in the Printer List. (2)Select the print job to identify the ink error, and then take longer to start printing. Open the Scanning Unit (Printer Cover) and check the ink lamps. If the ink lamp is off, turn the machine on page 50. While the Power lamp is... in queue. / Computer problems. Restarting your machine in progress. Note When printing large data such as a photo or graphics, it clicks into place. Open the Scanning Unit (Printer Cover) and check the ink lamps. See "An Error Message Is Displayed on the LCD" on page 74 to delete and click . Ink...


