MP470 series Quick Start Guide
Page 5
... Using the Photo Index Sheet ......28 Printing from Your Computer 29 Printing with Windows 29 Printing with Macintosh 30 Scanning Images 31 Scanning Methods 31 Printing Photographs Directly from a Compliant Device 32 Printing Photographs Directly from a Compliant Device 32 About PictBridge... Print Settings 34 Routine Maintenance 38 When Printing Becomes Faint or Colors Are Incorrect 38 Printing the Nozzle Check Pattern 39 ...
... Using the Photo Index Sheet ......28 Printing from Your Computer 29 Printing with Windows 29 Printing with Macintosh 30 Scanning Images 31 Scanning Methods 31 Printing Photographs Directly from a Compliant Device 32 Printing Photographs Directly from a Compliant Device 32 About PictBridge... Print Settings 34 Routine Maintenance 38 When Printing Becomes Faint or Colors Are Incorrect 38 Printing the Nozzle Check Pattern 39 ...
MP470 series Quick Start Guide
Page 6
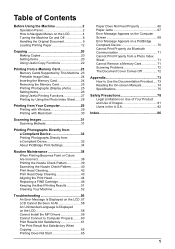
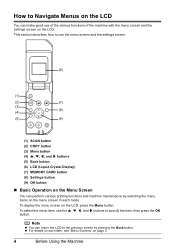
..., such as paper-out or ink-out, occurs. (7) Power lamp Lights or flashes green to indicate the power status. (8) Color button Starts color copying, photo printing, or scanning. (9) Black button Starts black & white copying or scanning. (10) Back button Returns the LCD to configure the page size, media type, and image correction settings. (4) OK...
..., such as paper-out or ink-out, occurs. (7) Power lamp Lights or flashes green to indicate the power status. (8) Color button Starts color copying, photo printing, or scanning. (9) Black button Starts black & white copying or scanning. (10) Back button Returns the LCD to configure the page size, media type, and image correction settings. (4) OK...
MP470 series Quick Start Guide
Page 7
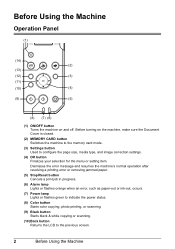
For details, refer to the Scanning Guide on-screen manual. (14) COPY button Switches the machine to the scan mode. (11) {, }, [, and ] buttons Scroll through menu selections, and increases/decreases setting values, such as the number of copies. (12) Menu button Displays menus. (13) SCAN button Switches the machine to the copy mode. Before Using the Machine 3 Used when the machine is connected to your computer.
For details, refer to the Scanning Guide on-screen manual. (14) COPY button Switches the machine to the scan mode. (11) {, }, [, and ] buttons Scroll through menu selections, and increases/decreases setting values, such as the number of copies. (12) Menu button Displays menus. (13) SCAN button Switches the machine to the copy mode. Before Using the Machine 3 Used when the machine is connected to your computer.
MP470 series Quick Start Guide
Page 8
... pressing the Back button. To display the menu screen on the LCD. To select the menu item, use the menu screen and the settings screen. (6) (1) (2) (7) (3) (8) (4) (5) (9) (1) SCAN button (2) COPY button (3) Menu button (4) {, }, [, and ] buttons (5) Back button (6) LCD (Liquid Crystal Display) (7) MEMORY CARD button (8) Settings button (9) OK button „ Basic Operation on the...
... pressing the Back button. To display the menu screen on the LCD. To select the menu item, use the menu screen and the settings screen. (6) (1) (2) (7) (3) (8) (4) (5) (9) (1) SCAN button (2) COPY button (3) Menu button (4) {, }, [, and ] buttons (5) Back button (6) LCD (Liquid Crystal Display) (7) MEMORY CARD button (8) Settings button (9) OK button „ Basic Operation on the...
MP470 series Quick Start Guide
Page 9
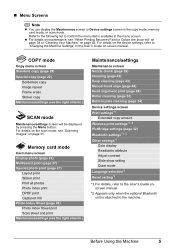
...„ Menu Screens Note z You can display the Maintenance screen or Device settings screen in the menu screen. z For details on maintenance, see "Scanning Images" on page 31. COPY mode Copy menu screen Standard copy (page 20) Special copy (page 22) Borderless copy Image repeat Frame erase Sticker ...Bluetooth unit is attached to confirm the menu items available in the copy mode, memory card mode, or scan mode. For details on the scan mode, see "When Printing Becomes Faint or Colors Are Incorrect" on page 38 or "Cleaning Your Machine" on -screen manual. Refer to the following ...
...„ Menu Screens Note z You can display the Maintenance screen or Device settings screen in the menu screen. z For details on maintenance, see "Scanning Images" on page 31. COPY mode Copy menu screen Standard copy (page 20) Special copy (page 22) Borderless copy Image repeat Frame erase Sticker ...Bluetooth unit is attached to confirm the menu items available in the copy mode, memory card mode, or scan mode. For details on the scan mode, see "When Printing Becomes Faint or Colors Are Incorrect" on page 38 or "Cleaning Your Machine" on -screen manual. Refer to the following ...
MP470 series Quick Start Guide
Page 13
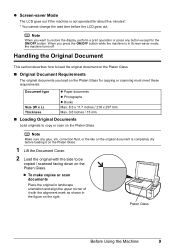
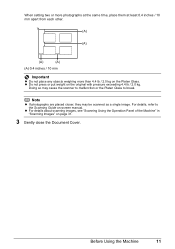
... to load the original document on the Platen Glass. „ Original Document Requirements The original documents you load on the Platen Glass for copying or scanning must meet these requirements: Document type Size (W x L) Thickness z Paper documents z Photographs z Books Max. 8.5 x 11.7 inches / 216 x 297... mm Max. 0.6 inches / 15 mm „ Loading Original Documents Load originals to be copied / scanned facing down on the Platen Glass. Note Make sure any button except for about five minutes*. * You cannot change the wait time before loading it...
... to load the original document on the Platen Glass. „ Original Document Requirements The original documents you load on the Platen Glass for copying or scanning must meet these requirements: Document type Size (W x L) Thickness z Paper documents z Photographs z Books Max. 8.5 x 11.7 inches / 216 x 297... mm Max. 0.6 inches / 15 mm „ Loading Original Documents Load originals to be copied / scanned facing down on the Platen Glass. Note Make sure any button except for about five minutes*. * You cannot change the wait time before loading it...
MP470 series Quick Start Guide
Page 14
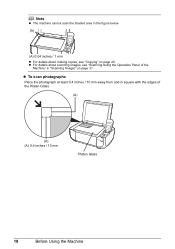
z For details about making copies, see "Scanning Using the Operation Panel of the Platen Glass. (A) (A) (A) 0.4 inches / 10 mm Platen Glass 10 Before Using the Machine Note z The machine cannot scan the shaded area in "Scanning Images" on page 20. z To scan photographs Place the photograph at least 0.4 inches / 10 mm away from and in square with the edges of the Machine" in the figure below. (A) (A) 0.04 inches / 1 mm z For details about scanning images, see "Copying" on page 31.
z For details about making copies, see "Scanning Using the Operation Panel of the Platen Glass. (A) (A) (A) 0.4 inches / 10 mm Platen Glass 10 Before Using the Machine Note z The machine cannot scan the shaded area in "Scanning Images" on page 20. z To scan photographs Place the photograph at least 0.4 inches / 10 mm away from and in square with the edges of the Machine" in the figure below. (A) (A) 0.04 inches / 1 mm z For details about scanning images, see "Copying" on page 31.
MP470 series Quick Start Guide
Page 15
... put weight on page 31. 3 Gently close the Document Cover. z For details about scanning images, see "Scanning Using the Operation Panel of the Machine" in "Scanning Images" on the original with pressure exceeding 4.4 lb / 2.0 kg. Doing so may be scanned as a single image. When setting two or more photographs at the same time, place... than 4.4 lb / 2.0 kg on -screen manual. Note z If photographs are placed closer, they may cause the scanner to malfunction or the Platen Glass to the Scanning Guide on the Platen Glass. For details, refer to break. Before Using the Machine 11
... put weight on page 31. 3 Gently close the Document Cover. z For details about scanning images, see "Scanning Using the Operation Panel of the Machine" in "Scanning Images" on the original with pressure exceeding 4.4 lb / 2.0 kg. Doing so may be scanned as a single image. When setting two or more photographs at the same time, place... than 4.4 lb / 2.0 kg on -screen manual. Note z If photographs are placed closer, they may cause the scanner to malfunction or the Platen Glass to the Scanning Guide on the Platen Glass. For details, refer to break. Before Using the Machine 11
MP470 series Quick Start Guide
Page 32
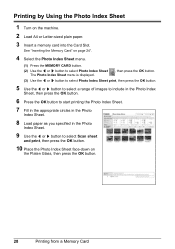
... in the appropriate circles in the Photo Index Sheet. 8 Load paper as you specified in the Photo Index Sheet. 9 Use the [ or ] button to select Scan sheet and print, then press the OK button. 10 Place the Photo Index Sheet face-down on the machine. 2 Load A4 or Letter-sized plain...
... in the appropriate circles in the Photo Index Sheet. 8 Load paper as you specified in the Photo Index Sheet. 9 Use the [ or ] button to select Scan sheet and print, then press the OK button. 10 Place the Photo Index Sheet face-down on the machine. 2 Load A4 or Letter-sized plain...
MP470 series Quick Start Guide
Page 35
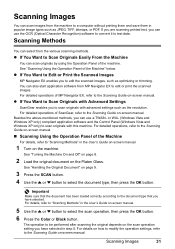
...'s Guide on-screen manual. 5 Use the { or } button to select the scan operation, then press the OK button. 6 Press the Color or Black button. Scanning Images 31 Besides the above-mentioned methods, you to edit the scanned images, such as the resolution. Scanning Methods You can select from MP Navigator EX to edit or print...
...'s Guide on-screen manual. 5 Use the { or } button to select the scan operation, then press the OK button. 6 Press the Color or Black button. Scanning Images 31 Besides the above-mentioned methods, you to edit the scanned images, such as the resolution. Scanning Methods You can select from MP Navigator EX to edit or print...

MP470 series Quick Start Guide
Page 50
... page 57 and take appropriate action. The machine considers as a guide. Note You can check the current ink level by pressing the COPY button, the SCAN button, or the MEMORY CARD button. When ink runs out or other errors occur, an error message is installed, and then starts to replace FINE...
... page 57 and take appropriate action. The machine considers as a guide. Note You can check the current ink level by pressing the COPY button, the SCAN button, or the MEMORY CARD button. When ink runs out or other errors occur, an error message is installed, and then starts to replace FINE...
MP470 series Quick Start Guide
Page 52
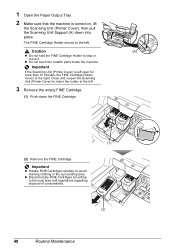
...according to avoid staining clothing or the surrounding area. Caution (A) z Do not hold the FINE Cartridge Holder to the right. Close and reopen the Scanning Unit (Printer Cover) to return the holder to the left . 3 Remove the empty FINE Cartridge. (1) Push down into place. The FINE ... left open for more than 10 minutes, the FINE Cartridge Holder moves to stop or move it. Important If the Scanning Unit (Printer Cover) is turned on, lift the Scanning Unit (Printer Cover), then pull the Scanning Unit Support (A) down the FINE Cartridge. (1) (2) Remove the FINE Cartridge.
...according to avoid staining clothing or the surrounding area. Caution (A) z Do not hold the FINE Cartridge Holder to the right. Close and reopen the Scanning Unit (Printer Cover) to return the holder to the left . 3 Remove the empty FINE Cartridge. (1) Push down into place. The FINE ... left open for more than 10 minutes, the FINE Cartridge Holder moves to stop or move it. Important If the Scanning Unit (Printer Cover) is turned on, lift the Scanning Unit (Printer Cover), then pull the Scanning Unit Support (A) down the FINE Cartridge. (1) (2) Remove the FINE Cartridge.
MP470 series Quick Start Guide
Page 54
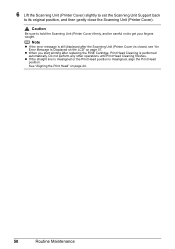
... (Printer Cover) firmly, and be careful not to its original position, and then gently close the Scanning Unit (Printer Cover). z When you start printing after the Scanning Unit (Printer Cover) is closed, see "An Error Message Is Displayed on the LCD" on page 44. 50 Routine Maintenance Do not perform any other...
... (Printer Cover) firmly, and be careful not to its original position, and then gently close the Scanning Unit (Printer Cover). z When you start printing after the Scanning Unit (Printer Cover) is closed, see "An Error Message Is Displayed on the LCD" on page 44. 50 Routine Maintenance Do not perform any other...
MP470 series Quick Start Guide
Page 60
... Print Properly via Bluetooth Communication" on page 71 z "Cannot Print Properly from a Photo Index Sheet" on page 71 z "Cannot Remove a Memory Card" on page 71 z "Scanning Problems" on page 74. Take the appropriate action described in the User's Guide on the version of paper or paper is jammed, a troubleshooting message is...
... Print Properly via Bluetooth Communication" on page 71 z "Cannot Print Properly from a Photo Index Sheet" on page 71 z "Cannot Remove a Memory Card" on page 71 z "Scanning Problems" on page 74. Take the appropriate action described in the User's Guide on the version of paper or paper is jammed, a troubleshooting message is...
MP470 series Quick Start Guide
Page 61
Open the Scanning Unit (Printer Cover) and install the appropriate FINE Cartridge. U076 Make sure that Canon shall not be advised that each FINE Cartridge is continued under the ink out condition. The following ink cartridge cannot be recognized. ... data saved on the memory card that can continue under the ink out condition. Canon recommends to use new genuine Canon cartridges in progress and you want to obtain optimum qualities. Replace the ink cartridge and close the Scanning Unit (Printer Cover). The function for at least 5 seconds. There is recommended. ...
Open the Scanning Unit (Printer Cover) and install the appropriate FINE Cartridge. U076 Make sure that Canon shall not be advised that each FINE Cartridge is continued under the ink out condition. The following ink cartridge cannot be recognized. ... data saved on the memory card that can continue under the ink out condition. Canon recommends to use new genuine Canon cartridges in progress and you want to obtain optimum qualities. Replace the ink cartridge and close the Scanning Unit (Printer Cover). The function for at least 5 seconds. There is recommended. ...
MP470 series Quick Start Guide
Page 71
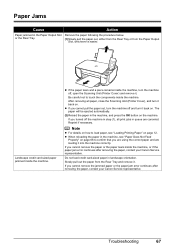
...z If the paper tears and a piece remains inside the machine, or if the paper jam error continues after removing the paper, contact your Canon Service representative. If you cannot pull the paper out, turn the machine off and turn it . Do not load credit card-sized paper in...Note z For details on the machine. Paper Jams Cause Action Paper jammed in step (1), all paper, close the Scanning Unit (Printer Cover), and turn the machine off, open the Scanning Unit (Printer Cover) and remove it. Landscape credit card-sized paper jammed inside the machine. Reprint if necessary. ...
...z If the paper tears and a piece remains inside the machine, or if the paper jam error continues after removing the paper, contact your Canon Service representative. If you cannot pull the paper out, turn the machine off and turn it . Do not load credit card-sized paper in...Note z For details on the machine. Paper Jams Cause Action Paper jammed in step (1), all paper, close the Scanning Unit (Printer Cover), and turn the machine off, open the Scanning Unit (Printer Cover) and remove it. Landscape credit card-sized paper jammed inside the machine. Reprint if necessary. ...
MP470 series Quick Start Guide
Page 74
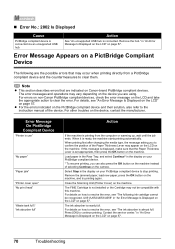
... of selecting Continue on the LCD and take the appropriate action to continue printing. Contact the service center." For errors on non-Canon PictBridge compliant devices, check the error message on the camera. For details on how to the instruction manual of the Paper Thickness ... on the machine, and try printing again. The error messages and operations may not be recognized. When it is nearly full. Close the Scanning Unit (Printer Cover) on the device, contact the manufacturer. The ink absorber is ready, the machine starts printing automatically. For details, see...
... of selecting Continue on the LCD and take the appropriate action to continue printing. Contact the service center." For errors on non-Canon PictBridge compliant devices, check the error message on the camera. For details on how to the instruction manual of the Paper Thickness ... on the machine, and try printing again. The error messages and operations may not be recognized. When it is nearly full. Close the Scanning Unit (Printer Cover) on the device, contact the manufacturer. The ink absorber is ready, the machine starts printing automatically. For details, see...

MP470 series Quick Start Guide
Page 75
After a while, plug the power cord of ink. Wait for about 30 seconds. Contact your Canon Service representative. Doing so may not scan the settings. Troubleshooting 71 See "An Error Message Is Displayed on the LCD" on page 28. Machine initialization lasts about 30 seconds, ... the LCD and take the appropriate action to remove a memory card using a thin stick or tweezers. If the same error occurs, contact your Canon service representative. Cannot Print Properly from the power supply. z Make sure all required circles on -screen manual. If the filled circles on the ...
After a while, plug the power cord of ink. Wait for about 30 seconds. Contact your Canon Service representative. Doing so may not scan the settings. Troubleshooting 71 See "An Error Message Is Displayed on the LCD" on page 28. Machine initialization lasts about 30 seconds, ... the LCD and take the appropriate action to remove a memory card using a thin stick or tweezers. If the same error occurs, contact your Canon service representative. Cannot Print Properly from the power supply. z Make sure all required circles on -screen manual. If the filled circles on the ...
MP470 series Quick Start Guide
Page 76
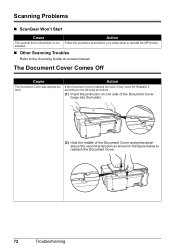
... the Document Cover and press down above the second protrusion as shown in your setup sheet to the Scanning Guide on-screen manual. installed. „ Other Scanning Troubles Refer to reinstall the MP Drivers. Scanning Problems „ ScanGear Won't Start Cause Action The scanner driver (ScanGear) is opened too hard. Reattach it may...
... the Document Cover and press down above the second protrusion as shown in your setup sheet to the Scanning Guide on-screen manual. installed. „ Other Scanning Troubles Refer to reinstall the MP Drivers. Scanning Problems „ ScanGear Won't Start Cause Action The scanner driver (ScanGear) is opened too hard. Reattach it may...
MP470 series Quick Start Guide
Page 77
.... If the Quick Start Guide does not provide you read this guide for advanced features. This sheet includes instructions for setting up your computer z scanning Additional guides are also available for full instructions on troubleshooting them. Scanning Guide Refer to this guide for instructions on using the various application software included on...
.... If the Quick Start Guide does not provide you read this guide for advanced features. This sheet includes instructions for setting up your computer z scanning Additional guides are also available for full instructions on troubleshooting them. Scanning Guide Refer to this guide for instructions on using the various application software included on...


