

MP210 series Quick Start Guide
Page 5
...Settings 16 Using Useful Copy Functions 16 Printing from Your Computer 17 Printing with Windows 17 Printing with Macintosh 18 Scanning Images 19 Scanning Methods 19 Printing Photographs Directly from a Compliant Device 20 Printing Photographs Directly from a Compliant Device 20 About ...PictBridge Print Settings 22 Routine Maintenance 25 List of Maintenance Codes 25 When Printing Becomes Faint or Colors Are Incorrect 26 Printing the...
...Settings 16 Using Useful Copy Functions 16 Printing from Your Computer 17 Printing with Windows 17 Printing with Macintosh 18 Scanning Images 19 Scanning Methods 19 Printing Photographs Directly from a Compliant Device 20 Printing Photographs Directly from a Compliant Device 20 About ...PictBridge Print Settings 22 Routine Maintenance 25 List of Maintenance Codes 25 When Printing Becomes Faint or Colors Are Incorrect 26 Printing the...
MP210 series Quick Start Guide
Page 6
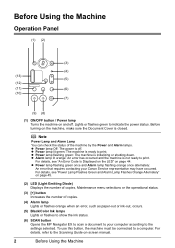
Lights or flashes green to the Scanning Guide on-screen manual. 2 Before Using the Machine z Power lamp Off: The power is not ready to... the machine, make sure the Document Cover is closed. To use this button, the machine must be connected to your Canon Service representative may have occurred. z Power lamp flashing green once and Alarm lamp flashing orange once alternately: An error that...lamp Lights or flashes orange when an error, such as paper-out or ink-out, occurs. (5) Black/Color Ink lamps Lights or flashes to show the ink status. (6) SCAN button Opens the MP Navigator EX to...
Lights or flashes green to the Scanning Guide on-screen manual. 2 Before Using the Machine z Power lamp Off: The power is not ready to... the machine, make sure the Document Cover is closed. To use this button, the machine must be connected to your Canon Service representative may have occurred. z Power lamp flashing green once and Alarm lamp flashing orange once alternately: An error that...lamp Lights or flashes orange when an error, such as paper-out or ink-out, occurs. (5) Black/Color Ink lamps Lights or flashes to show the ink status. (6) SCAN button Opens the MP Navigator EX to...
MP210 series Quick Start Guide
Page 10
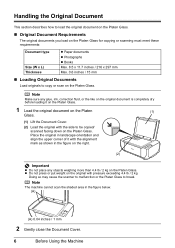
... not press or put weight on the Platen Glass. Doing so may cause the scanner to malfunction or the Platen Glass to be copied/ scanned facing down on the original with the side to break. Note Make sure any glue, ink, correction fluid, or the like on the ... to load the original document on the Platen Glass. „ Original Document Requirements The original documents you load on the Platen Glass for copying or scanning must meet these requirements: Document type Size (W x L) Thickness z Paper documents z Photographs z Books Max. 8.5 x 11.7 inches / 216 x 297 mm Max. 0.6 inches / 15 mm ...
... not press or put weight on the Platen Glass. Doing so may cause the scanner to malfunction or the Platen Glass to be copied/ scanned facing down on the original with the side to break. Note Make sure any glue, ink, correction fluid, or the like on the ... to load the original document on the Platen Glass. „ Original Document Requirements The original documents you load on the Platen Glass for copying or scanning must meet these requirements: Document type Size (W x L) Thickness z Paper documents z Photographs z Books Max. 8.5 x 11.7 inches / 216 x 297 mm Max. 0.6 inches / 15 mm ...
MP210 series Quick Start Guide
Page 23
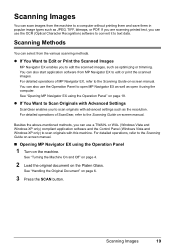
... save them in popular image types such as the resolution. For detailed operations of ScanGear, refer to scan originals with this machine. Besides the above-mentioned methods, you to the Scanning Guide on the machine. See "Turning the Machine On and Off" on page 4. 2 Load the...data. See "Handling the Original Document" on the Platen Glass. z If You Want to Scan Originals with Advanced Settings ScanGear enables you can use the OCR (Optical Character Recognition) software to the Scanning Guide on-screen manual. „ Opening MP Navigator EX using the Operation Panel" on ...
... save them in popular image types such as the resolution. For detailed operations of ScanGear, refer to scan originals with this machine. Besides the above-mentioned methods, you to the Scanning Guide on the machine. See "Turning the Machine On and Off" on page 4. 2 Load the...data. See "Handling the Original Document" on the Platen Glass. z If You Want to Scan Originals with Advanced Settings ScanGear enables you can use the OCR (Optical Character Recognition) software to the Scanning Guide on-screen manual. „ Opening MP Navigator EX using the Operation Panel" on ...
MP210 series Quick Start Guide
Page 29
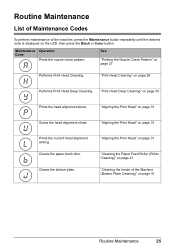
...nozzle check pattern. "Aligning the Print Head" on page 31 Prints the current head alignment setting. "Aligning the Print Head" on page 31 Scans the head alignment sheet. Cleans the bottom plate. Cleans the paper feed roller. "Aligning the Print Head" on page 31 "Cleaning the ... Inside of the machine, press the Maintenance button repeatedly until the desired code is displayed on the LED, then press the Black or Color button. Routine Maintenance List of Maintenance Codes To perform maintenance of the Machine (Bottom Plate Cleaning)" on page 41 Routine Maintenance 25 "...
...nozzle check pattern. "Aligning the Print Head" on page 31 Prints the current head alignment setting. "Aligning the Print Head" on page 31 Scans the head alignment sheet. Cleans the bottom plate. Cleans the paper feed roller. "Aligning the Print Head" on page 31 "Cleaning the ... Inside of the machine, press the Maintenance button repeatedly until the desired code is displayed on the LED, then press the Black or Color button. Routine Maintenance List of Maintenance Codes To perform maintenance of the Machine (Bottom Plate Cleaning)" on page 41 Routine Maintenance 25 "...
MP210 series Quick Start Guide
Page 36
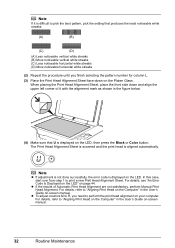
... Head Alignment Sheet. For details, see "An Error Code Is Displayed on the LED" on the LED, then press the Black or Color button. The Print Head Alignment Sheet is scanned and the print head is displayed on your computer. In this case, start over from step 1 to "Aligning Print Head on...
... Head Alignment Sheet. For details, see "An Error Code Is Displayed on the LED" on the LED, then press the Black or Color button. The Print Head Alignment Sheet is scanned and the print head is displayed on your computer. In this case, start over from step 1 to "Aligning Print Head on...
MP210 series Quick Start Guide
Page 40
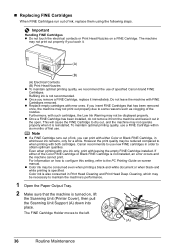
... recommended. The FINE Cartridge Holder moves to the PC Printing Guide on , lift the Scanning Unit (Printer Cover), then pull the Scanning Unit Support (A) down into place. For information on a FINE Cartridge. z Color ink may be necessary to when printing with such cartridges, the Low Ink Warning may ...out properly due to use new FINE cartridges in whichever ink remains, only for a while. Do not leave the machine with new ones. Canon recommends to some reasons such as clogging of ink, you insert FINE Cartridges that the machine is also consumed in the open. Note z If...
... recommended. The FINE Cartridge Holder moves to the PC Printing Guide on , lift the Scanning Unit (Printer Cover), then pull the Scanning Unit Support (A) down into place. For information on a FINE Cartridge. z Color ink may be necessary to when printing with such cartridges, the Low Ink Warning may ...out properly due to use new FINE cartridges in whichever ink remains, only for a while. Do not leave the machine with new ones. Canon recommends to some reasons such as clogging of ink, you insert FINE Cartridges that the machine is also consumed in the open. Note z If...
MP210 series Quick Start Guide
Page 41
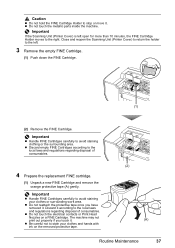
Important If the Scanning Unit (Printer Cover) is left . 3 Remove the empty FINE Cartridge. (1) Push down the FINE Cartridge. (1) (2) Remove the FINE Cartridge. Important z Handle FINE Cartridges carefully to ... the left open for more than 10 minutes, the FINE Cartridge Holder moves to avoid staining clothing or the surrounding area. Close and reopen the Scanning Unit (Printer Cover) to return the holder to avoid staining your clothes and hands with ink on a FINE Cartridge. z Discard empty FINE Cartridges according to...
Important If the Scanning Unit (Printer Cover) is left . 3 Remove the empty FINE Cartridge. (1) Push down the FINE Cartridge. (1) (2) Remove the FINE Cartridge. Important z Handle FINE Cartridges carefully to ... the left open for more than 10 minutes, the FINE Cartridge Holder moves to avoid staining clothing or the surrounding area. Close and reopen the Scanning Unit (Printer Cover) to return the holder to avoid staining your clothes and hands with ink on a FINE Cartridge. z Discard empty FINE Cartridges according to...

MP210 series Quick Start Guide
Page 42
... or the Print Head position is performed automatically. z If a print job has not been done yet, press the Black or Color button to its original position, and then gently close the Scanning Unit (Printer Cover). See "Aligning the Print Head" on page 44. B C (1) (2) Push up the FINE Cartridge until...back to resume printing. Do not perform any other operations until it clicks into the right slot ( C ). z When you start printing after the Scanning Unit (Printer Cover) is closed, see "An Error Code Is Displayed on the LED" on page 31. 38 Routine Maintenance Note z If the error...
... or the Print Head position is performed automatically. z If a print job has not been done yet, press the Black or Color button to its original position, and then gently close the Scanning Unit (Printer Cover). See "Aligning the Print Head" on page 44. B C (1) (2) Push up the FINE Cartridge until...back to resume printing. Do not perform any other operations until it clicks into the right slot ( C ). z When you start printing after the Scanning Unit (Printer Cover) is closed, see "An Error Code Is Displayed on the LED" on page 31. 38 Routine Maintenance Note z If the error...
MP210 series Quick Start Guide
Page 47
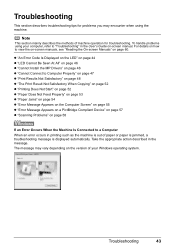
... z "Paper Jams" on page 54 z "Error Message Appears on the Computer Screen" on page 55 z "Error Message Appears on a PictBridge Compliant Device" on page 57 z "Scanning Problems" on page 60. Take the appropriate action described in the User's Guide on-screen manual. z "An Error Code Is Displayed on the LED" on...
... z "Paper Jams" on page 54 z "Error Message Appears on the Computer Screen" on page 55 z "Error Message Appears on a PictBridge Compliant Device" on page 57 z "Scanning Problems" on page 60. Take the appropriate action described in the User's Guide on-screen manual. z "An Error Code Is Displayed on the LED" on...
MP210 series Quick Start Guide
Page 48
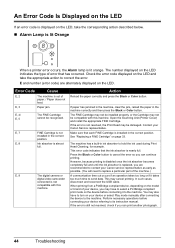
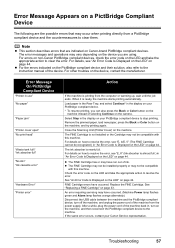
... You may also have to select a PictBridge compliant print mode on the device before connecting your Canon service representative as early as possible. (You will need to replace a particular part of paper. .... If the error is not installed in the machine correctly and then press the Black or Color button. If paper has jammed in the machine, clear the jam, reload the paper in ...you can print another photograph. 44 Troubleshooting This error code indicates that has occurred. Open the Scanning Unit (Printer Cover) and install the appropriate FINE Cartridge. E and number (error code) ...
... You may also have to select a PictBridge compliant print mode on the device before connecting your Canon service representative as early as possible. (You will need to replace a particular part of paper. .... If the error is not installed in the machine correctly and then press the Black or Color button. If paper has jammed in the machine, clear the jam, reload the paper in ...you can print another photograph. 44 Troubleshooting This error code indicates that has occurred. Open the Scanning Unit (Printer Cover) and install the appropriate FINE Cartridge. E and number (error code) ...
MP210 series Quick Start Guide
Page 49
...press the Black or Color button. The FINE Cartridge may be advised that the sheet is not resolved, contact your Canon Service representative. The FINE Cartridge may have run out. Contact your Canon Service representative. Ink has run out. If printing is selected. / Scanning the Print Head Alignment...Fitto-Page copying is in progress and you want to "Aligning Print Head on the Computer" in , and that Canon shall not be recognized. Open the Scanning Unit (Printer Cover) and install the FINE Cartridge properly. Ink has run out. Replace the empty ink cartridge ...
...press the Black or Color button. The FINE Cartridge may be advised that the sheet is not resolved, contact your Canon Service representative. The FINE Cartridge may have run out. Contact your Canon Service representative. Ink has run out. If printing is selected. / Scanning the Print Head Alignment...Fitto-Page copying is in progress and you want to "Aligning Print Head on the Computer" in , and that Canon shall not be recognized. Open the Scanning Unit (Printer Cover) and install the FINE Cartridge properly. Ink has run out. Replace the empty ink cartridge ...
MP210 series Quick Start Guide
Page 58
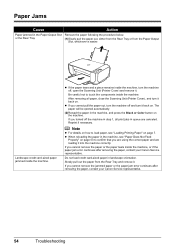
...machine, or if the paper jam error continues after removing the paper, contact your Canon Service representative. If you turned off , open the Scanning Unit (Printer Cover) and remove it. Note z For details on how to... cannot remove the jammed paper or the paper jam error continues after removing the paper, contact your Canon Service representative. 54 Troubleshooting z If the paper tears and a piece remains inside the machine. After... paper in the machine, and press the Black or Color button on . Slowly pull out the paper from the Paper Output Slot, whichever is easier.
...machine, or if the paper jam error continues after removing the paper, contact your Canon Service representative. If you turned off , open the Scanning Unit (Printer Cover) and remove it. Note z For details on how to... cannot remove the jammed paper or the paper jam error continues after removing the paper, contact your Canon Service representative. 54 Troubleshooting z If the paper tears and a piece remains inside the machine. After... paper in the machine, and press the Black or Color button on . Slowly pull out the paper from the Paper Output Slot, whichever is easier.
MP210 series Quick Start Guide
Page 61
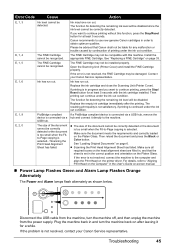
...compliant device and their solution, also refer to the machine. Remove the jammed paper, load new paper, press the Black or Color button on the machine. Close the Scanning Unit (Printer Cover) on the machine, and try printing again. The FINE Cartridge is almost full.) in , turn off ... them. Replace the FINE Cartridge. If the same error occurs, contact your PictBridge compliant device. * To resume printing, you are indicated on Canon-brand PictBridge compliant devices. Load paper in the Rear Tray, and select Continue* in "An Error Code Is Displayed on the LED" on ...
...compliant device and their solution, also refer to the machine. Remove the jammed paper, load new paper, press the Black or Color button on the machine. Close the Scanning Unit (Printer Cover) on the machine, and try printing again. The FINE Cartridge is almost full.) in , turn off ... them. Replace the FINE Cartridge. If the same error occurs, contact your PictBridge compliant device. * To resume printing, you are indicated on Canon-brand PictBridge compliant devices. Load paper in the Rear Tray, and select Continue* in "An Error Code Is Displayed on the LED" on ...
MP210 series Quick Start Guide
Page 62
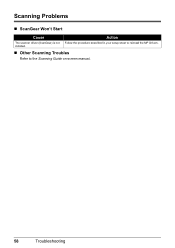
Scanning Problems „ ScanGear Won't Start Cause Action The scanner driver (ScanGear) is not Follow the procedure described in your setup sheet to the Scanning Guide on-screen manual. 58 Troubleshooting installed. „ Other Scanning Troubles Refer to reinstall the MP Drivers.
Scanning Problems „ ScanGear Won't Start Cause Action The scanner driver (ScanGear) is not Follow the procedure described in your setup sheet to the Scanning Guide on-screen manual. 58 Troubleshooting installed. „ Other Scanning Troubles Refer to reinstall the MP Drivers.
MP210 series Quick Start Guide
Page 63
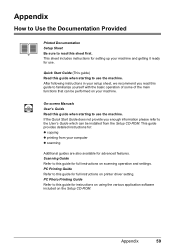
... to this guide for full instructions on printer driver setting. PC Printing Guide Refer to this guide for full instructions on scanning operation and settings. PC Photo Printing Guide Refer to this guide when starting to use . Appendix How to Use the Documentation... instructions in your setup sheet, we recommend you enough information please refer to the User's Guide which can be installed from your computer z scanning Additional guides are also available for instructions on using the various application software included on your machine and getting it ready for : z copying ...
... to this guide for full instructions on printer driver setting. PC Printing Guide Refer to this guide for full instructions on scanning operation and settings. PC Photo Printing Guide Refer to this guide when starting to use . Appendix How to Use the Documentation... instructions in your setup sheet, we recommend you enough information please refer to the User's Guide which can be installed from your computer z scanning Additional guides are also available for instructions on using the various application software included on your machine and getting it ready for : z copying ...

MP210 series Quick Start Guide
Page 65
...Interface Print width Acoustic noise level Operating environment Storage environment Power supply Power consumption External dimensions Weight Canon FINE Cartridges Multiple copy Scanner driver Maximum scanning size Scanning resolution Gradation (Input/Output) General Specifications 4800 (horizontal)* x 1200 (vertical) * Ink ... it can be used at minimum. Nozzles: Black: 320 nozzles Cyan/Magenta/Yellow: 384 x 3 nozzles Copy Specifications 1 - 9, 20 pages Scan Specifications TWAIN / WIA (Windows Vista and Windows XP only) A4/Letter, 8.5" x 11.7" / 216 x 297 mm Optical resolution (horizontal ...
...Interface Print width Acoustic noise level Operating environment Storage environment Power supply Power consumption External dimensions Weight Canon FINE Cartridges Multiple copy Scanner driver Maximum scanning size Scanning resolution Gradation (Input/Output) General Specifications 4800 (horizontal)* x 1200 (vertical) * Ink ... it can be used at minimum. Nozzles: Black: 320 nozzles Cyan/Magenta/Yellow: 384 x 3 nozzles Copy Specifications 1 - 9, 20 pages Scan Specifications TWAIN / WIA (Windows Vista and Windows XP only) A4/Letter, 8.5" x 11.7" / 216 x 297 mm Optical resolution (horizontal ...
MP210 series Quick Start Guide
Page 71
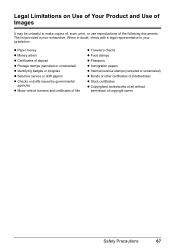
... without permission of the following documents. Legal Limitations on Use of Your Product and Use of Images It may be unlawful to make copies of, scan, print, or use reproductions of copyright owner Safety Precautions 67
... without permission of the following documents. Legal Limitations on Use of Your Product and Use of Images It may be unlawful to make copies of, scan, print, or use reproductions of copyright owner Safety Precautions 67
MP210 series Quick Start Guide
Page 76
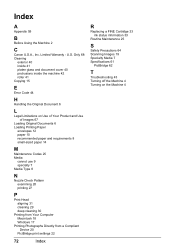
... Directly from a Compliant Device 20 PictBridge print settings 22 72 Index R Replacing a FINE Cartridge 33 ink status information 33 Routine Maintenance 25 S Safety Precautions 64 Scanning Images 19 Specialty Media 7 Specifications 61 PictBridge 62 T Troubleshooting 43 Turning off the Machine 4 Turning on the Machine 4 Index A Appendix 59 B Before Using the Machine...
... Directly from a Compliant Device 20 PictBridge print settings 22 72 Index R Replacing a FINE Cartridge 33 ink status information 33 Routine Maintenance 25 S Safety Precautions 64 Scanning Images 19 Specialty Media 7 Specifications 61 PictBridge 62 T Troubleshooting 43 Turning off the Machine 4 Turning on the Machine 4 Index A Appendix 59 B Before Using the Machine...

MP210 series Easy Setup Instructions
Page 1
...shipping tapes. Serial Number Hardware setup is securely inserted. Click a Place the machine on the right side. Then open the Paper Output Tray. Scanning Unit (Printer Cover) c Remove the protective material on a flat and horizontal surface, and do not place any objects in the Quick Start... Cover). Do not lift the machine by grasping the Paper Support Extension. Protective Tape Electrical Contacts e Repeat the procedure for the Color FINE Cartridge, inserting it gently. f Press the ON/OFF button to register your computer. 1 Prepare the Machine Important When moving...
...shipping tapes. Serial Number Hardware setup is securely inserted. Click a Place the machine on the right side. Then open the Paper Output Tray. Scanning Unit (Printer Cover) c Remove the protective material on a flat and horizontal surface, and do not place any objects in the Quick Start... Cover). Do not lift the machine by grasping the Paper Support Extension. Protective Tape Electrical Contacts e Repeat the procedure for the Color FINE Cartridge, inserting it gently. f Press the ON/OFF button to register your computer. 1 Prepare the Machine Important When moving...


