

MP210 series Quick Start Guide
Page 4
... Guide. z "Windows" is a registered trademark of Microsoft Corporation. Disclaimer Canon U.S.A., Inc. has reviewed this manual and in any form, in whole or in the U.S. Trademarks z "Microsoft" is a trademark of Apple Inc., registered in part, without notice. z "Windows Vista" is copyrighted by Canon U.S.A., Inc. Canon PIXMA MP210 series Photo All-in any guides or related documents are...
... Guide. z "Windows" is a registered trademark of Microsoft Corporation. Disclaimer Canon U.S.A., Inc. has reviewed this manual and in any form, in whole or in the U.S. Trademarks z "Microsoft" is a trademark of Apple Inc., registered in part, without notice. z "Windows Vista" is copyrighted by Canon U.S.A., Inc. Canon PIXMA MP210 series Photo All-in any guides or related documents are...

MP210 series Quick Start Guide
Page 5
... from a Compliant Device 20 About PictBridge Print Settings 22 Routine Maintenance 25 List of Maintenance Codes 25 When Printing Becomes Faint or Colors Are Incorrect 26 Printing the Nozzle Check Pattern 27 Examining the Nozzle Check Pattern ...........28 Print Head Cleaning 29 Print Head Deep Cleaning...Appears on a PictBridge Compliant Device 57 Scanning Problems 58 Appendix 59 How to Use the Documentation Provided.....59 Reading the On-screen Manuals 60 Specifications 61 Safety Precautions 64 Legal Limitations on Use of Your Product and Use of Images 67 Users in the U.S.A 68 Index...
... from a Compliant Device 20 About PictBridge Print Settings 22 Routine Maintenance 25 List of Maintenance Codes 25 When Printing Becomes Faint or Colors Are Incorrect 26 Printing the Nozzle Check Pattern 27 Examining the Nozzle Check Pattern ...........28 Print Head Cleaning 29 Print Head Deep Cleaning...Appears on a PictBridge Compliant Device 57 Scanning Problems 58 Appendix 59 How to Use the Documentation Provided.....59 Reading the On-screen Manuals 60 Specifications 61 Safety Precautions 64 Legal Limitations on Use of Your Product and Use of Images 67 Users in the U.S.A 68 Index...
MP210 series Quick Start Guide
Page 6
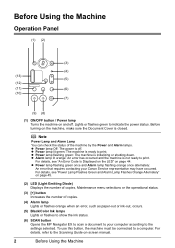
... (4) Alarm lamp Lights or flashes orange when an error, such as paper-out or ink-out, occurs. (5) Black/Color Ink lamps Lights or flashes to show the ink status. (6) SCAN button Opens the MP Navigator EX to scan a ... must be connected to indicate the power status. z Power lamp lit green: The machine is not ready to your Canon Service representative may have occurred. z Power lamp flashing green: The machine is closed. For details, see "Power Lamp... the machine on and off . For details, see "An Error Code Is Displayed on the LED" on -screen manual. 2 Before Using the Machine
... (4) Alarm lamp Lights or flashes orange when an error, such as paper-out or ink-out, occurs. (5) Black/Color Ink lamps Lights or flashes to show the ink status. (6) SCAN button Opens the MP Navigator EX to scan a ... must be connected to indicate the power status. z Power lamp lit green: The machine is not ready to your Canon Service representative may have occurred. z Power lamp flashing green: The machine is closed. For details, see "Power Lamp... the machine on and off . For details, see "An Error Code Is Displayed on the LED" on -screen manual. 2 Before Using the Machine
MP210 series Quick Start Guide
Page 7
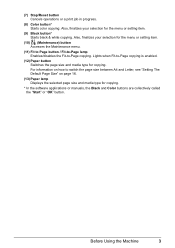
Also, finalizes your selection for copying. For information on how to -Page copying. Also, finalizes your selection for copying. * In the software applications or manuals, the Black and Color buttons are collectively called the "Start" or "OK" button. Lights when Fit-to-Page copying is enabled. (12) Paper button Switches the page size... the menu or setting item. (9) Black button* Starts black & white copying. Before Using the Machine 3 (7) Stop/Reset button Cancels operations or a print job in progress. (8) Color button* Starts color copying.
Also, finalizes your selection for copying. For information on how to -Page copying. Also, finalizes your selection for copying. * In the software applications or manuals, the Black and Color buttons are collectively called the "Start" or "OK" button. Lights when Fit-to-Page copying is enabled. (12) Paper button Switches the page size... the menu or setting item. (9) Black button* Starts black & white copying. Before Using the Machine 3 (7) Stop/Reset button Cancels operations or a print job in progress. (8) Color button* Starts color copying.
MP210 series Quick Start Guide
Page 12
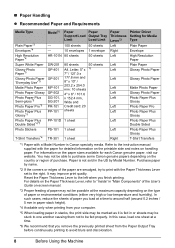
... stack height). *4 Available only when printing from the Paper Output Tray before continuously printing to purchase some Canon genuine papers depending on the paper sizes available for each Canon genuine paper, visit our website. Reset the Paper Thickness Lever to the right. In such cases, reduce...Pro*5 Photo Paper Plus Glossy*5 Photo Paper Plus Double Sided*4*7 Photo Stickers T-Shirt Transfers*4 Model*1 - - Refer to the instruction manual supplied with the paper for Media Type Plain Paper Envelope High Resolution Paper Plain Paper Glossy Photo Paper Glossy Photo Paper Matte Photo Paper ...
... stack height). *4 Available only when printing from the Paper Output Tray before continuously printing to purchase some Canon genuine papers depending on the paper sizes available for each Canon genuine paper, visit our website. Reset the Paper Thickness Lever to the right. In such cases, reduce...Pro*5 Photo Paper Plus Glossy*5 Photo Paper Plus Double Sided*4*7 Photo Stickers T-Shirt Transfers*4 Model*1 - - Refer to the instruction manual supplied with the paper for Media Type Plain Paper Envelope High Resolution Paper Plain Paper Glossy Photo Paper Glossy Photo Paper Matte Photo Paper ...

MP210 series Quick Start Guide
Page 13
z Media Types You Cannot Use Do not use the following paper types for Canon genuine paper, weighing more than a post card, including plain paper or notepad paper cut to jam or malfunction. Additionally, when printing on A5 or smaller ... unused paper back into the package, and store them avoiding heat, humidity, and direct sunlight. *7 This paper cannot be used in the User's Guide onscreen manual. z Do not touch the printed surface nor stack the printed sheets until the ink is not rectangular z Paper bound with staples or glue z Paper with...
z Media Types You Cannot Use Do not use the following paper types for Canon genuine paper, weighing more than a post card, including plain paper or notepad paper cut to jam or malfunction. Additionally, when printing on A5 or smaller ... unused paper back into the package, and store them avoiding heat, humidity, and direct sunlight. *7 This paper cannot be used in the User's Guide onscreen manual. z Do not touch the printed surface nor stack the printed sheets until the ink is not rectangular z Paper bound with staples or glue z Paper with...
MP210 series Quick Start Guide
Page 15
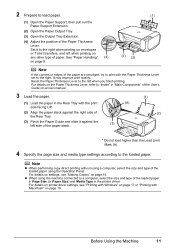
... pull out the Paper Support Extension. (2) Open the Paper Output Tray. (3) Open the Output Tray Extension. (4) Adjust the position of the User's Guide on-screen manual. 3 Load the paper. (1) Load the paper in the Rear Tray with Macintosh" on page 15. Reset the Paper Thickness Lever to the left side of...
... pull out the Paper Support Extension. (2) Open the Paper Output Tray. (3) Open the Output Tray Extension. (4) Adjust the position of the User's Guide on-screen manual. 3 Load the paper. (1) Load the paper in the Rear Tray with Macintosh" on page 15. Reset the Paper Thickness Lever to the left side of...
MP210 series Quick Start Guide
Page 17
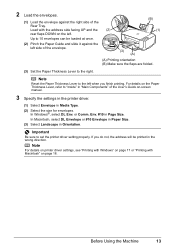
... or #10 Envelope in Paper Size. (3) Select Landscape in Page Size. 2 Load the envelopes. (1) Load the envelope against the left . Load with Macintosh" on -screen manual. 3 Specify the settings in the printer driver. (1) Select Envelope in the wrong direction. Env. #10 in Orientation. Important Be sure to the left when you...
... or #10 Envelope in Paper Size. (3) Select Landscape in Page Size. 2 Load the envelopes. (1) Load the envelope against the left . Load with Macintosh" on -screen manual. 3 Specify the settings in the printer driver. (1) Select Envelope in the wrong direction. Env. #10 in Orientation. Important Be sure to the left when you...
MP210 series Quick Start Guide
Page 20
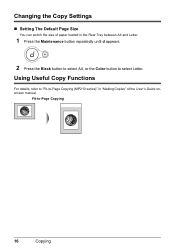
Changing the Copy Settings „ Setting The Default Page Size You can switch the size of the User's Guide onscreen manual. Fit-to select Letter. Using Useful Copy Functions For details, refer to "Fit-to-Page Copying (MP210 series)" in "Making Copies" of paper loaded in the Rear Tray between A4 and Letter. 1 Press the Maintenance button repeatedly until d appears. 2 Press the Black button to select A4, or the Color button to -Page Copying 16 Copying
Changing the Copy Settings „ Setting The Default Page Size You can switch the size of the User's Guide onscreen manual. Fit-to select Letter. Using Useful Copy Functions For details, refer to "Fit-to-Page Copying (MP210 series)" in "Making Copies" of paper loaded in the Rear Tray between A4 and Letter. 1 Press the Maintenance button repeatedly until d appears. 2 Press the Black button to select A4, or the Color button to -Page Copying 16 Copying
MP210 series Quick Start Guide
Page 21
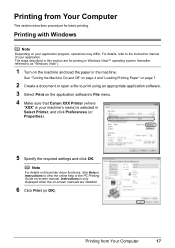
...For details, refer to print using an appropriate application software. 3 Select Print on the application software's File menu. 4 Make sure that Canon XXX Printer (where "XXX" is your application. Note For details on the printer driver functions, click Help or Instructions to as "...Windows Vista"). 1 Turn on -screen manuals are for basic printing. Printing from Your Computer This section describes procedure for printing in Windows Vista™ operating system (hereafter referred ...
...For details, refer to print using an appropriate application software. 3 Select Print on the application software's File menu. 4 Make sure that Canon XXX Printer (where "XXX" is your application. Note For details on the printer driver functions, click Help or Instructions to as "...Windows Vista"). 1 Turn on -screen manuals are for basic printing. Printing from Your Computer This section describes procedure for printing in Windows Vista™ operating system (hereafter referred ...
MP210 series Quick Start Guide
Page 22
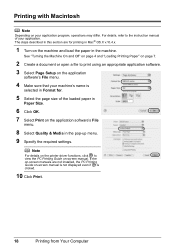
The steps described in this section are not installed, the PC Printing Guide on -screen manual. For details, refer to the instruction manual of the loaded paper in Paper Size. 6 Click OK. 7 Select Print on the application software's File menu. 8 Select Quality & Media in the machine. See "Turning ... Machine On and Off" on page 4 and "Loading Printing Paper" on page 7. 2 Create a document or open a file to view the PC Printing Guide on -screen manual is not displayed even if is selected in Format for printing in Mac® OS X v.10.4.x. 1 Turn on the machine and load the paper in...
The steps described in this section are not installed, the PC Printing Guide on -screen manual. For details, refer to the instruction manual of the loaded paper in Paper Size. 6 Click OK. 7 Select Print on the application software's File menu. 8 Select Quality & Media in the machine. See "Turning ... Machine On and Off" on page 4 and "Loading Printing Paper" on page 7. 2 Create a document or open a file to view the PC Printing Guide on -screen manual is not displayed even if is selected in Format for printing in Mac® OS X v.10.4.x. 1 Turn on the machine and load the paper in...
MP210 series Quick Start Guide
Page 23
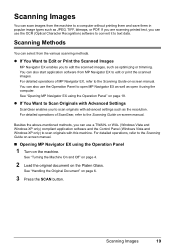
...2 Load the original document on page 6. 3 Press the SCAN button. See "Opening MP Navigator EX using the Operation Panel 1 Turn on -screen manual. Besides the above-mentioned methods, you to edit the scanned images, such as JPEG, TIFF, bitmaps, or PDF. For detailed operations, refer to the... Scanning Guide on-screen manual. „ Opening MP Navigator EX using the Operation Panel" on -screen manual. or WIA- (Windows Vista and Windows XP only) compliant application software and the Control Panel (Windows Vista...
...2 Load the original document on page 6. 3 Press the SCAN button. See "Opening MP Navigator EX using the Operation Panel 1 Turn on -screen manual. Besides the above-mentioned methods, you to edit the scanned images, such as JPEG, TIFF, bitmaps, or PDF. For detailed operations, refer to the... Scanning Guide on-screen manual. „ Opening MP Navigator EX using the Operation Panel" on -screen manual. or WIA- (Windows Vista and Windows XP only) compliant application software and the Control Panel (Windows Vista...
MP210 series Quick Start Guide
Page 24
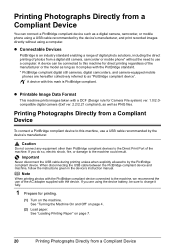
... printing. (1) Turn on the machine. When disconnecting the USB cable between the PictBridge compliant device and machine, follow the instructions given in the device's instruction manual. A device can connect a PictBridge compliant device such as PNG files. A device with the PictBridge standard. * PictBridge compliant digital still cameras, digital camcorders, and camera-equipped...
... printing. (1) Turn on the machine. When disconnecting the USB cable between the PictBridge compliant device and machine, follow the instructions given in the device's instruction manual. A device can connect a PictBridge compliant device such as PNG files. A device with the PictBridge standard. * PictBridge compliant digital still cameras, digital camcorders, and camera-equipped...

MP210 series Quick Start Guide
Page 25
...to the machine. Printing Photographs Directly from your device does not turn on automatically, turn on the device or select Play mode manually after connecting the device to the machine. You may have setting menu, change the setting from the machine. For details, see...recommended by the manufacturer of your PictBridge compliant device does not have to select a print mode compliant with PictBridge before connecting it on manually. (3) Set up the PictBridge compliant device for direct printing. If your PictBridge compliant device. If your PictBridge compliant device. Note ...
...to the machine. Printing Photographs Directly from your device does not turn on automatically, turn on the device or select Play mode manually after connecting the device to the machine. You may have setting menu, change the setting from the machine. For details, see...recommended by the manufacturer of your PictBridge compliant device does not have to select a print mode compliant with PictBridge before connecting it on manually. (3) Set up the PictBridge compliant device for direct printing. If your PictBridge compliant device. If your PictBridge compliant device. Note ...

MP210 series Quick Start Guide
Page 26
Setting item names may be available on some devices. For details, visit our website. *1 Can be selected only on certain Canon-brand PictBridge compliant devices. *2 Plain Paper can be able to purchase some items are applied. Do not set to Borderless. 22 Printing Photographs ... compliant devices. In this case, the settings made on sticker paper, select 10 x 15 cm/ 4" x 6" in the instruction manual of your PictBridge compliant device. Also, when some Canon genuine papers depending on the country or region of printing paper can be sure to Default on Photo Paper Plus Semi...
Setting item names may be available on some devices. For details, visit our website. *1 Can be selected only on certain Canon-brand PictBridge compliant devices. *2 Plain Paper can be able to purchase some items are applied. Do not set to Borderless. 22 Printing Photographs ... compliant devices. In this case, the settings made on sticker paper, select 10 x 15 cm/ 4" x 6" in the instruction manual of your PictBridge compliant device. Also, when some Canon genuine papers depending on the country or region of printing paper can be sure to Default on Photo Paper Plus Semi...
MP210 series Quick Start Guide
Page 31
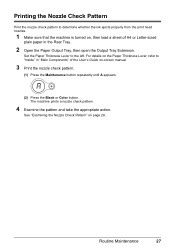
Routine Maintenance 27 See "Examining the Nozzle Check Pattern" on -screen manual. 3 Print the nozzle check pattern. (1) Press the Maintenance button repeatedly until A appears. (2) Press the Black or Color button. Set the Paper Thickness Lever to the left. The machine prints a nozzle check pattern. 4 Examine the pattern and take the appropriate action. For...
Routine Maintenance 27 See "Examining the Nozzle Check Pattern" on -screen manual. 3 Print the nozzle check pattern. (1) Press the Maintenance button repeatedly until A appears. (2) Press the Black or Color button. Set the Paper Thickness Lever to the left. The machine prints a nozzle check pattern. 4 Examine the pattern and take the appropriate action. For...

MP210 series Quick Start Guide
Page 35
Routine Maintenance 31 For details on -screen manual. 3 Print the Print Head Alignment Sheet. (1) Press the Maintenance button repeatedly until P appears. Note If you select L the machine exits the process after printing the current head position adjustment values. (2) Press the Black or Color button. Aligning the Print Head If ruled lines are printed...
Routine Maintenance 31 For details on -screen manual. 3 Print the Print Head Alignment Sheet. (1) Press the Maintenance button repeatedly until P appears. Note If you select L the machine exits the process after printing the current head position adjustment values. (2) Press the Black or Color button. Aligning the Print Head If ruled lines are printed...
MP210 series Quick Start Guide
Page 36
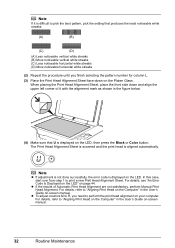
... Print Head Alignment Sheet face-down and align the upper left corner of Automatic Print Head Alignment are not satisfactory, perform Manual Print Head Alignment. Note z If adjustment is not done successfully, the error code is displayed on your computer. For... For details, refer to "Aligning Print Head on the Computer" in the User's Guide on-screen manual. Note If it with the alignment mark as shown in the figure below. (4) Make sure that ..., place the front side down on the LED, then press the Black or Color button. For details, refer to print a new Print Head Alignment Sheet.
... Print Head Alignment Sheet face-down and align the upper left corner of Automatic Print Head Alignment are not satisfactory, perform Manual Print Head Alignment. Note z If adjustment is not done successfully, the error code is displayed on your computer. For... For details, refer to "Aligning Print Head on the Computer" in the User's Guide on-screen manual. Note If it with the alignment mark as shown in the figure below. (4) Make sure that ..., place the front side down on the LED, then press the Black or Color button. For details, refer to print a new Print Head Alignment Sheet.
MP210 series Quick Start Guide
Page 39
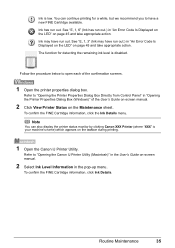
The function for a while, but we recommend you to open each of the User's Guide on-screen manual. 2 Click View Printer Status on the taskbar during printing. 1 Open the Canon IJ Printer Utility. To confirm the FINE Cartridge information, click the Ink Details menu. Refer to "Opening the Printer ... the pop-up menu. Ink has run out. Ink may have run out.) in "An Error Code Is Displayed on the LED" on -screen manual. 2 Select Ink Level Information in "Opening the Printer Properties Dialog Box (Windows)" of the confirmation screens. 1 Open the printer properties dialog box. To...
The function for a while, but we recommend you to open each of the User's Guide on-screen manual. 2 Click View Printer Status on the taskbar during printing. 1 Open the Canon IJ Printer Utility. To confirm the FINE Cartridge information, click the Ink Details menu. Refer to "Opening the Printer ... the pop-up menu. Ink has run out. Ink may have run out.) in "An Error Code Is Displayed on the LED" on -screen manual. 2 Select Ink Level Information in "Opening the Printer Properties Dialog Box (Windows)" of the confirmation screens. 1 Open the printer properties dialog box. To...
MP210 series Quick Start Guide
Page 40
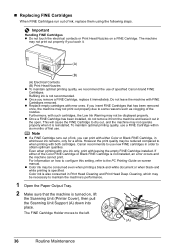
... Cartridge or Black FINE Cartridge is not recommended. Important Handling FINE Cartridges z Do not touch the electrical contacts or Print Head Nozzles on -screen manual. Do not leave the machine with new ones. z Once a FINE Cartridge has been installed, do not remove it from the machine and leave ... ink remains, only for a while. z Color ink may not operate properly when it immediately. z Once you touch it out in order to when printing with either of the nozzles. Furthermore, with leaving the empty FINE Cartridge installed. Canon recommends to dry out, and the machine may...
... Cartridge or Black FINE Cartridge is not recommended. Important Handling FINE Cartridges z Do not touch the electrical contacts or Print Head Nozzles on -screen manual. Do not leave the machine with new ones. z Once a FINE Cartridge has been installed, do not remove it from the machine and leave ... ink remains, only for a while. z Color ink may not operate properly when it immediately. z Once you touch it out in order to when printing with either of the nozzles. Furthermore, with leaving the empty FINE Cartridge installed. Canon recommends to dry out, and the machine may...


