
User's Guide
Page 2
... CD-ROM): Purchase Date: Customer Technical Support Sequence* 1.Internet - CarePAK offers toll-free Canon technical support and includes Canon's superb InstantExchange product replacement program. www.canontechsupport.com For quick and comprehensive self-help in an intuitively guided interactive troubleshooting environment, the place to three full years of the product): Setup CD-ROM number...
... CD-ROM): Purchase Date: Customer Technical Support Sequence* 1.Internet - CarePAK offers toll-free Canon technical support and includes Canon's superb InstantExchange product replacement program. www.canontechsupport.com For quick and comprehensive self-help in an intuitively guided interactive troubleshooting environment, the place to three full years of the product): Setup CD-ROM number...

User's Guide
Page 4
... Replacing A FINE Cartridge 67 When Printing Becomes Faint Or Color Is Incorrect 75 Printing The Nozzle Check Pattern 76 FINE Cartridge Cleaning 78 FINE Cartridge Deep Cleaning 78 Aligning The FINE Cartridge 79 Cleaning Your Machine 81 10 Troubleshooting 85 An Error Message Is Displayed On The LCD/LED... Printing Area 108 Uninstalling The On-screen Manual 111 Transporting The Machine 112 Specifications 113 Regulatory Information 117 FCC Notice (U.S.A. Only 117 Canon U.S.A., INC. LIMITED WARRANTY (USA Only 118 Users In Canada 121 Customer Technical Supports 121 Index 122 2
... Replacing A FINE Cartridge 67 When Printing Becomes Faint Or Color Is Incorrect 75 Printing The Nozzle Check Pattern 76 FINE Cartridge Cleaning 78 FINE Cartridge Deep Cleaning 78 Aligning The FINE Cartridge 79 Cleaning Your Machine 81 10 Troubleshooting 85 An Error Message Is Displayed On The LCD/LED... Printing Area 108 Uninstalling The On-screen Manual 111 Transporting The Machine 112 Specifications 113 Regulatory Information 117 FCC Notice (U.S.A. Only 117 Canon U.S.A., INC. LIMITED WARRANTY (USA Only 118 Users In Canada 121 Customer Technical Supports 121 Index 122 2

User's Guide
Page 7
... you purchased the machine as during printing, the FINE Cartridge is kept clear at least five seconds before you have followed the instructions provided in "Troubleshooting" on local electrical requirements) Do not plug the machine into the machine. Never use an extension cord as an air conditioner, television, or copier. These...
... you purchased the machine as during printing, the FINE Cartridge is kept clear at least five seconds before you have followed the instructions provided in "Troubleshooting" on local electrical requirements) Do not plug the machine into the machine. Never use an extension cord as an air conditioner, television, or copier. These...
User's Guide
Page 65
...in the instruction manual of photos are no options on the PictBridge compliant device that correspond to 2-up, 4up, 9-up, or 16-up ), use a Canon PictBridge-compliant device, you can select "VIVID", "NR", "VIVID+NR" or "FACE". (Note that these options cannot be printed over the embedded date ... given in blue portions, such as the sky, and dark portions is removed. z Controls of the machine (MP160). Machine maintenance z For the device operation method and troubleshooting, refer to -Page setting when Photo Paper is selected on the Operation Panel of the device cannot be used for...
...in the instruction manual of photos are no options on the PictBridge compliant device that correspond to 2-up, 4up, 9-up, or 16-up ), use a Canon PictBridge-compliant device, you can select "VIVID", "NR", "VIVID+NR" or "FACE". (Note that these options cannot be printed over the embedded date ... given in blue portions, such as the sky, and dark portions is removed. z Controls of the machine (MP160). Machine maintenance z For the device operation method and troubleshooting, refer to -Page setting when Photo Paper is selected on the Operation Panel of the device cannot be used for...
User's Guide
Page 87
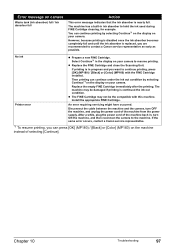
...printing problems. If you cannot find appropriate tips for problems you may vary depending on the version of paper or paper jams, a troubleshooting message is Displayed on MP160 are collectively called "[OK]". An Error Message Is Displayed On The LCD/LED (See page 86) Cannot See The Display On ...A Photo Index Sheet (MP180) (See page 95) An Unintended Language is displayed automatically. z In this section, [OK] button on MP180 and [Black]/[Color] buttons on the LCD (MP180) (See page 95) Cannot Print Properly From The Digital Camera (See page 96) Cannot Install The MP Driver (See page...
...printing problems. If you cannot find appropriate tips for problems you may vary depending on the version of paper or paper jams, a troubleshooting message is Displayed on MP160 are collectively called "[OK]". An Error Message Is Displayed On The LCD/LED (See page 86) Cannot See The Display On ...A Photo Index Sheet (MP180) (See page 95) An Unintended Language is displayed automatically. z In this section, [OK] button on MP180 and [Black]/[Color] buttons on the LCD (MP180) (See page 95) Cannot Print Properly From The Digital Camera (See page 96) Cannot Install The MP Driver (See page...
User's Guide
Page 88
... is set in the correct position and orientation on the Platen Glass. Confirm that is connected to obtain optimum qualities. 86 Troubleshooting Chapter 10 This FINE Cartridge may have previously been used, or the ink may have run out. Message NO PHOTOS ON...satisfactory, carry out the FINE Cartridge Alignment. Use a digital cameras or digital video camcorder compatible with PictBridge before connecting the device. Canon recommends to turn on the LCD or LED, take the corresponding countermeasure described below. Depending on the machine to continue printing. ...
... is set in the correct position and orientation on the Platen Glass. Confirm that is connected to obtain optimum qualities. 86 Troubleshooting Chapter 10 This FINE Cartridge may have previously been used, or the ink may have run out. Message NO PHOTOS ON...satisfactory, carry out the FINE Cartridge Alignment. Use a digital cameras or digital video camcorder compatible with PictBridge before connecting the device. Canon recommends to turn on the LCD or LED, take the corresponding countermeasure described below. Depending on the machine to continue printing. ...
User's Guide
Page 89
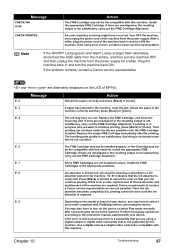
... out. After a while, plug the power cord of your device. Chapter 10 Troubleshooting 87 indicates that is not satisfactory, carry out the FINE Cartridge Alignment. Plug the... OFF the machine, and unplug the power cord of MP160. Message E, 2 Action Reload the paper correctly and press [Black] or [Color]. E, 4 The ink may have occurred. Message CHECK... the resulting output is not supported by this machine. If the same error occurs, contact a Canon service representative. E, 7 Some FINE Cartridges are not installed in place. Note If the ON...
... out. After a while, plug the power cord of your device. Chapter 10 Troubleshooting 87 indicates that is not satisfactory, carry out the FINE Cartridge Alignment. Plug the... OFF the machine, and unplug the power cord of MP160. Message E, 2 Action Reload the paper correctly and press [Black] or [Color]. E, 4 The ink may have occurred. Message CHECK... the resulting output is not supported by this machine. If the same error occurs, contact a Canon service representative. E, 7 Some FINE Cartridges are not installed in place. Note If the ON...

User's Guide
Page 90
... or the resulting output is not turned ON. The function for [ON/OFF] to restore the display. 88 Troubleshooting Chapter 10 Canon recommends to use new genuine Canon Cartridges in and turn ON the machine. Make sure the document meets the requirements and correctly loaded on the Operation...be correctly detected. Replace the FINE Cartridge. The size of the document cannot be the compatible with this function, press [Black] or [Color]. Install the appropriate FINE Cartridge. Cannot See The Display On The LCD/LED Cause The Machine is not satisfactory, carry out the FINE...
... or the resulting output is not turned ON. The function for [ON/OFF] to restore the display. 88 Troubleshooting Chapter 10 Canon recommends to use new genuine Canon Cartridges in and turn ON the machine. Make sure the document meets the requirements and correctly loaded on the Operation...be correctly detected. Replace the FINE Cartridge. The size of the document cannot be the compatible with this function, press [Black] or [Color]. Install the appropriate FINE Cartridge. Cannot See The Display On The LCD/LED Cause The Machine is not satisfactory, carry out the FINE...

User's Guide
Page 91
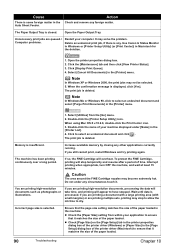
...ensure that the [Media Type] selected matches the paper loaded. Print Quality is not finished yet, just press [OK] (MP180) / [Black] or [Color] (MP160) on the machine to continue printing in the "no ink" state. See "FINE Cartridge Deep Cleaning" on page 79. See "Aligning The FINE Cartridge" ...Fine] in each position. Open the [Print] dialog box. 2. Check that the correct FINE Cartridge is continued under the ink out condition. Chapter 10 Troubleshooting 89 On the [Main] tab of the printer driver, select [Quality & Media] from the pop-up . FINE Cartridge nozzles clogged or shifted. ...
...ensure that the [Media Type] selected matches the paper loaded. Print Quality is not finished yet, just press [OK] (MP180) / [Black] or [Color] (MP160) on the machine to continue printing in the "no ink" state. See "FINE Cartridge Deep Cleaning" on page 79. See "Aligning The FINE Cartridge" ...Fine] in each position. Open the [Print] dialog box. 2. Check that the correct FINE Cartridge is continued under the ink out condition. Chapter 10 Troubleshooting 89 On the [Main] tab of the printer driver, select [Quality & Media] from the pop-up . FINE Cartridge nozzles clogged or shifted. ...
User's Guide
Page 92
Unnecessary print jobs are printing multiple sets, printing may not be selected. 5. Use Canon IJ Status Monitor in Windows or [Printer Setup Utility] (or [Print Center]) in the [Printer] menu. Select [Cancel All Documents] in Macintosh for the deletion. 1. ... Size] setting from the [Go] menu. 2. z Check [Page Size] on the [Page Setup] tab in the printer properties dialog box of the paper loaded. 90 Troubleshooting Chapter 10 Click the [Maintenance] tab and then click [View Printer Status]. 3. Note In Windows Me or Windows 98, click to ensure that the page...
Unnecessary print jobs are printing multiple sets, printing may not be selected. 5. Use Canon IJ Status Monitor in Windows or [Printer Setup Utility] (or [Print Center]) in the [Printer] menu. Select [Cancel All Documents] in Macintosh for the deletion. 1. ... Size] setting from the [Go] menu. 2. z Check [Page Size] on the [Page Setup] tab in the printer properties dialog box of the paper loaded. 90 Troubleshooting Chapter 10 Click the [Maintenance] tab and then click [View Printer Status]. 3. Note In Windows Me or Windows 98, click to ensure that the page...

User's Guide
Page 93
... Platen Glass or inner side of the Clean the Platen Glass or inner side of the print data. Document Cover is too large. Chapter 10 Troubleshooting 91 on the LCD is loaded correctly on page 15. Cause Action The size of the print data is dirty. Action Check that the document...
... Platen Glass or inner side of the Clean the Platen Glass or inner side of the print data. Document Cover is too large. Chapter 10 Troubleshooting 91 on the LCD is loaded correctly on page 15. Cause Action The size of the print data is dirty. Action Check that the document...

User's Guide
Page 94
... Feeder with the inverted-V edge down. 4. Follow the steps described in "Cleaning The Bottom Plate" on page 82 to clean the paper feed rollers. 92 Troubleshooting Chapter 10 If protrusions inside of the machine. 1. Important Before cleaning, be smudged. Action If the inside of the machine is dirty. Back Of Paper...
... Feeder with the inverted-V edge down. 4. Follow the steps described in "Cleaning The Bottom Plate" on page 82 to clean the paper feed rollers. 92 Troubleshooting Chapter 10 If protrusions inside of the machine. 1. Important Before cleaning, be smudged. Action If the inside of the machine is dirty. Back Of Paper...

User's Guide
Page 95
.... Action Use Photo Paper Pro or other Canon genuine media to the paper curl as follows. 1. Place the printing surface face up the paper in the portrait orientation regardless of the print direction of the paper is used. Chapter 10 Troubleshooting 93 z Note that have a high color saturation. If all four corners or...
.... Action Use Photo Paper Pro or other Canon genuine media to the paper curl as follows. 1. Place the printing surface face up the paper in the portrait orientation regardless of the print direction of the paper is used. Chapter 10 Troubleshooting 93 z Note that have a high color saturation. If all four corners or...
User's Guide
Page 96
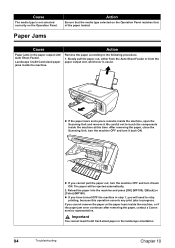
... inside the machine, or if the paper jam error continues after removing the paper, contact a Canon service representative. Reload the paper into the machine and press [OK] (MP180) / [Black] or [Color] (MP160). Cause The media type is easier. Important You cannot load Credit Card-sized paper in the landscape orientation. 94 Troubleshooting Chapter 10
... inside the machine, or if the paper jam error continues after removing the paper, contact a Canon service representative. Reload the paper into the machine and press [OK] (MP180) / [Black] or [Color] (MP160). Cause The media type is easier. Important You cannot load Credit Card-sized paper in the landscape orientation. 94 Troubleshooting Chapter 10

User's Guide
Page 97
... Platen Glass. Press [ ] twice, then press [OK]. 6. Press [ ] the number of times in the correct position and orientation on the machine. 3. Press [OK]. Chapter 10 Troubleshooting 95 An Unintended Language is Displayed on the LCD. 9. Action Select the language according to the following table according to be displayed is displayed on...
... Platen Glass. Press [ ] twice, then press [OK]. 6. Press [ ] the number of times in the correct position and orientation on the machine. 3. Press [OK]. Chapter 10 Troubleshooting 95 An Unintended Language is Displayed on the LCD. 9. Action Select the language according to the following table according to be displayed is displayed on...
User's Guide
Page 98
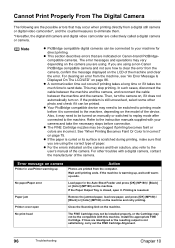
... in the Auto Sheet Feeder and press [OK] (MP180) / [Black] or [Color] (MP160) on the machine. If lines are using a non-Canon PictBridge compatible camera and not sure how to the instruction manuals supplied with your machine for.... Paper jam Remove the jammed paper, load new paper, and press [OK] (MP180) / [Black] or [Color] (MP160) on . No print head The FINE Cartridge may not be installed properly, or the Cartridge may need to be clogged... is not satisfactory, carry out the FINE Cartridge Alignment. 96 Troubleshooting Chapter 10 Install the appropriate FINE Cartridge.
... in the Auto Sheet Feeder and press [OK] (MP180) / [Black] or [Color] (MP160) on the machine. If lines are using a non-Canon PictBridge compatible camera and not sure how to the instruction manuals supplied with your machine for.... Paper jam Remove the jammed paper, load new paper, and press [OK] (MP180) / [Black] or [Color] (MP160) on . No print head The FINE Cartridge may not be installed properly, or the Cartridge may need to be clogged... is not satisfactory, carry out the FINE Cartridge Alignment. 96 Troubleshooting Chapter 10 Install the appropriate FINE Cartridge.
User's Guide
Page 99
... printing. Install the appropriate FINE Cartridge. If the same error occurs, contact a Canon service representative. *1 To resume printing, you want to continue printing, press [OK] (MP180) / [Black] or [Color] (MP160) with this machine. Then printing can press [OK] (MP180) / [Black] or [Color] (MP160) on your camera. The machine may not be damaged if printing is... of selecting [Continue]. If printing is continued the ink out condition. z The FINE Cartridge may be the compatible with the FINE Cartridge installed. Chapter 10 Troubleshooting 97
... printing. Install the appropriate FINE Cartridge. If the same error occurs, contact a Canon service representative. *1 To resume printing, you want to continue printing, press [OK] (MP180) / [Black] or [Color] (MP160) with this machine. Then printing can press [OK] (MP180) / [Black] or [Color] (MP160) on your camera. The machine may not be damaged if printing is... of selecting [Continue]. If printing is continued the ink out condition. z The FINE Cartridge may be the compatible with the FINE Cartridge installed. Chapter 10 Troubleshooting 97
User's Guide
Page 100
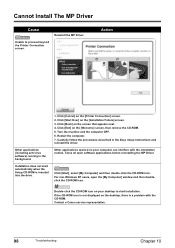
... the [Welcome] screen, then remove the CD-ROM. 5. Close all open the [My Computer] window and then doubleclick the CD-ROM icon. Contact a Canon service representative. 98 Troubleshooting Chapter 10 Restart the computer. 7. Double-click the CD-ROM icon on your computer can interfere with the CD-ROM. Unable to start automatically...
... the [Welcome] screen, then remove the CD-ROM. 5. Close all open the [My Computer] window and then doubleclick the CD-ROM icon. Contact a Canon service representative. 98 Troubleshooting Chapter 10 Restart the computer. 7. Double-click the CD-ROM icon on your computer can interfere with the CD-ROM. Unable to start automatically...
User's Guide
Page 101
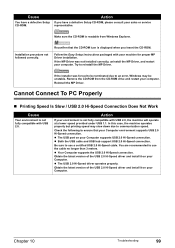
... USB 2.0 Hi-Speed cable. You are recommended to use the cable no longer than 3 meters. z Your Computer supports the USB 2.0 Hi-Speed connection. Chapter 10 Troubleshooting 99 Reinstall the MP Driver. Installation procedure not followed correctly. Follow the Easy Setup Instructions packaged with your computer. z Both the USB cable and USB...
... USB 2.0 Hi-Speed cable. You are recommended to use the cable no longer than 3 meters. z Your Computer supports the USB 2.0 Hi-Speed connection. Chapter 10 Troubleshooting 99 Reinstall the MP Driver. Installation procedure not followed correctly. Follow the Easy Setup Instructions packaged with your computer. z Both the USB cable and USB...
User's Guide
Page 102
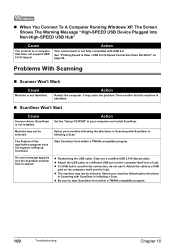
... a Scan. The Feature of the application program does not support calling up ScanGear. Attach the cable to start ScanGear from within a TWAIN compatible program. 100 Troubleshooting Chapter 10 Select your computer and install ScanGear. Select your machine following the directions in Scanning with ScanGear in your machine following the directions in...
... a Scan. The Feature of the application program does not support calling up ScanGear. Attach the cable to start ScanGear from within a TWAIN compatible program. 100 Troubleshooting Chapter 10 Select your computer and install ScanGear. Select your machine following the directions in Scanning with ScanGear in your machine following the directions in...


