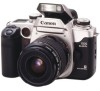

Instruction Manual
Page 2
... the two highly- I Retain this Instructions: : Warning for preventing camera malfunction or damage. : Information you should know when operating your camera. : Helpful tip for operating your camera and taking pictures. Thank you for purchasing a Canon product. • These instructions are for the EOS 50, EOS 50 E, EOS ELAN II and EOS ELAN II E. • The D symbol indicates instructions applicable only...
... the two highly- I Retain this Instructions: : Warning for preventing camera malfunction or damage. : Information you should know when operating your camera. : Helpful tip for operating your camera and taking pictures. Thank you for purchasing a Canon product. • These instructions are for the EOS 50, EOS 50 E, EOS ELAN II and EOS ELAN II E. • The D symbol indicates instructions applicable only...

Instruction Manual
Page 3
.... Also, the warranty does not cover any camera malfunction or damage occurring with an EOS camera may not result in the figure. Attaching the Neck Strap After inserting the end of non-Canon accessories. etc.) with electronic contacts for an important event such as shown in proper camera or lens operation. ATM 3 Pull the strap...
.... Also, the warranty does not cover any camera malfunction or damage occurring with an EOS camera may not result in the figure. Attaching the Neck Strap After inserting the end of non-Canon accessories. etc.) with electronic contacts for an important event such as shown in proper camera or lens operation. ATM 3 Pull the strap...

Instruction Manual
Page 5
... (*) 27 Landscape Mode ( zi ) 28 El EYE CONTROL Eye-Controlled Autofocus Calibration 40 Eye-Controlled Autofocus Calibration 40 Eye-Controlled Autofocus Guide 43 Holding the Camera Correctly 43 Proper Operating Conditions 44 Depth-of-Field AE (DEP) 58 Depth-of -Field Preview...48 9. Sports Mode ( ic ) 30 Deleting a Calibration ... Bracketing (AEB) 71 Multiple Exposures ( rim ) 73 Bulb Exposure 75 Setting a Custom Function 79 Canceling a Custom Function 80 FE Lock 84 ng Another EOS-Dedicated Speedlite 85 Nomenclature 12 4. Loading and Unloading Film 21 4.
... (*) 27 Landscape Mode ( zi ) 28 El EYE CONTROL Eye-Controlled Autofocus Calibration 40 Eye-Controlled Autofocus Calibration 40 Eye-Controlled Autofocus Guide 43 Holding the Camera Correctly 43 Proper Operating Conditions 44 Depth-of-Field AE (DEP) 58 Depth-of -Field Preview...48 9. Sports Mode ( ic ) 30 Deleting a Calibration ... Bracketing (AEB) 71 Multiple Exposures ( rim ) 73 Bulb Exposure 75 Setting a Custom Function 79 Canceling a Custom Function 80 FE Lock 84 ng Another EOS-Dedicated Speedlite 85 Nomenclature 12 4. Loading and Unloading Film 21 4.

Instruction Manual
Page 6
... salty air, wipe with a dry cloth. LCD Panel Over time, the camera's LCD panel indications may become slower. Never attempt to read. If the camera gets wet, consult your nearest Canon Service Center. 5. If the camera is not to the nearest Canon Service Center. During the storage period, release the shutter a few times once in...
... salty air, wipe with a dry cloth. LCD Panel Over time, the camera's LCD panel indications may become slower. Never attempt to read. If the camera gets wet, consult your nearest Canon Service Center. 5. If the camera is not to the nearest Canon Service Center. During the storage period, release the shutter a few times once in...

Instruction Manual
Page 7
...Power When only the ,c3 symbol blinks on one 2CR5 lithium battery. Replace with the rear end up. The shutter does not release. 4. The camera is to remove fingerprints and dirt. asittfizni 7 After replacing the battery. 2. In such a case, keep a spare battery warm in the following : &#.... Check the battery level in a pocket, etc., and use and warm the batteries alternately. Also note the following cases: 1. After the camera has not been used in high-temperature places or short circuit the battery contacts or toss the battery into a fire. • Although the ...
...Power When only the ,c3 symbol blinks on one 2CR5 lithium battery. Replace with the rear end up. The shutter does not release. 4. The camera is to remove fingerprints and dirt. asittfizni 7 After replacing the battery. 2. In such a case, keep a spare battery warm in the following : &#.... Check the battery level in a pocket, etc., and use and warm the batteries alternately. Also note the following cases: 1. After the camera has not been used in high-temperature places or short circuit the battery contacts or toss the battery into a fire. • Although the ...

Instruction Manual
Page 8
... lens is set to AF. 0 O O 1Y3 While pressing the lock release button, turn the Command Dial to frame 1 automatically. 8 Align the red dots on the camera and close the camera back until it snaps shut. Align the edge of the film leader with the orange mark on the lens and... camera and turn the lens clockwise until it snaps in the figure, open the battery compartment cover and insert a 2CR5 battery. 2 Attach a lens. The film will ...
... lens is set to AF. 0 O O 1Y3 While pressing the lock release button, turn the Command Dial to frame 1 automatically. 8 Align the red dots on the camera and close the camera back until it snaps shut. Align the edge of the film leader with the orange mark on the lens and... camera and turn the lens clockwise until it snaps in the figure, open the battery compartment cover and insert a 2CR5 battery. 2 Attach a lens. The film will ...

Instruction Manual
Page 9
... automatically. a *-CF Unloading the film. Aim the focusing point on the 1 subject and press the shutter button halfway to take the picture. Then open the camera back and remove the film cartridge. 9 Press the shutter button completely to autofocus. If the subject is blinking in the LCD Panel. Quick Start Guide...
... automatically. a *-CF Unloading the film. Aim the focusing point on the 1 subject and press the shutter button halfway to take the picture. Then open the camera back and remove the film cartridge. 9 Press the shutter button completely to autofocus. If the subject is blinking in the LCD Panel. Quick Start Guide...

Instruction Manual
Page 12
...) Self-timer/Remote control button (page 61) Metering mode lever (page 49) Neck strap eyelet (page 3) Camera back latch (page 21) Lens release button (page 19) Focus mode switch (page 19) Zoom ring - Nomenclature Camera Front Built-in flash (page 64) Flash button (page 64) AF mode dial (page 37) LCD panel...) 4 Main Dial AF-assist beam emitter (page 26) Self-timer lamp (page 61) Wireless remote control sensor • Receives signals from the separately-sold , dedicated Canon Speedlites.
...) Self-timer/Remote control button (page 61) Metering mode lever (page 49) Neck strap eyelet (page 3) Camera back latch (page 21) Lens release button (page 19) Focus mode switch (page 19) Zoom ring - Nomenclature Camera Front Built-in flash (page 64) Flash button (page 64) AF mode dial (page 37) LCD panel...) 4 Main Dial AF-assist beam emitter (page 26) Self-timer lamp (page 61) Wireless remote control sensor • Receives signals from the separately-sold , dedicated Canon Speedlites.

Instruction Manual
Page 13
... mode button Digit selection button Digit set button Tripod socket Nomenclature AE lock button (page 67) Custom Function button (page 79) FE lock button (tor Canon Speedlite n) (page 84) Focusing point selector (page 33) Quick Control Dial switch (page 68) Quick Control Dial (page 68) Remote control jack (page 92) &#...8226; For separately-sold Remote Switch RS60E3. Battery pack positioning hole (page 91) 13 Battery compartment cover lever (page 17) - Camera Rear Eyepiece (page 16) Eyecup Function button (page 66) Film rewind button (page 23) Film window -
... mode button Digit selection button Digit set button Tripod socket Nomenclature AE lock button (page 67) Custom Function button (page 79) FE lock button (tor Canon Speedlite n) (page 84) Focusing point selector (page 33) Quick Control Dial switch (page 68) Quick Control Dial (page 68) Remote control jack (page 92) &#...8226; For separately-sold Remote Switch RS60E3. Battery pack positioning hole (page 91) 13 Battery compartment cover lever (page 17) - Camera Rear Eyepiece (page 16) Eyecup Function button (page 66) Film rewind button (page 23) Film window -
Instruction Manual
Page 14
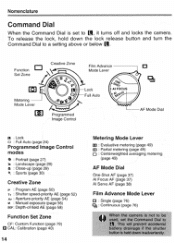
... AF (page 37) Al Focus AF (page 37) Al Servo AF (page 38) Film Advance Mode Lever O : Single (page 76) : Continuous (page 76) When the camera is held down the lock release button and turn the Command Dial to It it turns off and locks the... camera. Nomenclature Command Dial When the Command Dial is set the Command Dial to This will prevent accidental battery drainage if the shutter button is not ...
... AF (page 37) Al Focus AF (page 37) Al Servo AF (page 38) Film Advance Mode Lever O : Single (page 76) : Continuous (page 76) When the camera is held down the lock release button and turn the Command Dial to It it turns off and locks the... camera. Nomenclature Command Dial When the Command Dial is set the Command Dial to This will prevent accidental battery drainage if the shutter button is not ...

Instruction Manual
Page 17
oI O "00ormoota O • 29 Insert the battery with the contacts oriented as shown by the arrow and open the battery compartment cover. cr..• 00` °0000000ut'' 1 Slide the battery compartment cover lever as shown on the battery compartment cover. 3 Close the battery compartment cover. 17 Installing the Battery and Checking the Battery Level Installing the Battery Use a 2CR5 battery. • It you have purchased Battery Pack BP-50, see page 91. Before You Start To ready your camera for picture-taking, follow the procedures below. 1. I.
oI O "00ormoota O • 29 Insert the battery with the contacts oriented as shown by the arrow and open the battery compartment cover. cr..• 00` °0000000ut'' 1 Slide the battery compartment cover lever as shown on the battery compartment cover. 3 Close the battery compartment cover. 17 Installing the Battery and Checking the Battery Level Installing the Battery Use a 2CR5 battery. • It you have purchased Battery Pack BP-50, see page 91. Before You Start To ready your camera for picture-taking, follow the procedures below. 1. I.

Instruction Manual
Page 18
...; In parentheses, No. Take out the battery and install it correctly. • Before using the camera. of 24-exposure oils based on Canon's Standard Test Method with a new battery and EF 50mm f/1.4 USM ens. • Operating the camera without the use of Eye-Controlled Autofocus. • If nothing is released. 2CR5 Lithium Battery...
...; In parentheses, No. Take out the battery and install it correctly. • Before using the camera. of 24-exposure oils based on Canon's Standard Test Method with a new battery and EF 50mm f/1.4 USM ens. • Operating the camera without the use of Eye-Controlled Autofocus. • If nothing is released. 2CR5 Lithium Battery...

Instruction Manual
Page 19
... lens release button, turn the lens as shown by the arrow until it snaps in place. 3 Set the focus mode switch on the lens and camera and turn the lens as shown by the arrow. 2 Align the red dots on the lens to AF. Mounting and Detaching a Lens 1 .1011117-L-Tm2ntr- 3 28...' 4 ectoosce Mounting a Lens I Remove the rear lens cap and the camera body cap by turning the cap as shown by the arrow until it stops, then remove the lens.
... lens release button, turn the lens as shown by the arrow until it snaps in place. 3 Set the focus mode switch on the lens and camera and turn the lens as shown by the arrow. 2 Align the red dots on the lens to AF. Mounting and Detaching a Lens 1 .1011117-L-Tm2ntr- 3 28...' 4 ectoosce Mounting a Lens I Remove the rear lens cap and the camera body cap by turning the cap as shown by the arrow until it stops, then remove the lens.

Instruction Manual
Page 20
... picture and then the film advances. Shutter Button When it is pressed halfway ■ When it is pressed completely: The shutter is called camera shake. 3. Shutter Button Operation The EOS camera's shutter button operates in the viewfinder. • The exposure information will continue to be displayed for four seconds after the shutter button...
... picture and then the film advances. Shutter Button When it is pressed halfway ■ When it is pressed completely: The shutter is called camera shake. 3. Shutter Button Operation The EOS camera's shutter button operates in the viewfinder. • The exposure information will continue to be displayed for four seconds after the shutter button...

Instruction Manual
Page 21
... automatically sense the film's ISO speed rating. 1 Unlock the Command Dial. 29 Slide down the camera back latch to touch the shutter curtain with this camera. When loading or unloading film, be used with your fingers or the film. 21 4. Loading Film Use DX-coded film. GI Infrared film cannot ...be careful not to open the camera back. O 3 Insert the film cartridge at an angle as shown in the figure. Never touch the shutter curtain. Loading and Unloading Film 47 ,,,i0...
... automatically sense the film's ISO speed rating. 1 Unlock the Command Dial. 29 Slide down the camera back latch to touch the shutter curtain with this camera. When loading or unloading film, be used with your fingers or the film. 21 4. Loading Film Use DX-coded film. GI Infrared film cannot ...be careful not to open the camera back. O 3 Insert the film cartridge at an angle as shown in the figure. Never touch the shutter curtain. Loading and Unloading Film 47 ,,,i0...

Instruction Manual
Page 22
... displayed and film cartridge symbol a blinks, the film has not been loaded properly. The film will then advance automatically to the orange mark on the camera. • If the edge of the film leader goes beyond the orange mark, rewind some of the film leader to frame 1 as shown by the...
... displayed and film cartridge symbol a blinks, the film has not been loaded properly. The film will then advance automatically to the orange mark on the camera. • If the edge of the film leader goes beyond the orange mark, rewind some of the film leader to frame 1 as shown by the...

Instruction Manual
Page 23
.... Fs] Immediately before reaching the last frame, press the film rewind button. Nomenclature Unloading Film After the film's last frame is exposed, the camera rewinds the film automatically. 1 While the film rewinds, the scale on the LCD panel and viewfinder "flows" from right to left to the ...silent mode. In this case, the scale in the viewfinder does not indicate that the film cartridge symbol is blinking, then open the camera back and remove the film cartridge. Pressing the film rewind button --T; The film will make a sound. This is completely rewound, the film ...
.... Fs] Immediately before reaching the last frame, press the film rewind button. Nomenclature Unloading Film After the film's last frame is exposed, the camera rewinds the film automatically. 1 While the film rewinds, the scale on the LCD panel and viewfinder "flows" from right to left to the ...silent mode. In this case, the scale in the viewfinder does not indicate that the film cartridge symbol is blinking, then open the camera back and remove the film cartridge. Pressing the film rewind button --T; The film will make a sound. This is completely rewound, the film ...

Instruction Manual
Page 24
... points cover the subject, see on page 89. AF Frame 24 Full Auto Mode (0 ) The Full Auto mode is press the shutter button and the camera does the rest to focus the subject for any type of subject. all metering mode lever, AF mode dial, film advance mode lever, and Custom...
... points cover the subject, see on page 89. AF Frame 24 Full Auto Mode (0 ) The Full Auto mode is press the shutter button and the camera does the rest to focus the subject for any type of subject. all metering mode lever, AF mode dial, film advance mode lever, and Custom...

Instruction Manual
Page 25
... blink even while a tripod is not fast enough to prevent image blur due to take the picture. • Blinking shutter speed warning (Camera-shake warning) In the Full Auto or Programmed Image Control modes, the shutter speed display blinks if the shutter speed is used.) •... indicator warning If the in the viewfinder. 250 I t • 4 Press the shutter button completely to camera shake. In such a case, minimize camera shake by doing either of the following: 1) Hold the camera steadily and press the shutter button. 2) Use a tripod. (The shutter speed will be displayed on the LCD...
... blink even while a tripod is not fast enough to prevent image blur due to take the picture. • Blinking shutter speed warning (Camera-shake warning) In the Full Auto or Programmed Image Control modes, the shutter speed display blinks if the shutter speed is used.) •... indicator warning If the in the viewfinder. 250 I t • 4 Press the shutter button completely to camera shake. In such a case, minimize camera shake by doing either of the following: 1) Hold the camera steadily and press the shutter button. 2) Use a tripod. (The shutter speed will be displayed on the LCD...

Instruction Manual
Page 28
3. Landscape Mode This is the same as for sweeping scenery, sunsets. etc. Hold the camera steady or use the shortest focal length. (For example, a 28-r 80mm zoom lens set at 28 mm.) The resulting photograph will still blink even while a ... :a . • The picture-taking procedure is for the Full Auto mode (page 24). If a zoom lens is used.) 28 O 7 a d30 Set the Command Dial to camera shake.
3. Landscape Mode This is the same as for sweeping scenery, sunsets. etc. Hold the camera steady or use the shortest focal length. (For example, a 28-r 80mm zoom lens set at 28 mm.) The resulting photograph will still blink even while a ... :a . • The picture-taking procedure is for the Full Auto mode (page 24). If a zoom lens is used.) 28 O 7 a d30 Set the Command Dial to camera shake.


