
User Manual
Page 1
INSTRUCTION MANUAL E E INSTRUCTION MANUAL
INSTRUCTION MANUAL E E INSTRUCTION MANUAL

User Manual
Page 2
...of people and certain subjects for beginners as well as instructed and check the results. With a digital camera, you can learn and enjoy photography http://web.canon.jp/Imaging/enjoydslr/index.html 2 This is faulty and the images cannot be recorded on the card...even for purchasing a Canon product. If the camera or memory card is how you can immediately view the image you for private enjoyment. The EOS DIGITAL REBEL XTi/EOS 400D DIGITAL is a highperformance, digital single-lens reflex camera with a 10.10-megapixel imaging sensor. While reading this manual, take pictures as advanced...
...of people and certain subjects for beginners as well as instructed and check the results. With a digital camera, you can learn and enjoy photography http://web.canon.jp/Imaging/enjoydslr/index.html 2 This is faulty and the images cannot be recorded on the card...even for purchasing a Canon product. If the camera or memory card is how you can immediately view the image you for private enjoyment. The EOS DIGITAL REBEL XTi/EOS 400D DIGITAL is a highperformance, digital single-lens reflex camera with a 10.10-megapixel imaging sensor. While reading this manual, take pictures as advanced...

User Manual
Page 3
The accessories included can also be checked in the System Map (p.164). ‰ Camera: EOS DIGITAL REBEL XTi/EOS 400D DIGITAL (includes eyecup, body cap, and installed battery for the date/time clock) ‰ Lens: EF-S18-55mm f/3.5-5.6 II (...items have been included with eyepiece cover) ‰ 2 CD-ROMs ‰ EOS DIGITAL Solution Disk (bundled software) ‰ Software Instruction Manual (PDF) ‰ Pocket Guide Quick start guide to shooting. ‰ EOS DIGITAL REBEL XTi/EOS 400D DIGITAL Instruction Manual (this booklet) ‰ Software Guide Gives an overview of the bundled software ...
The accessories included can also be checked in the System Map (p.164). ‰ Camera: EOS DIGITAL REBEL XTi/EOS 400D DIGITAL (includes eyecup, body cap, and installed battery for the date/time clock) ‰ Lens: EF-S18-55mm f/3.5-5.6 II (...items have been included with eyepiece cover) ‰ 2 CD-ROMs ‰ EOS DIGITAL Solution Disk (bundled software) ‰ Software Instruction Manual (PDF) ‰ Pocket Guide Quick start guide to shooting. ‰ EOS DIGITAL REBEL XTi/EOS 400D DIGITAL Instruction Manual (this booklet) ‰ Software Guide Gives an overview of the bundled software ...

User Manual
Page 4
... the setting. The M icon on the LCD monitor. Basic Assumptions * All operations explained in this manual assume that the power switch is available only in this manual, the icons and markings indicating the camera's buttons, dials, and settings correspond to prevent shooting problems.... : Supplemental information. In this Manual The icon indicates the Main Dial. Conventions Used in this Manual Icons in the Creative Zone modes (p.20). About the Symbols : Tip or advice for 4 sec., ...
... the setting. The M icon on the LCD monitor. Basic Assumptions * All operations explained in this manual assume that the power switch is available only in this manual, the icons and markings indicating the camera's buttons, dials, and settings correspond to prevent shooting problems.... : Supplemental information. In this Manual The icon indicates the Main Dial. Conventions Used in this Manual Icons in the Creative Zone modes (p.20). About the Symbols : Tip or advice for 4 sec., ...
User Manual
Page 5
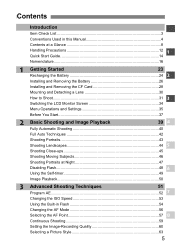
Contents Introduction Item Check List 3 Conventions Used in this Manual 4 Contents at a Glance 8 Handling Precautions 12 1 Quick Start Guide 14 Nomenclature 16 1 Getting Started 23 Recharging the Battery 24 2 Installing and Removing the Battery 26 ...
Contents Introduction Item Check List 3 Conventions Used in this Manual 4 Contents at a Glance 8 Handling Precautions 12 1 Quick Start Guide 14 Nomenclature 16 1 Getting Started 23 Recharging the Battery 24 2 Installing and Removing the Battery 26 ...

User Manual
Page 6
Contents 4 More Advanced Techniques 65 Action Shots ...66 Changing the Depth of Field 68 Manual Exposure 71 Automatic Depth-of-Field AE 72 Changing the Metering Mode 73 Setting Exposure Compensation 74 Auto Exposure Bracketing 76 Customizing the Picture Style ... off Automatically 101 Setting Custom Functions 101 Transferring Images to a Personal Computer 107 Automatic Sensor Cleaning 111 Appending Dust Delete Data 112 About "Sensor cleaning: Manual 114 6
Contents 4 More Advanced Techniques 65 Action Shots ...66 Changing the Depth of Field 68 Manual Exposure 71 Automatic Depth-of-Field AE 72 Changing the Metering Mode 73 Setting Exposure Compensation 74 Auto Exposure Bracketing 76 Customizing the Picture Style ... off Automatically 101 Setting Custom Functions 101 Transferring Images to a Personal Computer 107 Automatic Sensor Cleaning 111 Appending Dust Delete Data 112 About "Sensor cleaning: Manual 114 6
User Manual
Page 18
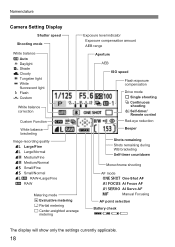
... reduction Beeper Shots remaining Shots remaining during WB bracketing Self-timer countdown Monochrome shooting AF mode X One-Shot AF 9 AI Focus AF Z AI Servo AF g Manual Focusing AF point selection Battery check zxcn The display will show only the settings currently applicable. 18
... reduction Beeper Shots remaining Shots remaining during WB bracketing Self-timer countdown Monochrome shooting AF mode X One-Shot AF 9 AI Focus AF Z AI Servo AF g Manual Focusing AF point selection Battery check zxcn The display will show only the settings currently applicable. 18

User Manual
Page 20
Nomenclature Mode Dial The Mode Dial has the Basic Zone modes and Creative Zone modes. d : Program AE (p.52) s : Shutter-priority AE (p.66) f : Aperture-priority AE (p.68) a : Manual exposure (p.71) 8 : Automatic Depth-of subjects. 1: Full Auto (p.40) Image Zone 2 : Portrait (p.43) 3: Landscape (p.44) 4 : Close-up (p.45) 5: Sports (p.46) 6 : Night Portrait (p.47) 7: Flash Off (p.48) 20 Fully automatic shooting for specific kinds of -field AE (p.72) Full Auto Basic Zone All you more control over the result. Creative Zone These modes give you do is press the shutter button.
Nomenclature Mode Dial The Mode Dial has the Basic Zone modes and Creative Zone modes. d : Program AE (p.52) s : Shutter-priority AE (p.66) f : Aperture-priority AE (p.68) a : Manual exposure (p.71) 8 : Automatic Depth-of subjects. 1: Full Auto (p.40) Image Zone 2 : Portrait (p.43) 3: Landscape (p.44) 4 : Close-up (p.45) 5: Sports (p.46) 6 : Night Portrait (p.47) 7: Flash Off (p.48) 20 Fully automatic shooting for specific kinds of -field AE (p.72) Full Auto Basic Zone All you more control over the result. Creative Zone These modes give you do is press the shutter button.

User Manual
Page 22
... Corporation in the United States and other countries. Macintosh is a trademark of the strap through the strap's buckle as shown in this manual are the property of Adobe Systems Incorporated. Exif Print is incorporated to an Exif Print-compliant printer, the shooting information is a standard ...printers. Then pass it through the camera's strap mount eyelet from the buckle. Windows is a trademark of their respective owners. * This digital camera supports Design rule for Camera File System 2.0 and Exif 2.21 (also called "Exif Print"). By connecting to optimize the print ...
... Corporation in the United States and other countries. Macintosh is a trademark of the strap through the strap's buckle as shown in this manual are the property of Adobe Systems Incorporated. Exif Print is incorporated to an Exif Print-compliant printer, the shooting information is a standard ...printers. Then pass it through the camera's strap mount eyelet from the buckle. Windows is a trademark of their respective owners. * This digital camera supports Design rule for Camera File System 2.0 and Exif 2.21 (also called "Exif Print"). By connecting to optimize the print ...
User Manual
Page 30
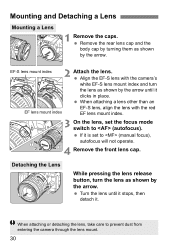
... shown by the arrow. If it clicks in place. Align the EF-S lens with the red EF lens mount index. 3 On the lens, set to (manual focus), autofocus will not operate. 4 Remove the front lens cap. Turn the lens until it is set the focus mode switch to prevent dust from...
... shown by the arrow. If it clicks in place. Align the EF-S lens with the red EF lens mount index. 3 On the lens, set to (manual focus), autofocus will not operate. 4 Remove the front lens cap. Turn the lens until it is set the focus mode switch to prevent dust from...
User Manual
Page 41
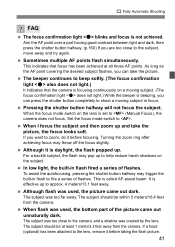
... subject, move away and try again. Pressing the shutter button halfway will not focus the subject. If you can press the shutter button completely to (Manual Focus), the camera does not focus. This is not achieved. Although flash was used , the picture came out unnaturally dark. The subject should be within...
... subject, move away and try again. Pressing the shutter button halfway will not focus the subject. If you can press the shutter button completely to (Manual Focus), the camera does not focus. This is not achieved. Although flash was used , the picture came out unnaturally dark. The subject should be within...
User Manual
Page 58
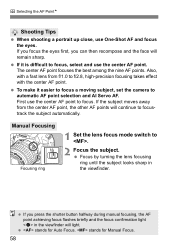
...the center AF point. To make it is difficult to focustrack the subject automatically. stands for Manual Focus. 58 If you focus the eyes first, you press the shutter button halfway during manual focusing, the AF point achieving focus flashes briefly and the focus confirmation light in the viewfinder.... If it easier to focus a moving subject, set the camera to . 2 Focus the subject. Manual Focusing Focusing ring 1 Set the lens focus mode switch to automatic AF point selection and AI Servo AF. The center AF point focuses the best...
...the center AF point. To make it is difficult to focustrack the subject automatically. stands for Manual Focus. 58 If you focus the eyes first, you press the shutter button halfway during manual focusing, the AF point achieving focus flashes briefly and the focus confirmation light in the viewfinder.... If it easier to focus a moving subject, set the camera to . 2 Focus the subject. Manual Focusing Focusing ring 1 Set the lens focus mode switch to automatic AF point selection and AI Servo AF. The center AF point focuses the best...

User Manual
Page 71
... [b Custom Functions (C.Fn)] menu's [Long exp. To set the aperture, hold down the button and turn the dial. A bulb exposure keeps the shutter open for Manual. 1 Set the Mode Dial to set. It can be set at the center. While you change the shutter speed and aperture, the exposure level mark... button during the bulb exposure, the elapsed exposure time will be displayed. You can decide which exposure level to . 2 Set the shutter speed and aperture. a: Manual Exposure You can set both the shutter speed and aperture as you hold down the shutter button.
... [b Custom Functions (C.Fn)] menu's [Long exp. To set the aperture, hold down the button and turn the dial. A bulb exposure keeps the shutter open for Manual. 1 Set the Mode Dial to set. It can be set at the center. While you change the shutter speed and aperture, the exposure level mark... button during the bulb exposure, the elapsed exposure time will be displayed. You can decide which exposure level to . 2 Set the shutter speed and aperture. a: Manual Exposure You can set both the shutter speed and aperture as you hold down the shutter button.
User Manual
Page 83
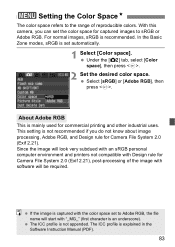
... captured with "_MG_" (first character is set to Adobe RGB, the file name will be required. The ICC profile is explained in the Software Instruction Manual (PDF). 83 In the Basic Zone modes, sRGB is an underscore). With this camera, you do not know about image processing, Adobe RGB, and Design...
... captured with "_MG_" (first character is set to Adobe RGB, the file name will be required. The ICC profile is explained in the Software Instruction Manual (PDF). 83 In the Basic Zone modes, sRGB is an underscore). With this camera, you do not know about image processing, Adobe RGB, and Design...
User Manual
Page 86
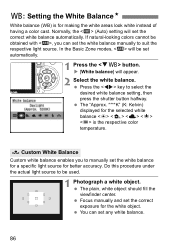
... select the desired white balance setting, then press the shutter button halfway. O Custom White Balance Custom white balance enables you can set the white balance manually to suit the respective light source. You can set any white balance. 86 Press the key to...
... select the desired white balance setting, then press the shutter button halfway. O Custom White Balance Custom white balance enables you can set the white balance manually to suit the respective light source. You can set any white balance. 86 Press the key to...

User Manual
Page 97
... and the file numbering of the new images might continue from 0001. This is convenient when you reset the file numbering manually, a new folder is reset [Manual reset]: You can reset the file numbering 0001 at any time or for the images taken yesterday and the ones taken today... [Auto reset]: Resets the file numbering to continuous or auto reset. The file name extension will start the file numbering from 0001. After the manual reset, the file numbering returns to 0001 whenever the CF card is created, [Folder number full] will display a message to that folder contains...
... and the file numbering of the new images might continue from 0001. This is convenient when you reset the file numbering manually, a new folder is reset [Manual reset]: You can reset the file numbering 0001 at any time or for the images taken yesterday and the ones taken today... [Auto reset]: Resets the file numbering to continuous or auto reset. The file name extension will start the file numbering from 0001. After the manual reset, the file numbering returns to 0001 whenever the CF card is created, [Folder number full] will display a message to that folder contains...

User Manual
Page 107
...] screen will not return the camera to install the software, see "Connect the Camera and the Computer and then Start EOS Utility" in the Software Instruction Manual in the personal computer. Before connecting the camera to the personal computer, be sure to . This is displayed, pressing ...turn off the camera's power switch before connecting it to the personal computer. 2 Set the camera's power switch to install the bundled software (EOS Digital Solution Disk/ CD-ROM) in the CD-ROM. 107 Preparation for Image Transfer 1 Connect the camera to a personal computer, you can transfer ...
...] screen will not return the camera to install the software, see "Connect the Camera and the Computer and then Start EOS Utility" in the Software Instruction Manual in the personal computer. Before connecting the camera to the personal computer, be sure to . This is displayed, pressing ...turn off the camera's power switch before connecting it to the personal computer. 2 Set the camera's power switch to install the bundled software (EOS Digital Solution Disk/ CD-ROM) in the CD-ROM. 107 Preparation for Image Transfer 1 Connect the camera to a personal computer, you can transfer ...
User Manual
Page 111
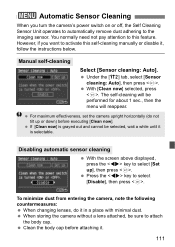
... upright horizontally (do it . 111 Press the key to the imaging sensor. 3 Automatic Sensor Cleaning When you want to activate this feature. Manual self-cleaning Select [Sensor cleaning: Auto]. Under the [b] tab, select [Sensor cleaning: Auto], then press . Disabling automatic sensor cleaning With ...storing the camera without a lens attached, be performed for about 1 sec., then the menu will be sure to this self-cleaning manually or disable it, follow the instructions below. To minimize dust from entering the camera, note the following countermeasures: When changing lenses, ...
... upright horizontally (do it . 111 Press the key to the imaging sensor. 3 Automatic Sensor Cleaning When you want to activate this feature. Manual self-cleaning Select [Sensor cleaning: Auto]. Under the [b] tab, select [Sensor cleaning: Auto], then press . Disabling automatic sensor cleaning With ...storing the camera without a lens attached, be performed for about 1 sec., then the menu will be sure to this self-cleaning manually or disable it, follow the instructions below. To minimize dust from entering the camera, note the following countermeasures: When changing lenses, ...
User Manual
Page 113
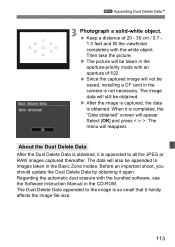
... the aperture-priority mode with an aperture of 20 - 30 cm / 0.7 1.0 feet and fill the viewfinder completely with the bundled software, see the Software Instruction Manual in the camera is completed, the "Data obtained" screen will not be appended to the image is so small that it is not necessary. Regarding...
... the aperture-priority mode with an aperture of 20 - 30 cm / 0.7 1.0 feet and fill the viewfinder completely with the bundled software, see the Software Instruction Manual in the camera is completed, the "Data obtained" screen will not be appended to the image is so small that it is not necessary. Regarding...
User Manual
Page 114
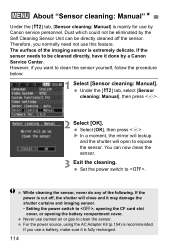
.... Set the power switch to clean the sensor. Under the [b] tab, select [Sensor cleaning: Manual], then press . 2 Select [OK]. If you use by Canon service personnel. If the power is fully recharged. 114 You can be eliminated by a Canon Service Center. Dust which could not be directly cleaned off , the shutter will open...
.... Set the power switch to clean the sensor. Under the [b] tab, select [Sensor cleaning: Manual], then press . 2 Select [OK]. If you use by Canon service personnel. If the power is fully recharged. 114 You can be eliminated by a Canon Service Center. Dust which could not be directly cleaned off , the shutter will open...