

User Manual
Page 3
...-100 ‰ Strap: EW-100DBII (with your dealer. The accessories included can also be checked in the System Map (p.164). ‰ Camera: EOS DIGITAL REBEL XTi/EOS 400D DIGITAL (includes eyecup, body cap, and installed battery for the date/time clock) ‰ Lens: EF-S18-55mm f/3.5-5.6 II (includes lens cap, dust cap) *Lens Kit only. ‰ Power...
...-100 ‰ Strap: EW-100DBII (with your dealer. The accessories included can also be checked in the System Map (p.164). ‰ Camera: EOS DIGITAL REBEL XTi/EOS 400D DIGITAL (includes eyecup, body cap, and installed battery for the date/time clock) ‰ Lens: EF-S18-55mm f/3.5-5.6 II (includes lens cap, dust cap) *Lens Kit only. ‰ Power...
User Manual
Page 5
... 3 Conventions Used in this Manual 4 Contents at a Glance 8 Handling Precautions 12 1 Quick Start Guide 14 Nomenclature 16 1 Getting Started 23 Recharging the Battery 24 2 Installing and Removing the Battery 26 Installing and Removing the CF Card 28 Mounting and Detaching a Lens 30 How to Shoot...31 3 Switching the LCD Monitor Screen 34...
... 3 Conventions Used in this Manual 4 Contents at a Glance 8 Handling Precautions 12 1 Quick Start Guide 14 Nomenclature 16 1 Getting Started 23 Recharging the Battery 24 2 Installing and Removing the Battery 26 Installing and Removing the CF Card 28 Mounting and Detaching a Lens 30 How to Shoot...31 3 Switching the LCD Monitor Screen 34...

User Manual
Page 7
... Ordering 144 Direct Printing with DPOF 149 4 8 Reference 151 External Speedlites 152 Wireless Remote Control 153 Using a Household Power Outlet 154 5 Replacing the Date/Time Battery 155 Menu Settings 156 Function Availability Table 158 When Autofocus Fails 160 6 Troubleshooting Guide 161 Error Codes...163 System Map 164 Specifications 166 7 Index ...176 8 7
... Ordering 144 Direct Printing with DPOF 149 4 8 Reference 151 External Speedlites 152 Wireless Remote Control 153 Using a Household Power Outlet 154 5 Replacing the Date/Time Battery 155 Menu Settings 156 Function Availability Table 158 When Autofocus Fails 160 6 Troubleshooting Guide 161 Error Codes...163 System Map 164 Specifications 166 7 Index ...176 8 7
User Manual
Page 10
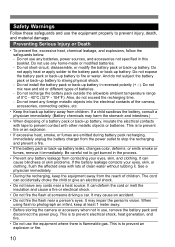
...heat source. When using flash to prevent an explosion or fire. 10 Do not expose the battery pack or back-up battery. Do not install the battery pack or back-up battery in use the equipment where there is to photograph an infant, keep the equipment away from ...heat generation, and fire. • Do not use , remove the battery pack and disconnect the power plug. If a child swallows the battery, consult a physician immediately. (Battery chemicals may harm the stomach and intestines.) • When disposing of batteries. - The cord can deform the cord or melt the insulation and...
...heat source. When using flash to prevent an explosion or fire. 10 Do not expose the battery pack or back-up battery. Do not install the battery pack or back-up battery in use the equipment where there is to photograph an infant, keep the equipment away from ...heat generation, and fire. • Do not use , remove the battery pack and disconnect the power plug. If a child swallows the battery, consult a physician immediately. (Battery chemicals may harm the stomach and intestines.) • When disposing of batteries. - The cord can deform the cord or melt the insulation and...

User Manual
Page 11
... equipment. • To prevent fire and electrical shock, follow the safeguards below: - Electromagnetic waves emitted by the camera may damage your nearest Canon Service Center. 11 Do not scratch, cut, or excessively bend the cord or put a heavy object on the power outlet may become moist ...enough to clean the equipment. Preventing Injury or Equipment Damage • Do not leave equipment inside the camera, promptly remove the battery pack and back-up battery. Doing so may cause injury. The neck strap can accidentally choke the child. • Do not store the equipment in water...
... equipment. • To prevent fire and electrical shock, follow the safeguards below: - Electromagnetic waves emitted by the camera may damage your nearest Canon Service Center. 11 Do not scratch, cut, or excessively bend the cord or put a heavy object on the power outlet may become moist ...enough to clean the equipment. Preventing Injury or Equipment Damage • Do not leave equipment inside the camera, promptly remove the battery pack and back-up battery. Doing so may cause injury. The neck strap can accidentally choke the child. • Do not store the equipment in water...
User Manual
Page 12
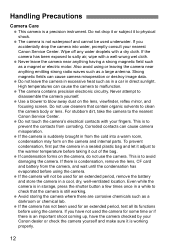
... a large antenna. Do not use the camera. If there is not waterproof and cannot be used the camera for an extended period, remove the battery and store the camera in a cool, dry, well-ventilated location. Also avoid using the camera. Do not leave the camera in excessive heat such... as a darkroom or chemical lab. Never attempt to the nearest Canon Service Center. This is to the warmer temperature before using or leaving the camera near anything emitting strong radio waves such as a magnet or ...
... a large antenna. Do not use the camera. If there is not waterproof and cannot be used the camera for an extended period, remove the battery and store the camera in a cool, dry, well-ventilated location. Also avoid using the camera. Do not leave the camera in excessive heat such... as a darkroom or chemical lab. Never attempt to the nearest Canon Service Center. This is to the warmer temperature before using or leaving the camera near anything emitting strong radio waves such as a magnet or ...
User Manual
Page 14
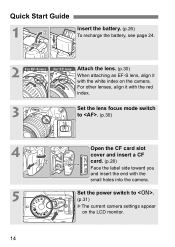
Quick Start Guide 1 Insert the battery. (p.26) To recharge the battery, see page 24. 2 For EF-S lens For EF l ens Attach the lens. (p.30) When attaching an EF-S lens, align it with the red index. 3 Set the lens focus mode switch to . (p.31) XThe current camera settings appear on the camera. Set the power switch to . (p.30) 4 5 14 Open the CF card slot cover and insert a CF card. (p.28) Face the label side toward you and insert the end with the white index on the LCD monitor. For other lenses, align it with the small holes into the camera.
Quick Start Guide 1 Insert the battery. (p.26) To recharge the battery, see page 24. 2 For EF-S lens For EF l ens Attach the lens. (p.30) When attaching an EF-S lens, align it with the red index. 3 Set the lens focus mode switch to . (p.31) XThe current camera settings appear on the camera. Set the power switch to . (p.30) 4 5 14 Open the CF card slot cover and insert a CF card. (p.28) Face the label side toward you and insert the end with the white index on the LCD monitor. For other lenses, align it with the small holes into the camera.
User Manual
Page 17
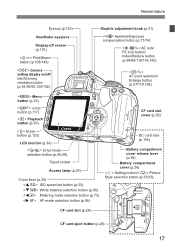
...) White balance selection button (p.86) Metering mode selection button (p.73) AF mode selection button (p.56) CF card slot cover (p.28) DC cord hole (p.154) Battery compartment cover release lever (p.26) Battery compartment cover (p.26) Setting button/ Picture Style selection button (p.35/63) CF card slot (p.28) CF card eject button (p.28) 17
...) White balance selection button (p.86) Metering mode selection button (p.73) AF mode selection button (p.56) CF card slot cover (p.28) DC cord hole (p.154) Battery compartment cover release lever (p.26) Battery compartment cover (p.26) Setting button/ Picture Style selection button (p.35/63) CF card slot (p.28) CF card eject button (p.28) 17
User Manual
Page 18
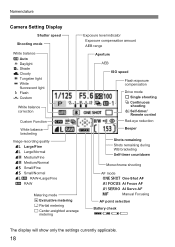
... remaining during WB bracketing Self-timer countdown Monochrome shooting AF mode X One-Shot AF 9 AI Focus AF Z AI Servo AF g Manual Focusing AF point selection Battery check zxcn The display will show only the settings currently applicable. 18
... remaining during WB bracketing Self-timer countdown Monochrome shooting AF mode X One-Shot AF 9 AI Focus AF Z AI Servo AF g Manual Focusing AF point selection Battery check zxcn The display will show only the settings currently applicable. 18

User Manual
Page 21
Using such incompatible adapters may result in a vertical or floor mount position. Battery Charger CB-2LW Battery pack slot index Nomenclature Power plug Recharge lamp Battery pack slot This power unit is intended to be correctly orientated in fire, overheating, or electrical shock. 21 Battery Charger CB-2LWE Battery pack slot Recharge lamp Power cord Power cord socket Do not use any AC adapters or compact power adapters other than the ones (rated input: 100-240 V AC, 50/60 Hz, rated output: 7.8-8.1 V DC) shown on the system map (p.164).
Using such incompatible adapters may result in a vertical or floor mount position. Battery Charger CB-2LW Battery pack slot index Nomenclature Power plug Recharge lamp Battery pack slot This power unit is intended to be correctly orientated in fire, overheating, or electrical shock. 21 Battery Charger CB-2LWE Battery pack slot Recharge lamp Power cord Power cord socket Do not use any AC adapters or compact power adapters other than the ones (rated input: 100-240 V AC, 50/60 Hz, rated output: 7.8-8.1 V DC) shown on the system map (p.164).

User Manual
Page 24
... the power cord and recharge the battery. X Recharging starts automatically and the recharge lamp turns orange. While pressing down the battery, slide it in reverse. 3 For CB-2LW Flip out the prongs and recharge the battery. Recharging the Battery 1 Remove the cover. Battery pack slot index CB-2LW CB...-2LWE 2 Attach the battery. It takes about 90 minutes to the charger...
... the power cord and recharge the battery. X Recharging starts automatically and the recharge lamp turns orange. While pressing down the battery, slide it in reverse. 3 For CB-2LW Flip out the prongs and recharge the battery. Recharging the Battery 1 Remove the cover. Battery pack slot index CB-2LW CB...-2LWE 2 Attach the battery. It takes about 90 minutes to the charger...
User Manual
Page 25
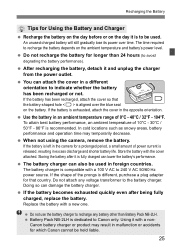
... orientation to avoid degrading the battery performance). Do not attach any battery other than 24 hours (to indicate whether the battery has been recharged or not. Do not recharge the battery for which Canon cannot be held liable. 25 Storing the battery after being fully charged, replace the battery. If the battery becomes exhausted quickly even after it...
... orientation to avoid degrading the battery performance). Do not attach any battery other than 24 hours (to indicate whether the battery has been recharged or not. Do not recharge the battery for which Canon cannot be held liable. 25 Storing the battery after being fully charged, replace the battery. If the battery becomes exhausted quickly even after it...

User Manual
Page 26
n : Battery must be exhausted soon. c : Battery will be displayed: z : Battery level OK. Installing and Removing the Battery Installing the Battery 1 Open the battery compartment cover. Insert the battery until it locks in place. 3 Close the cover. Insert the end with the battery contacts. Checking the Battery Level When the power switch is slightly down, but adequate power remains. x : Battery level is...
n : Battery must be exhausted soon. c : Battery will be displayed: z : Battery level OK. Installing and Removing the Battery Installing the Battery 1 Open the battery compartment cover. Insert the battery until it locks in place. 3 Close the cover. Insert the end with the battery contacts. Checking the Battery Level When the power switch is slightly down, but adequate power remains. x : Battery level is...
User Manual
Page 27
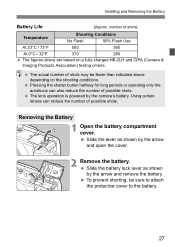
... lever as shown by the arrow and open the cover. 2 Remove the battery. Slide the lever as shown by the camera's battery. To prevent shorting, be fewer than indicated above are based on the shooting conditions. Pressing the shutter button halfway for long periods or operating only ... depending on a fully-charged NB-2LH and CIPA (Camera & Imaging Products Association) testing criteria. The lens operation is powered by the arrow and remove the battery. Using certain lenses can also reduce the number of shots may be sure to attach the protective cover to the...
... lever as shown by the arrow and open the cover. 2 Remove the battery. Slide the lever as shown by the camera's battery. To prevent shorting, be fewer than indicated above are based on the shooting conditions. Pressing the shutter button halfway for long periods or operating only ... depending on a fully-charged NB-2LH and CIPA (Camera & Imaging Products Association) testing criteria. The lens operation is powered by the arrow and remove the battery. Using certain lenses can also reduce the number of shots may be sure to attach the protective cover to the...
User Manual
Page 29
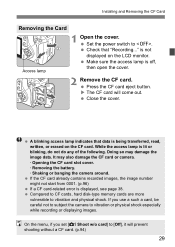
... do any of the following. Doing so may also damage the CF card or camera. · Opening the CF card slot cover. · Removing the battery. · Shaking or banging the camera around. Check that data is displayed, see page 38. While the access lamp is off, then open the cover...
... do any of the following. Doing so may also damage the CF card or camera. · Opening the CF card slot cover. · Removing the battery. · Shaking or banging the camera around. Check that data is displayed, see page 38. While the access lamp is off, then open the cover...

User Manual
Page 31
Turn the dioptric adjustment knob. To save battery power, the camera turns off automatically after the power switch is turned on. : The power lamp lights, and the camera turns on the LCD monitor ...
Turn the dioptric adjustment knob. To save battery power, the camera turns off automatically after the power switch is turned on. : The power lamp lights, and the camera turns on the LCD monitor ...
User Manual
Page 77
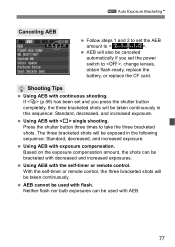
... exposures. Using AEB with AEB. 77 AEB will be canceled automatically if you set the power switch to , change lenses, obtain flash-ready, replace the battery, or replace the CF card. Press the shutter button three times to < >. With the self-timer or remote control, the three bracketed shots will be...
... exposures. Using AEB with AEB. 77 AEB will be canceled automatically if you set the power switch to , change lenses, obtain flash-ready, replace the battery, or replace the CF card. Press the shutter button three times to < >. With the self-timer or remote control, the three bracketed shots will be...
User Manual
Page 95
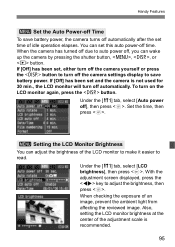
... adjust the brightness of the adjustment scale is not used for 30 min., the LCD monitor will turn off the camera settings display to save battery power, the camera turns off automatically after the set time of an image, prevent the ambient light from affecting the reviewed image. With the...easier to adjust the brightness, then press . Under the [c] tab, select [Auto power off automatically. Handy Features 3 Set the Auto Power-off Time To save battery power. If [Off] has been set this auto power-off time. Under the [c] tab, select [LCD brightness], then press . You can wake up the ...
... adjust the brightness of the adjustment scale is not used for 30 min., the LCD monitor will turn off the camera settings display to save battery power, the camera turns off automatically after the set time of an image, prevent the ambient light from affecting the reviewed image. With the...easier to adjust the brightness, then press . Under the [c] tab, select [Auto power off automatically. Handy Features 3 Set the Auto Power-off Time To save battery power. If [Off] has been set this auto power-off time. Under the [c] tab, select [LCD brightness], then press . You can wake up the ...
User Manual
Page 106
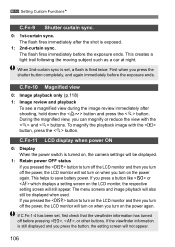
... power switch is exposed. 1: 2nd-curtain sync. The flash fires immediately before the exposure ends. During the magnified view, you pressed the button to save battery power. This helps to turn on , the camera settings will not appear. 106 When 2nd-curtain sync is still displayed and you turn on the...
... power switch is exposed. 1: 2nd-curtain sync. The flash fires immediately before the exposure ends. During the magnified view, you pressed the button to save battery power. This helps to turn on , the camera settings will not appear. 106 When 2nd-curtain sync is still displayed and you turn on the...
User Manual
Page 114
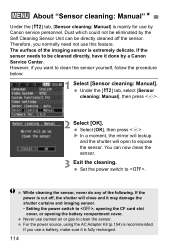
... Select [OK]. While cleaning the sensor, never do any of the imaging sensor is extremely delicate. Never use by Canon service personnel. However, if you normally need not use a battery, make sure it may damage the shutter curtains and imaging sensor. • Setting the power switch to , opening ...the CF card slot cover, or opening the battery compartment cover. X In a moment, the mirror will lockup and the shutter will close and it is fully recharged. 114 3 About "Sensor cleaning...
... Select [OK]. While cleaning the sensor, never do any of the imaging sensor is extremely delicate. Never use by Canon service personnel. However, if you normally need not use a battery, make sure it may damage the shutter curtains and imaging sensor. • Setting the power switch to , opening ...the CF card slot cover, or opening the battery compartment cover. X In a moment, the mirror will lockup and the shutter will close and it is fully recharged. 114 3 About "Sensor cleaning...