
EOS DIGITAL Rebel XT / EOS 350D Instruction Manual
Page 5
... 93 4 Mirror Lockup 94 6 Flash Photography 95 Using the Built-in Flash 96 5 Using EOS-Dedicated, External Speedlites 101 Using Non-Canon Flash Units 102 LCD Panel Illumination 102 7 Image Playback 6 103 Setting the Image Review Time 104 Auto Image Rotation 105 Setting the LCD Brightness 106 7 Image Playback 107 Single image... 118 9 8 Direct Printing from the Camera 119 Preparing to Print 121 PictBridge / CP Direct / Bubble Jet Direct 124 - 133 Easy Printing 136 10 9 DPOF: Digital Print Order Format 137 10 Customizing the Camera 145 11 11 Reference 151 5
... 93 4 Mirror Lockup 94 6 Flash Photography 95 Using the Built-in Flash 96 5 Using EOS-Dedicated, External Speedlites 101 Using Non-Canon Flash Units 102 LCD Panel Illumination 102 7 Image Playback 6 103 Setting the Image Review Time 104 Auto Image Rotation 105 Setting the LCD Brightness 106 7 Image Playback 107 Single image... 118 9 8 Direct Printing from the Camera 119 Preparing to Print 121 PictBridge / CP Direct / Bubble Jet Direct 124 - 133 Easy Printing 136 10 9 DPOF: Digital Print Order Format 137 10 Customizing the Camera 145 11 11 Reference 151 5

EOS DIGITAL Rebel XT / EOS 350D Instruction Manual
Page 11
Quick Start Guide 6 Set the Mode Dial to take the picture. 9 Review the picture on the LCD monitor. ¡ To view images captured so far, see "Image Playback" (p.107). ¡ To delete an image, see "Erasing Images" (p.116). 11 on the LCD monitor. (p.104) The captured image will be set automatically. 7 Focus the subject. (p.28) Aim the AF point over the subject and press the shutter button halfway to autofocus. 8 Take the picture. (p.28) Press the shutter button fully to (Full Auto). (p.44) All the necessary camera settings will be displayed for about 2 sec.
Quick Start Guide 6 Set the Mode Dial to take the picture. 9 Review the picture on the LCD monitor. ¡ To view images captured so far, see "Image Playback" (p.107). ¡ To delete an image, see "Erasing Images" (p.116). 11 on the LCD monitor. (p.104) The captured image will be set automatically. 7 Focus the subject. (p.28) Aim the AF point over the subject and press the shutter button halfway to autofocus. 8 Take the picture. (p.28) Press the shutter button fully to (Full Auto). (p.44) All the necessary camera settings will be displayed for about 2 sec.

EOS DIGITAL Rebel XT / EOS 350D Instruction Manual
Page 33
... mode ONE SHOT / AI FOCUS / AI SERVO 70 Metering mode q: Evaluative / w: Partial / e: Center-weighted average metering 77 ISO speed 100 / 200 / 400 / 800 / 1600 55 Shooting 2 menu (Red) AEB 1/3-stop increments, ±2 stops 90 Flash exp comp 1/3-stop increments, ±2 stops 100 White balance Q / W / E / R / Y / ...image 115 Rotate Rotate vertical image 113 Print order Specifies images to be printed (DPOF). 137 Auto play Auto playback of images 112 Review time Off / 2 sec. / 4 sec. / 8 sec. / Hold 104 ¡ Shooting 2 menu screen/tubs are not displayed in...
... mode ONE SHOT / AI FOCUS / AI SERVO 70 Metering mode q: Evaluative / w: Partial / e: Center-weighted average metering 77 ISO speed 100 / 200 / 400 / 800 / 1600 55 Shooting 2 menu (Red) AEB 1/3-stop increments, ±2 stops 90 Flash exp comp 1/3-stop increments, ±2 stops 100 White balance Q / W / E / R / Y / ...image 115 Rotate Rotate vertical image 113 Print order Specifies images to be printed (DPOF). 137 Auto play Auto playback of images 112 Review time Off / 2 sec. / 4 sec. / 8 sec. / Hold 104 ¡ Shooting 2 menu screen/tubs are not displayed in...
EOS DIGITAL Rebel XT / EOS 350D Instruction Manual
Page 45
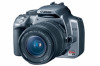
... with , do not touch the focusing ring at the front of the lens. ¡ If you want to and again. ¡ Using a non-Canon lens with an EOS camera may not result in proper camera or lens operation. ¡ When focus is achieved, the focus and exposure setting will also be locked... obstructs the built-in low-light or backlit conditions. To retract the flash, push it before focusing. Replace the CF card with the menu's [x Review time] setting. (p.104) ¡ If you want to freely select the AF point for about 2 sec. 1 Using Full Auto 5 Take the picture. ¡ Compose ...
... with , do not touch the focusing ring at the front of the lens. ¡ If you want to and again. ¡ Using a non-Canon lens with an EOS camera may not result in proper camera or lens operation. ¡ When focus is achieved, the focus and exposure setting will also be locked... obstructs the built-in low-light or backlit conditions. To retract the flash, push it before focusing. Replace the CF card with the menu's [x Review time] setting. (p.104) ¡ If you want to freely select the AF point for about 2 sec. 1 Using Full Auto 5 Take the picture. ¡ Compose ...
EOS DIGITAL Rebel XT / EOS 350D Instruction Manual
Page 68
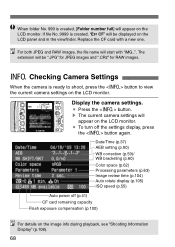
... LCD monitor. Date/Time (p.37) AEB setting (p.90) WB correction (p.59)/ WB bracketing (p.60) Color space (p.62) Processing parameters (p.63) Image review time (p.104) Auto rotate display (p.105) ISO speed (p.55) Auto power off the settings display, press the button again. Display the camera settings. ¡ Press the button. s The current camera...
... LCD monitor. Date/Time (p.37) AEB setting (p.90) WB correction (p.59)/ WB bracketing (p.60) Color space (p.62) Processing parameters (p.63) Image review time (p.104) Auto rotate display (p.105) ISO speed (p.55) Auto power off the settings display, press the button again. Display the camera settings. ¡ Press the button. s The current camera...

EOS DIGITAL Rebel XT / EOS 350D Instruction Manual
Page 104
...you press the shutter button halfway. To not have the image displayed, set [Off]. 1 Select [Review time]. ¡ Select the [x] tab. ¡ Press the key to select [Review time], then press . 2 Set the desired review time. ¡ Press the key to be displayed on the LCD monitor right after shooting, you can...image displayed, set how long the image is to select the desired setting, then press . ¡ If you press the button during the image review right after it is captured. However, if auto power off has been set, the camera will turn off automatically after the auto power off time...
...you press the shutter button halfway. To not have the image displayed, set [Off]. 1 Select [Review time]. ¡ Select the [x] tab. ¡ Press the key to select [Review time], then press . 2 Set the desired review time. ¡ Press the key to be displayed on the LCD monitor right after shooting, you can...image displayed, set how long the image is to select the desired setting, then press . ¡ If you press the button during the image review right after it is captured. However, if auto power off has been set, the camera will turn off automatically after the auto power off time...

EOS DIGITAL Rebel XT / EOS 350D Instruction Manual
Page 105
... the button. Auto rotate will not work only if [Auto rotate] has been set to select [On], then press . 3 Take a vertical shot. ¡ The image review right after image capture will not display the image vertically on the left. ¡ Auto rotate will be rotated automatically so that they are displayed...
... the button. Auto rotate will not work only if [Auto rotate] has been set to select [On], then press . 3 Take a vertical shot. ¡ The image review right after image capture will not display the image vertically on the left. ¡ Auto rotate will be rotated automatically so that they are displayed...

EOS DIGITAL Rebel XT / EOS 350D Instruction Manual
Page 156
...or PAL) has not been set. s Set the camera to the correct video format matching the TV set. (p.34) ¡ You are not using a non-Canon CF card. s If it is [Err 02], see page 118. s Insert the video cable plugs all the way. s To prevent camera shake, hold the ... appears on the LCD panel. s Use the video cable that came with the camera. s Set the lens focus mode switch to . s Using Canon CF cards is recommended. (p.159) Image Review & Operation The image cannot be used. ¡ [Err **] is erase-protected. Troubleshooting Guide The image is out of focus. ¡ The ...
...or PAL) has not been set. s Set the camera to the correct video format matching the TV set. (p.34) ¡ You are not using a non-Canon CF card. s If it is [Err 02], see page 118. s Insert the video cable plugs all the way. s To prevent camera shake, hold the ... appears on the LCD panel. s Use the video cable that came with the camera. s Set the lens focus mode switch to . s Using Canon CF cards is recommended. (p.159) Image Review & Operation The image cannot be used. ¡ [Err **] is erase-protected. Troubleshooting Guide The image is out of focus. ¡ The ...

EOS DIGITAL Rebel XT / EOS 350D Instruction Manual
Page 170
...speed sync 101 Histogram 108 Holding the Camera 42 I Image processing 53 Image review time 104 Image size 153 Image Zone 16 Image-recording quality 52 Index 139 ...Index display 109 INFO 68, 107 Interface cable 3 170 ISO speed 55 J JPEG 52 Jump by 10 images/100 images... 111 Jump by date 111... 102 Lens 9, 25 M M (Manual 86 Magnified view 110 Main Dial 18, 29 Manual AF point selection 73 Manual Focusing 76 Max. Burst 54 Menus 31, 33... Portrait 47 Noise reduction 148 Nomenclature 12 Non-Canon flash units 102 NTSC 34, 114 Number of copies ... 126, 129, 132...
...speed sync 101 Histogram 108 Holding the Camera 42 I Image processing 53 Image review time 104 Image size 153 Image Zone 16 Image-recording quality 52 Index 139 ...Index display 109 INFO 68, 107 Interface cable 3 170 ISO speed 55 J JPEG 52 Jump by 10 images/100 images... 111 Jump by date 111... 102 Lens 9, 25 M M (Manual 86 Magnified view 110 Main Dial 18, 29 Manual AF point selection 73 Manual Focusing 76 Max. Burst 54 Menus 31, 33... Portrait 47 Noise reduction 148 Nomenclature 12 Non-Canon flash units 102 NTSC 34, 114 Number of copies ... 126, 129, 132...