Instruction Manual
Page 2
.... WARNING TO REDUCE THE RISK OF ELECTRIC SHOCK, DO NOT EXPOSE THIS PRODUCT TO DRIPPING OR SPLASHING. FCC NOTICE HD Camcorder, EOS C300 / EOS C300 PL Systems. This device complies with the instructions, may cause harmful interference to the following measures: • Reorient or relocate...not expose batteries or product to which can radiate radio frequency energy and, if not installed and use in a residential installation. Canon U.S.A., Inc. Use of batteries are designed to provide reasonable protection against harmful interference in accordance with Part 15 of the following...
.... WARNING TO REDUCE THE RISK OF ELECTRIC SHOCK, DO NOT EXPOSE THIS PRODUCT TO DRIPPING OR SPLASHING. FCC NOTICE HD Camcorder, EOS C300 / EOS C300 PL Systems. This device complies with the instructions, may cause harmful interference to the following measures: • Reorient or relocate...not expose batteries or product to which can radiate radio frequency energy and, if not installed and use in a residential installation. Canon U.S.A., Inc. Use of batteries are designed to provide reasonable protection against harmful interference in accordance with Part 15 of the following...
Instruction Manual
Page 4
... objects have fallen into your outlet, consult an electrician for your safety. Important Safety Instructions In these safety instructions the word "apparatus" 4 refers to the Canon HD Camcorder EOS C300 / EOS C300 PL and all warnings. 4.
... objects have fallen into your outlet, consult an electrician for your safety. Important Safety Instructions In these safety instructions the word "apparatus" 4 refers to the Canon HD Camcorder EOS C300 / EOS C300 PL and all warnings. 4.
Instruction Manual
Page 5
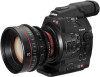
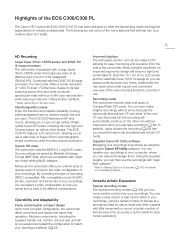
...effect in use a huge variety of 29 different combinations. Recording media The camcorder records video and audio to a Computer (A 143) for stop motion animation). Highlights of the EOS C300/C300 PL The Canon HD Camcorder EOS C300/C300 PL has been designed to meet the demanding needs and highest expectations of 1,...in your needs from the side of your shots. Furthermore, thanks to its most compact configuration, the camcorder offers convenient and hassle-free hand-held operation. The EOS C300 features an EF lens mount, allowing you a whole array of options when it comes to -life...
...effect in use a huge variety of 29 different combinations. Recording media The camcorder records video and audio to a Computer (A 143) for stop motion animation). Highlights of the EOS C300/C300 PL The Canon HD Camcorder EOS C300/C300 PL has been designed to meet the demanding needs and highest expectations of 1,...in your needs from the side of your shots. Furthermore, thanks to its most compact configuration, the camcorder offers convenient and hassle-free hand-held operation. The EOS C300 features an EF lens mount, allowing you a whole array of options when it comes to -life...
Instruction Manual
Page 6
..., such as 2-channel linear PCM audio (16-bit/48 kHz). You can assign often-used menu settings in the same way. Using the Canon Log gamma, you can get recordings with amazing dynamic range, allowing you to realize in postproduction the artistic vision you can call up those functions...buttons (A 111) so that you monitor the image through live view and remotely control the focus, shutter speed, ISO speed/gain and other C300 / C300 PL camcorders in the recording itself. The custom picture settings can be part of any multi-camera shooting setup. Audio Sound is recorded as gamma and ...
..., such as 2-channel linear PCM audio (16-bit/48 kHz). You can assign often-used menu settings in the same way. Using the Canon Log gamma, you can get recordings with amazing dynamic range, allowing you to realize in postproduction the artistic vision you can call up those functions...buttons (A 111) so that you monitor the image through live view and remotely control the focus, shutter speed, ISO speed/gain and other C300 / C300 PL camcorders in the recording itself. The custom picture settings can be part of any multi-camera shooting setup. Audio Sound is recorded as gamma and ...
Instruction Manual
Page 7
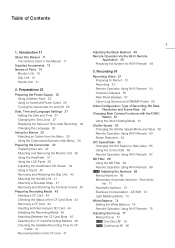
...- Recording 51 Recording Video 51 Preparing to Record 51 Recording 51 Remote Operation Using Wi-Fi Remote 54 Onscreen Displays 55 Rear Panel Displays 57 Canon Log Gamma and CINEMA Preset 58 Video Configuration: Type of Parts 14 Monitor Unit 19 Grip Unit 21 Handle Unit 21 2. Preparations 23 Preparing the...28 Changing the Language 28 Using the Menus 29 Selecting an Option from the Menu 29 Using the Customized Submenu (My Menu) 30 Preparing the Camcorder 32 Preparing the Lens 32 Attaching and Removing the Monitor Unit 36 Using the Viewfinder 37 Using the LCD Panel 38 Adjusting the Viewfinder/LCD...
...- Recording 51 Recording Video 51 Preparing to Record 51 Recording 51 Remote Operation Using Wi-Fi Remote 54 Onscreen Displays 55 Rear Panel Displays 57 Canon Log Gamma and CINEMA Preset 58 Video Configuration: Type of Parts 14 Monitor Unit 19 Grip Unit 21 Handle Unit 21 2. Preparations 23 Preparing the...28 Changing the Language 28 Using the Menus 29 Selecting an Option from the Menu 29 Using the Customized Submenu (My Menu) 30 Preparing the Camcorder 32 Preparing the Lens 32 Attaching and Removing the Monitor Unit 36 Using the Viewfinder 37 Using the LCD Panel 38 Adjusting the Viewfinder/LCD...
Instruction Manual
Page 8
... Running Mode 84 Selecting Drop or Non-Drop Frame 85 Putting the Time Code Display on Hold 86 Setting the User Bit 87 Synchronizing with Canon XF Utility 96 Setting a User Memo Using Wi-Fi Remote 97 Colors Bars/Audio Reference Signal 98 Recording Color Bars 98 Recording an Audio Reference... Adding Marks while Recording 101 Adding Shot Marks while Recording 101 Remote Operation Using Wi-Fi Remote 101 Adding an $ Mark or % Mark to the Camcorder 91 Selecting the Audio Input from the XLR Terminals 92 Adjusting the Audio Level from the XLR Terminals 93 Adjusting the Audio Level from an...
... Running Mode 84 Selecting Drop or Non-Drop Frame 85 Putting the Time Code Display on Hold 86 Setting the User Bit 87 Synchronizing with Canon XF Utility 96 Setting a User Memo Using Wi-Fi Remote 97 Colors Bars/Audio Reference Signal 98 Recording Color Bars 98 Recording an Audio Reference... Adding Marks while Recording 101 Adding Shot Marks while Recording 101 Remote Operation Using Wi-Fi Remote 101 Adding an $ Mark or % Mark to the Camcorder 91 Selecting the Audio Input from the XLR Terminals 92 Adjusting the Audio Level from the XLR Terminals 93 Adjusting the Audio Level from an...
Instruction Manual
Page 11
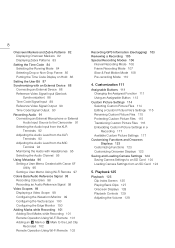
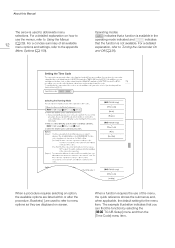
... to a CompactFlash (CF) card. "Recording media" refers to CF cards and SD cards. • Photographs in this Manual Thank you use the camcorder and retain it for purchasing the Canon EOS C300/C300 PL. "SD card" refers to Troubleshooting (A 176). 1 Introduction 11 About this manual. Some screenshots have been altered to make them easier to...
... to a CompactFlash (CF) card. "Recording media" refers to CF cards and SD cards. • Photographs in this Manual Thank you use the camcorder and retain it for purchasing the Canon EOS C300/C300 PL. "SD card" refers to Troubleshooting (A 176). 1 Introduction 11 About this manual. Some screenshots have been altered to make them easier to...
Instruction Manual
Page 12
... the use the menus, refer to Using the Menus 12 (A 29). For a detailed explanation, refer to abbreviate menu selections. Brackets [ ] are used to Turning the Camcorder On and Off (A 26). About this Manual The arrow is not available. When a procedure requires selecting an option, the available options are displayed on how...
... the use the menus, refer to Using the Menus 12 (A 29). For a detailed explanation, refer to abbreviate menu selections. Brackets [ ] are used to Turning the Camcorder On and Off (A 26). About this Manual The arrow is not available. When a procedure requires selecting an option, the available options are displayed on how...
Instruction Manual
Page 13
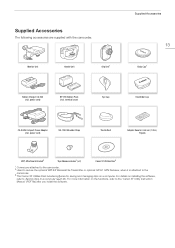
...(incl. Supplied Accessories The following accessories are supplied with the camcorder. terminal cover) Eye Cup Viewfinder Cap CA-940N Compact Power Adapter (incl. For more information on the functions, refer to the camcorder. 3 The Canon XF Utilities Disc includes software for 0.64 cm (1/4 in.)... Tripods WFT Attachment Bracket2 Tape Measure Hooks1 (x 2) Canon XF Utilities Disc3 1 Comes pre-attached to the camcorder. 2 Used to secure the optional WFT-E6 ...
...(incl. Supplied Accessories The following accessories are supplied with the camcorder. terminal cover) Eye Cup Viewfinder Cap CA-940N Compact Power Adapter (incl. For more information on the functions, refer to the camcorder. 3 The Canon XF Utilities Disc includes software for 0.64 cm (1/4 in.)... Tripods WFT Attachment Bracket2 Tape Measure Hooks1 (x 2) Canon XF Utilities Disc3 1 Comes pre-attached to the camcorder. 2 Used to secure the optional WFT-E6 ...
Instruction Manual
Page 23
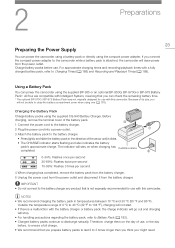
...and Playback Times (A 188). All four are compatible with Intelligent System, meaning that is not expressly recommended for use with this camcorder. The indicator will not be able to close the battery compartment cover when using the compact power adapter. For approximate charging times ...recommend that you prepare battery packs to last 2 to the battery charger any product that you connect the compact power adapter to the camcorder while a battery pack is a malfunction with a fully charged battery pack, refer to discharge naturally. Charging the Battery Pack Charge battery...
...and Playback Times (A 188). All four are compatible with Intelligent System, meaning that is not expressly recommended for use with this camcorder. The indicator will not be able to close the battery compartment cover when using the compact power adapter. For approximate charging times ...recommend that you prepare battery packs to last 2 to the battery charger any product that you connect the compact power adapter to the camcorder while a battery pack is a malfunction with a fully charged battery pack, refer to discharge naturally. Charging the Battery Pack Charge battery...
Instruction Manual
Page 24
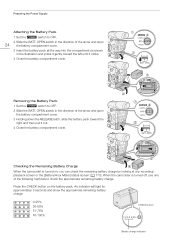
...% 51-75% 76-100% CHECK button 0 100% Battery charge indicator Checking the Remaining Battery Charge When the camcorder is turned off, use one of the following methods to OFF. 2 Slide the BATT. When the camcorder is turned on the battery pack. Press the CHECK button on , you can check the remaining battery...
...% 51-75% 76-100% CHECK button 0 100% Battery charge indicator Checking the Remaining Battery Charge When the camcorder is turned off, use one of the following methods to OFF. 2 Slide the BATT. When the camcorder is turned on the battery pack. Press the CHECK button on , you can check the remaining battery...
Instruction Manual
Page 25
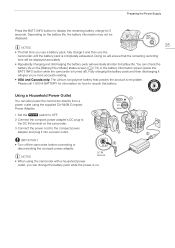
...polymer battery that the remaining recording time will be displayed. 25 NOTES • The first time you can check the battery life on the camcorder. 3 Connect the power cord to recycle this battery. Doing so will eventually shorten its battery life. Please call 1-800-8-BATTERY for 5 ...terminal on the [Battery/Hour Meter] status screen (A 173) or the battery information screen (press the BATT. INFO button while the camcorder is on the battery life, the battery information may not be displayed accurately. • Repeatedly charging and discharging the battery pack will ...
...polymer battery that the remaining recording time will be displayed. 25 NOTES • The first time you can check the battery life on the camcorder. 3 Connect the power cord to recycle this battery. Doing so will eventually shorten its battery life. Please call 1-800-8-BATTERY for 5 ...terminal on the [Battery/Hour Meter] status screen (A 173) or the battery information screen (press the BATT. INFO button while the camcorder is on the battery life, the battery information may not be displayed accurately. • Repeatedly charging and discharging the battery pack will ...
Instruction Manual
Page 26
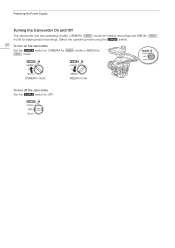
MEDIA mode Preparing the Power Supply Turning the Camcorder On and Off The camcorder has two operating modes: CAMERA ( ) mode for making recordings and MEDIA ( ) mode for mode. Select the operating mode using the Q switch. 26 To turn off the camcorder Set the Q switch to CAMERA for playing back recordings. mode or MEDIA for CAMERA mode To turn on the camcorder Set the Q switch to OFF.
MEDIA mode Preparing the Power Supply Turning the Camcorder On and Off The camcorder has two operating modes: CAMERA ( ) mode for making recordings and MEDIA ( ) mode for mode. Select the operating mode using the Q switch. 26 To turn off the camcorder Set the Q switch to CAMERA for playing back recordings. mode or MEDIA for CAMERA mode To turn on the camcorder Set the Q switch to OFF.
Instruction Manual
Page 27
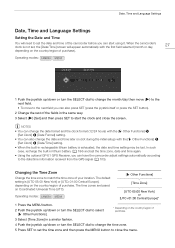
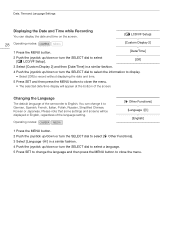
... format (12/24 hours) with the [w Other Functions] > [Set Clock] > [Date Format] setting. • You can have the camcorder adjust settings automatically according to set the date and time of purchase. When the camcorder's clock is [UTC-05:00 New York] or [UTC+01:00 Central Europe], depending on the country/region... of the camcorder before you can also change the date and time later on the country/region of purchase. 3 Select [Time Zone] in rechargeable lithium battery is exhausted, ...
... format (12/24 hours) with the [w Other Functions] > [Set Clock] > [Date Format] setting. • You can have the camcorder adjust settings automatically according to set the date and time of purchase. When the camcorder's clock is [UTC-05:00 New York] or [UTC+01:00 Central Europe], depending on the country/region... of the camcorder before you can also change the date and time later on the country/region of purchase. 3 Select [Time Zone] in rechargeable lithium battery is exhausted, ...
Instruction Manual
Page 28
... /down or turn the SELECT dial to select [£ LCD/VF Setup]. [Off] 3 Select [Custom Display 2] and then [Date/Time] in English, regardless of the camcorder is English. Please note that some settings and screens will appear at the bottom of the screen. You can display the date and time on...
... /down or turn the SELECT dial to select [£ LCD/VF Setup]. [Off] 3 Select [Custom Display 2] and then [Date/Time] in English, regardless of the camcorder is English. Please note that some settings and screens will appear at the bottom of the screen. You can display the date and time on...
Instruction Manual
Page 29
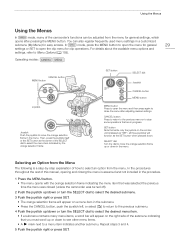
... to select the menu item indicated by -step explanation of the submenu indicating that was selected the previous time the menu was closed (unless the camcorder was turned off). 2 Push the joystick up/down or turn the SELECT dial to select the desired menu item. • If a submenu ...contains many of the camcorder's functions can also register frequently used menu settings in the menu. SET button SELECT dial Joystick CANCEL button MENU button MENU button Press to open...
... to select the menu item indicated by -step explanation of the submenu indicating that was selected the previous time the menu was closed (unless the camcorder was turned off). 2 Push the joystick up/down or turn the SELECT dial to select the desired menu item. • If a submenu ...contains many of the camcorder's functions can also register frequently used menu settings in the menu. SET button SELECT dial Joystick CANCEL button MENU button MENU button Press to open...
Instruction Manual
Page 32
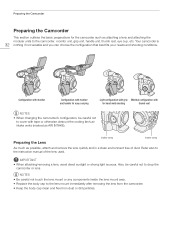
...free from dust or dirt particles. IMPORTANT • When attaching/removing a lens, avoid direct sunlight or strong light sources. Your camcorder is 32 nothing if not versatile and you can choose the configuration that best fits your needs and shooting conditions. Configuration with ...monitor Configuration with monitor and handle for easy carrying Light configuration with grip Minimal configuration with for the camcorder such as attaching a lens and attaching the modular units to cover with tape or otherwise obstruct the cooling fan's air intake ...
...free from dust or dirt particles. IMPORTANT • When attaching/removing a lens, avoid direct sunlight or strong light sources. Your camcorder is 32 nothing if not versatile and you can choose the configuration that best fits your needs and shooting conditions. Configuration with ...monitor Configuration with monitor and handle for easy carrying Light configuration with grip Minimal configuration with for the camcorder such as attaching a lens and attaching the modular units to cover with tape or otherwise obstruct the cooling fan's air intake ...
Instruction Manual
Page 33
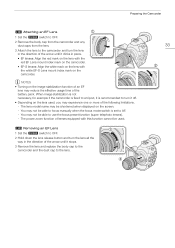
... of the arrow until it clicks in the direction of the arrow until it stops. 3 Remove the lens and replace the body cap to the camcorder and the dust cap to turn the lens all the way in place. • EF lenses: Align the red mark on the lens with the... red EF Lens mount index mark on the camcorder. • EF-S lenses: Align the white mark on the lens with this function cannot be used , you may experience one or more of the following...
... of the arrow until it clicks in the direction of the arrow until it stops. 3 Remove the lens and replace the body cap to the camcorder and the dust cap to turn the lens all the way in place. • EF lenses: Align the red mark on the lens with the... red EF Lens mount index mark on the camcorder. • EF-S lenses: Align the white mark on the lens with this function cannot be used , you may experience one or more of the following...
Instruction Manual
Page 34
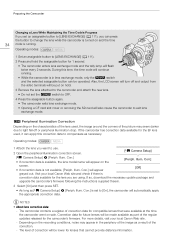
...used , the image around the corners of the correction. - Illum. The camcorder contains a register of the regular updates released for compatible lenses that cannot provide distance information. For more details, visit your local Canon Web site and check if there is not available, [Periph. Corr.] ...• If correction data is in the periphery of the image as part of correction data for the camcorder's firmware. Corr.] screen. [Off] •...
...used , the image around the corners of the correction. - Illum. The camcorder contains a register of the regular updates released for compatible lenses that cannot provide distance information. For more details, visit your local Canon Web site and check if there is not available, [Periph. Corr.] ...• If correction data is in the periphery of the image as part of correction data for the camcorder's firmware. Corr.] screen. [Off] •...
Instruction Manual
Page 35
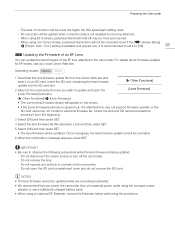
... open the SD card compartment cover and do not remove the SD card. The level of the EF lens attached to the camcorder the lens you power the camcorder from the Canon Web site and save it is being updated. - Even if the [~ Camera Setup] > [Periph. Operating modes: 1 Download the lens firmware update...
... open the SD card compartment cover and do not remove the SD card. The level of the EF lens attached to the camcorder the lens you power the camcorder from the Canon Web site and save it is being updated. - Even if the [~ Camera Setup] > [Periph. Operating modes: 1 Download the lens firmware update...


