Instruction Manual
Page 2
... images using a Wi-Fi printer Print images (Canon Image Gateway) (5) Send images to Canon Web site (http://canon.com/cig). For information on countries and areas supporting CANON iMAGE GATEWAY services, refer to a Web service Save and share images (4) Operate the camera remotely using EOS Utility Remotely control the camera CANON iMAGE GATEWAY Web services are not supported...
... images using a Wi-Fi printer Print images (Canon Image Gateway) (5) Send images to Canon Web site (http://canon.com/cig). For information on countries and areas supporting CANON iMAGE GATEWAY services, refer to a Web service Save and share images (4) Operate the camera remotely using EOS Utility Remotely control the camera CANON iMAGE GATEWAY Web services are not supported...

Instruction Manual
Page 3
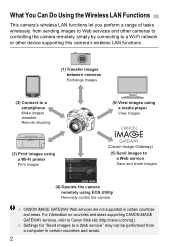
... media player (p.131) Display images on the camera's memory card on your smartphone. What You Can Do Using the Wireless LAN Functions (1) z Transfer images between cameras (p.19) Transfer images between this camera and other Canon cameras with family and friends. (6) View images using...103) Upload your images to CANON iMAGE GATEWAY, an online photo service for Canon users (free registration required), to share them with built-in wireless LAN functions. (2) q Connect to print images wirelessly. (4) D Operate the camera remotely using EOS Utility (p.93) Use EOS Utility via a wireless LAN. ...
... media player (p.131) Display images on the camera's memory card on your smartphone. What You Can Do Using the Wireless LAN Functions (1) z Transfer images between cameras (p.19) Transfer images between this camera and other Canon cameras with family and friends. (6) View images using...103) Upload your images to CANON iMAGE GATEWAY, an online photo service for Canon users (free registration required), to share them with built-in wireless LAN functions. (2) q Connect to print images wirelessly. (4) D Operate the camera remotely using EOS Utility (p.93) Use EOS Utility via a wireless LAN. ...
Instruction Manual
Page 4
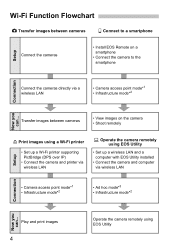
... PictBridge (DPS over IP) • Connect the camera and printer via wireless LAN D Operate the camera remotely using EOS Utility Transfer images between cameras q Connect to a smartphone Setup Connect the cameras • Install EOS Remote on the camera • Shoot remotely Setup l Print images using ...a Wi-Fi printer • Set up a wireless LAN and a computer with EOS Utility installed • Connect the camera and computer via wireless LAN • Camera access point mode*1 • Infrastructure mode*2 • Ad hoc mode*3 • Infrastructure mode*2 ...
... PictBridge (DPS over IP) • Connect the camera and printer via wireless LAN D Operate the camera remotely using EOS Utility Transfer images between cameras q Connect to a smartphone Setup Connect the cameras • Install EOS Remote on the camera • Shoot remotely Setup l Print images using ...a Wi-Fi printer • Set up a wireless LAN and a computer with EOS Utility installed • Connect the camera and computer via wireless LAN • Camera access point mode*1 • Infrastructure mode*2 • Ad hoc mode*3 • Infrastructure mode*2 ...
Instruction Manual
Page 5
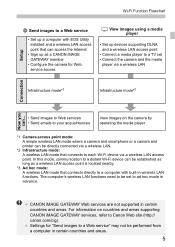
... LAN functions need to be established as long as a CANON iMAGE GATEWAY member • Configure the camera for "Send images to a Web service" may not be directly connected via a wireless LAN. *2 Infrastructure mode: A wireless LAN mode that connects directly to a computer with EOS Utility installed and a wireless LAN access point that can be...
... LAN functions need to be established as long as a CANON iMAGE GATEWAY member • Configure the camera for "Send images to a Web service" may not be directly connected via a wireless LAN. *2 Infrastructure mode: A wireless LAN mode that connects directly to a computer with EOS Utility installed and a wireless LAN access point that can be...
Instruction Manual
Page 6
... is used on the computer screen. Brackets also indicate camera menu items. The ** (numbers) for using the camera. UPnP is a registered trademark of their respective owners. Sections of information as a general term for Wi-Fi and Canon's original wireless communication functions. WPS used as described below... the following symbols contain particular types of this manual indicate reference page numbers for Wi-Fi Protected Setup. In addition, Canon cannot be held liable for any loss or damage from erroneous wireless LAN settings for "(p.**)" in the United States and other...
... is used on the computer screen. Brackets also indicate camera menu items. The ** (numbers) for using the camera. UPnP is a registered trademark of their respective owners. Sections of information as a general term for Wi-Fi and Canon's original wireless communication functions. WPS used as described below... the following symbols contain particular types of this manual indicate reference page numbers for Wi-Fi Protected Setup. In addition, Canon cannot be held liable for any loss or damage from erroneous wireless LAN settings for "(p.**)" in the United States and other...
Instruction Manual
Page 7
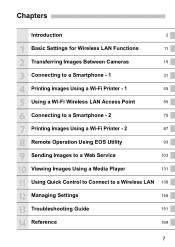
... for Wireless LAN Functions 11 2 Transferring Images Between Cameras 19 3 Connecting to a Smartphone - 1 31 4 Printing Images Using a Wi-Fi Printer - 1 45 5 Using a Wi-Fi Wireless LAN Access Point 55 6 Connecting to a Smartphone - 2 75 7 Printing Images Using a Wi-Fi Printer - 2 87 8 Remote Operation Using EOS Utility 93 9 Sending Images to a Web Service 103...
... for Wireless LAN Functions 11 2 Transferring Images Between Cameras 19 3 Connecting to a Smartphone - 1 31 4 Printing Images Using a Wi-Fi Printer - 1 45 5 Using a Wi-Fi Wireless LAN Access Point 55 6 Connecting to a Smartphone - 2 75 7 Printing Images Using a Wi-Fi Printer - 2 87 8 Remote Operation Using EOS Utility 93 9 Sending Images to a Web Service 103...
Instruction Manual
Page 8
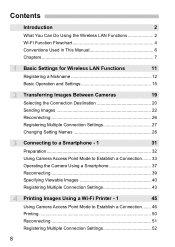
... Basic Settings for Wireless LAN Functions 11 Registering a Nickname 12 Basic Operation and Settings 15 2 Transferring Images Between Cameras 19 Selecting the Connection Destination 20 Sending Images 22 Reconnecting 26 Registering Multiple Connection Settings 27 Changing Setting Names 28 ...3 Connecting to a Smartphone - 1 31 Preparation 32 Using Camera Access Point Mode to Establish a Connection ....... 33 Operating the Camera Using a Smartphone 37 Reconnecting 39 Specifying Viewable Images 40 Registering Multiple Connection Settings 43...
... Basic Settings for Wireless LAN Functions 11 Registering a Nickname 12 Basic Operation and Settings 15 2 Transferring Images Between Cameras 19 Selecting the Connection Destination 20 Sending Images 22 Reconnecting 26 Registering Multiple Connection Settings 27 Changing Setting Names 28 ...3 Connecting to a Smartphone - 1 31 Preparation 32 Using Camera Access Point Mode to Establish a Connection ....... 33 Operating the Camera Using a Smartphone 37 Reconnecting 39 Specifying Viewable Images 40 Registering Multiple Connection Settings 43...
Instruction Manual
Page 9
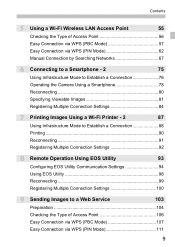
...by Searching Networks 67 6 Connecting to a Smartphone - 2 75 Using Infrastructure Mode to Establish a Connection 76 Operating the Camera Using a Smartphone 78 Reconnecting 80 Specifying Viewable Images 81 Registering Multiple Connection Settings 84 7 Printing Images Using a Wi-Fi... Connection 88 Printing 90 Reconnecting 91 Registering Multiple Connection Settings 92 8 Remote Operation Using EOS Utility 93 Configuring EOS Utility Communication Settings 94 Using EOS Utility 98 Reconnecting 99 Registering Multiple Connection Settings 100 9 Sending Images to a Web ...
...by Searching Networks 67 6 Connecting to a Smartphone - 2 75 Using Infrastructure Mode to Establish a Connection 76 Operating the Camera Using a Smartphone 78 Reconnecting 80 Specifying Viewable Images 81 Registering Multiple Connection Settings 84 7 Printing Images Using a Wi-Fi... Connection 88 Printing 90 Reconnecting 91 Registering Multiple Connection Settings 92 8 Remote Operation Using EOS Utility 93 Configuring EOS Utility Communication Settings 94 Using EOS Utility 98 Reconnecting 99 Registering Multiple Connection Settings 100 9 Sending Images to a Web ...

Instruction Manual
Page 11
Basic Settings for Wireless LAN Functions This chapter describes settings necessary for using the camera's wireless LAN functions. 11
Basic Settings for Wireless LAN Functions This chapter describes settings necessary for using the camera's wireless LAN functions. 11

Instruction Manual
Page 12
Press the key to set the camera's nickname. Select [OK] and proceed on the device. X [Wi-Fi function] is connected to another device via a wireless LAN, the nickname will be displayed on ...to step 4. 12 Registering a Nickname First, set a nickname for the first time, a screen to register a nickname is selected for your camera. 1 Select [Wi-Fi]. Under the [53] tab, select [Wi-Fi], then press . 2 Select [Enable]. Under the [53] tab, select [Wi-Fi function], then press . X When...
Press the key to set the camera's nickname. Select [OK] and proceed on the device. X [Wi-Fi function] is connected to another device via a wireless LAN, the nickname will be displayed on ...to step 4. 12 Registering a Nickname First, set a nickname for the first time, a screen to register a nickname is selected for your camera. 1 Select [Wi-Fi]. Under the [53] tab, select [Wi-Fi], then press . 2 Select [Enable]. Under the [53] tab, select [Wi-Fi function], then press . X When...
Instruction Manual
Page 15
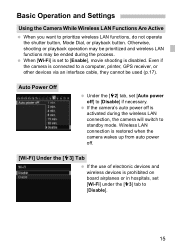
... is disabled. Otherwise, shooting or playback operation may be prioritized and wireless LAN functions may be used (p.17). Even if the camera is restored when the camera wakes up from auto power off ] to standby mode. Wireless LAN connection is connected to a computer, printer, GPS receiver, or... other devices via an interface cable, they cannot be ended during the wireless LAN connection, the camera will switch to [Disable] if necessary. If the camera's auto power off is set [Wi-Fi] under the [53] tab to prioritize wireless LAN functions, do not operate...
... is disabled. Otherwise, shooting or playback operation may be prioritized and wireless LAN functions may be used (p.17). Even if the camera is restored when the camera wakes up from auto power off ] to standby mode. Wireless LAN connection is connected to a computer, printer, GPS receiver, or... other devices via an interface cable, they cannot be ended during the wireless LAN connection, the camera will switch to [Disable] if necessary. If the camera's auto power off is set [Wi-Fi] under the [53] tab to prioritize wireless LAN functions, do not operate...

Instruction Manual
Page 16
... (Off) Not connected (Blinking) Connected Data is being transmitted Waiting for connection Waiting for [Wi-Fi] under the [53] tab can be checked on the camera's LCD panel and LCD monitor. Basic Operation and Settings [Wi-Fi] Settings and Connection Status Settings and connection status for reconnection (Blinking) (Blinking) Connection error...
... (Off) Not connected (Blinking) Connected Data is being transmitted Waiting for connection Waiting for [Wi-Fi] under the [53] tab can be checked on the camera's LCD panel and LCD monitor. Basic Operation and Settings [Wi-Fi] Settings and Connection Status Settings and connection status for reconnection (Blinking) (Blinking) Connection error...
Instruction Manual
Page 17
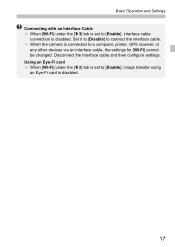
Set it to [Disable] to connect the interface cable. When the camera is disabled. 17 Using an Eye-Fi card When [Wi-Fi] under the [53] tab is set to [Enable], image transfer using an Eye-Fi card is connected to a computer, printer, GPS receiver, or any other devices via an interface cable, the settings for [Wi-Fi] cannot be changed. Disconnect the interface cable and then configure settings. Basic Operation and Settings Connecting with an Interface Cable When [Wi-Fi] under the [53] tab is set to [Enable], interface cable connection is disabled.
Set it to [Disable] to connect the interface cable. When the camera is disabled. 17 Using an Eye-Fi card When [Wi-Fi] under the [53] tab is set to [Enable], image transfer using an Eye-Fi card is connected to a computer, printer, GPS receiver, or any other devices via an interface cable, the settings for [Wi-Fi] cannot be changed. Disconnect the interface cable and then configure settings. Basic Operation and Settings Connecting with an Interface Cable When [Wi-Fi] under the [53] tab is set to [Enable], interface cable connection is disabled.
Instruction Manual
Page 19
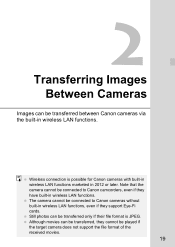
...be transferred, they cannot be played if the target camera does not support the file format of the received movies. 19 Note that the camera cannot be transferred only if their file format is possible for Canon cameras with built-in wireless LAN functions marketed in wireless LAN... functions. Wireless connection is JPEG. Although movies can be connected to Canon cameras without built-in wireless LAN functions...
...be transferred, they cannot be played if the target camera does not support the file format of the received movies. 19 Note that the camera cannot be transferred only if their file format is possible for Canon cameras with built-in wireless LAN functions marketed in wireless LAN... functions. Wireless connection is JPEG. Although movies can be connected to Canon cameras without built-in wireless LAN functions...
Instruction Manual
Page 20
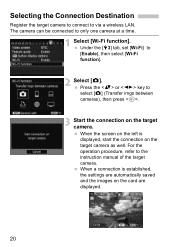
... displayed. 20 When a connection is displayed, start the connection on the card are automatically saved and the images on the target camera as well. The camera can be connected to [Enable], then select [Wi-Fi function]. 2 Select [z]. Under the [53] tab, set [Wi-Fi]... to only one camera at a time. 1 Select [Wi-Fi function]. Press the or key to the instruction manual of the target camera. For the operation procedure, refer to select [z] (Transfer imgs between cameras), then press . 3 Start the connection on the target camera. Selecting the Connection Destination ...
... displayed. 20 When a connection is displayed, start the connection on the card are automatically saved and the images on the target camera as well. The camera can be connected to [Enable], then select [Wi-Fi function]. 2 Select [z]. Under the [53] tab, set [Wi-Fi]... to only one camera at a time. 1 Select [Wi-Fi function]. Press the or key to the instruction manual of the target camera. For the operation procedure, refer to select [z] (Transfer imgs between cameras), then press . 3 Start the connection on the target camera. Selecting the Connection Destination ...
Instruction Manual
Page 21
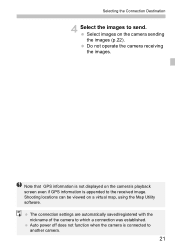
... the Map Utility software. Auto power off does not function when the camera is appended to another camera. 21 The connection settings are automatically saved/registered with the nickname of the camera to send. Shooting locations can be viewed on the camera's playback screen even if GPS information is connected to the received image...
... the Map Utility software. Auto power off does not function when the camera is appended to another camera. 21 The connection settings are automatically saved/registered with the nickname of the camera to send. Shooting locations can be viewed on the camera's playback screen even if GPS information is connected to the received image...
Instruction Manual
Page 25
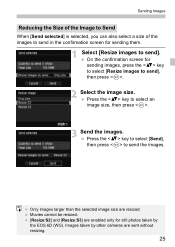
... image size are sent without resizing. 25 Movies cannot be resized. [Resize:S2] and [Resize:S3] are enabled only for still photos taken by other cameras are resized. Images taken by the EOS 6D (WG). Press the key to select [Send], then press to select an image size, then press . 3 Send the images.
... image size are sent without resizing. 25 Movies cannot be resized. [Resize:S2] and [Resize:S3] are enabled only for still photos taken by other cameras are resized. Images taken by the EOS 6D (WG). Press the key to select [Send], then press to select an image size, then press . 3 Send the images.

Instruction Manual
Page 26
...-Fi function]. On the confirmation screen, select [OK]. X The images on the target camera as well. By default, settings are displayed and the images to the destination. Select [z] (Transfer imgs between cameras) and press . 3 Establish a connection. Under the [53] tab, set .], select... the connection destination, then connect to send can reconnect to another camera for multiple connection destinations are registered, select [Choose set [Wi...
...-Fi function]. On the confirmation screen, select [OK]. X The images on the target camera as well. By default, settings are displayed and the images to the destination. Select [z] (Transfer imgs between cameras) and press . 3 Establish a connection. Under the [53] tab, set .], select... the connection destination, then connect to send can reconnect to another camera for multiple connection destinations are registered, select [Choose set [Wi...
Instruction Manual
Page 27
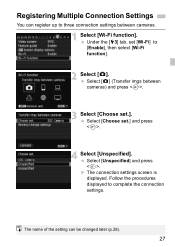
Under the [53] tab, set .] and press . 4 Select [Unspecified]. Select [Unspecified] and press . Select [Choose set [Wi-Fi] to [Enable], then select [Wi-Fi function]. 2 Select [z]. The name of the setting can register up to complete the connection settings. X The connection settings screen is displayed. Registering Multiple Connection Settings You can be changed later (p.28). 27 Select [z] (Transfer imgs between cameras. 1 Select [Wi-Fi function]. Follow the procedures displayed to three connection settings between cameras) and press . 3 Select [Choose set.].
Under the [53] tab, set .] and press . 4 Select [Unspecified]. Select [Unspecified] and press . Select [Choose set [Wi-Fi] to [Enable], then select [Wi-Fi function]. 2 Select [z]. The name of the setting can register up to complete the connection settings. X The connection settings screen is displayed. Registering Multiple Connection Settings You can be changed later (p.28). 27 Select [z] (Transfer imgs between cameras. 1 Select [Wi-Fi function]. Follow the procedures displayed to three connection settings between cameras) and press . 3 Select [Choose set.].
Instruction Manual
Page 28
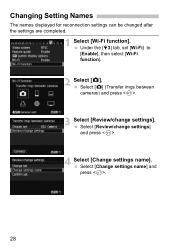
Select [z] (Transfer imgs between cameras) and press . 3 Select [Review/change settings] and press . 4 Select [Change settings name]. Select [Change settings name] and press . 28 Changing Setting Names The names displayed for reconnection settings can be changed after the settings are completed. 1 Select [Wi-Fi function]. Select [Review/change settings]. Under the [53] tab, set [Wi-Fi] to [Enable], then select [Wi-Fi function]. 2 Select [z].
Select [z] (Transfer imgs between cameras) and press . 3 Select [Review/change settings] and press . 4 Select [Change settings name]. Select [Change settings name] and press . 28 Changing Setting Names The names displayed for reconnection settings can be changed after the settings are completed. 1 Select [Wi-Fi function]. Select [Review/change settings]. Under the [53] tab, set [Wi-Fi] to [Enable], then select [Wi-Fi function]. 2 Select [z].


