
Instruction Manual
Page 3
... to a wireless LAN compatible printer supporting PictBridge (DPS over IP) to print images wirelessly. (4) D Operate the camera remotely using EOS Utility (p.93) Use EOS Utility via a wireless LAN instead of an interface cable, and operate your camera from computer wirelessly. (5) w Send images to ...103) Upload your images to CANON iMAGE GATEWAY, an online photo service for Canon users (free registration required), to a smartphone (p.31, 75) View saved images or operate the camera from your TV set, by using a media player supporting DLNA* via a wireless LAN. * Digital Living Network Alliance 3
... to a wireless LAN compatible printer supporting PictBridge (DPS over IP) to print images wirelessly. (4) D Operate the camera remotely using EOS Utility (p.93) Use EOS Utility via a wireless LAN instead of an interface cable, and operate your camera from computer wirelessly. (5) w Send images to ...103) Upload your images to CANON iMAGE GATEWAY, an online photo service for Canon users (free registration required), to a smartphone (p.31, 75) View saved images or operate the camera from your TV set, by using a media player supporting DLNA* via a wireless LAN. * Digital Living Network Alliance 3

Instruction Manual
Page 45
... printed by connecting this camera with a wireless LAN compatible printer supporting PictBridge (DPS over IP has been established for easily printing images by directly connecting digital cameras to printers and other devices supporting the standard. Images can directly print images by connecting the camera with a printer by PictBridge via an access...
... printed by connecting this camera with a wireless LAN compatible printer supporting PictBridge (DPS over IP has been established for easily printing images by directly connecting digital cameras to printers and other devices supporting the standard. Images can directly print images by connecting the camera with a printer by PictBridge via an access...

Instruction Manual
Page 62
... [Enable], then select [Wi-Fi function]. 2 Select an item. Select either [q], [D], [l], or [ ], then press . 3 Select [Infrastructure mode]. In PIN code connection mode (PIN mode), an 8-digit identification number specified on the camera is a connection mode available when using this shared identification number. Even if there are enabled, connection may take about...
... [Enable], then select [Wi-Fi function]. 2 Select an item. Select either [q], [D], [l], or [ ], then press . 3 Select [Infrastructure mode]. In PIN code connection mode (PIN mode), an 8-digit identification number specified on the camera is a connection mode available when using this shared identification number. Even if there are enabled, connection may take about...

Instruction Manual
Page 63
Press the key to the access point's instruction manual. At the access point, specify the 8-digit PIN code displayed on setting PIN codes at the access point. Select [OK] and press to establish a connection with the access point is established, the [...
Press the key to the access point's instruction manual. At the access point, specify the 8-digit PIN code displayed on setting PIN codes at the access point. Select [OK] and press to establish a connection with the access point is established, the [...

Instruction Manual
Page 87
... the manufacturer. This camera conforms with a wireless LAN compatible printer supporting PictBridge (DPS over IP has been established for easily printing images by directly connecting digital cameras to the documentation provided with a printer by connecting the camera with the standard. 87 Printing Images Using a Wi-Fi Printer - 2 You can be followed...
... the manufacturer. This camera conforms with a wireless LAN compatible printer supporting PictBridge (DPS over IP has been established for easily printing images by directly connecting digital cameras to the documentation provided with a printer by connecting the camera with the standard. 87 Printing Images Using a Wi-Fi Printer - 2 You can be followed...
Instruction Manual
Page 94
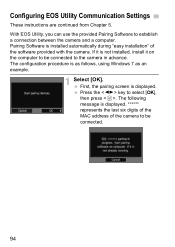
...is displayed. Press the key to establish a connection between the camera and a computer. If it is displayed. ****** represents the last six digits of the MAC address of the software provided with the camera. The following message is not installed, install it on the computer to the ...camera in advance. Configuring EOS Utility Communication Settings These instructions are continued from Chapter 5. With EOS Utility, you can use the provided Pairing Software to select [OK], then press .
...is displayed. Press the key to establish a connection between the camera and a computer. If it is displayed. ****** represents the last six digits of the MAC address of the software provided with the camera. The following message is not installed, install it on the computer to the ...camera in advance. Configuring EOS Utility Communication Settings These instructions are continued from Chapter 5. With EOS Utility, you can use the provided Pairing Software to select [OK], then press .
Instruction Manual
Page 111
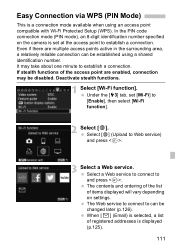
...) This is a connection mode available when using a shared identification number. It may be changed later (p.126). In the PIN code connection mode (PIN mode), an 8-digit identification number specified on settings. If stealth functions of items displayed will vary depending on the camera is displayed (p.125). 111 Select a Web service to...
...) This is a connection mode available when using a shared identification number. It may be changed later (p.126). In the PIN code connection mode (PIN mode), an 8-digit identification number specified on settings. If stealth functions of items displayed will vary depending on the camera is displayed (p.125). 111 Select a Web service to...

Instruction Manual
Page 112
...] and press to go to the next screen. 112 Press the key to select [WPS (PIN mode)], then press . At the access point, specify the 8-digit PIN code displayed on setting PIN codes at the access point. Select [OK] and press to establish a connection with the access point is established, the...
...] and press to go to the next screen. 112 Press the key to select [WPS (PIN mode)], then press . At the access point, specify the 8-digit PIN code displayed on setting PIN codes at the access point. Select [OK] and press to establish a connection with the access point is established, the...

Instruction Manual
Page 131
... manual, the term "media player" is used is connected to an access point. For information about settings and configuration, refer to any such device. * DLNA: Digital Living Network Alliance These instructions should be viewed on a TV set or other media player. Viewing Images Using a Media Player Images on a card in the...
... manual, the term "media player" is used is connected to an access point. For information about settings and configuration, refer to any such device. * DLNA: Digital Living Network Alliance These instructions should be viewed on a TV set or other media player. Viewing Images Using a Media Player Images on a card in the...
