

PowerShot A95 Quick Start Guide
Page 2
...now.] in even more advanced ways by linking it active. Click the images you can do with the installation while reviewing installation settings. Please download them from the CD-ROM drive after restarting. ■ Mac OS X a. d.When the...Images by the [Mac OS 9] and [Canon Digital Camera Installer] ( ) icons. 6 Preparing to Download Images to a Computer ➜ Camera User Guide, Software Starter Guide Never connect the camera to Prepare • Camera and Computer • Canon Digital Camera Solution Disk provided with the camera • Interface Cable (use the cable...
...now.] in even more advanced ways by linking it active. Click the images you can do with the installation while reviewing installation settings. Please download them from the CD-ROM drive after restarting. ■ Mac OS X a. d.When the...Images by the [Mac OS 9] and [Canon Digital Camera Installer] ( ) icons. 6 Preparing to Download Images to a Computer ➜ Camera User Guide, Software Starter Guide Never connect the camera to Prepare • Camera and Computer • Canon Digital Camera Solution Disk provided with the camera • Interface Cable (use the cable...

PowerShot A95 Camera User Guide
Page 4
...144;Selecting Menus and Settings 66 The Basics 34 Auto Mode 34 Reviewing an Image Right after Shooting ...... 37 Using the Mode Dial ... Changing the Resolution and Compression... 41 Using the Flash 43 Macro Mode 45 Self-timer 46 Digital Zoom 47 Continuous Shooting 48 Shooting Panoramic Images (Stitch Assist).... 49 Special Scene Mode 51 Postcard...144; are lists or charts that summarize camera functions or procedures. Read This First 4 Please Read 4 Safety Precautions 6 Preventing Malfunctions 11 Components Guide 12 Preparing the Camera 15 Installing the Batteries 15 Installing a...
...144;Selecting Menus and Settings 66 The Basics 34 Auto Mode 34 Reviewing an Image Right after Shooting ...... 37 Using the Mode Dial ... Changing the Resolution and Compression... 41 Using the Flash 43 Macro Mode 45 Self-timer 46 Digital Zoom 47 Continuous Shooting 48 Shooting Panoramic Images (Stitch Assist).... 49 Special Scene Mode 51 Postcard...144; are lists or charts that summarize camera functions or procedures. Read This First 4 Please Read 4 Safety Precautions 6 Preventing Malfunctions 11 Components Guide 12 Preparing the Camera 15 Installing the Batteries 15 Installing a...

PowerShot A95 Camera User Guide
Page 29
...45 Manual Focus p. 93 Auto Rotate Function p. 95 z(Red) Movie Recording Mode p. 56 3.8x 4.9x 6.1x 7.6x 9.3x 12x Digital Zoom Setting*2 p. 47 Camera Shake Warning p. 14 Low Battery p. 17 *1:The icons of insufficient lighting if the upper indicator blinks orange after the metering preparations are ... button, the image displays on the LCD monitor for approximately two seconds (or the review duration you press the SET button while the image is displayed, it is activated. Preparing the Camera z When a Shooting mode setting is changed, the settings appear on the LCD monitor...
...45 Manual Focus p. 93 Auto Rotate Function p. 95 z(Red) Movie Recording Mode p. 56 3.8x 4.9x 6.1x 7.6x 9.3x 12x Digital Zoom Setting*2 p. 47 Camera Shake Warning p. 14 Low Battery p. 17 *1:The icons of insufficient lighting if the upper indicator blinks orange after the metering preparations are ... button, the image displays on the LCD monitor for approximately two seconds (or the review duration you press the SET button while the image is displayed, it is activated. Preparing the Camera z When a Shooting mode setting is changed, the settings appear on the LCD monitor...

PowerShot A95 Camera User Guide
Page 37
...The Basics z See page 159 for approximately two seconds on . z Shots cannot be set it is recorded onto the CF card. Shooting - z With the Review function, you can change the length of time images show on the LCD monitor after shooting, or set On/Off in this sound. • The...is on . 7 Press the shutter button all (p. 37). Pressing Halfway Pressing halfway automatically sets the exposure and focus. • Two beeps will sound when the camera has finished metering, and the upper indicator will sound one time if the subject is set to [ , , (On)] (p. 74), no shutter sound in ...
...The Basics z See page 159 for approximately two seconds on . z Shots cannot be set it is recorded onto the CF card. Shooting - z With the Review function, you can change the length of time images show on the LCD monitor after shooting, or set On/Off in this sound. • The...is on . 7 Press the shutter button all (p. 37). Pressing Halfway Pressing halfway automatically sets the exposure and focus. • Two beeps will sound when the camera has finished metering, and the upper indicator will sound one time if the subject is set to [ , , (On)] (p. 74), no shutter sound in ...

PowerShot A95 Camera User Guide
Page 39
... Image Right after Shooting Mode Dial After a photo is taken, the image displays on displaying regardless of the review duration setting if one of the following while images are displayed.* • Erase Images Individually (p. 64) • Display the setting details of the image (p. 28). &#...-assist beam to focus in dark conditions. - You can shoot the next image. In addition, the image will keep on the LCD monitor for the camera to [Off] in (Stitch Assist) mode. 37 The Basics If the AF-assist beam is turned off . Shooting -
... Image Right after Shooting Mode Dial After a photo is taken, the image displays on displaying regardless of the review duration setting if one of the following while images are displayed.* • Erase Images Individually (p. 64) • Display the setting details of the image (p. 28). &#...-assist beam to focus in dark conditions. - You can shoot the next image. In addition, the image will keep on the LCD monitor for the camera to [Off] in (Stitch Assist) mode. 37 The Basics If the AF-assist beam is turned off . Shooting -

PowerShot A95 Camera User Guide
Page 40
... displayed after a photo has been taken can be changed from 2 seconds to [10 sec.] options, the image will not display. z The [ (Rec.)] menu appears. 2 Select (Review) using the up or down button. 3 Select a duration setting using the left or right button and press the MENU button. Shooting -
... displayed after a photo has been taken can be changed from 2 seconds to [10 sec.] options, the image will not display. z The [ (Rec.)] menu appears. 2 Select (Review) using the up or down button. 3 Select a duration setting using the left or right button and press the MENU button. Shooting -

PowerShot A95 Camera User Guide
Page 72
... whether or not the image will be embedded in reverse, as with the direct print function or at a photo lab service. Advanced Functions Menu Item Review Reverse Disp. Plays images automatically one after the shutter button is selected. • Off*/Date/Date & Time Saves settings selected in the display. menu and...
... whether or not the image will be embedded in reverse, as with the direct print function or at a photo lab service. Advanced Functions Menu Item Review Reverse Disp. Plays images automatically one after the shutter button is selected. • Off*/Date/Date & Time Saves settings selected in the display. menu and...

PowerShot A95 Camera User Guide
Page 157
S Self-timer 46 Sound 74 Shooting 34, 66 Reviewing an Image 37 Switching from Playback Mode 32 TV Set 117 Shooting Mode 159 Dial 14 Functions Available 159 Shutter Shutter-Speed Priority AE 77 ...
S Self-timer 46 Sound 74 Shooting 34, 66 Reviewing an Image 37 Switching from Playback Mode 32 TV Set 117 Shooting Mode 159 Dial 14 Functions Available 159 Shutter Shutter-Speed Priority AE 77 ...

Software Starter Guide Ver. 19
Page 16
... appropriate one for your operating system). •Windows 2000/Windows 98: Canon Camera TWAIN Driver •Windows Me: Canon Camera WIA Driver With Windows XP, the USB driver supplied with an interface cable. The items displayed here differ according to all the conditions. 8 Review the installation settings and click [Next]. Follow the onscreen instructions to...
... appropriate one for your operating system). •Windows 2000/Windows 98: Canon Camera TWAIN Driver •Windows Me: Canon Camera WIA Driver With Windows XP, the USB driver supplied with an interface cable. The items displayed here differ according to all the conditions. 8 Review the installation settings and click [Next]. Follow the onscreen instructions to...
Software Starter Guide Ver. 19
Page 52
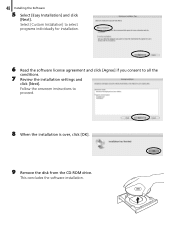
48 Installing the Software 5 Select [Easy Installation] and click [Next]. Select [Custom Installation] to select programs individually for installation. 6 Read the software license agreement and click [Agree] if you consent to proceed. 8 When the installation is over, click [OK]. 9 Remove the disk from the CD-ROM drive. Follow the onscreen instructions to all the conditions. 7 Review the installation settings and click [Next]. This concludes the software installation.
48 Installing the Software 5 Select [Easy Installation] and click [Next]. Select [Custom Installation] to select programs individually for installation. 6 Read the software license agreement and click [Agree] if you consent to proceed. 8 When the installation is over, click [OK]. 9 Remove the disk from the CD-ROM drive. Follow the onscreen instructions to all the conditions. 7 Review the installation settings and click [Next]. This concludes the software installation.


