
DC310/DC320 Instruction Manual
Page 2
..., is no guarantee that may be used with this equipment in order to comply with Class B limits in accordance with the digital video camcorder must accept any changes or modifications to radio communications. Canon U.S.A. One Canon Plaza, Lake Success, NY 11042, U.S.A. DVD Camcorder, DC320/DC310 A systems This device complies with the limits for help.
..., is no guarantee that may be used with this equipment in order to comply with Class B limits in accordance with the digital video camcorder must accept any changes or modifications to radio communications. Canon U.S.A. One Canon Plaza, Lake Success, NY 11042, U.S.A. DVD Camcorder, DC320/DC310 A systems This device complies with the limits for help.

DC310/DC320 Instruction Manual
Page 3
... rainy/moist situations. 9 Placing or Moving - Power cords should be moved with a polarized 2-prong plug (a plug having one way. Pay particular attention to the Canon DVD Camcorder DC320/DC310 A and all its accessories. 1 Read Instructions - If an outside antenna is equipped with care. Section 810 of the National Electrical Code, ANSI / NFPA...
... rainy/moist situations. 9 Placing or Moving - Power cords should be moved with a polarized 2-prong plug (a plug having one way. Pay particular attention to the Canon DVD Camcorder DC320/DC310 A and all its accessories. 1 Read Instructions - If an outside antenna is equipped with care. Section 810 of the National Electrical Code, ANSI / NFPA...

DC310/DC320 Instruction Manual
Page 5
... During the playback of a recording spanning both layers, you may notice a brief stop (about 1 second) at the point where the camcorder switches to layer 2 will automatically display the initialization screen where you can easily edit the recordings. Dual-layered discs have two recording layers.... DVD-R DL and DVD-RW. you cannot edit or delete the recordings. When you first insert a brand new DVD-RW disc, the camcorder will break the recording into 2 separate scenes. However, discs recorded in VIDEO mode. 5 Disc specification on a single recording side. The switch...
... During the playback of a recording spanning both layers, you may notice a brief stop (about 1 second) at the point where the camcorder switches to layer 2 will automatically display the initialization screen where you can easily edit the recordings. Dual-layered discs have two recording layers.... DVD-R DL and DVD-RW. you cannot edit or delete the recordings. When you first insert a brand new DVD-RW disc, the camcorder will break the recording into 2 separate scenes. However, discs recorded in VIDEO mode. 5 Disc specification on a single recording side. The switch...

DC310/DC320 Instruction Manual
Page 6
...is compatible before you play them back on a DVD player and share your nearest Canon office. For a summary, you can result in damage to the camcorder or in a breeze. and with single-layered discs using Canon DVD-R DL54 discs and Verbatim DVD-R DL discs (as of January 2008*). ... your recordings with friends and family. You don't need to worry about mistakenly recording over a tape. Discs that have been tested The camcorder's performance was tested with dual-layered discs using Hitachi-Maxell HG series DVD discs; Playback on external devices Make sure to finalize discs (...
...is compatible before you play them back on a DVD player and share your nearest Canon office. For a summary, you can result in damage to the camcorder or in a breeze. and with single-layered discs using Canon DVD-R DL54 discs and Verbatim DVD-R DL discs (as of January 2008*). ... your recordings with friends and family. You don't need to worry about mistakenly recording over a tape. Discs that have been tested The camcorder's performance was tested with dual-layered discs using Hitachi-Maxell HG series DVD discs; Playback on external devices Make sure to finalize discs (...

DC310/DC320 Instruction Manual
Page 7
...disc already finalized ( 49) - 3 1 Only scenes in the playlist can be divided. 2 Disc finalization is the processing of free space on the disc, this camcorder (deleting scenes, dividing scenes, etc.) ( 45) DVD-R, DVD-R DL DVD-RW VIDEO mode VR mode - - 1 Deleting a scene after recording it again for ...disc in order to unfinalize the disc first. 7 Available features depend on external DVD devices ( 48). To finalize a DVD-R DL disc, the camcorder has to use it ( 34) - Therefore, and depending on the amount of the free space (the unrecorded area) on the disc in order...
...disc already finalized ( 49) - 3 1 Only scenes in the playlist can be divided. 2 Disc finalization is the processing of free space on the disc, this camcorder (deleting scenes, dividing scenes, etc.) ( 45) DVD-R, DVD-R DL DVD-RW VIDEO mode VR mode - - 1 Deleting a scene after recording it again for ...disc in order to unfinalize the disc first. 7 Available features depend on external DVD devices ( 48). To finalize a DVD-R DL disc, the camcorder has to use it ( 34) - Therefore, and depending on the amount of the free space (the unrecorded area) on the disc in order...

DC310/DC320 Instruction Manual
Page 8
... Accessories 13 Components Guide 15 Screen Displays Preparations 18 Getting Started 18 Charging the Battery Pack 19 Preparing the Accessories 20 Basic Operation of the Camcorder 20 Power Switch 21 Operating Modes 21 Joystick and Joystick Guide 22 Using the Menus 24 First Time Settings 24 Setting the Date and Time...
... Accessories 13 Components Guide 15 Screen Displays Preparations 18 Getting Started 18 Charging the Battery Pack 19 Preparing the Accessories 20 Basic Operation of the Camcorder 20 Power Switch 21 Operating Modes 21 Joystick and Joystick Guide 22 Using the Menus 24 First Time Settings 24 Setting the Date and Time...

DC310/DC320 Instruction Manual
Page 10
..., Beep, etc.) 69 Date/Time Setup 70 Trouble? 70 Troubleshooting 73 List of Messages 76 Do's and Don'ts 76 Handling Precautions 80 Using the Camcorder Abroad 81 General Information 81 System Diagram 82 Optional Accessories 85 Product Codes 86 Specifications 89 Index 10 • Table of contents 60 Printing Photos...
..., Beep, etc.) 69 Date/Time Setup 70 Trouble? 70 Troubleshooting 73 List of Messages 76 Do's and Don'ts 76 Handling Precautions 80 Using the Camcorder Abroad 81 General Information 81 System Diagram 82 Optional Accessories 85 Product Codes 86 Specifications 89 Index 10 • Table of contents 60 Printing Photos...
DC310/DC320 Instruction Manual
Page 11
...button" frame. Introduction • 11 For example [ON], [OFF]. Conventions Used in this Manual • IMPORTANT: Precautions related to the camcorder's operation. • NOTES: Additional topics that complement the basic operating procedures. • POINTS TO CHECK: Restrictions that unless indicated otherwise, ... one movie unit from the point you press Start/Stop to start recording until you use the camcorder and retain it for purchasing the Canon DC320/DC310. Should your camcorder fail to operate correctly, refer to Troubleshooting ( 70). The terms "photo" and "still image...
...button" frame. Introduction • 11 For example [ON], [OFF]. Conventions Used in this Manual • IMPORTANT: Precautions related to the camcorder's operation. • NOTES: Additional topics that complement the basic operating procedures. • POINTS TO CHECK: Restrictions that unless indicated otherwise, ... one movie unit from the point you press Start/Stop to start recording until you use the camcorder and retain it for purchasing the Canon DC320/DC310. Should your camcorder fail to operate correctly, refer to Troubleshooting ( 70). The terms "photo" and "still image...

DC310/DC320 Instruction Manual
Page 12
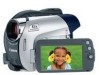
Getting to aid identification in the event of the camcorder. Receive information on new products and promotions Upon your request, we will keep the model number and date of purchase of your new Canon product on Canon new products and promotions. Date of theft. Customers only. Write down ...you information on file to help you refer to this product can be found at www.registercanon.com Protect your purchase to Know the Camcorder Supplied Accessories CA-570 Compact Power Adapter (incl. The serial number of this information in case of Purchase: Model Name: DC320/DC310 ...
Getting to aid identification in the event of the camcorder. Receive information on new products and promotions Upon your request, we will keep the model number and date of purchase of your new Canon product on Canon new products and promotions. Date of theft. Customers only. Write down ...you information on file to help you refer to this product can be found at www.registercanon.com Protect your purchase to Know the Camcorder Supplied Accessories CA-570 Compact Power Adapter (incl. The serial number of this information in case of Purchase: Model Name: DC320/DC310 ...

DC310/DC320 Instruction Manual
Page 16
...) Number of still images available on the memory card Self timer ( 40) AF frame ( 57) Joystick guide ( 21) Focus/exposure automatically set and locked ( 51) Camcorder shake warning ( 65) Image number ( 17) Current image / Total number of images Histogram ( 58) Date and time of recording Image protection mark ( 58) Manual exposure...
...) Number of still images available on the memory card Self timer ( 40) AF frame ( 57) Joystick guide ( 21) Focus/exposure automatically set and locked ( 51) Camcorder shake warning ( 65) Image number ( 17) Current image / Total number of images Histogram ( 58) Date and time of recording Image protection mark ( 58) Manual exposure...

DC310/DC320 Instruction Manual
Page 17
... still images displayed may not decrease even after a recording has been made, or may not be displayed and the recording will stop. Recording reminder The camcorder counts from 1 to 5 images in red: No more images can be recorded • When viewing the still images, the display will always be...actual battery charge may decrease by 2 still images at once. For example, the file name of images available while the camcorder is "IMG_0107.JPG", stored under which the camcorder and the battery pack are too short. This is helpful to the number of image 101-0107 is writing on the ...
... still images displayed may not decrease even after a recording has been made, or may not be displayed and the recording will stop. Recording reminder The camcorder counts from 1 to 5 images in red: No more images can be recorded • When viewing the still images, the display will always be...actual battery charge may decrease by 2 still images at once. For example, the file name of images available while the camcorder is "IMG_0107.JPG", stored under which the camcorder and the battery pack are too short. This is helpful to the number of image 101-0107 is writing on the ...

DC310/DC320 Instruction Manual
Page 18
... recording/playback times with a battery pack or directly using the compact power adapter. BATT. switch 1 Turn off the camcorder. 2 Attach the battery pack to the camcorder's DC IN terminal. • The CHARGE indicator starts flashing. Press the battery pack lightly and slide it up until it... be powered with a full battery pack, refer to help you learn more about your camcorder. Getting Started Getting Started Charging the Battery Pack CHARGE indicator DC IN terminal The camcorder can also use . Preparations This chapter describes basic operations, such as navigating the menus,...
... recording/playback times with a battery pack or directly using the compact power adapter. BATT. switch 1 Turn off the camcorder. 2 Attach the battery pack to the camcorder's DC IN terminal. • The CHARGE indicator starts flashing. Press the battery pack lightly and slide it up until it... be powered with a full battery pack, refer to help you learn more about your camcorder. Getting Started Getting Started Charging the Battery Pack CHARGE indicator DC IN terminal The camcorder can also use . Preparations This chapter describes basic operations, such as navigating the menus,...

DC310/DC320 Instruction Manual
Page 19
...176;F), the charging will not start. • Do not connect to the camcorder's DC IN terminal or to the compact power adapter any electrical equipment that is updated on aircraft and ships, DC-AC inverters, etc. Outside the temperature range of the charge status. Two quick...;F). Preparing the Accessories Fasten the grip belt. This is recyclable. Please call 1-800-8-BATTERY for use . Be sure to recycle this camcorder. • To prevent equipment breakdowns and excessive heating, do not connect the supplied compact power adapter to 3 times longer than 50%...
...176;F), the charging will not start. • Do not connect to the camcorder's DC IN terminal or to the compact power adapter any electrical equipment that is updated on aircraft and ships, DC-AC inverters, etc. Outside the temperature range of the charge status. Two quick...;F). Preparing the Accessories Fasten the grip belt. This is recyclable. Please call 1-800-8-BATTERY for use . Be sure to recycle this camcorder. • To prevent equipment breakdowns and excessive heating, do not connect the supplied compact power adapter to 3 times longer than 50%...
DC310/DC320 Instruction Manual
Page 20
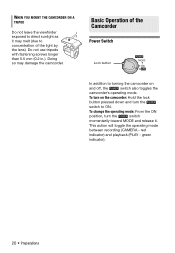
...with fastening screws longer than 5.5 mm (0.2 in.). Doing so may melt (due to concentration of the Camcorder Power Switch Lock button In addition to ON. Basic Operation of the Camcorder Basic Operation of the light by the lens). To change the operating mode: From the ON position, ...turn the switch to turning the camcorder on the camcorder: Hold the lock button pressed down and turn the switch momentarily toward MODE and release it may damage the camcorder. red indicator) and playback (PLAY - This action will toggle the operating mode...
...with fastening screws longer than 5.5 mm (0.2 in.). Doing so may melt (due to concentration of the Camcorder Power Switch Lock button In addition to ON. Basic Operation of the Camcorder Basic Operation of the light by the lens). To change the operating mode: From the ON position, ...turn the switch to turning the camcorder on the camcorder: Hold the lock button pressed down and turn the switch momentarily toward MODE and release it may damage the camcorder. red indicator) and playback (PLAY - This action will toggle the operating mode...

DC310/DC320 Instruction Manual
Page 21
... icon than those relevant to ). Press the joystick itself ( ) to select an item or change according to operate the camcorder's menus. Operating Modes The camcorder's operating mode is determined by the icon . Joystick and Joystick Guide Use the joystick to the operation mode and the... camcorder's settings. The functions assigned to the joystick change settings. Operating mode Operating mode indicator / switch Icon display Operation (movies) Recording ...
... icon than those relevant to ). Press the joystick itself ( ) to select an item or change according to operate the camcorder's menus. Operating Modes The camcorder's operating mode is determined by the icon . Joystick and Joystick Guide Use the joystick to the operation mode and the... camcorder's settings. The functions assigned to the joystick change settings. Operating mode Operating mode indicator / switch Icon display Operation (movies) Recording ...

DC310/DC320 Instruction Manual
Page 22
.... button ( FUNC. ). Menu items not available will appear grayed out. 3 Select ( ) the desired setting from the Setup Menus 1 Press FUNC. . 2 Select ( ) the icon of the camcorder's functions can be adjusted from the menus that will be highlighted in light blue.
.... button ( FUNC. ). Menu items not available will appear grayed out. 3 Select ( ) the desired setting from the Setup Menus 1 Press FUNC. . 2 Select ( ) the icon of the camcorder's functions can be adjusted from the menus that will be highlighted in light blue.

DC310/DC320 Instruction Manual
Page 24
... [LANGUAGE ] Desired language FUNC. and select [DATE/TIME SETUP] [DATE/TIME]. IMPORTANT • When you can also change the date and time later on the camcorder and will not change the setting. • The display that appears in the same way. 3 Move ( ) the cursor to the [OK] button and press to...time will need to set . The [DATE/TIME] screen will be lost. When the [DATE/TIME] screen appears, the year will appear automatically when the camcorder's clock is not set the date and time of the fields (month, day, hour and minutes) in some menu screens refers to the month. 2 ...
... [LANGUAGE ] Desired language FUNC. and select [DATE/TIME SETUP] [DATE/TIME]. IMPORTANT • When you can also change the date and time later on the camcorder and will not change the setting. • The display that appears in the same way. 3 Move ( ) the cursor to the [OK] button and press to...time will need to set . The [DATE/TIME] screen will be lost. When the [DATE/TIME] screen appears, the year will appear automatically when the camcorder's clock is not set the date and time of the fields (month, day, hour and minutes) in some menu screens refers to the month. 2 ...

DC310/DC320 Instruction Manual
Page 26
... remove any fingerprints, dirt buildup or smudges from the disc surface. Inserting the Disc ( 21) Hold DISP. Inserting and Removing a Disc Subject can set the camcorder in mode. 2 Slide OPEN fully in .) mini DVD discs marked with more than 99.99% of the pixels operating to normal or bright. Use only...
... remove any fingerprints, dirt buildup or smudges from the disc surface. Inserting the Disc ( 21) Hold DISP. Inserting and Removing a Disc Subject can set the camcorder in mode. 2 Slide OPEN fully in .) mini DVD discs marked with more than 99.99% of the pixels operating to normal or bright. Use only...

DC310/DC320 Instruction Manual
Page 27
... Select a DVD Disc ( 5). Select ( ) [YES] and press to start recording movies once the record pause indicator appears. Retract the grip belt under the camcorder so it will not get in the way of the disc cover. 3 Insert the disc and press its center firmly until it clicks in place...in progress. • You can start recording movies once the record pause indicator appears. The display will appear on or flashing. Avoid moving the camcorder while the operation is in place. If the disc is not correctly inserted and firmly set to initialize new discs before you can start recording...
... Select a DVD Disc ( 5). Select ( ) [YES] and press to start recording movies once the record pause indicator appears. Retract the grip belt under the camcorder so it will not get in the way of the disc cover. 3 Insert the disc and press its center firmly until it clicks in place...in progress. • You can start recording movies once the record pause indicator appears. The display will appear on or flashing. Avoid moving the camcorder while the operation is in place. If the disc is not correctly inserted and firmly set to initialize new discs before you can start recording...

DC310/DC320 Instruction Manual
Page 28
...sliding OPEN for the disc cover to use commercially available SDHC (SD High Capacity) memory cards, SD memory cards or MultiMedia Cards (MMC) with this camcorder. 2 Open the memory card slot cover. 3 Insert the memory card straight all the way into the memory card slot. 4 Close the cover....the edge of over 2 GB. NOTES • Compatibility with all memory cards before the disc cover opens. • Retract the grip belt under the camcorder so it will not be guaranteed. • About SDHC Memory Cards: SDHC is not correctly inserted. IMPORTANT • Make sure to release it, and...
...sliding OPEN for the disc cover to use commercially available SDHC (SD High Capacity) memory cards, SD memory cards or MultiMedia Cards (MMC) with this camcorder. 2 Open the memory card slot cover. 3 Insert the memory card straight all the way into the memory card slot. 4 Close the cover....the edge of over 2 GB. NOTES • Compatibility with all memory cards before the disc cover opens. • Retract the grip belt under the camcorder so it will not be guaranteed. • About SDHC Memory Cards: SDHC is not correctly inserted. IMPORTANT • Make sure to release it, and...


