
DC100 Instruction Manual
Page 3
... power before cleaning. Do not use electrician to 9. voltage surges and built-up static charges. Power Sources - The CA-570 Compact refers to the Canon DVD Camcorder DC100 Power Adapter should be retained such as recommended polarized plug. for the grounding electrode. Heed Warnings - The 2-prong polarized plug will fit into the...
... power before cleaning. Do not use electrician to 9. voltage surges and built-up static charges. Power Sources - The CA-570 Compact refers to the Canon DVD Camcorder DC100 Power Adapter should be retained such as recommended polarized plug. for the grounding electrode. Heed Warnings - The 2-prong polarized plug will fit into the...
DC100 Instruction Manual
Page 5
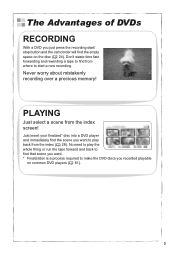
PLAYING Just select a scene from where to start / stop button and the camcorder will find from the index screen! Just insert your finalized* disc into a DVD player and immediately find the scene you want . * Finalization is a process required ...
PLAYING Just select a scene from where to start / stop button and the camcorder will find from the index screen! Just insert your finalized* disc into a DVD player and immediately find the scene you want . * Finalization is a process required ...
DC100 Instruction Manual
Page 6
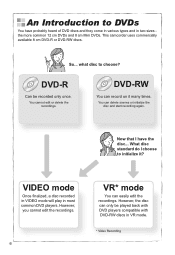
An Introduction to DVDs You have the disc... This camcorder uses commercially available 8 cm DVD-R or DVD-RW discs. DVD-RW You can delete scenes or initialize the disc and start recording again. However, the ...
An Introduction to DVDs You have the disc... This camcorder uses commercially available 8 cm DVD-R or DVD-RW discs. DVD-RW You can delete scenes or initialize the disc and start recording again. However, the ...
DC100 Instruction Manual
Page 7
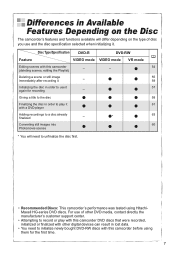
...initializing it again for recording - 57 Giving a title to the disc 58 Finalizing the disc in order to play with this camcorder before using HitachiMaxell HG-series DVD discs. Differences in lost data. • You need to initialize newly bought DVD-RW discs with ... or finalized with other digital devices can result in Available Features Depending on the Disc The camcorder's features and functions available will need to unfinalize the disc first. • Recommended Discs: This camcorder's performance was tested using them for the first time. 7 For use of other DVD ...
...initializing it again for recording - 57 Giving a title to the disc 58 Finalizing the disc in order to play with this camcorder before using HitachiMaxell HG-series DVD discs. Differences in lost data. • You need to initialize newly bought DVD-RW discs with ... or finalized with other digital devices can result in Available Features Depending on the Disc The camcorder's features and functions available will need to unfinalize the disc first. • Recommended Discs: This camcorder's performance was tested using them for the first time. 7 For use of other DVD ...
DC100 Instruction Manual
Page 8
... 10 Checking the Supplied Accessories 12 Components Guide 13 Screen Displays 15 Preparations Getting Started 17 Step 1: Preparing the Power Supply 17 Step 2: Preparing the Camcorder 19 Step 3: Adjusting the LCD Screen 19 Step 4: Changing the Display Language 20 Step 5: Setting the Time Zone / Daylight Saving Time 20 Step 6: Setting the...
... 10 Checking the Supplied Accessories 12 Components Guide 13 Screen Displays 15 Preparations Getting Started 17 Step 1: Preparing the Power Supply 17 Step 2: Preparing the Camcorder 19 Step 3: Adjusting the LCD Screen 19 Step 4: Changing the Display Language 20 Step 5: Setting the Time Zone / Daylight Saving Time 20 Step 6: Setting the...
DC100 Instruction Manual
Page 10
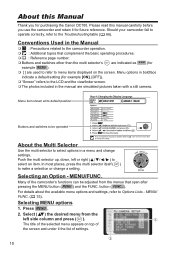
... operating procedures. : Reference page number. Buttons and switches other than the multi selector's are indicated as *** (for purchasing the Canon DC100. The title of the selected menu appears on the screen. button ( FUNC. ). Menu options in the manual are simulated pictures taken with a... still camera. MENU/FUNC. MENU/ FUNC. ( 33). Press MENU . 2. Please read this Manual Thank you use the camcorder and retain it the list of the camcorder's functions can be operated About the Multi Selector Use the multi selector to Options Lists - Should your...
... operating procedures. : Reference page number. Buttons and switches other than the multi selector's are indicated as *** (for purchasing the Canon DC100. The title of the selected menu appears on the screen. button ( FUNC. ). Menu options in the manual are simulated pictures taken with a... still camera. MENU/FUNC. MENU/ FUNC. ( 33). Press MENU . 2. Please read this Manual Thank you use the camcorder and retain it the list of the camcorder's functions can be operated About the Multi Selector Use the multi selector to Options Lists - Should your...
DC100 Instruction Manual
Page 11
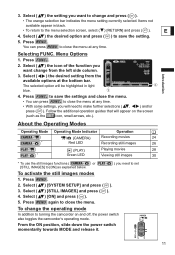
...save the settings and close the menu at any time. • With some settings, you want change the operating mode In addition to turning the camcorder on the screen (such as explained below. ) you want to make further selections ( , ) and/or press ( ). Menu Options 1. ... 4. Press MENU . Introduction Selecting FUNC. Press FUNC.. 2. The selected option will appear on and off, the power switch also toggles the camcorder's operating mode. Follow the additional operation guides that will be highlighted in black. • To return to close the menu at the bottom ...
...save the settings and close the menu at any time. • With some settings, you want change the operating mode In addition to turning the camcorder on the screen (such as explained below. ) you want to make further selections ( , ) and/or press ( ). Menu Options 1. ... 4. Press MENU . Introduction Selecting FUNC. Press FUNC.. 2. The selected option will appear on and off, the power switch also toggles the camcorder's operating mode. Follow the additional operation guides that will be highlighted in black. • To return to close the menu at the bottom ...
DC100 Instruction Manual
Page 12
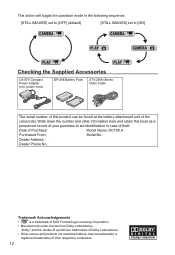
... Power Adapter (incl. Date of Purchase: Model Name: DC100 A Purchased From: Serial No.: Dealer Address: Dealer Phone No.: Trademark Acknowledgements • is a trademark of the camcorder. "Dolby" and the double-D symbol are trademarks of Dolby Laboratories. • Other names and products not mentioned above may be found at the battery attachment...
... Power Adapter (incl. Date of Purchase: Model Name: DC100 A Purchased From: Serial No.: Dealer Address: Dealer Phone No.: Trademark Acknowledgements • is a trademark of the camcorder. "Dolby" and the double-D symbol are trademarks of Dolby Laboratories. • Other names and products not mentioned above may be found at the battery attachment...
DC100 Instruction Manual
Page 15
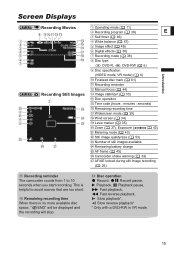
... mode ( 43) Still image quality/size ( 53) Number of still images available Remaining battery charge AF frame ( 45) Camcorder shake warning ( 33) AF/AE locked during still image recording ( 26) Recording reminder The camcorder counts from 1 to avoid scenes that are too short. Disc operation Record, Record pause, Playback, Playback pause, Fast...
... mode ( 43) Still image quality/size ( 53) Number of still images available Remaining battery charge AF frame ( 45) Camcorder shake warning ( 33) AF/AE locked during still image recording ( 26) Recording reminder The camcorder counts from 1 to avoid scenes that are too short. Disc operation Record, Record pause, Playback, Playback pause, Fast...

DC100 Instruction Manual
Page 16
Remaining battery charge • When " " starts flashing in green. • Depending on the conditions under which the camcorder and the battery pack are used, the actual battery charge may decrease by 2 still images at once. Playing Movies (Index Screen) Current scene number / Total ...
Remaining battery charge • When " " starts flashing in green. • Depending on the conditions under which the camcorder and the battery pack are used, the actual battery charge may decrease by 2 still images at once. Playing Movies (Index Screen) Current scene number / Total ...
DC100 Instruction Manual
Page 17
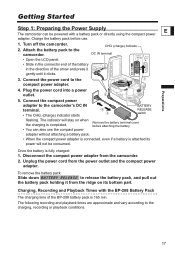
...the compact power adapter is connected, even if a battery is completed. • You can be consumed. Connect the power cord to the camcorder's DC IN terminal. • The CHG. (charge) indicator starts BATTERY RELEASE switch flashing. Connect the compact power adapter to the compact power adapter... with a battery pack or directly using the compact power adapter. Turn off the camcorder. 2. The following recording and playback times are approximate and vary according to the camcorder. CHG. (charge) indicator DC IN terminal • Open the LCD panel. • Slide in the connector ...
...the compact power adapter is connected, even if a battery is completed. • You can be consumed. Connect the power cord to the camcorder's DC IN terminal. • The CHG. (charge) indicator starts BATTERY RELEASE switch flashing. Connect the compact power adapter to the compact power adapter... with a battery pack or directly using the compact power adapter. Turn off the camcorder. 2. The following recording and playback times are approximate and vary according to the camcorder. CHG. (charge) indicator DC IN terminal • Open the LCD panel. • Slide in the connector ...

DC100 Instruction Manual
Page 18
... Time 80 min. 80 min. 75 min. 95 min. 90 min. 90 min. 105 min. 100 min. 95 min. Playback Time 85 min. 95 min. 105 min. * Approximate times for recording with this camcorder. You may hear some noise from the compact power adapter during use. Continuously on /off.... Turn off the camcorder before connecting or disconnecting the power adapter. Do not connect to the camcorder's DC IN terminal or to the compact power adapter any electrical equipment that you prepare battery packs 2 to 3 times...
... Time 80 min. 80 min. 75 min. 95 min. 90 min. 90 min. 105 min. 100 min. 95 min. Playback Time 85 min. 95 min. 105 min. * Approximate times for recording with this camcorder. You may hear some noise from the compact power adapter during use. Continuously on /off.... Turn off the camcorder before connecting or disconnecting the power adapter. Do not connect to the camcorder's DC IN terminal or to the compact power adapter any electrical equipment that you prepare battery packs 2 to 3 times...

DC100 Instruction Manual
Page 19
... recording or the viewfinder screen. Using the [BRIGHT] setting will shorten the effective usage time of the battery. 19 Press MENU . 2. Turn on the camcorder. 2. Keep the LCD panel closed to include yourself when recording with your thumb. Adjust the viewfinder. Select ( ) [DISPLAY SETUP] and press ( ). 3. Select ( ) [BACKLIGHT] and press...
... recording or the viewfinder screen. Using the [BRIGHT] setting will shorten the effective usage time of the battery. 19 Press MENU . 2. Turn on the camcorder. 2. Keep the LCD panel closed to include yourself when recording with your thumb. Adjust the viewfinder. Select ( ) [DISPLAY SETUP] and press ( ). 3. Select ( ) [BACKLIGHT] and press...

DC100 Instruction Manual
Page 21
... the screen. In such case, recharge the built-in lithium battery ( 72) and set the time zone, date and time, you do not use the camcorder for about 3 months, the built-in rechargeable lithium battery may discharge completely and the date and time setting may be lost. Press MENU . 2. Time Zones...
... the screen. In such case, recharge the built-in lithium battery ( 72) and set the time zone, date and time, you do not use the camcorder for about 3 months, the built-in rechargeable lithium battery may discharge completely and the date and time setting may be lost. Press MENU . 2. Time Zones...

DC100 Instruction Manual
Page 22
... cover completely until it will not appear when inserting a disc already initialized. In that the recording surface is not correctly inserted and firmly set the camcorder in .) mini DVD discs marked with the recording side facing down (single sided discs - Select ( ) the desired disc specification desired and press ( ). ...-RW is first inserted. Move the power switch to ON to confirm the disc specification you selected. Retract the grip belt under the camcorder so it clicks in place. Before inserting the disc be asked to set in place. • Insert the disc with the DVD-R...
... cover completely until it will not appear when inserting a disc already initialized. In that the recording surface is not correctly inserted and firmly set the camcorder in .) mini DVD discs marked with the recording side facing down (single sided discs - Select ( ) the desired disc specification desired and press ( ). ...-RW is first inserted. Move the power switch to ON to confirm the disc specification you selected. Retract the grip belt under the camcorder so it clicks in place. Before inserting the disc be asked to set in place. • Insert the disc with the DVD-R...

DC100 Instruction Manual
Page 23
... a disc may not appear automatically if you slide OPEN after pressing OPEN for the disc cover to open the disc cover completely until the camcorder finishes recognizing the disc before the disc cover opens. E • You can start recording movies once the record pause indication appears. ...you start the disc initialization. • The disc initialization will move while the disc is on or flashing. • Retract the grip belt under the camcorder so it on the screen. Slide OPEN fully in the direction of the arrow and gently open . 2. Select ( ) [YES] and press ( )...
... a disc may not appear automatically if you slide OPEN after pressing OPEN for the disc cover to open the disc cover completely until the camcorder finishes recognizing the disc before the disc cover opens. E • You can start recording movies once the record pause indication appears. ...you start the disc initialization. • The disc initialization will move while the disc is on or flashing. • Retract the grip belt under the camcorder so it on the screen. Slide OPEN fully in the direction of the arrow and gently open . 2. Select ( ) [YES] and press ( )...

DC100 Instruction Manual
Page 24
...sound may become distorted or it may result in bright places it may go on while the scene is powered by a battery pack, the camcorder will automatically shut off if left without any operations for 5 minutes ( 36). Recording Basic Functions Recording Movies Before You Begin Recording Make a...While recording and immediately after pausing, the DISC access indicator may not be recorded at the actual levels. Do not subject the camcorder to check if the camcorder operates correctly. When you can change the operating mode, refer to ). Open the LCD panel and the lens cover (move ...
...sound may become distorted or it may result in bright places it may go on while the scene is powered by a battery pack, the camcorder will automatically shut off if left without any operations for 5 minutes ( 36). Recording Basic Functions Recording Movies Before You Begin Recording Make a...While recording and immediately after pausing, the DISC access indicator may not be recorded at the actual levels. Do not subject the camcorder to check if the camcorder operates correctly. When you can change the operating mode, refer to ). Open the LCD panel and the lens cover (move ...

DC100 Instruction Manual
Page 25
... a malfunction. When using extremely high-precision manufacturing techniques, with more than 99.99% of the pixels may damage the camcorder. Do not use tripods with fastening screws longer than 0.01% of the pixels operating to specification. Reviewing the Last Scene Recorded Press... and release (record review). • The camcorder plays back the last scene and returns to record pause mode. • While reviewing the scene, select ( recording mode. ) the icon ...
... a malfunction. When using extremely high-precision manufacturing techniques, with more than 99.99% of the pixels may damage the camcorder. Do not use tripods with fastening screws longer than 0.01% of the pixels operating to specification. Reviewing the Last Scene Recorded Press... and release (record review). • The camcorder plays back the last scene and returns to record pause mode. • While reviewing the scene, select ( recording mode. ) the icon ...
DC100 Instruction Manual
Page 26
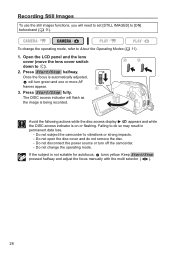
... pressed halfway and adjust the focus manually with the multi selector ( ). 26 Failing to vibrations or strong impacts. - Do not subject the camcorder to do not remove the disc. - Once the focus is automatically adjusted, will flash as the image is being recorded. The DISC access ...indicator will turn off the camcorder. - Do not change the operating mode, refer to ). 2. If the subject is on or flashing. Recording Still Images To use the still...
... pressed halfway and adjust the focus manually with the multi selector ( ). 26 Failing to vibrations or strong impacts. - Do not subject the camcorder to do not remove the disc. - Once the focus is automatically adjusted, will flash as the image is being recorded. The DISC access ...indicator will turn off the camcorder. - Do not change the operating mode, refer to ). 2. If the subject is on or flashing. Recording Still Images To use the still...

DC100 Instruction Manual
Page 28
... instead the date and time when the scene was recorded and additional recording data ( 32). As long as you don't turn off the camcorder you can resume playback from the scene selected. • When the end of the last movie recorded is reached, playback will stop the playback and...; To use the viewfinder, close the LCD panel. About the screen display: During playback, the recording's time code will return to stop and the camcorder will be displayed at the upper right corner of the scenes recorded on the first scene. 1. Fast reverse: 2.5x o 5x o 15x o 25x the normal ...
... instead the date and time when the scene was recorded and additional recording data ( 32). As long as you don't turn off the camcorder you can resume playback from the scene selected. • When the end of the last movie recorded is reached, playback will stop the playback and...; To use the viewfinder, close the LCD panel. About the screen display: During playback, the recording's time code will return to stop and the camcorder will be displayed at the upper right corner of the scenes recorded on the first scene. 1. Fast reverse: 2.5x o 5x o 15x o 25x the normal ...


