
DC100 Instruction Manual
Page 3
... should be retained such as to replace your obsolete outlet. Power Cord Protection - placed upon or against 8. so as battery power, refer to the Canon DVD Camcorder DC100 Power Adapter should be routed so that they to plugs and the point from which the cords exit the product. voltage surges and built...
... should be retained such as to replace your obsolete outlet. Power Cord Protection - placed upon or against 8. so as battery power, refer to the Canon DVD Camcorder DC100 Power Adapter should be routed so that they to plugs and the point from which the cords exit the product. voltage surges and built...
DC100 Instruction Manual
Page 5
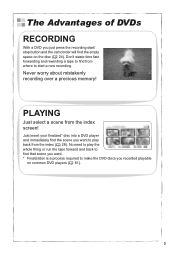
... need to play back from the index screen! The Advantages of DVDs RECORDING With a DVD you just press the recording start/ stop button and the camcorder will find that scene you recorded playable on the disc ( 24).
... need to play back from the index screen! The Advantages of DVDs RECORDING With a DVD you just press the recording start/ stop button and the camcorder will find that scene you recorded playable on the disc ( 24).
DC100 Instruction Manual
Page 6
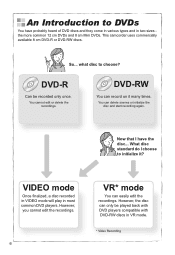
... edit the recordings. 6 VR* mode You can delete scenes or initialize the disc and start recording again. However, the disc can record on it ? This camcorder uses commercially available 8 cm DVD-R or DVD-RW discs. DVD-R Can be played back with DVD players compatible with DVD-RW discs in most common...
... edit the recordings. 6 VR* mode You can delete scenes or initialize the disc and start recording again. However, the disc can record on it ? This camcorder uses commercially available 8 cm DVD-R or DVD-RW discs. DVD-R Can be played back with DVD players compatible with DVD-RW discs in most common...
DC100 Instruction Manual
Page 7
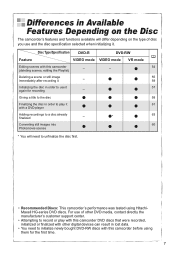
...Photomovie scenes * You will need to initialize newly bought DVD-RW discs with this camcorder before using HitachiMaxell HG-series DVD discs. Differences in Available Features Depending on the Disc The camcorder's features and functions available will differ depending on the type of other digital devices can... result in lost data. • You need to unfinalize the disc first. • Recommended Discs: This camcorder's performance was tested using them for recording - 57 Giving a title to the disc 58 Finalizing the disc in order to play with this...
...Photomovie scenes * You will need to initialize newly bought DVD-RW discs with this camcorder before using HitachiMaxell HG-series DVD discs. Differences in Available Features Depending on the Disc The camcorder's features and functions available will differ depending on the type of other digital devices can... result in lost data. • You need to unfinalize the disc first. • Recommended Discs: This camcorder's performance was tested using them for recording - 57 Giving a title to the disc 58 Finalizing the disc in order to play with this...
DC100 Instruction Manual
Page 8
... 10 Checking the Supplied Accessories 12 Components Guide 13 Screen Displays 15 Preparations Getting Started 17 Step 1: Preparing the Power Supply 17 Step 2: Preparing the Camcorder 19 Step 3: Adjusting the LCD Screen 19 Step 4: Changing the Display Language 20 Step 5: Setting the Time Zone / Daylight Saving Time 20 Step 6: Setting the...
... 10 Checking the Supplied Accessories 12 Components Guide 13 Screen Displays 15 Preparations Getting Started 17 Step 1: Preparing the Power Supply 17 Step 2: Preparing the Camcorder 19 Step 3: Adjusting the LCD Screen 19 Step 4: Changing the Display Language 20 Step 5: Setting the Time Zone / Daylight Saving Time 20 Step 6: Setting the...
DC100 Instruction Manual
Page 10
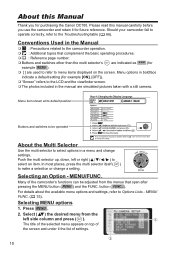
...than the multi selector's are indicated as *** (for example MENU ). [ ] are simulated pictures taken with a still camera. Should your camcorder fail to operate correctly, refer to the LCD and the viewfinder screen. The photos included in boldface indicate a default setting (for example ...FUNC. ). Selecting MENU options 1. About this manual carefully before you for purchasing the Canon DC100. Please read this Manual Thank you use the camcorder and retain it the list of the camcorder's functions can be operated About the Multi Selector Use the multi selector to make a ...
...than the multi selector's are indicated as *** (for example MENU ). [ ] are simulated pictures taken with a still camera. Should your camcorder fail to operate correctly, refer to the LCD and the viewfinder screen. The photos included in boldface indicate a default setting (for example ...FUNC. ). Selecting MENU options 1. About this manual carefully before you for purchasing the Canon DC100. Please read this Manual Thank you use the camcorder and retain it the list of the camcorder's functions can be operated About the Multi Selector Use the multi selector to make a ...
DC100 Instruction Manual
Page 11
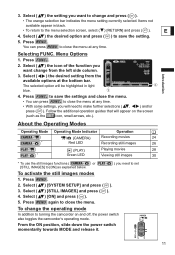
... functions ( or [STILL IMAGES] to make further selections ( , ) and/or press ( ). To change the operating mode In addition to turning the camcorder on the screen (such as explained below. ) you need to [ON] as the icon, small arrows, etc.). Press FUNC. Follow the additional operation ...guides that will appear on and off, the power switch also toggles the camcorder's operating mode. Select ( ) the setting you will be highlighted in black. • To return to save the settings and close the ...
... functions ( or [STILL IMAGES] to make further selections ( , ) and/or press ( ). To change the operating mode In addition to turning the camcorder on the screen (such as explained below. ) you need to [ON] as the icon, small arrows, etc.). Press FUNC. Follow the additional operation ...guides that will appear on and off, the power switch also toggles the camcorder's operating mode. Select ( ) the setting you will be highlighted in black. • To return to save the settings and close the ...
DC100 Instruction Manual
Page 12
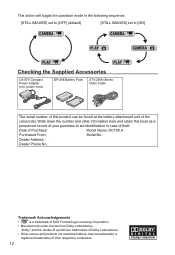
... • is a trademark of theft. Write down the number and other information here and retain this product can be trademarks or registered trademarks of the camcorder. "Dolby" and the double-D symbol are trademarks of Dolby Laboratories. • Other names and products not mentioned above may be found at the battery attachment...
... • is a trademark of theft. Write down the number and other information here and retain this product can be trademarks or registered trademarks of the camcorder. "Dolby" and the double-D symbol are trademarks of Dolby Laboratories. • Other names and products not mentioned above may be found at the battery attachment...
DC100 Instruction Manual
Page 15
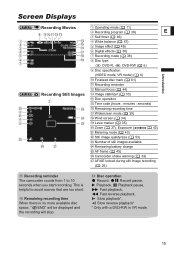
... marker ( 35) Zoom ( 27), Exposure ( 43) Metering mode ( 43) Still image quality/size ( 53) Number of still images available Remaining battery charge AF frame ( 45) Camcorder shake warning ( 33) AF/AE locked during still image recording ( 26) Recording reminder The...
... marker ( 35) Zoom ( 27), Exposure ( 43) Metering mode ( 43) Still image quality/size ( 53) Number of still images available Remaining battery charge AF frame ( 45) Camcorder shake warning ( 33) AF/AE locked during still image recording ( 26) Recording reminder The...

DC100 Instruction Manual
Page 16
... available displayed may not decrease even after a recording has been made, or may not be in green. • Depending on the conditions under which the camcorder and the battery pack are used, the actual battery charge may decrease by 2 still images at once. Number of still images available flashing in red...
... available displayed may not decrease even after a recording has been made, or may not be in green. • Depending on the conditions under which the camcorder and the battery pack are used, the actual battery charge may decrease by 2 still images at once. Number of still images available flashing in red...
DC100 Instruction Manual
Page 17
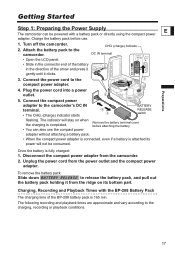
... consumed. Disconnect the compact power adapter from the power outlet and the compact power adapter. Connect the power cord to the camcorder's DC IN terminal. • The CHG. (charge) indicator starts BATTERY RELEASE switch flashing. Getting Started Preparations Step 1: Preparing the Power Supply E The... bottom part. CHG. (charge) indicator DC IN terminal • Open the LCD panel. • Slide in the connector end of the battery in the direction of the BP-208 battery pack is fully charged: 1. Unplug the power cord from the camcorder. 2. To remove the battery pack: ...
... consumed. Disconnect the compact power adapter from the power outlet and the compact power adapter. Connect the power cord to the camcorder's DC IN terminal. • The CHG. (charge) indicator starts BATTERY RELEASE switch flashing. Getting Started Preparations Step 1: Preparing the Power Supply E The... bottom part. CHG. (charge) indicator DC IN terminal • Open the LCD panel. • Slide in the connector end of the battery in the direction of the BP-208 battery pack is fully charged: 1. Unplug the power cord from the camcorder. 2. To remove the battery pack: ...

DC100 Instruction Manual
Page 18
...the battery charge status. Continuously on /off. Turn off the camcorder before connecting or disconnecting the power adapter. Do not connect to the camcorder's DC IN terminal or to the compact power adapter any electrical equipment that you prepare... Outside the temperature range of 0 °C to 40 °C (32 °F to voltage converters for recording with this camcorder. You may hear some noise from the compact power adapter during use with repeated operations such as a rough estimate...min. 80 min. 75 min. 95 min. 90 min. 90 min. 105 min. 100 min. 95 min.
...the battery charge status. Continuously on /off. Turn off the camcorder before connecting or disconnecting the power adapter. Do not connect to the camcorder's DC IN terminal or to the compact power adapter any electrical equipment that you prepare... Outside the temperature range of 0 °C to 40 °C (32 °F to voltage converters for recording with this camcorder. You may hear some noise from the compact power adapter during use with repeated operations such as a rough estimate...min. 80 min. 75 min. 95 min. 90 min. 90 min. 105 min. 100 min. 95 min.

DC100 Instruction Manual
Page 19
Step 2: Preparing the Camcorder 1. Keep the LCD panel closed to monitor the LCD screen while you use the viewfinder E and adjust the dioptric adjustment lever as necessary. 3. Rotating the ... you can switch the brightness of the battery. 19 Press MENU . 2. Select ( ) [DISPLAY SETUP] and press ( ). 3. Select ( ) the desired option and press ( ). 5. Turn on the camcorder. 2. Adjust the viewfinder. Press MENU to close the menu. This setting does not affect the brightness of the recording or the viewfinder screen. ...
Step 2: Preparing the Camcorder 1. Keep the LCD panel closed to monitor the LCD screen while you use the viewfinder E and adjust the dioptric adjustment lever as necessary. 3. Rotating the ... you can switch the brightness of the battery. 19 Press MENU . 2. Select ( ) [DISPLAY SETUP] and press ( ). 3. Select ( ) the desired option and press ( ). 5. Turn on the camcorder. 2. Adjust the viewfinder. Press MENU to close the menu. This setting does not affect the brightness of the recording or the viewfinder screen. ...

DC100 Instruction Manual
Page 21
... the day, year, hours and minutes in orange. 4. Time Zones Once you have set the time zone, date and time, you do not use the camcorder for about 3 months, the built-in lithium battery ( 72) and set the time zone, date and time again. You can also change . 5. E Time Zones...
... the day, year, hours and minutes in orange. 4. Time Zones Once you have set the time zone, date and time, you do not use the camcorder for about 3 months, the built-in lithium battery ( 72) and set the time zone, date and time again. You can also change . 5. E Time Zones...

DC100 Instruction Manual
Page 22
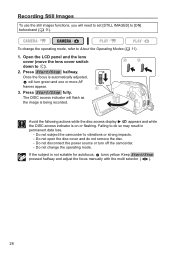
... Disc To change the operating mode, refer to remove any fingerprints, dirt buildup or smudges from the disc surface. Retract the grip belt under the camcorder so it will be sure to DVDs ( 6). Select ( ) the desired disc specification desired and press ( ). You will not get in place...different disc specification. 22 Close the disc cover. Do not force the cover closed if the disc is not correctly inserted and firmly set the camcorder in place. When using DVD-R discs: You can start recording once the record pause indication appears. For a comparison between the specifications [VIDEO]...
... Disc To change the operating mode, refer to remove any fingerprints, dirt buildup or smudges from the disc surface. Retract the grip belt under the camcorder so it will be sure to DVDs ( 6). Select ( ) the desired disc specification desired and press ( ). You will not get in place...different disc specification. 22 Close the disc cover. Do not force the cover closed if the disc is not correctly inserted and firmly set the camcorder in place. When using DVD-R discs: You can start recording once the record pause indication appears. For a comparison between the specifications [VIDEO]...

DC100 Instruction Manual
Page 23
... The disc initialization will not get in the way of the disc cover. • It may not appear automatically if you operated the camcorder's buttons while the disc recognition was in the direction of recognizing a disc may take a moment after making a recording, additional important data ...is on a table. 23 Select ( ) [YES] and press ( ) to open the disc cover completely until the camcorder finishes recognizing the disc before you slide OPEN after pressing OPEN for the disc cover to start recording movies once the record pause indication appears...
... The disc initialization will not get in the way of the disc cover. • It may not appear automatically if you operated the camcorder's buttons while the disc recognition was in the direction of recognizing a disc may take a moment after making a recording, additional important data ...is on a table. 23 Select ( ) [YES] and press ( ) to open the disc cover completely until the camcorder finishes recognizing the disc before you slide OPEN after pressing OPEN for the disc cover to start recording movies once the record pause indication appears...

DC100 Instruction Manual
Page 24
...down to pause recording. • While recording and immediately after pausing, the DISC access indicator may be difficult to check if the camcorder operates correctly. This is on a DVD-R cannot be recorded at the actual levels. Recording Basic Functions Recording Movies Before You Begin Recording...test recording first to use a DVD-RW disc to vibrations or strong impacts. - Do not disconnect the power source or turn off the camcorder. 3. Do not change the operating mode. About the recording time: By changing the recording mode you have finished recording: 1. ...
...down to pause recording. • While recording and immediately after pausing, the DISC access indicator may be difficult to check if the camcorder operates correctly. This is on a DVD-R cannot be recorded at the actual levels. Recording Basic Functions Recording Movies Before You Begin Recording...test recording first to use a DVD-RW disc to vibrations or strong impacts. - Do not disconnect the power source or turn off the camcorder. 3. Do not change the operating mode. About the recording time: By changing the recording mode you have finished recording: 1. ...

DC100 Instruction Manual
Page 25
... 0.01% of the light by selecting ( ) the icon ( 55). Reviewing the Last Scene Recorded Press and release (record review). • The camcorder plays back the last scene and returns to record pause mode. • While reviewing the scene, select ( recording mode. ) the icon and press ...( ) to return to concentration of the pixels may E occasionally misfire or appear as it may damage the camcorder. Widescreen is not available when the recording mode is set to specification. This has no effect on a TV with normal aspect ratio (4:3) change...
... 0.01% of the light by selecting ( ) the icon ( 55). Reviewing the Last Scene Recorded Press and release (record review). • The camcorder plays back the last scene and returns to record pause mode. • While reviewing the scene, select ( recording mode. ) the icon and press ...( ) to return to concentration of the pixels may E occasionally misfire or appear as it may damage the camcorder. Widescreen is not available when the recording mode is set to specification. This has no effect on a TV with normal aspect ratio (4:3) change...
DC100 Instruction Manual
Page 26
...or turn green and one or more AF frames appear. 3. Recording Still Images To use the still images functions, you will turn off the camcorder. - Press Start/Stop halfway. Avoid the following actions while the disc access display appears and while the DISC access indicator is not suitable ... will flash as the image is automatically adjusted, will need to set [STILL IMAGES] to About the Operating Modes ( 11). 1. Do not subject the camcorder to ). 2. Press Start/Stop fully. Do not change the operating mode, refer to [ON] beforehand ( 11). Keep Start/Stop pressed halfway and adjust...
...or turn green and one or more AF frames appear. 3. Recording Still Images To use the still images functions, you will turn off the camcorder. - Press Start/Stop halfway. Avoid the following actions while the disc access display appears and while the DISC access indicator is not suitable ... will flash as the image is automatically adjusted, will need to set [STILL IMAGES] to About the Operating Modes ( 11). 1. Do not subject the camcorder to ). 2. Press Start/Stop fully. Do not change the operating mode, refer to [ON] beforehand ( 11). Keep Start/Stop pressed halfway and adjust...

DC100 Instruction Manual
Page 28
... the date and time when the scene was recorded and additional recording data ( 32). As long as you don't turn off the camcorder you can resume playback from the scene selected. • When the end of the last movie recorded is reached, playback will stop the playback... index screen. Playback Playing Back Movies To change the operating mode, refer to increase the playback speed. During Playback: 3. Press to stop and the camcorder will return to the scene index screen. To use the viewfinder, close the LCD panel. About the screen display: During playback,...
... the date and time when the scene was recorded and additional recording data ( 32). As long as you don't turn off the camcorder you can resume playback from the scene selected. • When the end of the last movie recorded is reached, playback will stop the playback... index screen. Playback Playing Back Movies To change the operating mode, refer to increase the playback speed. During Playback: 3. Press to stop and the camcorder will return to the scene index screen. To use the viewfinder, close the LCD panel. About the screen display: During playback,...


