
DC100 Instruction Manual
Page 3
... of power supply to instructions in this manual. All operating and maintenance instructions should be walked on the marking label. This is connected to the Canon DVD Camcorder DC100 Power Adapter should be operated only E A and all its accessories. Power Cord Protection - Water and Moisture - Regarding other 13. Do not use accessories...
... of power supply to instructions in this manual. All operating and maintenance instructions should be walked on the marking label. This is connected to the Canon DVD Camcorder DC100 Power Adapter should be operated only E A and all its accessories. Power Cord Protection - Water and Moisture - Regarding other 13. Do not use accessories...
DC100 Instruction Manual
Page 4
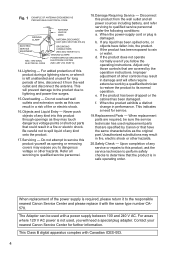
... as opening or removing covers may result in a fire or electric shock. This Class B digital apparatus complies with a power supply between 100 and 240 V AC. This will need for further information. If any kind onto the product. 17.Servicing - Adjust only those controls ...replacement of time, disconnect it with the same type number CA570. For areas where 120 V AC power is in performance. Contact your nearest Canon Service Center for service. 19.Replacement Parts - Refer all power sources including battery, and refer servicing to this product yourself as the original ...
... as opening or removing covers may result in a fire or electric shock. This Class B digital apparatus complies with a power supply between 100 and 240 V AC. This will need for further information. If any kind onto the product. 17.Servicing - Adjust only those controls ...replacement of time, disconnect it with the same type number CA570. For areas where 120 V AC power is in performance. Contact your nearest Canon Service Center for service. 19.Replacement Parts - Refer all power sources including battery, and refer servicing to this product yourself as the original ...
DC100 Instruction Manual
Page 5
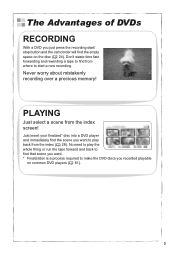
Just insert your finalized* disc into a DVD player and immediately find from where to start / stop button and the camcorder will find that scene you want to play the whole thing or run the tape forward and back to make the DVD discs you recorded ...
Just insert your finalized* disc into a DVD player and immediately find from where to start / stop button and the camcorder will find that scene you want to play the whole thing or run the tape forward and back to make the DVD discs you recorded ...
DC100 Instruction Manual
Page 6
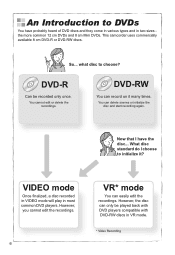
... the recordings. What disc standard do I have probably heard of DVD discs and they come in various types and in most common DVD players. This camcorder uses commercially available 8 cm DVD-R or DVD-RW discs. You can easily edit the recordings. An Introduction to initialize it many times. However, the disc...
... the recordings. What disc standard do I have probably heard of DVD discs and they come in various types and in most common DVD players. This camcorder uses commercially available 8 cm DVD-R or DVD-RW discs. You can easily edit the recordings. An Introduction to initialize it many times. However, the disc...
DC100 Instruction Manual
Page 7
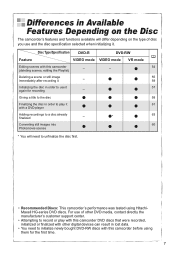
... * You will need to use it . Disc Type/Specification DVD-R DVD-RW Feature VIDEO mode VIDEO mode VR mode Editing scenes with this camcorder (deleting scenes, editing the Playlist) - - 54 Deleting a scene or still image immediately after recording it - 55 59 Initializing the disc ...to the disc 58 Finalizing the disc in lost data. • You need to unfinalize the disc first. • Recommended Discs: This camcorder's performance was tested using HitachiMaxell HG-series DVD discs. For use of disc you use and the disc specification selected when initializing it again...
... * You will need to use it . Disc Type/Specification DVD-R DVD-RW Feature VIDEO mode VIDEO mode VR mode Editing scenes with this camcorder (deleting scenes, editing the Playlist) - - 54 Deleting a scene or still image immediately after recording it - 55 59 Initializing the disc ...to the disc 58 Finalizing the disc in lost data. • You need to unfinalize the disc first. • Recommended Discs: This camcorder's performance was tested using HitachiMaxell HG-series DVD discs. For use of disc you use and the disc specification selected when initializing it again...
DC100 Instruction Manual
Page 8
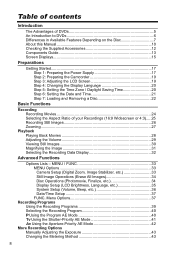
... 10 Checking the Supplied Accessories 12 Components Guide 13 Screen Displays 15 Preparations Getting Started 17 Step 1: Preparing the Power Supply 17 Step 2: Preparing the Camcorder 19 Step 3: Adjusting the LCD Screen 19 Step 4: Changing the Display Language 20 Step 5: Setting the Time Zone / Daylight Saving Time 20 Step 6: Setting the...
... 10 Checking the Supplied Accessories 12 Components Guide 13 Screen Displays 15 Preparations Getting Started 17 Step 1: Preparing the Power Supply 17 Step 2: Preparing the Camcorder 19 Step 3: Adjusting the LCD Screen 19 Step 4: Changing the Display Language 20 Step 5: Setting the Time Zone / Daylight Saving Time 20 Step 6: Setting the...
DC100 Instruction Manual
Page 9
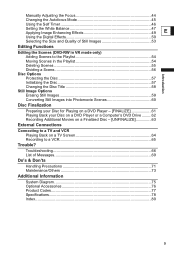
Troubleshooting 66 List of Still Images 53 Editing Functions Introduction Editing the Scenes (DVD-RW in VR mode only) Adding Scenes to the Playlist 54 Moving Scenes in the Playlist 54 Deleting Scenes 55 Dividing a Scene 56 Disc Options Protecting the Disc 57 Initializing the Disc 57 Changing the Disc Title 58 Still Image Options Erasing Still Images 59 Converting Still Images into Photomovie Scenes 60 Disc Finalization Preparing your Disc for Playing on a DVD Player - [FINALIZE 61 Playing Back your Disc on a DVD Player or a Computer's DVD Drive .........62 Recording ...
Troubleshooting 66 List of Still Images 53 Editing Functions Introduction Editing the Scenes (DVD-RW in VR mode only) Adding Scenes to the Playlist 54 Moving Scenes in the Playlist 54 Deleting Scenes 55 Dividing a Scene 56 Disc Options Protecting the Disc 57 Initializing the Disc 57 Changing the Disc Title 58 Still Image Options Erasing Still Images 59 Converting Still Images into Photomovie Scenes 60 Disc Finalization Preparing your Disc for Playing on a DVD Player - [FINALIZE 61 Playing Back your Disc on a DVD Player or a Computer's DVD Drive .........62 Recording ...
DC100 Instruction Manual
Page 10
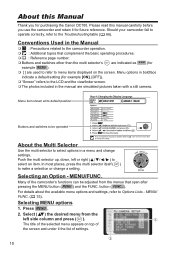
...to the LCD and the viewfinder screen. The photos included in a menu and change a setting. Selecting MENU options 1. Should your camcorder fail to operate correctly, refer to select an item. Menu options in boldface indicate a default setting (for example [ON], [OFF]). ...taken with a still camera. MENU/ FUNC. ( 33). About this manual carefully before you for purchasing the Canon DC100. For details about the available menu options and settings, refer to the camcorder operation. : Additional topics that open after pressing the MENU button ( MENU ) and the FUNC...
...to the LCD and the viewfinder screen. The photos included in a menu and change a setting. Selecting MENU options 1. Should your camcorder fail to operate correctly, refer to select an item. Menu options in boldface indicate a default setting (for example [ON], [OFF]). ...taken with a still camera. MENU/ FUNC. ( 33). About this manual carefully before you for purchasing the Canon DC100. For details about the available menu options and settings, refer to the camcorder operation. : Additional topics that open after pressing the MENU button ( MENU ) and the FUNC...
DC100 Instruction Manual
Page 11
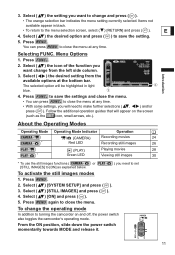
...still images modes 1. The selected option will need to close the menu at any time. • With some settings, you want to turning the camcorder on the screen (such as the icon, small arrows, etc.). to make further selections ( , ) and/or press ( ). Follow the ...additional operation guides that will appear on and off, the power switch also toggles the camcorder's operating mode. Press MENU . 2. Press MENU again to close the menu at the bottom bar. E 4. Select ( ) the desired option and press ( ...
...still images modes 1. The selected option will need to close the menu at any time. • With some settings, you want to turning the camcorder on the screen (such as the icon, small arrows, etc.). to make further selections ( , ) and/or press ( ). Follow the ...additional operation guides that will appear on and off, the power switch also toggles the camcorder's operating mode. Press MENU . 2. Press MENU again to close the menu at the bottom bar. E 4. Select ( ) the desired option and press ( ...
DC100 Instruction Manual
Page 12
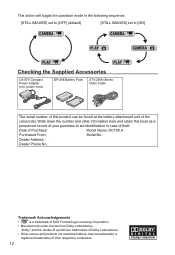
... double-D symbol are trademarks of Dolby Laboratories. • Other names and products not mentioned above may be found at the battery attachment unit of the camcorder. This action will toggle the operation mode in case of theft. power cord) BP-208 Battery Pack STV-250N Stereo Video Cable The serial number...
... double-D symbol are trademarks of Dolby Laboratories. • Other names and products not mentioned above may be found at the battery attachment unit of the camcorder. This action will toggle the operation mode in case of theft. power cord) BP-208 Battery Pack STV-250N Stereo Video Cable The serial number...
DC100 Instruction Manual
Page 13
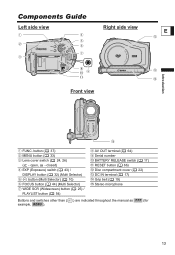
...) WIDE SCR (Widescreen) button ( 25) / PLAYLIST button ( 54) AV OUT terminal ( 64) Serial number BATTERY RELEASE switch ( 17) RESET button ( 66) Disc compartment cover ( 22) DC IN terminal ( 17) Grip belt ( 19) Stereo microphone Buttons and switches other than ( ) are indicated throughout the manual as *** (for example, MENU ). 13
...) WIDE SCR (Widescreen) button ( 25) / PLAYLIST button ( 54) AV OUT terminal ( 64) Serial number BATTERY RELEASE switch ( 17) RESET button ( 66) Disc compartment cover ( 22) DC IN terminal ( 17) Grip belt ( 19) Stereo microphone Buttons and switches other than ( ) are indicated throughout the manual as *** (for example, MENU ). 13
DC100 Instruction Manual
Page 14
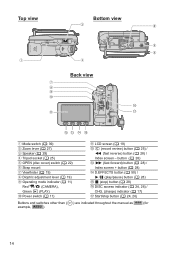
Top view Bottom view Back view Mode switch ( 39) Zoom lever ( 27) Speaker ( 29) Tripod socket ( 25) OPEN (disc cover) switch ( 22) Strap mount Viewfinder ( 19) Dioptric adjustment lever ( 19) Operating mode indicator ( 11) Red / (CAMERA), Green (PLAY) Power switch ( 11) LCD screen ( 19) (record review) button ( 25) / (fast reverse) button ( 28) / Index screen - button ( 28) (fast forward) button ( 28) / Index screen + button ( 28) D.EFFECTS button ( 50) / / (play/pause) button ( 28) (stop) button ( 28) DISC access indicator ( 24, 26) / CHG. (charge) indicator ( 17) Start/stop button ( 24, ...
Top view Bottom view Back view Mode switch ( 39) Zoom lever ( 27) Speaker ( 29) Tripod socket ( 25) OPEN (disc cover) switch ( 22) Strap mount Viewfinder ( 19) Dioptric adjustment lever ( 19) Operating mode indicator ( 11) Red / (CAMERA), Green (PLAY) Power switch ( 11) LCD screen ( 19) (record review) button ( 25) / (fast reverse) button ( 28) / Index screen - button ( 28) (fast forward) button ( 28) / Index screen + button ( 28) D.EFFECTS button ( 50) / / (play/pause) button ( 28) (stop) button ( 28) DISC access indicator ( 24, 26) / CHG. (charge) indicator ( 17) Start/stop button ( 24, ...
DC100 Instruction Manual
Page 15
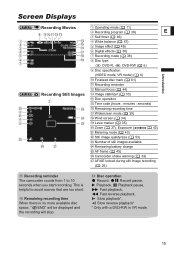
... marker ( 35) Zoom ( 27), Exposure ( 43) Metering mode ( 43) Still image quality/size ( 53) Number of still images available Remaining battery charge AF frame ( 45) Camcorder shake warning ( 33) AF/AE locked during still image recording ( 26) Recording reminder The...
... marker ( 35) Zoom ( 27), Exposure ( 43) Metering mode ( 43) Still image quality/size ( 53) Number of still images available Remaining battery charge AF frame ( 45) Camcorder shake warning ( 33) AF/AE locked during still image recording ( 26) Recording reminder The...

DC100 Instruction Manual
Page 16
Remaining battery charge • When " " starts flashing in green. • Depending on the conditions under which the camcorder and the battery pack are used, the actual battery charge may decrease by 2 still images at once. Playing Movies (Index Screen) Current scene number / Total ...
Remaining battery charge • When " " starts flashing in green. • Depending on the conditions under which the camcorder and the battery pack are used, the actual battery charge may decrease by 2 still images at once. Playing Movies (Index Screen) Current scene number / Total ...
DC100 Instruction Manual
Page 17
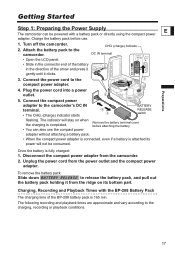
Turn off the camcorder. 2. CHG. (charge) indicator DC IN terminal • Open the LCD panel. • Slide in the connector end of the battery in the direction of the BP-208 battery pack ... playback conditions. 17 The following recording and playback times are approximate and vary according to the camcorder's DC IN terminal. • The CHG. (charge) indicator starts BATTERY RELEASE switch flashing. Connect the power cord to the camcorder. Preparations 4. Attach the battery pack to the compact power adapter. The indicator will stay on its...
Turn off the camcorder. 2. CHG. (charge) indicator DC IN terminal • Open the LCD panel. • Slide in the connector end of the battery in the direction of the BP-208 battery pack ... playback conditions. 17 The following recording and playback times are approximate and vary according to the camcorder's DC IN terminal. • The CHG. (charge) indicator starts BATTERY RELEASE switch flashing. Connect the power cord to the camcorder. Preparations 4. Attach the battery pack to the compact power adapter. The indicator will stay on its...

DC100 Instruction Manual
Page 18
...Viewfinder LP LCD [NORMAL] LCD [BRIGHT] Max. Outside the temperature range of the battery charge status. Continuously on aircraft and ships, DC-AC inverters, etc. We recommend charging the battery pack in temperatures between 10 °C and 30 °C (50 &#... as start/stop, zooming, power on/off. Turn off the camcorder before connecting or disconnecting the power adapter. Do not connect to the camcorder's DC IN terminal or to the compact power adapter any electrical equipment that you prepare.... 80 min. 75 min. 95 min. 90 min. 90 min. 105 min. 100 min. 95 min.
...Viewfinder LP LCD [NORMAL] LCD [BRIGHT] Max. Outside the temperature range of the battery charge status. Continuously on aircraft and ships, DC-AC inverters, etc. We recommend charging the battery pack in temperatures between 10 °C and 30 °C (50 &#... as start/stop, zooming, power on/off. Turn off the camcorder before connecting or disconnecting the power adapter. Do not connect to the camcorder's DC IN terminal or to the compact power adapter any electrical equipment that you prepare.... 80 min. 75 min. 95 min. 90 min. 90 min. 105 min. 100 min. 95 min.

DC100 Instruction Manual
Page 19
... to [NORMAL] or [BRIGHT]. 1. Keep the LCD panel closed to include yourself when recording with your thumb. Select ( ) [DISPLAY SETUP] and press ( ). 3. Turn on the camcorder. 2. Adjust the viewfinder. LCD Backlight You can rotate the panel by 180 degrees is also useful if you wish to use the viewfinder). Adjust the...
... to [NORMAL] or [BRIGHT]. 1. Keep the LCD panel closed to include yourself when recording with your thumb. Select ( ) [DISPLAY SETUP] and press ( ). 3. Turn on the camcorder. 2. Adjust the viewfinder. LCD Backlight You can rotate the panel by 180 degrees is also useful if you wish to use the viewfinder). Adjust the...

DC100 Instruction Manual
Page 20
Select ( ) [LANGUAGE ] and press ( ). 4. The default setting is New York. 4. Select ( , ) the desired option and press ( ). 5. Select ( ) [DISPLAY SETUP] and press ( ). 3. Step 5: Setting the Time Zone / Daylight Saving Time MENU ( 33) DATE/TIME SETUP T.ZONE/DST NEW YORK 1. The time zone setting appears. mark next to change the setting. Select ( ) your time zone and press ( ). If you changed the language by mistake, follow the mark next to the menu item to the 20 Press MENU . 2. Select ( ) [DATE/TIME SETUP] and press ( ). 3. Step 4: Changing the Display ...
Select ( ) [LANGUAGE ] and press ( ). 4. The default setting is New York. 4. Select ( , ) the desired option and press ( ). 5. Select ( ) [DISPLAY SETUP] and press ( ). 3. Step 5: Setting the Time Zone / Daylight Saving Time MENU ( 33) DATE/TIME SETUP T.ZONE/DST NEW YORK 1. The time zone setting appears. mark next to change the setting. Select ( ) your time zone and press ( ). If you changed the language by mistake, follow the mark next to the menu item to the 20 Press MENU . 2. Select ( ) [DATE/TIME SETUP] and press ( ). 3. Step 4: Changing the Display ...

DC100 Instruction Manual
Page 21
... ( 37). 21 In such case, recharge the built-in lithium battery ( 72) and set the time zone, date and time, you do not use the camcorder for about 3 months, the built-in rechargeable lithium battery may discharge completely and the date and time setting may be lost. Time Zones Once you...
... ( 37). 21 In such case, recharge the built-in lithium battery ( 72) and set the time zone, date and time, you do not use the camcorder for about 3 months, the built-in rechargeable lithium battery may discharge completely and the date and time setting may be lost. Time Zones Once you...

DC100 Instruction Manual
Page 22
...disc cover. 3. Close the disc cover. Select ( ) [YES] and press ( ) to continue, or select [NO] and press ( ) to DVDs ( 6). Retract the grip belt under the camcorder so it will appear when a new DVD-RW is first inserted. In that the recording surface is not correctly inserted and firmly set the... camcorder in the way of the disc or the pick up lens. 4. For a comparison between the specifications [VIDEO] and [VR], see An Introduction to return ...
...disc cover. 3. Close the disc cover. Select ( ) [YES] and press ( ) to continue, or select [NO] and press ( ) to DVDs ( 6). Retract the grip belt under the camcorder so it will appear when a new DVD-RW is first inserted. In that the recording surface is not correctly inserted and firmly set the... camcorder in the way of the disc or the pick up lens. 4. For a comparison between the specifications [VIDEO] and [VR], see An Introduction to return ...