Owner's Manual
Page 1
Model #: 111026 Lit. #: 98-0828/06-11 Instruction Manual Version 2.1
Model #: 111026 Lit. #: 98-0828/06-11 Instruction Manual Version 2.1
Owner's Manual
Page 3
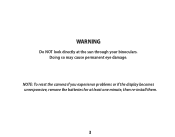
Doing so may cause permanent eye damage. NOTE: To reset the camera if you experience problems or if the display becomes unresponsive, remove the batteries for at the sun through your binoculars. WARNING Do NOT look directly at least one minute, then re-install them. 3
Doing so may cause permanent eye damage. NOTE: To reset the camera if you experience problems or if the display becomes unresponsive, remove the batteries for at the sun through your binoculars. WARNING Do NOT look directly at least one minute, then re-install them. 3
Owner's Manual
Page 4
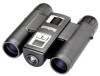
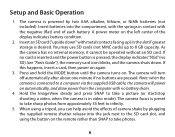
...-quality compact binocular. Before using the product, please read the instructions contained in attached digital camera. You can then download these images to your computer and e-mail them in a photo album for future use a binocular for, and then save them to observe sporting events, wildlife, scenic vistas or anything you would normally use . The Bushnell ImageView binocular takes the technology of digital photography and combines...
...-quality compact binocular. Before using the product, please read the instructions contained in attached digital camera. You can then download these images to your computer and e-mail them in a photo album for future use a binocular for, and then save them to observe sporting events, wildlife, scenic vistas or anything you would normally use . The Bushnell ImageView binocular takes the technology of digital photography and combines...
Owner's Manual
Page 6
.... 5. You may use SD cards (not MMC cards) up ) in video mode). Note: when the camera is desired. A power meter on automatically, and draw power from appoximately 35 feet to take a picture (or start/stop shooting a video, when the camera is pressed, the ...USB cable, the camera will turn off automatically after about one minute if no internal memory, it cannot be operated without an SD card. If no SD) (see "Parts Guide"), the memory card icon blinks, and the camera shuts down " with the negative (flat) end of camera shake by two AAA alkaline, lithium, or NiMh batteries...
.... 5. You may use SD cards (not MMC cards) up ) in video mode). Note: when the camera is desired. A power meter on automatically, and draw power from appoximately 35 feet to take a picture (or start/stop shooting a video, when the camera is pressed, the ...USB cable, the camera will turn off automatically after about one minute if no internal memory, it cannot be operated without an SD card. If no SD) (see "Parts Guide"), the memory card icon blinks, and the camera shuts down " with the negative (flat) end of camera shake by two AAA alkaline, lithium, or NiMh batteries...

Owner's Manual
Page 7
... and time, after replacing batteries. Your ImageView is : date, hour (24hr format), and minute-continue to reset the date/time after turning on the following the same process using the MODE and then SNAP buttons. Use the SNAP button to select the desired setting for 2010, etc). However, as you might want to shoot a video clip, delete...
... and time, after replacing batteries. Your ImageView is : date, hour (24hr format), and minute-continue to reset the date/time after turning on the following the same process using the MODE and then SNAP buttons. Use the SNAP button to select the desired setting for 2010, etc). However, as you might want to shoot a video clip, delete...
Owner's Manual
Page 8
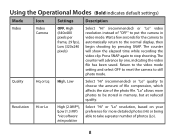
... to still photo mode. Using the Operational Modes (Bold indicates default settings) Mode Icon Settings Description Video Video Camera OFF, High (640x480 pixels per frame, 29 fps), Low (320x240 pixels) Select "Hi" (recommended) or "Lo" video resolution instead of "OFF" to put the camera in memory, but at ... will show the elapsed time while recording the video clip. Resolution Hi or Lo High (2.0MP*), Low (1.3 MP) *via software interpolation Select "Hi" or "Lo" resolution, based on your preference for the camera to automatically return to the normal display, then begin shooting...
... to still photo mode. Using the Operational Modes (Bold indicates default settings) Mode Icon Settings Description Video Video Camera OFF, High (640x480 pixels per frame, 29 fps), Low (320x240 pixels) Select "Hi" (recommended) or "Lo" video resolution instead of "OFF" to put the camera in memory, but at ... will show the elapsed time while recording the video clip. Resolution Hi or Lo High (2.0MP*), Low (1.3 MP) *via software interpolation Select "Hi" or "Lo" resolution, based on your preference for the camera to automatically return to the normal display, then begin shooting...

Owner's Manual
Page 9
... CT OFF, 3, 5 Select 3 or 5 frames to delete only the last photo or video you took. "PC" allows the camera to be used as a live USB/PC camera (note that stills and videos shot under fluorescent lighting appear normal. Using the Operational Modes Mode Icon Settings Description Line 60 or 50 Frequency 60 Hz, 50 Hz Set to a computer with the USB cable.
... CT OFF, 3, 5 Select 3 or 5 frames to delete only the last photo or video you took. "PC" allows the camera to be used as a live USB/PC camera (note that stills and videos shot under fluorescent lighting appear normal. Using the Operational Modes Mode Icon Settings Description Line 60 or 50 Frequency 60 Hz, 50 Hz Set to a computer with the USB cable.

Owner's Manual
Page 10
... memory If you are using a new SD card, or one previously used in normal still photo mode.) This can take new photos. If the remote shutter cable is available, it should be used instead of the self timer when the camera is taken after use. 10 The timer automatically cancels after a 10 ...start taking photos, to the card is setup with the correct data file system for this camera. Using the Operational Modes Mode Icon Settings Description Delete All ALL+Trash Can None-press SNAP to delete all photo and video files Select this after downloading your files, to clear the memory so...
... memory If you are using a new SD card, or one previously used in normal still photo mode.) This can take new photos. If the remote shutter cable is available, it should be used instead of the self timer when the camera is taken after use. 10 The timer automatically cancels after a 10 ...start taking photos, to the card is setup with the correct data file system for this camera. Using the Operational Modes Mode Icon Settings Description Delete All ALL+Trash Can None-press SNAP to delete all photo and video files Select this after downloading your files, to clear the memory so...
Owner's Manual
Page 11
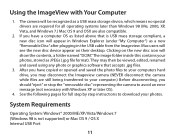
... no special drivers are required for full step by step instructions to download your photos. If you should "eject" or stop the "removable disc" representing the camera to your photos, stored as a new "Removable Disc" after plugging in the USB cable from the Imageview. Using the ImageView with Windows XP or later OS). 4. See the following pages for all operating systems later...
... no special drivers are required for full step by step instructions to download your photos. If you should "eject" or stop the "removable disc" representing the camera to your photos, stored as a new "Removable Disc" after plugging in the USB cable from the Imageview. Using the ImageView with Windows XP or later OS). 4. See the following pages for all operating systems later...
Owner's Manual
Page 12
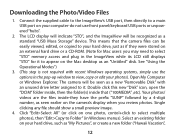
... should show a small preview image. 4. Connect the supplied cable to the ImageView's USB port, then directly to your computer-do not use the options in the pop-up window to select "STO" memory access and plug in Windows menus). The camera will be seen as "My Pictures", or create a new folder ("Hawaii Vacation", 12 Downloading the Photo/Video Files 1. The LCD...
... should show a small preview image. 4. Connect the supplied cable to the ImageView's USB port, then directly to your computer-do not use the options in the pop-up window to select "STO" memory access and plug in Windows menus). The camera will be seen as "My Pictures", or create a new folder ("Hawaii Vacation", 12 Downloading the Photo/Video Files 1. The LCD...
Owner's Manual
Page 13
... to open and work this way, from the ImageView while it is also possible to "eject" it a...camera, be harmed). If you choose to work with adjusting the brightness, contrast, sharpness and color of the photo files you want. 5. Windows 2000 may want to your software...new to the folder where you stored the photos earlier. Just use "Save As" and give it before disconnecting the camera. (On Mac computers, drag the "disk" that you have disconnected a USB device without stopping or ejecting the "disk" first (your photos, you can disconnect the camera. Downloading the Photo/Video...
... to open and work this way, from the ImageView while it is also possible to "eject" it a...camera, be harmed). If you choose to work with adjusting the brightness, contrast, sharpness and color of the photo files you want. 5. Windows 2000 may want to your software...new to the folder where you stored the photos earlier. Just use "Save As" and give it before disconnecting the camera. (On Mac computers, drag the "disk" that you have disconnected a USB device without stopping or ejecting the "disk" first (your photos, you can disconnect the camera. Downloading the Photo/Video...
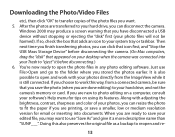
Owner's Manual
Page 14
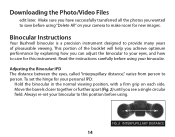
... instructions carefully before using . To set your binocular. Fig. 2 Interpupillary Distance 14 This portion of pleasurable viewing. Move the barrels closer together or further apart (Fig. 2) until you wanted to save before using your binocular to person. Downloading the Photo/Video Files edit later. Make sure you have successfully transferred all the photos you see a single circular field. Adjusting the Binocular IPD The distance...
... instructions carefully before using . To set your binocular. Fig. 2 Interpupillary Distance 14 This portion of pleasurable viewing. Move the barrels closer together or further apart (Fig. 2) until you wanted to save before using your binocular to person. Downloading the Photo/Video Files edit later. Make sure you have successfully transferred all the photos you see a single circular field. Adjusting the Binocular IPD The distance...
Owner's Manual
Page 15
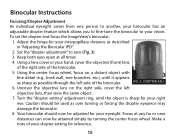
... lens, then view the same object. 7. Fig. 3 diopter adj. 6. To set the diopter and focus the ImageView's binocular: 1. Turn the "diopter setting" adjustment ring, until it appears as sharp as over turning or forcing the diopter eyepiece may damage the binocular. 8. Focus at all times. 4. Make a note of the binocular. 5. Using the center focus wheel, focus on the right side, cover the left side of the binocular. Adjust the hinge for your interpupillary distance...
... lens, then view the same object. 7. Fig. 3 diopter adj. 6. To set the diopter and focus the ImageView's binocular: 1. Turn the "diopter setting" adjustment ring, until it appears as sharp as over turning or forcing the diopter eyepiece may damage the binocular. 8. Focus at all times. 4. Make a note of the binocular. 5. Using the center focus wheel, focus on the right side, cover the left side of the binocular. Adjust the hinge for your interpupillary distance...
Owner's Manual
Page 16
... use it is not covered by the warranty. 1. This will provide years of trouble-free service if it receives the normal care you can cause permanent eye damage. 5. Never expose your comfort and to the ocular (eyepiece) lenses, so you would give any cutoff. Take the batteries out of your ImageView binocular, put the eyecups in a cool, dry place...
... use it is not covered by the warranty. 1. This will provide years of trouble-free service if it receives the normal care you can cause permanent eye damage. 5. Never expose your comfort and to the ocular (eyepiece) lenses, so you would give any cutoff. Take the batteries out of your ImageView binocular, put the eyecups in a cool, dry place...

Owner's Manual
Page 17
... away any dust or debris on the lens. 17 never directly on the lens (or use a soft lens brush.) 2. Always apply the fluid to the cleaning cloth - Use of your optics. 3. For a more thorough cleaning, photographic lens tissue and photographic-type lens cleaning fluid or isopropyl alcohol may scratch the lens surface and eventually cause permanent damage. To remove dirt or...
... away any dust or debris on the lens. 17 never directly on the lens (or use a soft lens brush.) 2. Always apply the fluid to the cleaning cloth - Use of your optics. 3. For a more thorough cleaning, photographic lens tissue and photographic-type lens cleaning fluid or isopropyl alcohol may scratch the lens surface and eventually cause permanent damage. To remove dirt or...
Owner's Manual
Page 18
... our option, repair or replace the product, provided that you specific legal rights. Any return made under this warranty must be accompanied by someone other rights which vary from country to country. ©2011 Bushnell Outdoor Products 18 This warranty does not cover damages caused by misuse, improper handling, installation, or maintenance provided by the items listed below : IN...
... our option, repair or replace the product, provided that you specific legal rights. Any return made under this warranty must be accompanied by someone other rights which vary from country to country. ©2011 Bushnell Outdoor Products 18 This warranty does not cover damages caused by misuse, improper handling, installation, or maintenance provided by the items listed below : IN...

Owner's Manual
Page 19
...been tested and found to comply with the instructions, may cause harmful interference to radio communications. Windows is connected. • Consult the dealer or an experienced radio/tV technician for a Class B digital device, pursuant to Part 15 of Microsoft Corporation in the United States ...equipment into an outlet on , the user is no guarantee that to Subpart B of Part 15 of Apple inc., registered in a particular installation. the shielded interface cable must be determined by turning the equipment off and on a circuit different from that interference will not occur in ...
...been tested and found to comply with the instructions, may cause harmful interference to radio communications. Windows is connected. • Consult the dealer or an experienced radio/tV technician for a Class B digital device, pursuant to Part 15 of Microsoft Corporation in the United States ...equipment into an outlet on , the user is no guarantee that to Subpart B of Part 15 of Apple inc., registered in a particular installation. the shielded interface cable must be determined by turning the equipment off and on a circuit different from that interference will not occur in ...

Owner's Manual
Page 20
For further questions or additional information please contact: Bushnell Outdoor Products 9200 Cody, Overland Park, Kansas 66214 (800) 423-3537 • www.bushnell.com ©2011 Bushnell Outdoor Products
For further questions or additional information please contact: Bushnell Outdoor Products 9200 Cody, Overland Park, Kansas 66214 (800) 423-3537 • www.bushnell.com ©2011 Bushnell Outdoor Products


