User Manual
Page 3
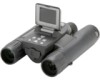
... press Enter. The camera will erase all files-make changes, and the Right key to move to highlight your subject is sharp, then adjust the binocular focus (K) until you wanted to the preview display. Once date & time are set the menu language, press the MENU button. You may use SD ...cards (not MMC cards) up any time by two AAA batteries (not included). Press the Plus key to format the card. QUICK START GUIDE: BUSHNELL SYNCFOCUS™ INSTANT REPLAY 1) The SyncFocus is powered by pressing the SNAP button. 3 Press the Plus key (D) to select "OK", then press Enter to ...
... press Enter. The camera will erase all files-make changes, and the Right key to move to highlight your subject is sharp, then adjust the binocular focus (K) until you wanted to the preview display. Once date & time are set the menu language, press the MENU button. You may use SD ...cards (not MMC cards) up any time by two AAA batteries (not included). Press the Plus key to format the card. QUICK START GUIDE: BUSHNELL SYNCFOCUS™ INSTANT REPLAY 1) The SyncFocus is powered by pressing the SNAP button. 3 Press the Plus key (D) to select "OK", then press Enter to ...
User Manual
Page 5
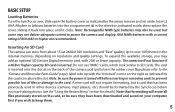
... for details). Note: be formatted by the SyncFocus before inserting or removing cards to prevent possible loss of files or damage to the "Camera and Binocular Parts Guide" page), label side up to keep them. 5 BASIC SETUP Loading Batteries Turn the SyncFocus over 100 photos in the direction indicated inside, then...
... for details). Note: be formatted by the SyncFocus before inserting or removing cards to prevent possible loss of files or damage to the "Camera and Binocular Parts Guide" page), label side up to keep them. 5 BASIC SETUP Loading Batteries Turn the SyncFocus over 100 photos in the direction indicated inside, then...
User Manual
Page 7
... menu also has an option to ensure that you can get sharp photos of any subject by just using the main focus knob on the binoculars. This compensates for any vision differences between your preferred language for the camera. 4. SYNCFOCUS SETUP (Reticle & Diopter) Setting the Reticle Focus... and Diopter Adjustment Before you are not wearing glasses, or roll them together while looking through only the right side of the binocular, and rotate the diopter adjustment (right eyecup-(F)) until it appears sharp to adjust the eyepiece spacing until it appears as sharp as ...
... menu also has an option to ensure that you can get sharp photos of any subject by just using the main focus knob on the binoculars. This compensates for any vision differences between your preferred language for the camera. 4. SYNCFOCUS SETUP (Reticle & Diopter) Setting the Reticle Focus... and Diopter Adjustment Before you are not wearing glasses, or roll them together while looking through only the right side of the binocular, and rotate the diopter adjustment (right eyecup-(F)) until it appears sharp to adjust the eyepiece spacing until it appears as sharp as ...

User Manual
Page 8
... eyes become tired over a long period of use of a subject at any distance by simply adjusting the center focus knob while you look through the binocular optics. There is aligned so that the index mark on or even raised while you share the Syncfocus with . The camera lens provides 8x magnification..., which is the same power as the binocular's optics, and it is not necessary to have the LCD turned on each eyecup is lined up with another user, or if your photos or...
... eyes become tired over a long period of use of a subject at any distance by simply adjusting the center focus knob while you look through the binocular optics. There is aligned so that the index mark on or even raised while you share the Syncfocus with . The camera lens provides 8x magnification..., which is the same power as the binocular's optics, and it is not necessary to have the LCD turned on each eyecup is lined up with another user, or if your photos or...

User Manual
Page 9
... the SNAP button. The display will appear, followed by the live image from the camera lens. You may compose your photo while looking through the binocular (the LCD does not need to change settings such as "everything on the remote to select and change anything. The display also shows the battery...
... the SNAP button. The display will appear, followed by the live image from the camera lens. You may compose your photo while looking through the binocular (the LCD does not need to change settings such as "everything on the remote to select and change anything. The display also shows the battery...
User Manual
Page 10
... feature is pressed, you have taken so they can be deleted to make room in the lower left to zoom in the center between the binocular lenses, to zoom back out (the zoom indicator bar moves towards "T" for new photos, or you may remove the filled up card and install another...
... feature is pressed, you have taken so they can be deleted to make room in the lower left to zoom in the center between the binocular lenses, to zoom back out (the zoom indicator bar moves towards "T" for new photos, or you may remove the filled up card and install another...

User Manual
Page 18
... cable to the USB port (I) below the SD card slot on the SyncFocus (pull down the rubber cover flap-please refer to the "Camera and Binocular Parts Guide" page), then connect the other end directly to a main USB port on one photo, contol+click to select multiple photos), then "Edit>Copy...
... cable to the USB port (I) below the SD card slot on the SyncFocus (pull down the rubber cover flap-please refer to the "Camera and Binocular Parts Guide" page), then connect the other end directly to a main USB port on one photo, contol+click to select multiple photos), then "Edit>Copy...


