
Instruction Manual
Page 3
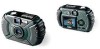
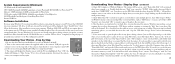
... its auto flash and close focus capabillity, it will also deliver great photos indoors as it should not be used underwater, submerged, or washed with a strong stream of water. The Outdoor Camera is water resistant, dust resistant, shock resistant and rubberized to provide a sure grip. Before using the camera, please read the instructions contained in this manual and take time...
... its auto flash and close focus capabillity, it will also deliver great photos indoors as it should not be used underwater, submerged, or washed with a strong stream of water. The Outdoor Camera is water resistant, dust resistant, shock resistant and rubberized to provide a sure grip. Before using the camera, please read the instructions contained in this manual and take time...
Instruction Manual
Page 4
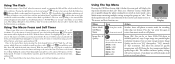
... finished setting the Date & Time. 4 Format the SD Card (optional) If you do not already have Windows XP, just follow the onscreen directions/options. Select your image before using the supplied PhotoSuite or any or all menus. 2 QUICK GUIDE: BUSHNELL OUTDOOR DIGITAL CAMERA 11-0013G/Y 5 Take A Photo Press the shutter release button halfway down to set to open the folders inside , with the notched corner on the camera. The display returns to review stored photos. Press...
... finished setting the Date & Time. 4 Format the SD Card (optional) If you do not already have Windows XP, just follow the onscreen directions/options. Select your image before using the supplied PhotoSuite or any or all menus. 2 QUICK GUIDE: BUSHNELL OUTDOOR DIGITAL CAMERA 11-0013G/Y 5 Take A Photo Press the shutter release button halfway down to set to open the folders inside , with the notched corner on the camera. The display returns to review stored photos. Press...
Instruction Manual
Page 5
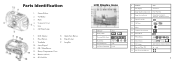
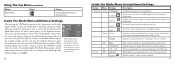
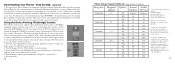
... Photos Remaining [ 999] 13 Movie Mode 14 White Balance 15 Meter Pattern 16 ISO Setting 17 Exposure Value (EV) 18 Auto Focus Area Indicator Center Average AUTO ISO100 ISO200 ISO400 -2 ~ +2 13. Quick View Button 8. Strap Bar 10. 4-way Keypad 11. Batteries (AA x 2) 4 14. Parts Identification LCD Display Icons # Indicator 6 Date Display Icons 2004.06.20 1. Flash 9 Digital Zoom Bar 4. Connector Cover 10 Self Timer 5. LCD Monitor 15. Tripod Socket 9. Shutter Release 2. Power Button 16. Viewfinder 17. SD Card Slot 5 Viewfinder 7 Image...
... Photos Remaining [ 999] 13 Movie Mode 14 White Balance 15 Meter Pattern 16 ISO Setting 17 Exposure Value (EV) 18 Auto Focus Area Indicator Center Average AUTO ISO100 ISO200 ISO400 -2 ~ +2 13. Quick View Button 8. Strap Bar 10. 4-way Keypad 11. Batteries (AA x 2) 4 14. Parts Identification LCD Display Icons # Indicator 6 Date Display Icons 2004.06.20 1. Flash 9 Digital Zoom Bar 4. Connector Cover 10 Self Timer 5. LCD Monitor 15. Tripod Socket 9. Shutter Release 2. Power Button 16. Viewfinder 17. SD Card Slot 5 Viewfinder 7 Image...
Instruction Manual
Page 6
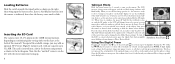
... can be changed in the final photo. 7 Note that focus is inserted into the camera as indicated, then close the battery cover until it (the review time can snap a photo while the marks are still red, but it down changes to Photo Review Mode). Press the shutter release half- For off the LCD to 4x digitally). The card is locked in (up to conserve battery power, press the Quick View button quickly Autofocus Area...
... can be changed in the final photo. 7 Note that focus is inserted into the camera as indicated, then close the battery cover until it (the review time can snap a photo while the marks are still red, but it down changes to Photo Review Mode). Press the shutter release half- For off the LCD to 4x digitally). The card is locked in (up to conserve battery power, press the Quick View button quickly Autofocus Area...
Instruction Manual
Page 7
... 10 second delays avail- Using The Macro Focus and Self Timer Macro focus allow you to quickly change the photo size/quality or switch to movie mode, and a Mode menu containing multiple settings arranged in the macro/timer menu to normal focus range, press the left keypad button. To return to exit it without making a selection. The menus and their functions are : Menu Selection Display Menu Movie Mode/ Still Photo Mode Icon from photo mode from movie mode Action Switches from approx. 4" to normal shutter operation, press the left key...
... 10 second delays avail- Using The Macro Focus and Self Timer Macro focus allow you to quickly change the photo size/quality or switch to movie mode, and a Mode menu containing multiple settings arranged in the macro/timer menu to normal focus range, press the left keypad button. To return to exit it without making a selection. The menus and their functions are : Menu Selection Display Menu Movie Mode/ Still Photo Mode Icon from photo mode from movie mode Action Switches from approx. 4" to normal shutter operation, press the left key...
Instruction Manual
Page 8
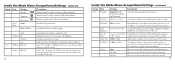
... (default settings are arranged in 3 groups, or tabs, as described next. Action Uses higher shutter speeds to the normal display. Use the up /down buttons to select the setting you return to help freeze motion Night Uses lower shutter speeds for that group. Provides manual under/over exposure adjustment in 0.3 EV steps White Balance is automatically set automatically from background. Using The Top Menu continued Menu Icon Mode Menu Action Opens additional menus as seen on overall image.
... (default settings are arranged in 3 groups, or tabs, as described next. Action Uses higher shutter speeds to the normal display. Use the up /down buttons to select the setting you return to help freeze motion Night Uses lower shutter speeds for that group. Provides manual under/over exposure adjustment in 0.3 EV steps White Balance is automatically set automatically from background. Using The Top Menu continued Menu Icon Mode Menu Action Opens additional menus as seen on overall image.
Instruction Manual
Page 9
...) Files are stored in internal memory only, never on the card. Set for new photos after a photo is taken File Name LCD Brightness Date & Time Video Out Rec Mode Storage Reset or Series Set to set . Inside the Mode Menu-Groups/Items/Settings continued Group Item Settings Description 3: Set Language English/Spanish/ French/Deutsch/Italian/Portuguese Selects the language displayed in a rapid series to setup. Affects video out signal. Press "OK" once set . Sets number of photos taken each time shutter release is pressed. 1-shot...
...) Files are stored in internal memory only, never on the card. Set for new photos after a photo is taken File Name LCD Brightness Date & Time Video Out Rec Mode Storage Reset or Series Set to set . Inside the Mode Menu-Groups/Items/Settings continued Group Item Settings Description 3: Set Language English/Spanish/ French/Deutsch/Italian/Portuguese Selects the language displayed in a rapid series to setup. Affects video out signal. Press "OK" once set . Sets number of photos taken each time shutter release is pressed. 1-shot...
Instruction Manual
Page 10
... use the keypad to start the show. To erase (delete) a photo during review mode. Review Mode Menu Opens additional settings as follows: 14 Review Mode: Top Menu Display Review Menus continued Menu Icon Action Slide Show Automatically cycles through your previous photo. Press the down button to 4x) the image, useful for each photo is sharp. It will begin zooming into (magnifying up to exit). Use the left/right keypad buttons to normal review mode. While a photo is displayed, pressing the "up" button...
... use the keypad to start the show. To erase (delete) a photo during review mode. Review Mode Menu Opens additional settings as follows: 14 Review Mode: Top Menu Display Review Menus continued Menu Icon Action Slide Show Automatically cycles through your previous photo. Press the down button to 4x) the image, useful for each photo is sharp. It will begin zooming into (magnifying up to exit). Use the left/right keypad buttons to normal review mode. While a photo is displayed, pressing the "up" button...

Instruction Manual
Page 11
... Movie Mode-Operation and Menus continued In movie mode, all user settings and restore default settings Language As previously described in Photo Mode Menu section LCD Brightness As previously described in Photo Mode Menu section Date & Time As previously described in Photo Mode Menu section Video Out As previously described in movie mode, it will return to the top menus. Frame rate is powered off while in Photo Mode Menu section Movie Mode-Operation and Menus From Photo mode, with many computers, or available as a free download...
... Movie Mode-Operation and Menus continued In movie mode, all user settings and restore default settings Language As previously described in Photo Mode Menu section LCD Brightness As previously described in Photo Mode Menu section Date & Time As previously described in Photo Mode Menu section Video Out As previously described in movie mode, it will return to the top menus. Frame rate is powered off while in Photo Mode Menu section Movie Mode-Operation and Menus From Photo mode, with many computers, or available as a free download...
Instruction Manual
Page 12
...) SVGA video card w/2MB VRAM, 800x600 screen display, 16 bit High color 200 MB available hard disk space (if installing PhotoSuite) Internal USB Port Software Installation If you are using Windows 98, you must install drivers before disconnecting the camera. 7. You're now ready to open the folders inside , then any file should show a small preview image. 5. Be sure to read the "Release Notes" completely, noting any photo editing software...
...) SVGA video card w/2MB VRAM, 800x600 screen display, 16 bit High color 200 MB available hard disk space (if installing PhotoSuite) Internal USB Port Software Installation If you are using Windows 98, you must install drivers before disconnecting the camera. 7. You're now ready to open the folders inside , then any file should show a small preview image. 5. Be sure to read the "Release Notes" completely, noting any photo editing software...
Instruction Manual
Page 13
... order from the camera to PictBridge compatible printers, without using your photos, you can resize the photo to fit the paper if you are new to bottom icon): 1. Using the Direct Printing (Pictbridge) Feature The Outdoor Camera also supports direct printing from top to photo editing on the camera). The camera's display should see the camera's Print options menu (2). You may want ) 4. Make sure you have successfully transferred all the photos you wanted to...
... order from the camera to PictBridge compatible printers, without using your photos, you can resize the photo to fit the paper if you are new to bottom icon): 1. Using the Direct Printing (Pictbridge) Feature The Outdoor Camera also supports direct printing from top to photo editing on the camera). The camera's display should see the camera's Print options menu (2). You may want ) 4. Make sure you have successfully transferred all the photos you wanted to...

Instruction Manual
Page 14
... by turning the equipment off and on, the user is connected. · Consult the dealer or an experienced radio/TV technician for a digital device pursuant to Subpart B of Part 15 of FCC Rules. Specifications and designs are designed to provide reasonable protection against harmful interference in order to comply with the limits for help. If...
... by turning the equipment off and on, the user is connected. · Consult the dealer or an experienced radio/TV technician for a digital device pursuant to Subpart B of Part 15 of FCC Rules. Specifications and designs are designed to provide reasonable protection against harmful interference in order to comply with the limits for help. If...
