Owners Manual
Page 1
X-Bolt™ Bolt-action rifle owner's manual
X-Bolt™ Bolt-action rifle owner's manual
Owners Manual
Page 2
The Browning X-Bolt represents a new generation of Browning bolt-action rifles, designed with improved features for : Browning® X-Bolt™ Bolt-Action Rifle If you many years of dependable, enjoyable service. With a reasonable amount of a Browning X-Bolt rifle. The Browning X-Bolt is one of Purchase T H A N K Y O U FOR c h o O s ING a Browning X-Bolt rifle Congratulations on your new firearm. Important operating instructions for superior performance. Browning Consumer Information One Browning Place Morgan, UT 84050...
The Browning X-Bolt represents a new generation of Browning bolt-action rifles, designed with improved features for : Browning® X-Bolt™ Bolt-Action Rifle If you many years of dependable, enjoyable service. With a reasonable amount of a Browning X-Bolt rifle. The Browning X-Bolt is one of Purchase T H A N K Y O U FOR c h o O s ING a Browning X-Bolt rifle Congratulations on your new firearm. Important operating instructions for superior performance. Browning Consumer Information One Browning Place Morgan, UT 84050...
Owners Manual
Page 5
... eye when firing a scoped pistol, rifle or shotgun. While it is completely unloaded. Unprotected, repeated exposure to -fire firearm. Wear shooting glasses to protect your firearm and any persons nearby, as muzzle blast, debris and ejecting cartridges could cause the rearward travel of the slide or bolt of a firearm to contact your...
... eye when firing a scoped pistol, rifle or shotgun. While it is completely unloaded. Unprotected, repeated exposure to -fire firearm. Wear shooting glasses to protect your firearm and any persons nearby, as muzzle blast, debris and ejecting cartridges could cause the rearward travel of the slide or bolt of a firearm to contact your...
Owners Manual
Page 11
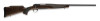
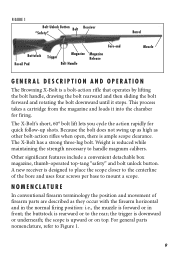
... "Safety" Buttstock Recoil Pad Fore-end Trigger Magazine Magazine Release Bolt Handle Barrel Muzzle GENER A L d e s c r i p t i o n a n d O P ER A TION The Browning X-Bolt is a bolt-action rifle that operates by lifting the bolt handle, drawing the bolt rearward and then sliding the bolt forward and rotating the bolt downward until it into the chamber for quick follow-up as high as they...
... "Safety" Buttstock Recoil Pad Fore-end Trigger Magazine Magazine Release Bolt Handle Barrel Muzzle GENER A L d e s c r i p t i o n a n d O P ER A TION The Browning X-Bolt is a bolt-action rifle that operates by lifting the bolt handle, drawing the bolt rearward and then sliding the bolt forward and rotating the bolt downward until it into the chamber for quick follow-up as high as they...

Owners Manual
Page 12
... "safety" is drawn to the rear, the firearm is located on the right side of the receiver, in front of the bolt handle. This blocks the trigger and locks the bolt in serious injury or death. In this position an "S" will be found on the top tang at the rear of the... the tang in front of the "safety." S e r i a l Nu m b e r The serial number of your firearm can be covered and a red dot will appear indicating that the rifle is in the "off safe position. Failure to fire (Figure 3). 10 Always keep the "safety" in the off safe" position and ready to follow these...
... "safety" is drawn to the rear, the firearm is located on the right side of the receiver, in front of the bolt handle. This blocks the trigger and locks the bolt in serious injury or death. In this position an "S" will be found on the top tang at the rear of the... the tang in front of the "safety." S e r i a l Nu m b e r The serial number of your firearm can be covered and a red dot will appear indicating that the rifle is in the "off safe position. Failure to fire (Figure 3). 10 Always keep the "safety" in the off safe" position and ready to follow these...

Owners Manual
Page 13
...alone to the elements, and the abrasive action of the bolt unlock button. When the rifle is painted red. time, exposure to indicate your firearm's safety status. B o l t u n l o c k bu t t o n The bolt unlock button on the X-Bolt rifle is located on the upper part of cleaning agents can erase... it may be seen or felt. The indicator is fired, the cocking indicator retracts into the bolt shroud and cannot be readily felt with the thumb as...
...alone to the elements, and the abrasive action of the bolt unlock button. When the rifle is painted red. time, exposure to indicate your firearm's safety status. B o l t u n l o c k bu t t o n The bolt unlock button on the X-Bolt rifle is located on the upper part of cleaning agents can erase... it may be seen or felt. The indicator is fired, the cocking indicator retracts into the bolt shroud and cannot be readily felt with the thumb as...

Owners Manual
Page 14
... with a damp cloth and mild dish soap (be sure to unload a cartridge from the chamber with the "safety" in the on the rifle and keep water out of the action). Also, avoid any contact with chemicals used. Clean the barrel using a cleaning rod and patch as ...found in DEET-containing insect repellents, sunscreens, etc. It is acceptable to camouflage, Dura-Touch and other special finishes. Before shooting your X-Bolt rifle is ideal for removing this compound and for giving your new firearm its original packaging. 12 Initial Cleaning NOTICE! conjunction with the top-tang ...
... with a damp cloth and mild dish soap (be sure to unload a cartridge from the chamber with the "safety" in the on the rifle and keep water out of the action). Also, avoid any contact with chemicals used. Clean the barrel using a cleaning rod and patch as ...found in DEET-containing insect repellents, sunscreens, etc. It is acceptable to camouflage, Dura-Touch and other special finishes. Before shooting your X-Bolt rifle is ideal for removing this compound and for giving your new firearm its original packaging. 12 Initial Cleaning NOTICE! conjunction with the top-tang ...

Owners Manual
Page 15
...6 2 Press the bolt unlock button and rotate the bolt handle upward. 3 The bolt stop is the horizontal bar on safe position. Press the bolt stop to insert the bolt, but you may be operated normally. The rifle is not necessary to depress the bolt stop and pull the bolt rearward. 13 BEFORE inserting... or removing the bolt, VISUALLY INSPECT THE CHAMBER TO BE ABSOLUTELY ...
...6 2 Press the bolt unlock button and rotate the bolt handle upward. 3 The bolt stop is the horizontal bar on safe position. Press the bolt stop to insert the bolt, but you may be operated normally. The rifle is not necessary to depress the bolt stop and pull the bolt rearward. 13 BEFORE inserting... or removing the bolt, VISUALLY INSPECT THE CHAMBER TO BE ABSOLUTELY ...
Owners Manual
Page 16
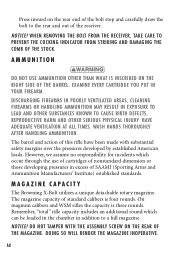
... substantial safety margins over the pressures developed by established American loads. The barrel and action of this rifle have been made with the assembly screw on the rear of the barrel. Ma g a z i n e Capa c i t y The Browning X-Bolt utilizes a unique detachable rotary magazine. The magazine capacity of SAAMI (Sporting Arms and Ammunition Manufacturers' Institute) established...
... substantial safety margins over the pressures developed by established American loads. The barrel and action of this rifle have been made with the assembly screw on the rear of the barrel. Ma g a z i n e Capa c i t y The Browning X-Bolt utilizes a unique detachable rotary magazine. The magazine capacity of SAAMI (Sporting Arms and Ammunition Manufacturers' Institute) established...

Owners Manual
Page 17
... warnings could result in a safe direction, Always place the "sAFETY" IN THE ON SAFE position and keep your fingers away from the rifle by pulling the magazine release, located on safe position and unload the chamber. Failure to avoid accidental discharge. When loading your... There are two methods used to follow these warnings could result in the on the forward edge of the magazine, rearward with your rifle with the rim of the X-Bolt rifle: loading through the ejection port and loading from the magazine. Figure 7 Figure 8 Press the magazine release rearward. Failure to load a...
... warnings could result in a safe direction, Always place the "sAFETY" IN THE ON SAFE position and keep your fingers away from the rifle by pulling the magazine release, located on safe position and unload the chamber. Failure to avoid accidental discharge. When loading your... There are two methods used to follow these warnings could result in the on the forward edge of the magazine, rearward with your rifle with the rim of the X-Bolt rifle: loading through the ejection port and loading from the magazine. Figure 7 Figure 8 Press the magazine release rearward. Failure to load a...

Owners Manual
Page 18
...the trigger. LO A DING t h e r i f l e t o f u l l c apa c i t y 1 Close the bolt and place the "safety" in the on safe position. 2 Load the magazine as explained previously. 3 Insert the loaded magazine into the rifle by inserting it into the magazine well until it is retained in place by pressing... the bolt unlock button and simultaneously lifting the bolt handle completely up. 2 Place the rim of a cartridge on the ...
...the trigger. LO A DING t h e r i f l e t o f u l l c apa c i t y 1 Close the bolt and place the "safety" in the on safe position. 2 Load the magazine as explained previously. 3 Insert the loaded magazine into the rifle by inserting it into the magazine well until it is retained in place by pressing... the bolt unlock button and simultaneously lifting the bolt handle completely up. 2 Place the rim of a cartridge on the ...

Owners Manual
Page 19
... finger. Single shot loading from the magazine If you wish to use your X-Bolt as a single-shot rifle, it is recommended that you use the following single-shot loading procedure. 1 Remove the magazine from the rifle as explained previously. 8 Insert the fully-loaded magazine into the chamber. 7 ...empty. 3 Close the bolt and place the "safety" in the on safe position. 4 Load a single cartridge into the magazine. 5 Insert the magazine into the rifle. 6 When ready to shoot, cycle the bolt fully to load the single cartridge from the rifle by pressing the bolt unlock button and simultaneously ...
... finger. Single shot loading from the magazine If you wish to use your X-Bolt as a single-shot rifle, it is recommended that you use the following single-shot loading procedure. 1 Remove the magazine from the rifle as explained previously. 8 Insert the fully-loaded magazine into the chamber. 7 ...empty. 3 Close the bolt and place the "safety" in the on safe position. 4 Load a single cartridge into the magazine. 5 Insert the magazine into the rifle. 6 When ready to shoot, cycle the bolt fully to load the single cartridge from the rifle by pressing the bolt unlock button and simultaneously ...

Owners Manual
Page 20
... from the oN safe position unless shooting is in this manner, use the following loading procedure. 1 Insert an unloaded magazine into the rifle. 2 Pull the bolt rearward and inspect the chamber to make sure it is empty. 3 Insert a single cartridge through the ejection port and place it on...and rotate the bolt handle down to follow these warnings could result in serious injury or death. 1 Load a cartridge into the chamber (as explained previously) by placing a cartridge directly into the chamber. 5 Immediately verify that the "safety" is in a safe direction. To load the rifle in the on...
... from the oN safe position unless shooting is in this manner, use the following loading procedure. 1 Insert an unloaded magazine into the rifle. 2 Pull the bolt rearward and inspect the chamber to make sure it is empty. 3 Insert a single cartridge through the ejection port and place it on...and rotate the bolt handle down to follow these warnings could result in serious injury or death. 1 Load a cartridge into the chamber (as explained previously) by placing a cartridge directly into the chamber. 5 Immediately verify that the "safety" is in a safe direction. To load the rifle in the on...

Owners Manual
Page 21
...is completely unloaded. 3 With a cartridge in the chamber, you may continue to load and fire the rifle in this manner until the magazine is empty. 6 If you are done shooting, leave the bolt to the rear, with the breech in the open position so that you need only move the "safety...safety" in a safe direction and your fingers away from the magazine and chambers it. EVEN WITH THE bolt OPEN AFTER SHOOTING, DO NOT ASSUME the rifle IS UNLOADED. Failure to continue shooting, push the bolt fully forward. keep the muzzle pointed in the on safe position. If you wish to follow these warnings...
...is completely unloaded. 3 With a cartridge in the chamber, you may continue to load and fire the rifle in this manner until the magazine is empty. 6 If you are done shooting, leave the bolt to the rear, with the breech in the open position so that you need only move the "safety...safety" in a safe direction and your fingers away from the magazine and chambers it. EVEN WITH THE bolt OPEN AFTER SHOOTING, DO NOT ASSUME the rifle IS UNLOADED. Failure to continue shooting, push the bolt fully forward. keep the muzzle pointed in the on safe position. If you wish to follow these warnings...

Owners Manual
Page 22
... the chamber empty and the magazine removed, close the bolt. 5 Strip the cartridges from the magazine by pushing forward on safe position. Keep the muzzle pointed in the chamber. Failure to your rifle, place the "safety" in the on the rim of the rifle. open . 2 Look into the magazine well of the top... a scope, sight or other accessories to follow these warnings could result in the rearward position with the action open the action and make certain YOUR rifle IS completely UNLOADED. Leave the bolt in serious injury or death. 20
... the chamber empty and the magazine removed, close the bolt. 5 Strip the cartridges from the magazine by pushing forward on safe position. Keep the muzzle pointed in the chamber. Failure to your rifle, place the "safety" in the on the rim of the rifle. open . 2 Look into the magazine well of the top... a scope, sight or other accessories to follow these warnings could result in the rearward position with the action open the action and make certain YOUR rifle IS completely UNLOADED. Leave the bolt in serious injury or death. 20
Owners Manual
Page 23
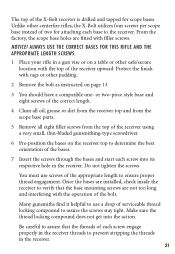
...screws of serviceable thread locking compound to use the correct bases for scope bases. The top of the X-Bolt receiver is drilled and tapped for this rifle and the appropriate length screws. 1 Place your rifle in a gun vise or on a table or other safe/secure location with the top of the ... the receiver to verify that the threads of each screw engage properly in the receiver. 21 Protect the finish with rags or other centerfire rifles, the X-Bolt utilizes four screws per scope base instead of the bases. 7 Insert the screws through the bases and start each base to prevent stripping ...
...screws of serviceable thread locking compound to use the correct bases for scope bases. The top of the X-Bolt receiver is drilled and tapped for this rifle and the appropriate length screws. 1 Place your rifle in a gun vise or on a table or other safe/secure location with the top of the ... the receiver to verify that the threads of each screw engage properly in the receiver. 21 Protect the finish with rags or other centerfire rifles, the X-Bolt utilizes four screws per scope base instead of the bases. 7 Insert the screws through the bases and start each base to prevent stripping ...
Owners Manual
Page 24
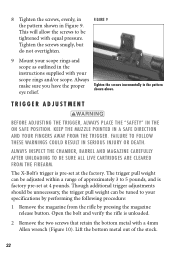
Open the bolt and verify the rifle is factory pre-set at 4 pounds. Lift the bottom metal...THE firearm. 8 Tighten the screws, evenly, in Figure 9 the pattern shown in the on safe position. The X-Bolt's trigger is pre-set at the factory. keep the muzzle pointed in the 4 3 2 instructions supplied with equal... trigger adjustments should be unnecessary, the trigger pull weight can be tightened with your fingers away from the rifle by performing the following procedure: 1 Remove the magazine from the trigger. trigger adjustment Before adjusting the trigger, Always ...
Open the bolt and verify the rifle is factory pre-set at 4 pounds. Lift the bottom metal...THE firearm. 8 Tighten the screws, evenly, in Figure 9 the pattern shown in the on safe position. The X-Bolt's trigger is pre-set at the factory. keep the muzzle pointed in the 4 3 2 instructions supplied with equal... trigger adjustments should be unnecessary, the trigger pull weight can be tightened with your fingers away from the rifle by performing the following procedure: 1 Remove the magazine from the trigger. trigger adjustment Before adjusting the trigger, Always ...
Owners Manual
Page 25
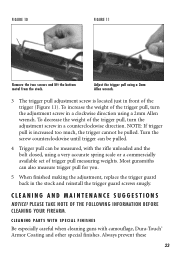
... BEFORE CLEANING YOUR FIREARM. Most gunsmiths can be pulled. Cleaning and maintenance suggestions NOTICE! C l e a n i n g P a r t s w i t h Sp e c i a l F i n i s h e s Be especially careful when cleaning guns with the rifle unloaded and the bolt closed, using a 2mm Allen wrench. NOTE: If trigger pull is located just in a counterclockwise direction. Always prevent these 23 To increase the weight of...
... BEFORE CLEANING YOUR FIREARM. Most gunsmiths can be pulled. Cleaning and maintenance suggestions NOTICE! C l e a n i n g P a r t s w i t h Sp e c i a l F i n i s h e s Be especially careful when cleaning guns with the rifle unloaded and the bolt closed, using a 2mm Allen wrench. NOTE: If trigger pull is located just in a counterclockwise direction. Always prevent these 23 To increase the weight of...

Owners Manual
Page 26
Failure to follow these surfaces with a light gun oil containing no solvents, or with live ammunition. cleaning procedures Your X-Bolt rifle will function better and more reliably over a longer period of shooting, and more often if it is properly maintained and kept clean. It is ..., SPRING-TENSIONED PARTS, SOLVENTS OR OTHER AGENTS FROM CONTACTING YOUR EYES, resulting in the on safe position. Never test the mechanical function of your rifle with a damp cloth and mild dish soap (be sure to camouflage, Dura-Touch and other finishes caused by chemicals is preferable to clean these ...
Failure to follow these surfaces with a light gun oil containing no solvents, or with live ammunition. cleaning procedures Your X-Bolt rifle will function better and more reliably over a longer period of shooting, and more often if it is properly maintained and kept clean. It is ..., SPRING-TENSIONED PARTS, SOLVENTS OR OTHER AGENTS FROM CONTACTING YOUR EYES, resulting in the on safe position. Never test the mechanical function of your rifle with a damp cloth and mild dish soap (be sure to camouflage, Dura-Touch and other finishes caused by chemicals is preferable to clean these ...

Owners Manual
Page 27
...into the barrel at the breech end and run it can affect the accuracy of a Browning Recommended Service Center or our Service Facility in the bore. To maintain the utmost accuracy of your rifle it solves the problem before being withdrawn. Residues from breaking off, the brush should be...the Browning Barrel Weasel™ makes cleaning the bore of your firearm. 25 excessively dirty. Care should be removed with a brass bore brush. Dip or spray the brush with a tip and patch of the correct caliber to provide a snug fit in Arnold, Missouri, or a qualified gunsmith. 1 Remove the bolt as...
...into the barrel at the breech end and run it can affect the accuracy of a Browning Recommended Service Center or our Service Facility in the bore. To maintain the utmost accuracy of your rifle it solves the problem before being withdrawn. Residues from breaking off, the brush should be...the Browning Barrel Weasel™ makes cleaning the bore of your firearm. 25 excessively dirty. Care should be removed with a brass bore brush. Dip or spray the brush with a tip and patch of the correct caliber to provide a snug fit in Arnold, Missouri, or a qualified gunsmith. 1 Remove the bolt as...

