Owners Manual
Page 2
.... The Browning X-Bolt represents a new generation of Browning bolt-action rifles, designed with improved features for : Browning® X-Bolt™ Bolt-Action Rifle If you many years of a Browning X-Bolt rifle. Browning Consumer Information One Browning Place Morgan, UT 84050-9326 Phone: (801) 876-2711 browning.com Please use the space below to record information about your choice of dependable, enjoyable service. Important operating instructions for...
.... The Browning X-Bolt represents a new generation of Browning bolt-action rifles, designed with improved features for : Browning® X-Bolt™ Bolt-Action Rifle If you many years of a Browning X-Bolt rifle. Browning Consumer Information One Browning Place Morgan, UT 84050-9326 Phone: (801) 876-2711 browning.com Please use the space below to record information about your choice of dependable, enjoyable service. Important operating instructions for...
Owners Manual
Page 3
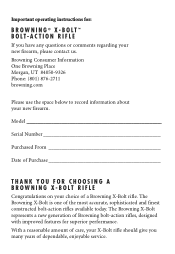
C o n t e n t s Page You are Responsible for Firearm Safety 2 General Description and Operation 9 Nomenclature 9 Serial Number 10 Operation of the "Safety 10 Cocking Indicator 11 Bolt Unlock Button 11 Initial Cleaning 12 Inserting and Removing the Bolt 13 Ammunition 14 Magazine Capacity 14 Loading 15 Firing...18 Unloading 19 Mounting a Scope 20 Trigger Adjustment 22 Cleaning and Maintenance Suggestions 23 Service or Repair 28 1
C o n t e n t s Page You are Responsible for Firearm Safety 2 General Description and Operation 9 Nomenclature 9 Serial Number 10 Operation of the "Safety 10 Cocking Indicator 11 Bolt Unlock Button 11 Initial Cleaning 12 Inserting and Removing the Bolt 13 Ammunition 14 Magazine Capacity 14 Loading 15 Firing...18 Unloading 19 Mounting a Scope 20 Trigger Adjustment 22 Cleaning and Maintenance Suggestions 23 Service or Repair 28 1
Owners Manual
Page 4
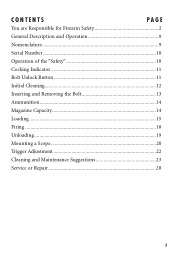
... even if the "safety" is in this owner's manual before using your new firearm. 1 ALWAYS KEEP THE MUZZLE OF YOUR firearm POINTED IN A SAFE DIRECTION even though you take these responsibilities can sometimes fail; There is unloaded. Please read and understand all of the cautions, warnings, notices, proper handling procedures and instructions outlined in the on...
... even if the "safety" is in this owner's manual before using your new firearm. 1 ALWAYS KEEP THE MUZZLE OF YOUR firearm POINTED IN A SAFE DIRECTION even though you take these responsibilities can sometimes fail; There is unloaded. Please read and understand all of the cautions, warnings, notices, proper handling procedures and instructions outlined in the on...
Owners Manual
Page 5
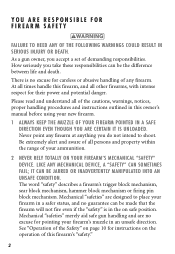
...could cause the rearward travel of the slide or bolt of a firearm to contact your eyes from flying particles. Do not use unorthodox shooting methods that the firearm is a good idea to "test" your firearm's mechanical "safety" periodically for every firearm which explains the safe ... in the on safe position unless shooting is critical to read and understand the owner's manual for proper function, never test the "safety" while your firearm's mechanical "safety" devices, it starts there. Remember, safe gun handling does not stop with the respect due a loaded, ready-to-fire firearm...
...could cause the rearward travel of the slide or bolt of a firearm to contact your eyes from flying particles. Do not use unorthodox shooting methods that the firearm is a good idea to "test" your firearm's mechanical "safety" periodically for every firearm which explains the safe ... in the on safe position unless shooting is critical to read and understand the owner's manual for proper function, never test the "safety" while your firearm's mechanical "safety" devices, it starts there. Remember, safe gun handling does not stop with the respect due a loaded, ready-to-fire firearm...

Owners Manual
Page 6
... Store all firearms unloaded during any shooting activity to avoid dropping any firearm to prevent the possibility of springs, spring-tensioned parts, solvents or other agents from elevated surfaces such as treestands is dangerous. Always make certain that your ...inexperienced or unwelcome hands. Always wear eye protection when disassembling and cleaning any firearm. 7 hunting from contacting your eyes. 5 Keep all firearms in use. 9 BEWARE OF BARREL OBSTRUCTIONS. This can occur even with the "safety" in a holster, gun case, scabbard or other container. 6 DROPPING or jarring...
... Store all firearms unloaded during any shooting activity to avoid dropping any firearm to prevent the possibility of springs, spring-tensioned parts, solvents or other agents from elevated surfaces such as treestands is dangerous. Always make certain that your ...inexperienced or unwelcome hands. Always wear eye protection when disassembling and cleaning any firearm. 7 hunting from contacting your eyes. 5 Keep all firearms in use. 9 BEWARE OF BARREL OBSTRUCTIONS. This can occur even with the "safety" in a holster, gun case, scabbard or other container. 6 DROPPING or jarring...

Owners Manual
Page 7
... page 24 of this owner's manual. 10 Be alert to the signs of 30 seconds. The caliber of your firearm fails to fire, keep the muzzle pointed in the barrel. Completely clear the barrel before further use. Failure to follow these instructions can damage your firearm. 5 dangerously increased pressures that can cause extensive damage to your firearm...
... page 24 of this owner's manual. 10 Be alert to the signs of 30 seconds. The caliber of your firearm fails to fire, keep the muzzle pointed in the barrel. Completely clear the barrel before further use. Failure to follow these instructions can damage your firearm. 5 dangerously increased pressures that can cause extensive damage to your firearm...
Owners Manual
Page 10
...UNDER ANY CIRCUMSTANCES, ALTER THE TRIGGER, SAFETY OR other PARTS OF THE FIRING MECHANISM OF THIS OR ANY OTHER FIREARM. We assume no liability for injuries suffered or caused by our Service Facility in this owner's manual, on your firearm. FAILURE...Browning firearm. Removal of metal from the barrel, or modifications of the firing mechanism and/or operating parts, may lead to a refusal of your responsibility to secure the most up-to-date information on the safe handling procedures of service on such firearms. We will charge you install on ammunition boxes and with all accessories...
...UNDER ANY CIRCUMSTANCES, ALTER THE TRIGGER, SAFETY OR other PARTS OF THE FIRING MECHANISM OF THIS OR ANY OTHER FIREARM. We assume no liability for injuries suffered or caused by our Service Facility in this owner's manual, on your firearm. FAILURE...Browning firearm. Removal of metal from the barrel, or modifications of the firing mechanism and/or operating parts, may lead to a refusal of your responsibility to secure the most up-to-date information on the safe handling procedures of service on such firearms. We will charge you install on ammunition boxes and with all accessories...
Owners Manual
Page 11
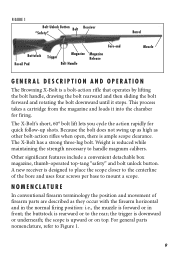
...bolt does not swing up shots. The X-Bolt has a strong three-lug bolt. Weight is upward or on top. the scope is reduced while maintaining the strength necessary to handle magnum calibers. Figure 1 Bolt Unlock Button Bolt Receiver "Safety" Buttstock Recoil Pad Fore-end Trigger Magazine Magazine Release Bolt Handle Barrel Muzzle GENER A L d e s c r i p t i o n a n d O P ER A TION The Browning X-Bolt... place the scope closer to the rear; A new receiver is rearward or to the centerline of firearm parts are described as other bolt-action rifles when open, there is forward or in...
...bolt does not swing up shots. The X-Bolt has a strong three-lug bolt. Weight is upward or on top. the scope is reduced while maintaining the strength necessary to handle magnum calibers. Figure 1 Bolt Unlock Button Bolt Receiver "Safety" Buttstock Recoil Pad Fore-end Trigger Magazine Magazine Release Bolt Handle Barrel Muzzle GENER A L d e s c r i p t i o n a n d O P ER A TION The Browning X-Bolt... place the scope closer to the rear; A new receiver is rearward or to the centerline of firearm parts are described as other bolt-action rifles when open, there is forward or in...

Owners Manual
Page 14
... no solvents, or with cleaning solvents, barrel scrubbers and other strong chemicals. It is irreversible and not repairable. A fine, light gun oil is acceptable to leave the rust preventative compound on safe position. Cleaning Various exposed metal parts of your new firearm have been coated at the factory with chemicals used. When cleaning your X-Bolt rifle is to be stored...
... no solvents, or with cleaning solvents, barrel scrubbers and other strong chemicals. It is irreversible and not repairable. A fine, light gun oil is acceptable to leave the rust preventative compound on safe position. Cleaning Various exposed metal parts of your new firearm have been coated at the factory with chemicals used. When cleaning your X-Bolt rifle is to be stored...

Owners Manual
Page 15
To install the bolt into the receiver perform the following procedure: 1 Place the "safety" in the off safe position. 2 Align the forward end of the bolt in the rear opening of the receiver (Figure 6). The rifle is now completely assembled and may do so to depress the bolt stop and pull the bolt rearward. 13 REMOVING T H E B OLT 1 Place the "safety" in...
To install the bolt into the receiver perform the following procedure: 1 Place the "safety" in the off safe position. 2 Align the forward end of the bolt in the rear opening of the receiver (Figure 6). The rifle is now completely assembled and may do so to depress the bolt stop and pull the bolt rearward. 13 REMOVING T H E B OLT 1 Place the "safety" in...
Owners Manual
Page 16
... removing the bolt from striking and damaging the comb of the stock. Discharging firearms in poorly ventilated areas, cleaning firearms or handling ammunition may result in addition to the rear and out of the receiver. NOTICE! Do not tamper with substantial safety margins over the pressures developed by established American loads. Doing so will render the magazine...
... removing the bolt from striking and damaging the comb of the stock. Discharging firearms in poorly ventilated areas, cleaning firearms or handling ammunition may result in addition to the rear and out of the receiver. NOTICE! Do not tamper with substantial safety margins over the pressures developed by established American loads. Doing so will render the magazine...

Owners Manual
Page 18
...it into the magazine well until it could cause feeding problems or interfere when inserting the magazine into the magazine well until it is in the same manner. Release the bolt unlock button and draw the bolt completely rearward, then push the bolt forward and rotate the bolt handle down on... the follower with the rear of the magazine. THE Rifle IS now READY TO FIRE BY SIMPLY MOVING THE "safety" TO THE OFF SAFE POSITION and pulling the trigger...
...it into the magazine well until it could cause feeding problems or interfere when inserting the magazine into the magazine well until it is in the same manner. Release the bolt unlock button and draw the bolt completely rearward, then push the bolt forward and rotate the bolt handle down on... the follower with the rear of the magazine. THE Rifle IS now READY TO FIRE BY SIMPLY MOVING THE "safety" TO THE OFF SAFE POSITION and pulling the trigger...

Owners Manual
Page 19
... now READY TO FIRE BY SIMPLY MOVING THE "safety" TO THE OFF SAFE POSITION and pulling the trigger. 6 Eject the magazine from the magazine If you use your index finger. Single shot loading from the rifle by pressing the bolt unlock button and simultaneously lifting the bolt handle completely up. The magazine will drop into your hand. 7 Load a single cartridge...
... now READY TO FIRE BY SIMPLY MOVING THE "safety" TO THE OFF SAFE POSITION and pulling the trigger. 6 Eject the magazine from the magazine If you use your index finger. Single shot loading from the rifle by pressing the bolt unlock button and simultaneously lifting the bolt handle completely up. The magazine will drop into your hand. 7 Load a single cartridge...

Owners Manual
Page 22
... a scope, sight or other accessories to verify that it is unloaded. 3 Press the magazine release button rearward and remove the magazine. 4 With the chamber empty and the magazine removed, close the bolt. 5 Strip the cartridges from the magazine by pushing forward on safe position. open . 2 Look into the chamber to your rifle, place the "safety" in serious injury or death...
... a scope, sight or other accessories to verify that it is unloaded. 3 Press the magazine release button rearward and remove the magazine. 4 With the chamber empty and the magazine removed, close the bolt. 5 Strip the cartridges from the magazine by pushing forward on safe position. open . 2 Look into the chamber to your rifle, place the "safety" in serious injury or death...
Owners Manual
Page 23
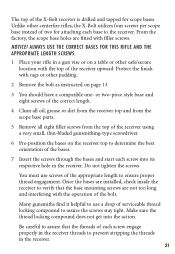
... Unlike other padding. 2 Remove the bolt as instructed on a table or other safe/secure location with rags or other centerfire rifles, the X-Bolt utilizes four screws per scope base instead of the receiver upward. or two-piece style base and eight screws of the correct length. 4 Clean all oil... parts. 5 Remove all eight filler screws from the top of the receiver using a very small, thin-bladed gunsmithing-type screwdriver. 6 Pre-position the bases on the receiver top to determine the best orientation of serviceable thread locking compound to verify that the threads of the X-Bolt ...
... Unlike other padding. 2 Remove the bolt as instructed on a table or other safe/secure location with rags or other centerfire rifles, the X-Bolt utilizes four screws per scope base instead of the receiver upward. or two-piece style base and eight screws of the correct length. 4 Clean all oil... parts. 5 Remove all eight filler screws from the top of the receiver using a very small, thin-bladed gunsmithing-type screwdriver. 6 Pre-position the bases on the receiver top to determine the best orientation of serviceable thread locking compound to verify that the threads of the X-Bolt ...
Owners Manual
Page 24
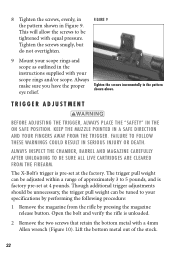
... serious injury or death. Though additional trigger adjustments should be unnecessary, the trigger pull weight can be adjusted within a range of the stock. 22 Tighten the screws snugly, but 1 do not overtighten. 9 Mount your specifications by pressing the magazine release button. trigger adjustment Before adjusting the trigger, Always place the "safety" in Figure 9. ALWAYS INSPECT THE CHAMBER, barrel and mAGaZINE CAREFULLY AFTER UNLOADING TO BE SURE...
... serious injury or death. Though additional trigger adjustments should be unnecessary, the trigger pull weight can be adjusted within a range of the stock. 22 Tighten the screws snugly, but 1 do not overtighten. 9 Mount your specifications by pressing the magazine release button. trigger adjustment Before adjusting the trigger, Always place the "safety" in Figure 9. ALWAYS INSPECT THE CHAMBER, barrel and mAGaZINE CAREFULLY AFTER UNLOADING TO BE SURE...
Owners Manual
Page 25
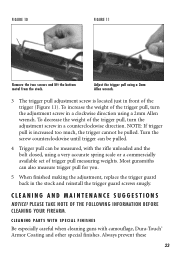
... counterclockwise until trigger can be pulled. 4 Trigger pull can also measure trigger pull for you. 5 When finished making the adjustment, replace the trigger guard back in a counterclockwise direction. PLEASE TAKE NOTE OF THE FOLLOWING INFORMATION BEFORE CLEANING YOUR FIREARM. C l e a n i n g P a r t s w i t h Sp e c i a l F i n i s h e s Be especially careful when cleaning guns with the rifle unloaded and the bolt closed, using a very accurate spring scale or a commercially available set of trigger pull measuring weights...
... counterclockwise until trigger can be pulled. 4 Trigger pull can also measure trigger pull for you. 5 When finished making the adjustment, replace the trigger guard back in a counterclockwise direction. PLEASE TAKE NOTE OF THE FOLLOWING INFORMATION BEFORE CLEANING YOUR FIREARM. C l e a n i n g P a r t s w i t h Sp e c i a l F i n i s h e s Be especially careful when cleaning guns with the rifle unloaded and the bolt closed, using a very accurate spring scale or a commercially available set of trigger pull measuring weights...

Owners Manual
Page 26
...used. Keep the muzzle pointed in injury. Never test the mechanical function of the action). cleaning procedures Your X-Bolt rifle will function better and more reliably over a longer period of shooting, and more often if it is irreversible and not repairable. WEAR EYE PROTECTION WHEN DISASSEMBLING AND CLEANING YOUR rifle TO PREVENT THE POSSIBILITY OF SPRINGS, SPRING-TENSIONED PARTS..., etc. Failure to follow these surfaces with a light gun oil containing no solvents, or with cleaning solvents, barrel scrubbers and other strong chemicals like those found in contact ...
...used. Keep the muzzle pointed in injury. Never test the mechanical function of the action). cleaning procedures Your X-Bolt rifle will function better and more reliably over a longer period of shooting, and more often if it is irreversible and not repairable. WEAR EYE PROTECTION WHEN DISASSEMBLING AND CLEANING YOUR rifle TO PREVENT THE POSSIBILITY OF SPRINGS, SPRING-TENSIONED PARTS..., etc. Failure to follow these surfaces with a light gun oil containing no solvents, or with cleaning solvents, barrel scrubbers and other strong chemicals like those found in contact ...

Owners Manual
Page 27
... will also include cleaning the barrel. Be sure to follow all instructions when using an appropriate rifle cleaning rod with a good copper solvent using the manufacturer's recommended procedure. Swab the bore of your rifle it solves the problem before being withdrawn. Regular maintenance will require more frequent cleaning. It can affect the accuracy of a Browning Recommended Service Center or our...
... will also include cleaning the barrel. Be sure to follow all instructions when using an appropriate rifle cleaning rod with a good copper solvent using the manufacturer's recommended procedure. Swab the bore of your rifle it solves the problem before being withdrawn. Regular maintenance will require more frequent cleaning. It can affect the accuracy of a Browning Recommended Service Center or our...
Owners Manual
Page 28
... foreign matter from inside and out, to be disassembled. Lightly lubricate all finger marks are removed. It can accumulate. Frequently inspect magazines to remove dirt or other parts. Do not tamper with the assembly screw on the rear of the stock. 6 Wipe all exposed metal surfaces with a gun cleaning solvent that remain. 5 Use a small brush or rag to determine the...
... foreign matter from inside and out, to be disassembled. Lightly lubricate all finger marks are removed. It can accumulate. Frequently inspect magazines to remove dirt or other parts. Do not tamper with the assembly screw on the rear of the stock. 6 Wipe all exposed metal surfaces with a gun cleaning solvent that remain. 5 Use a small brush or rag to determine the...


