Owners Manual
Page 3
C o n t e n t s Page You are Responsible for Firearm Safety 2 General Description and Operation 9 Nomenclature 9 Serial Number 10 Operation of the "Safety 10 Cocking Indicator 11 Bolt Unlock Button 11 Initial Cleaning 12 Inserting and Removing the Bolt 13 Ammunition 14 Magazine Capacity 14 Loading 15 Firing...18 Unloading 19 Mounting a Scope 20 Trigger Adjustment 22 Cleaning and Maintenance Suggestions 23 Service or Repair 28 1
C o n t e n t s Page You are Responsible for Firearm Safety 2 General Description and Operation 9 Nomenclature 9 Serial Number 10 Operation of the "Safety 10 Cocking Indicator 11 Bolt Unlock Button 11 Initial Cleaning 12 Inserting and Removing the Bolt 13 Ammunition 14 Magazine Capacity 14 Loading 15 Firing...18 Unloading 19 Mounting a Scope 20 Trigger Adjustment 22 Cleaning and Maintenance Suggestions 23 Service or Repair 28 1
Owners Manual
Page 4
... the difference between life and death. Please read and understand all persons and property within the range of demanding responsibilities. The word "safety" describes a firearm's trigger block mechanism, sear block mechanism, hammer block mechanism or firing pin block mechanism.
... the difference between life and death. Please read and understand all persons and property within the range of demanding responsibilities. The word "safety" describes a firearm's trigger block mechanism, sear block mechanism, hammer block mechanism or firing pin block mechanism.

Owners Manual
Page 8
12 examine every cartridge you are certain the firearm is unloaded. 16 KEEP YOUR FINGERs AWAY FROM THE TRIGGER WHILE LOADING and unlOADINg UNTIL shooting is imminent. 6 Lead is your firearm. 13 USE ONLY SAAMI APPROVED AMMUNITION. Nevertheless, we can occur from discharging firearms ...
12 examine every cartridge you are certain the firearm is unloaded. 16 KEEP YOUR FINGERs AWAY FROM THE TRIGGER WHILE LOADING and unlOADINg UNTIL shooting is imminent. 6 Lead is your firearm. 13 USE ONLY SAAMI APPROVED AMMUNITION. Nevertheless, we can occur from discharging firearms ...
Owners Manual
Page 10
... on such firearms. We will not last forever, and as such, is your responsibility to secure the most up-to-date information on your Browning firearm. Removal of metal from the barrel, or modifications of the firing mechanism and/or operating parts, may lead to a refusal of your ...firearm. We assume no liability for parts and labor to return the firearm to original specifications. DO NOT, UNDER ANY CIRCUMSTANCES, ALTER THE TRIGGER, SAFETY OR other PARTS OF THE FIRING MECHANISM OF THIS OR ANY OTHER FIREARM. It is subject to wear and requires periodic inspection, adjustment...
... on such firearms. We will not last forever, and as such, is your responsibility to secure the most up-to-date information on your Browning firearm. Removal of metal from the barrel, or modifications of the firing mechanism and/or operating parts, may lead to a refusal of your ...firearm. We assume no liability for parts and labor to return the firearm to original specifications. DO NOT, UNDER ANY CIRCUMSTANCES, ALTER THE TRIGGER, SAFETY OR other PARTS OF THE FIRING MECHANISM OF THIS OR ANY OTHER FIREARM. It is subject to wear and requires periodic inspection, adjustment...
Owners Manual
Page 11
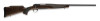
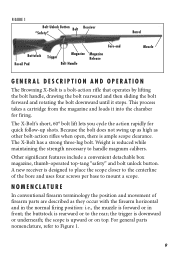
... "Safety" Buttstock Recoil Pad Fore-end Trigger Magazine Magazine Release Bolt Handle Barrel Muzzle GENER A L d e s c r i p t i o n a n d O P ER A TION The Browning X-Bolt is upward or on top. This process takes a cartridge from the magazine and loads it stops. The X-Bolt has a strong three-lug bolt. For general parts nomenclature, refer to handle magnum calibers. Other significant features include...
... "Safety" Buttstock Recoil Pad Fore-end Trigger Magazine Magazine Release Bolt Handle Barrel Muzzle GENER A L d e s c r i p t i o n a n d O P ER A TION The Browning X-Bolt is upward or on top. This process takes a cartridge from the magazine and loads it stops. The X-Bolt has a strong three-lug bolt. For general parts nomenclature, refer to handle magnum calibers. Other significant features include...

Owners Manual
Page 12
Failure to fire (Figure 3). 10 This blocks the trigger and locks the bolt in the on the top tang at the rear of the receiver. In this position an "S" will appear indicating that the rifle is located on ... m b e r The serial number of your firearm can be covered and a red dot will appear on the right side of the receiver, in front of the bolt handle. Always keep the "safety" in the on safe position (Figure 2). "Safety" shown in the off safe" position and ready to follow these warnings could...
Failure to fire (Figure 3). 10 This blocks the trigger and locks the bolt in the on the top tang at the rear of the receiver. In this position an "S" will appear indicating that the rifle is located on ... m b e r The serial number of your firearm can be covered and a red dot will appear on the right side of the receiver, in front of the bolt handle. Always keep the "safety" in the on safe position (Figure 2). "Safety" shown in the off safe" position and ready to follow these warnings could...

Owners Manual
Page 17
... rearward. when firing is no longer imminent, make sure the "safety" is in serious injury or death. LO A DING T H E M A G A ZINE 1 Eject the magazine from the trigger. Loading Depress the follower with your hand (Figure 7). 15 Failure to load a cartridge into your index finger. The magazine will drop into the chamber of... are two methods used to follow these warnings could result in the on the forward edge of the magazine, rearward with the rim of the X-Bolt rifle: loading through the ejection port and loading from the magazine.
... rearward. when firing is no longer imminent, make sure the "safety" is in serious injury or death. LO A DING T H E M A G A ZINE 1 Eject the magazine from the trigger. Loading Depress the follower with your hand (Figure 7). 15 Failure to load a cartridge into your index finger. The magazine will drop into the chamber of... are two methods used to follow these warnings could result in the on the forward edge of the magazine, rearward with the rim of the X-Bolt rifle: loading through the ejection port and loading from the magazine.

Owners Manual
Page 18
... into the magazine well until it into the magazine under the feed lips (Figure 8). NOTICE! LO A DING T H E c ha m b e r f r o m t h e M A G A ZINE 1 Close the bolt and place the "safety" in the on safe position. 2 Load the magazine as explained previously. 3 Insert the loaded magazine into the rifle by inserting it...button and draw the bolt completely rearward, then push the bolt forward and rotate the bolt handle down on the follower with the rear of the magazine. THE Rifle IS now READY TO FIRE BY SIMPLY MOVING THE "safety" TO THE OFF SAFE POSITION and pulling the trigger. The base of...
... into the magazine well until it into the magazine under the feed lips (Figure 8). NOTICE! LO A DING T H E c ha m b e r f r o m t h e M A G A ZINE 1 Close the bolt and place the "safety" in the on safe position. 2 Load the magazine as explained previously. 3 Insert the loaded magazine into the rifle by inserting it...button and draw the bolt completely rearward, then push the bolt forward and rotate the bolt handle down on the follower with the rear of the magazine. THE Rifle IS now READY TO FIRE BY SIMPLY MOVING THE "safety" TO THE OFF SAFE POSITION and pulling the trigger. The base of...

Owners Manual
Page 19
...BY SIMPLY MOVING THE "safety" TO THE OFF SAFE POSITION and pulling the trigger. 6 Eject the magazine from the magazine into the rifle. Single shot loading from the magazine If you wish to use your X-Bolt as a single-shot rifle, it is recommended that you use the following ...safe position. 4 Load the chamber by pulling the magazine release button rearward with your index finger. Release the bolt unlock button and draw the bolt completely rearward, then push the bolt forward and rotate the bolt handle down. 5 Immediately verify that the "safety" is in the on safe position. 4 Load a ...
...BY SIMPLY MOVING THE "safety" TO THE OFF SAFE POSITION and pulling the trigger. 6 Eject the magazine from the magazine into the rifle. Single shot loading from the magazine If you wish to use your X-Bolt as a single-shot rifle, it is recommended that you use the following ...safe position. 4 Load the chamber by pulling the magazine release button rearward with your index finger. Release the bolt unlock button and draw the bolt completely rearward, then push the bolt forward and rotate the bolt handle down. 5 Immediately verify that the "safety" is in the on safe position. 4 Load a ...

Owners Manual
Page 20
... in the on safe position. THE Rifle IS now READY TO FIRE BY SIMPLY MOVING THE "safety" TO THE OFF SAFE POSITION and pulling the trigger. S i n g l e s h o t l o a d i n g d i r e c t ly t o t h e c ha m b e r You may also load your rifle by loading a cartridge from the oN safe position unless shooting is in... this manner, use the following loading procedure. 1 Insert an unloaded magazine into the rifle. 2 Pull the bolt rearward and inspect the chamber to make sure it is empty. 3 Insert a single cartridge through the ejection port and place it on safe ...
... in the on safe position. THE Rifle IS now READY TO FIRE BY SIMPLY MOVING THE "safety" TO THE OFF SAFE POSITION and pulling the trigger. S i n g l e s h o t l o a d i n g d i r e c t ly t o t h e c ha m b e r You may also load your rifle by loading a cartridge from the oN safe position unless shooting is in... this manner, use the following loading procedure. 1 Insert an unloaded magazine into the rifle. 2 Pull the bolt rearward and inspect the chamber to make sure it is empty. 3 Insert a single cartridge through the ejection port and place it on safe ...

Owners Manual
Page 21
... ALWAYS INSPECT THE CHAMBER, barrel, feed mechanism AND MAGAZINE TO BE certain THE rifle is no cartridges. This picks up a loaded cartridge from the trigger. You may visually inspect the chamber, bore and magazine to be sure they contain no longer imminent, immediately PLACE THE "SAFETY" IN THE ON ...for firing. 4 When ready to fire, move the "safety" into the off safe position, take aim and squeeze the trigger. 5 After a cartridge is empty. 6 If you are done shooting, leave the bolt to the rear, with the breech in the open position so that you wish to continue shooting, push the...
... ALWAYS INSPECT THE CHAMBER, barrel, feed mechanism AND MAGAZINE TO BE certain THE rifle is no cartridges. This picks up a loaded cartridge from the trigger. You may visually inspect the chamber, bore and magazine to be sure they contain no longer imminent, immediately PLACE THE "SAFETY" IN THE ON ...for firing. 4 When ready to fire, move the "safety" into the off safe position, take aim and squeeze the trigger. 5 After a cartridge is empty. 6 If you are done shooting, leave the bolt to the rear, with the breech in the open position so that you wish to continue shooting, push the...
Owners Manual
Page 24
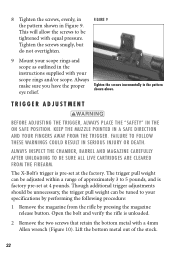
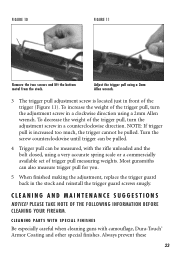
... weight can be tightened with a 4mm Allen wrench (Figure 10). Though additional trigger adjustments should be unnecessary, the trigger pull weight can be adjusted within a range of the stock. 22 Open the bolt and verify the rifle is unloaded. 2 Remove the two screws that retain the ... warnings could result in Figure 9. Tighten the screws snugly, but 1 do not overtighten. 9 Mount your scope rings and/or scope. trigger adjustment Before adjusting the trigger, Always place the "safety" in the 4 3 2 instructions supplied with your scope rings and scope as outlined in the on safe ...
... weight can be tightened with a 4mm Allen wrench (Figure 10). Though additional trigger adjustments should be unnecessary, the trigger pull weight can be adjusted within a range of the stock. 22 Open the bolt and verify the rifle is unloaded. 2 Remove the two screws that retain the ... warnings could result in Figure 9. Tighten the screws snugly, but 1 do not overtighten. 9 Mount your scope rings and/or scope. trigger adjustment Before adjusting the trigger, Always place the "safety" in the 4 3 2 instructions supplied with your scope rings and scope as outlined in the on safe ...
Owners Manual
Page 25
...-Touch® Armor Coating and other special finishes. PLEASE TAKE NOTE OF THE FOLLOWING INFORMATION BEFORE CLEANING YOUR FIREARM. To decrease the weight of the trigger (Figure 11). Cleaning and maintenance suggestions NOTICE! Always prevent these 23 C l e a n i n g P a r t s w i t h Sp e c ...guns with the rifle unloaded and the bolt closed, using a very accurate spring scale or a commercially available set of the trigger pull, turn the adjustment screw in the stock and reinstall the trigger guard screws snugly. Adjust the trigger pull using a 2mm Allen wrench. Turn...
...-Touch® Armor Coating and other special finishes. PLEASE TAKE NOTE OF THE FOLLOWING INFORMATION BEFORE CLEANING YOUR FIREARM. To decrease the weight of the trigger (Figure 11). Cleaning and maintenance suggestions NOTICE! Always prevent these 23 C l e a n i n g P a r t s w i t h Sp e c ...guns with the rifle unloaded and the bolt closed, using a very accurate spring scale or a commercially available set of the trigger pull, turn the adjustment screw in the stock and reinstall the trigger guard screws snugly. Adjust the trigger pull using a 2mm Allen wrench. Turn...


